Browsed by
Tag: wet felting

Pandagirl’s Year End Round Up 2017

Pandagirl’s Year End Round Up 2017

I’m always amazed at what I accomplished at the end of year. This year I took a few classes in order to expand my creativity in addition to experimenting on  my own. I also tried to use up more materials and finish some UFOs.

Here is a bedside case for odds and ends made with some merino inside and unknown fiber batt with silk embellishment.

Experimenting with different types of yarn to make a table runner.

Our First Quarter Challenge – Fauvism.

Weaving then felting.

A Valentine gift for granddaughter Lisa.


Teri Berry’s Snail hat class.


Finishing and hanging an eco print.                                                  Crochet around wire bowl.


Framing the felted weaving.

I did a lot of experimenting with crochet stitches.


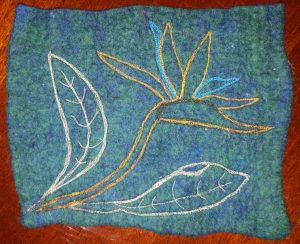
Practicing for Ruth’s Free Motion Embroidery class.

Crochet hats for my granddaughter and her new premature brother Ken.

A dimensional potholder.

Learning more crochet stitches.

Making a crochet hook case from a crochet sample.

A bowl for the Second quarter Challenge – Celtic

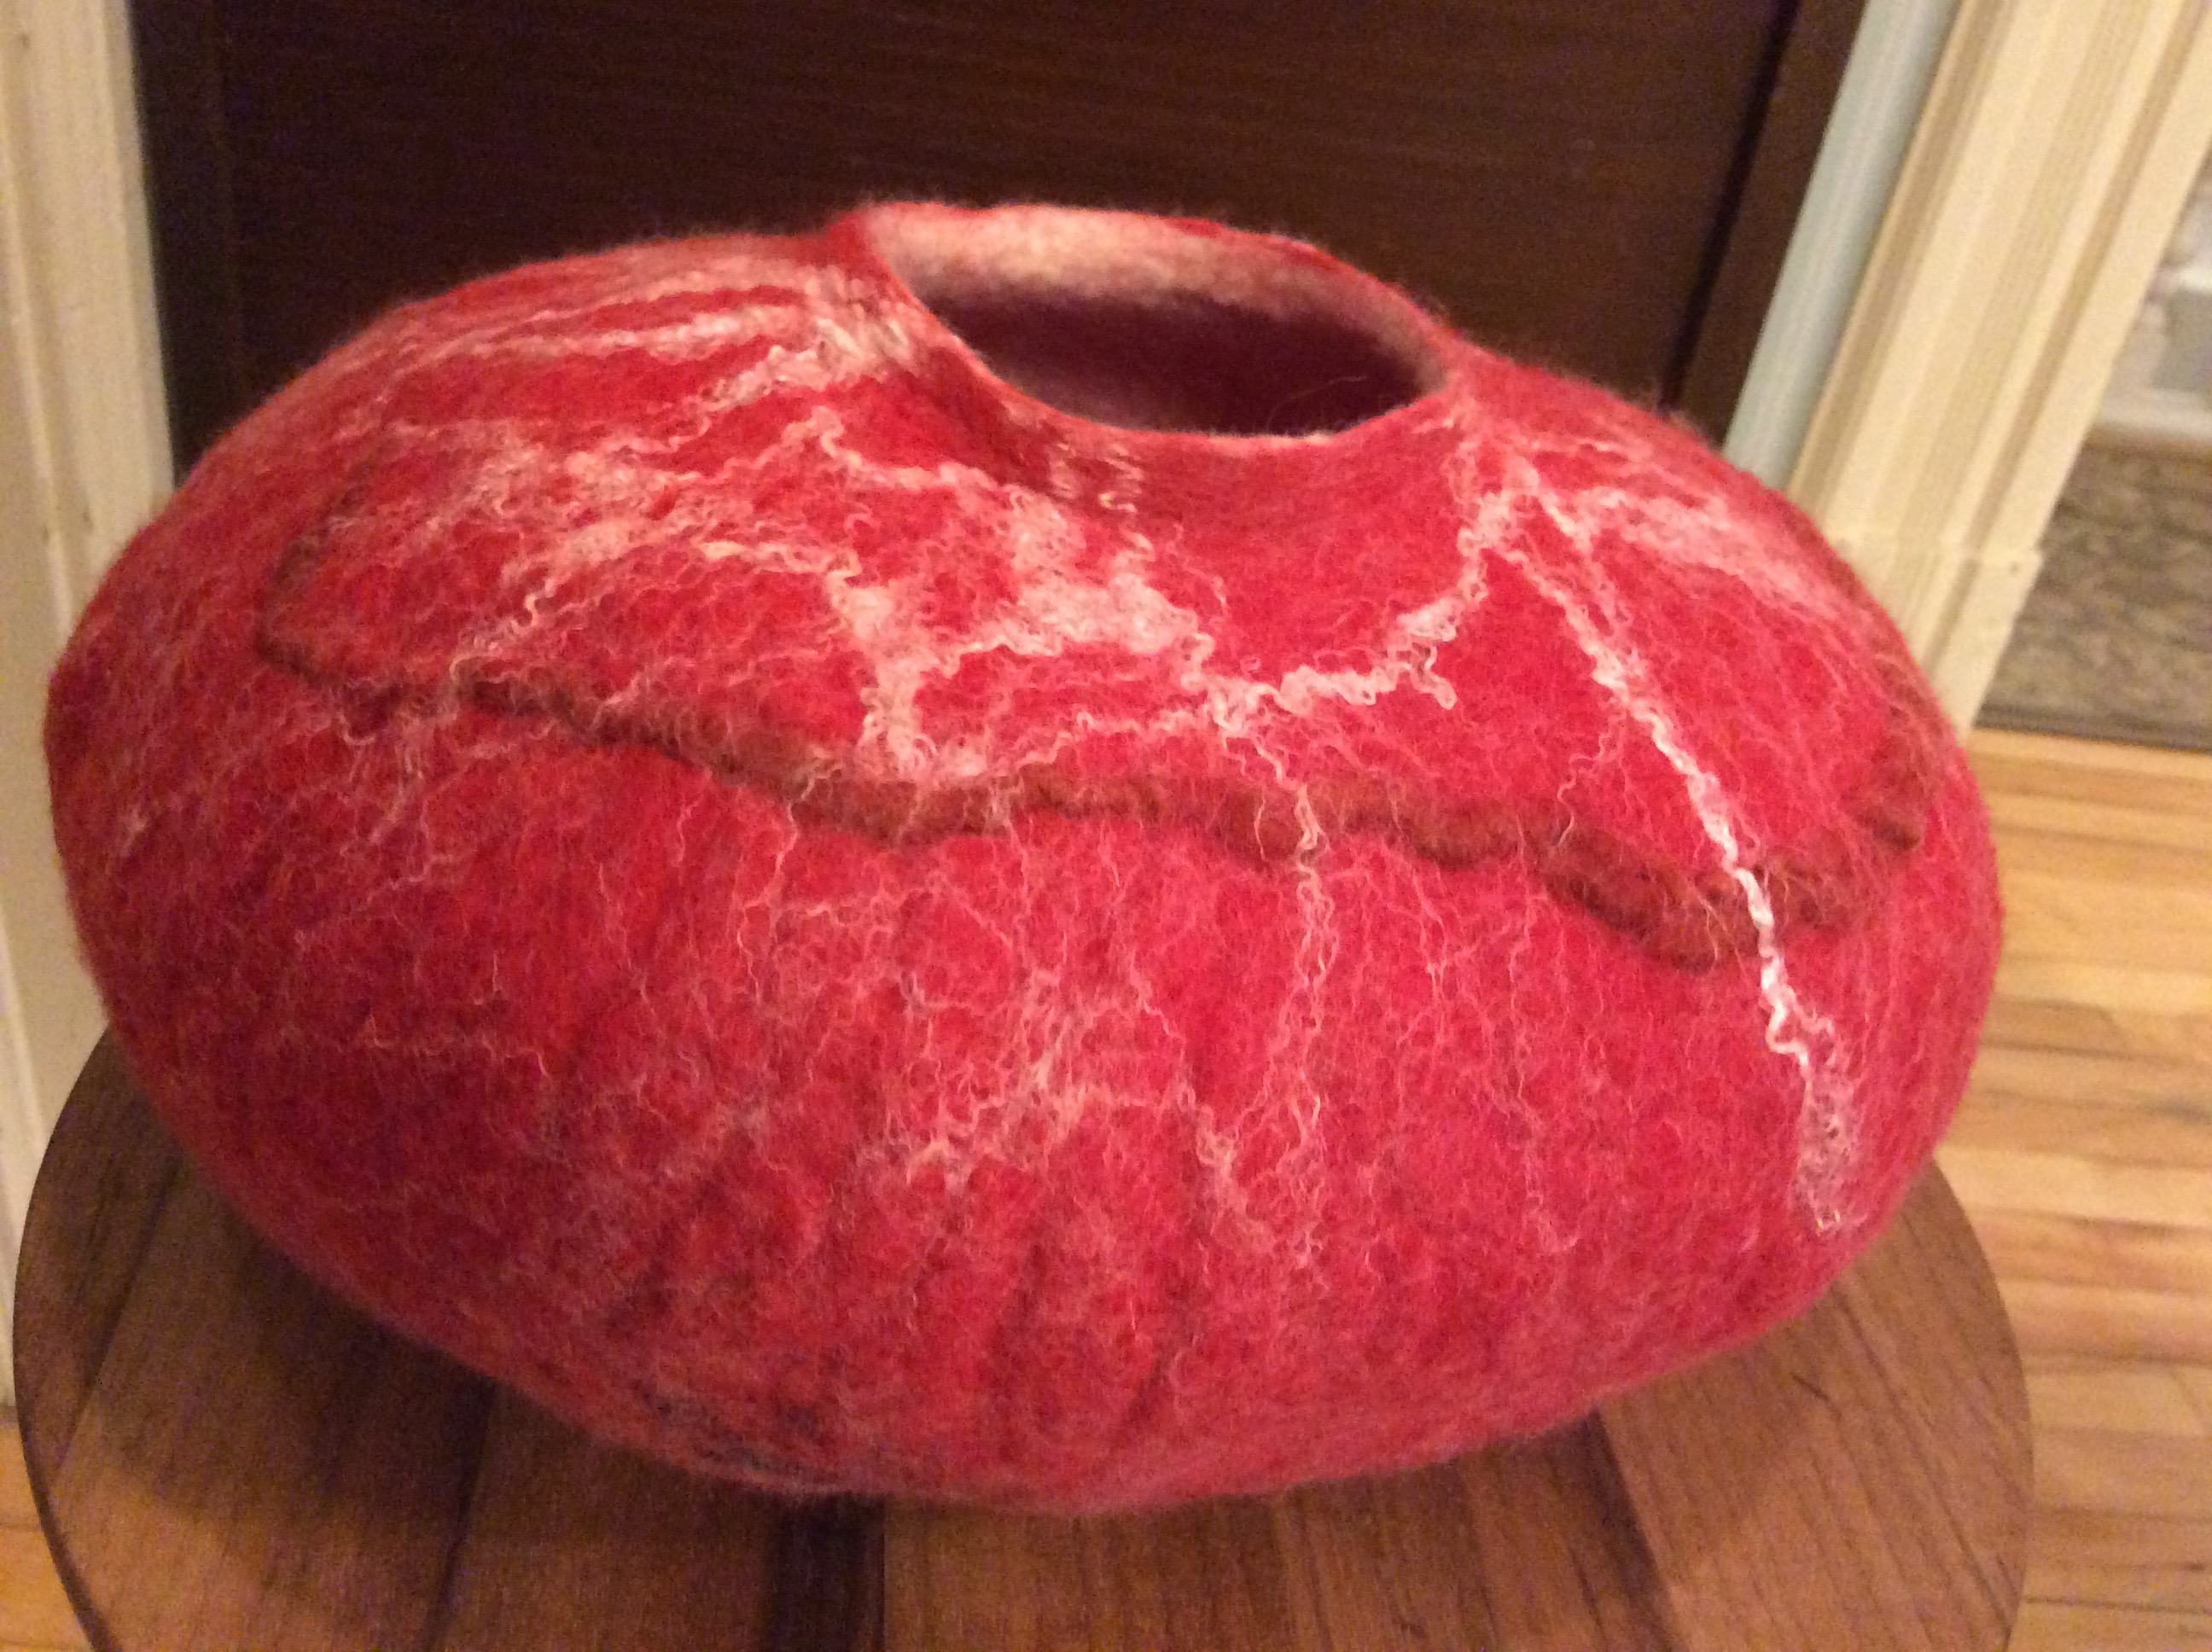
Using yarn on a resist for a vase cover.

Adding dimension to the hummingbird/tiger lily picture.

Crocheting scrubbies.

Felt and crochet earrings.


Crochet beaded bowl with stiffener.

A Pumpkin for Ken.

The Third Quarter Challenge – Edo Period; felt and hand embroidery Sakura.

Ribbon embroidery and framing.


Playing with thickened dye for Ruth’s class on felt.


Finishing  a case from UFO pile and FME Butterfly


Maneki-Neko for Third Quarter Challenge Edo Period.

Framing the Rooster.

More stencil play with acrylic and thickened dye.

The Fourth Quarter Challenge — Suprematist

Penguin’s Poinsettia Holiday card.

A couple of scarves for my daughter in laws parents in Japan where it’s as cold as Chicago.


I want to let everyone know I am taking a leave of absence to focus on my health and family.  I will be around just not posting weekly.  We have a lot of talented artists that will be filling in starting with Tracey Thompson next week.

I want to thank everyone for helping out to give me this time.   If you or someone you know has something to share — it doesn’t have to be felt but anything fiber related including paper, please contact me or one of the other moderators on the forum and we’ll get you on the schedule.

I hope everyone has a Happy, Healthy and Prosperous New Year!  Happy Creating in 2018!

Year End Round Up

Year End Round Up

I hope everyone’s enjoying the Holidays 🙂 I have one more scarf and scarf sample left to show you. This first one is a grey marl Merino on hand dyed cotton gauze. I blended up 4 shades of 18.5 mic Merino, 2 greys, a duck egg and black. It wasn’t very easy to get photos, they kept turning out blue!:

The sample is a fabric which might look familiar as I bought 3 scarves with the same design in different colours. I think this is the first time I tried it with 18.5 mic Merino:

Whenever we do posts looking back over the year, I think I haven’t done much, but then get surprised! I think there was a definite theme of texture and surface design for me this year, so, here’s a slide show of some of the things I’ve enjoyed making this year:

This slideshow requires JavaScript.

Thanks for reading over the past year and leaving comments, I hope to see you in the New Year!

Wrapping Up 2017 Projects

Wrapping Up 2017 Projects

Right now its cold in the Chicago area and as Christmas quickly approaches, I thought of my daughter in law Mari’s parents who live in Japan.  Their weather is very much like ours here.  While we will spend the holidays in California, I thought I would make and send some warm scarves for them since they are staying in Japan for the winter.

Lately, I’ve been doing  smaller projects,  so these scarves took me a while to complete in stages.

I had some merino/silk roving in a couple of colors I thought would be neutral enough.The one on the left I used to make myself a cobweb scarf a while back. Then I made a my husband a scarf using prefelt in the center.  This time I was going to do something different.


The roving was quite twisted, so I made batts for each scarf. I laid them next to each other, wetted them down then let my EZ Felter machine do the hard work.

I finished and fulled them by hand using my bead boards and solar pool covering.  I  believe this roving had more silk in it and is a bit softer.

This roving was multicolored with a bit of brown, green, blue, gold and white in it.

While it looks beige in the pic above, the closeup is more the actual color scheme.

I hope no matter if you are in the heat or cold, you all have a wonderful, happy holiday!

More Scarves

More Scarves

I made a short, wide scarf/wrap similar to the white scarf I showed last time, using natural cotton scrim and 18.5 mic Merino:

It’s about 3 times as wide as the scarf, and I didn’t scrunch the scrim first:

I used 3 different cellulose fibres for embellishing this: Viscose, Rose and Tencel, this is the Viscose:

I made a few scarves for the craft fair this last weekend, the weather was predicted to be sub-zero, so I thought I’d get lucky. But this is Manchester, we all have a scarf collection and everyone had come prepared, mostly with ‘scarves’ which wouldn’t look out of place on a double bed!! This is a bright, colourful one I made, I always prefer the side where the wispy ends of the wool tops overlap (or underlap since they’re laid first) the next colour:

This is the other side where the colours are in blocks:

An ‘arty’ shot to shop how soft it is 🙂

Felt Vessel Class

Felt Vessel Class

I taught an enthusiastic group of ladies how to make felted vessels last Sunday. They were a great group and without Carleen’s reminders to take pictures I would have nothing to show you today.

This slideshow requires JavaScript.

Three ladies chose to make pots that were a different colour inside.  and two made theirs a solid colour.

Then of course there was the wetting, rubbing and rolling and shaping


Blowing up a balloon inside  helps get a nice shape. In the back ground you can see Carlene rolling on a car mat.

For some reason I did not get a picture of all the finished pieces. This is the only one I have of this white and gold pot. It was very elegant and I think it would make a great light cover. She said she was rewetting it and reshaping it. I hope she remembers to send me a picture of it when it’s done.

There was also some very determined rolling on the glass wash board.

I do have some finished pictures.


The blue one is Carlene’s. She wants to add to it. Here are 3 thoughts. The second and third pictures are the same yarn but different ends,  one has more blue in it.

Her husband thinks the yarn covers up to much of the pot. I like the spiral but think maybe make the lines farther apart. What do you think? It may have been better to felt it right in. It would still be texture but flatter, more integral to the pot. Hey Carlene, maybe you just need to make another pot.

I’ve Been Framed

I’ve Been Framed

A few years ago I wet and needle felted a Rooster portrait.  Of course, its been sitting in my UFO pile.  I wrote about it here:

https://feltingandfiberstudio.com/2014/11/22/a-colorful-rooster/

I had a canvas frame I had used for something else and decided to use the rooster pic to cover it.

Then I tried it on several colored walls.

But I wasn’t really thrilled.  I felt something was missing. Then  I found a frame I thought would be perfect.

So, I removed all the staples, steamed out the bumps and mounted it in the frame.

Here’s a  closeup of the distressed frame which just happens to have a turquoise/teal color accent.

It’s found its home in the teal kitchen.

I think it all ties together nicely.  I feel like I’m looking out a farmhouse window at the rooster. What do you think?

Holliday Exchange

Holliday Exchange

Hi all,  for those who may knot know we also run an interactive forum for felting and fiber folks. It’s a great place to share your work, ask questions and help each other out. http://feltandfiberstudio.proboards.com/

Each year we have a holiday exchange. You make a small felted post card or similar size card with some felt on it. We are doing it again this year.  If you would like to participate then hop over her and sign up. http://feltandfiberstudio.proboards.com/thread/3495/holliday-exchange-2017

Here’s the time line:

October 4-Nov 9: people sign up

November 10 partners are announced.

November: Make your card, contact your partner for an address

December 1: Mail your card

Here are some of the cards form our past exchange, there has been lots of variety.


MINOLTA DIGITAL CAMERA


Colourful Nuno

Colourful Nuno

A while ago, I made a few pieces of orange felt to get the right one for my friend who wanted me to make a purse. It took a while, but I did finish the purse. Here is the front:

And the back:

Inside:

I made a couple of nuno felt pieces recently with plans to make them into things. I left the tassels hanging over the edge because I thought it’d look good made into a bag:

I like these scarves, luckily other people don’t seem to anymore so I’ve found quite a few at charity shops:

Great texture:

I made a patchy textured piece:

I like the combination of textures:

I really like the way viscose fabric ripples in such a soft ‘swishy’ way 🙂

Do you have a favourite fabric to nuno felt with?

New Felted Hat in Progress

New Felted Hat in Progress

If you are on the forum you may have seen the resist for this hat in the daily dose of fiber thread for this month. daily-dose-fiber-october-2017

I used wool in 3 layers because I wanted most of the shrinkage to be around. I wanted some height to play with.

After I cut it open I worked the edges and the rest as normal but near the end I also cut the top part of the right hand curled brim. I worked those edges to get them sealed. the rinsed all the soap out and let it dry because I was out of time for a few days. Today I finally got some time to work on it some more. I wet it all down and popped it onto a regular hat block and twisted the two long cut pieces around each other and then curled the ends around some tiny “pool noodles” I over exposed the picture trying to get the twist to show but the wool is just to dark.

Then I put in two sloped folds and pinned them with the little double pins. I found them after spending half an hour trying to fined my T pins that I gave up on finding. I am sure they are somewhere that was logical at the time but isn’t any more. I am not sure how that happens but it happens to me all the time.

It is now drying. The hat is sitting on another flat toped hat block and the pop bottle is holding the rim up so it dries in a better position.

When it is all dry I will take a picture of it again and show it to you.

Have you been working on any new designs lately?


Nothing Spooky Here

Nothing Spooky Here

Update on Maneki-Neko:

I took Lyn’s advice and made the whiskers from wire.  Here is the new look.  I also decided to put her on a pedestal to see out the window rather than sitting on the windowsill.  I found an old pot and turned it upside down, but I’m thinking gold may be better.  Although, when she’s in the window you can’t see the pot.


I recently realized I needed to carry on my tradition of giving each grandchild a pumpkin wall hanging.  I have a new grandson, Ken who arrived early in April.

But I didn’t really have a nice orange to make the pumpkin.  So, I made a batt using hand dyed Corriedale, a funky orange pink merino, bright orange coarse commercial fiber, gold merino, hand dyed Domestic 56s with Logwood from Cathy and a touch of white.  You can see the batt in the back.  I think the color turned out well.  I also used the merino/silk mix for the stem that I had used in the Edo challenge with the Sakura branches.

I had made a sketch of how I wanted the pumpkin to look.  A bit different than his sister Lisa’s girly pumpkin from last year.

Of course, I got into laying it out and cutting the prefelts and forgot to take pictures.  But here is Ken’s dried pumpkin.

Then after a little shave.

Now I guess I’d better start thinking about the upcoming holidays.  Did you do anything for Halloween?