Browsed by
Tag: wet felting

Maneki-Neko for 2017 3rd Quarter Challenge Part 2

Maneki-Neko for 2017 3rd Quarter Challenge Part 2

I never dreamed this project would take me almost two weeks to complete.  But it is finished.

If you missed part one, you can read about it here:

https://feltingandfiberstudio.com/2017/09/25/pandagirls-maneki-neko-for-2017-3rd-quarter-challenge-part-1/

It would seem adding the details to finish would be easy.  Not!

I needle felted blue roving around the eyes.  The gems underneath are actually blue, but because they were put over black it wasn’t obvious what color they were.

Then I spent time looking for a gold bell, but decided on using a wool ball instead.  When I added the ribbon I made a slit on both sides of the arm to pull it thru.

The nose and mouth are also needle felted.  But at one point, the nose fell off and had to be reattached.

I curled over the raised paw and secured it in order to show the paw and nails.

The nails proved to be a real challenge and after ripping them out at least a half dozen times, trying needle felting, then using floss and finally rayon thread.

I tried needle felting the arm in front and the tail in back to show the dimension, but it was negligible partly because of it being black. So, I stitched around them which helped.

Another challenge was the writing on the coin.  I made a gold prefelt and copied the characters I had translated from an app for Good Health and confirmed with my daughter in law, Mari. I transferred the characters to a stabilizer.

I thought using the satin stitch on my Pfaff machine would work, but its not a straight satin stitch, but the stitches varied.  So I decided to use a triple stitch which was fine until I reached curves.  I ended up finishing by hand. I’m hoping I haven’t butchered the characters too much.  After finishing the coin, I slip stitched it to the kitty.

The final addition were the whiskers.  They are a little funky and I had to use a little GAC to give them a little stiffness.

Now its time to find her place facing East in hopes of bringing Good Heath to my household.

What challenges have you had lately?


Tree Trunks in Snow

Tree Trunks in Snow

I thought I’d make some test pieces for making cards for the Winter fair. Basically, I wanted to work out the best wool and/or fibre blends for making wool tubes to look like tree trunks. I did have silver birch in mind for some, but anything which looked good was all I was after for now. The wool I used for the base was something I got in a bag of Botany Lap waste, It looked and felt like Merino, and after felting I’m failry certain it is, but finer than 23 mic.
I quite like this first one, I used various natural grey blends, but also some nylon on the 1st, 3rd and 5th. I think the first one was made with ‘Lightning’, an artifical white Merino, it looks blue-ish in natural light:

I used a natural blend which Leonor sent me for these next ones. I think the last two also had some white nylon because they have a blue-ish look too:

This is one of my favourites, it has tubes made from various natural blends, though the first one could have some artificial white. I also added some strands at the base after googling ‘tree trunks in snow’ 🙂 What isn’t very obvious is I also used a fine layer at the bottom of a Botany Lap blend which had trilobal nylon in it. It looks whiter/brighter if you look hard, but the sparkle isn’t obvious:

I tried a couple of tubes I made around dowelling, I think they were a bit thin and didn’t have enough colour variation:

I tried a new (to me) wool for this next piece: Charollais. It made a spongey felt. It was quite unusual when it came to fulling, as I rubbed from one direction, like top to bottom, it seemed to undo the fulling I’d done from the other, i.e side to side! I got there in the end, though I probably shouldn’t have bothered! The cream/white wool used on the grey tubes matched the base felt, so ‘diasappeared’, and the tube I made from Finn and Merino just had no definition:

Here’s a close up so you can see the felt texture:

I tried something a bit different on these next two, this first one has the same fine Merino base, but I made the trees out of bamboo paper. A layer of black, with a layer of white on top. The black bamboo paper had two layers, it separated when I was adding out the last tree, and I think that one looks better:

Close up:

This last one was made with a base of Svea X Finull which Zara sent me. I am hopeless at laying out anything which isn’t commercial tops, so it’s not the neatest piece! I tried a skeleton leaf on this one:

I really liked this piece 🙂 Here’s a close up of the leaf:

I’ll probably redo the samples with 23 mic Merino and add unblended trilobal on some to see if it looks like icy snow. I’ll save the artificial white wool for other things, I think the natural creamy whites look better.

This slideshow requires JavaScript.

Fine Layers and Shrinkage

Fine Layers and Shrinkage

I took some photos while I was laying out my first Trilobal Nylon sample last week. They aren’t the best – fine layers of Merino and sparkly fibre aren’t the easiest to photograph – so I don’t have photos of every layer. This is the start of the first layer of Trilobal Nylon:

I didn’t overlap the Trilobal nylon partly because the length of the fibre meant 3 columns fit in the template, and trying to take into account the effect of shrinkage. This is the first layer finished:

This is how it looked with the 2nd layer of nylon on top, you can see I used quite a lot:

This is after two fine layers of Merino were added:

And this is when the four fine layers were added, just before I felted it:

It’d be good if there were some large, waterproof scales to use durinng felting, so the weight of layers could be worked out easily!

This is a piece I made last month. I got some fabric from a charity shop a while ago, it has some embroidery paisleys and little ‘gems’ on it. The way they are spaced out meant that I could either cut/tear quite narrow strips between the paisley or wider strips to include them for trying a sample piece. I hate waste, so I had a think what I would use the sample for, I thought it’d make a nice coin purse, but even after shrinkage would be too wide. Oddly for me, I actually came up with a solution before making the sample instead of 6 weeks later! If I used an odd number of layers, with 3 across the width, and two along the length, then I’d get more shrinkage! It worked too! This is the whole piece:

It is a chiffon type fabric, it feels synthetic, but I might have to do a burn test. This is one end closer up:

The paisleys are really shiny so not easy to photograph, they rose up and became even more 3d with shrinkage:

You can see the texture and migration more here:

Have you had any brainwaves and found solutions for problems lately?

Pandagirl’s 2017 3rd Quarter Challenge Part 2

Pandagirl’s 2017 3rd Quarter Challenge Part 2

This challenge became more of a challenge than I expected.  If you  missed part 1,  you can see it here:  https://feltingandfiberstudio.com/2017/09/01/pandagirls-2017-3rd-quarter-challenge-part-1/

I had intended to use a combination of free motion and hand embroidery to add details  to finish it.  However, when I tried to use the sewing machine the felt was too thick and the stitches were just buried and I couldn’t control the machine.  So, after an hour or more ripping out teeny stitches, I started the hand embroidery.

Embroidery is not my strong suit. My goal was to give an impression of ruffled petals and a hint of stamens.  After looking at pictures of Sakura, I decided to keep it simple.

I made stars in the center of flowers with a knot in the middle on some.  I didn’t want them to all look alike.  Here I was getting started.


At first I tried using the stem stitch for the flower petal, but that proved to be hard to do in the felt and it really didn’t give it a ruffled look.  so, I settled on a satin stitch. I varied the tightness depending on how close or far away it was.   Then added some stem and back stitches to show differences.

Here are some closeups.

Another goal was to keep it subtle as if it was a 17th century scroll or painting that had faded over time.  I originally had wanted to give it a scroll texture, but I had purposely didn’t felt it hard and it was thick so that wasn’t going to work.  Best laid plans, right?

I also varied the color of the floss sometimes using white, pink or a strand of each to vary the depth.  I also didn’t want all the flowers to look the same. I loved the dimension, colors and texture of the merino/silk scraps I used for the branches.

After I finished and wove in the threads, I steamed it to try to get the lumps out. I tried.

I know everyone had a an idea of how to position it.  I liked Leonor’s idea to change it up occasionally so the same pictures looks different. Thanks Leonor!

Have you finished your challenge piece yet?


Felting With Nylon and Soy Fibres

Felting With Nylon and Soy Fibres

I made a few more fibre samples this week. I thought I’d use the same template for all of them to do comparisons. In the end, I only did a ‘normal’ sample and a ‘fulled hard’ sample of Trilobal Nylon for a direct comparison. Though thinking about it, for a ‘proper’ comparison, I should really have used the same colours! Each sample has two layers of the fibre, and 4 thin layers of 23 mic Merino. This is the Trilobal Nylon sample which I felted and fulled in the way I usually do:

Here’s a close up of the ripples/texture:

This is the Trilobal nylon sample I made and fulled hard:

The texture was interesting, especially where I used different colours for each fibre layer:

This next one is Soy top which I dyed, the tops all look nice, shiny, metallic shades, but for some reason, they now look a bit like wet tissue. Maybe two layers dulls the sheen?

The silver end looked quite nice:

My favourite piece was the Nylon Staple sample. It had a really nice, thick texture:

You can see it a bit more on an angle:

At first I was a bit disappointed with all the migration, because it covered some areas:

But, then I noticed there was something quite regular, almost geometric about the migration:

It can always be disguised by using a matching colour, or made a feature of by using a complementary colour. Here is a photo of all the pieces next to each other:

And, for reference, the bigger Trilobal Nylon sample on the template I used:

Pandagirl’s 2017 3rd Quarter Challenge Part 1

Pandagirl’s 2017 3rd Quarter Challenge Part 1

It took me a while to decide what I wanted to do for the challenge of the Edo period in Japan.  I was drawn to the simple scrolls with flowers and branches.

https://feltingandfiberstudio.com/2017/07/07/3rd-quarter-challenge-2017/

I scoured the museum sites and Pinterest.  I’ve been to Japan during Sakura (Cherry Blossom) season and particularly love the trees and flowers so it wasn’t too hard to narrow it down.

Since the scrolls seemed to be pale yellow, I made a batt backing then made another light batt using the Osage hand dyed merino and corriedale as a background. I added some darker fibers randomly to give the effect of lines in a scroll.

I had some left over merino/silk scraps from a scarf I had made for my son years ago.  They were supposed to be tassels, but I didn’t like them and cut them off and saved them.  But they make perfect tree branches.  Here is my first layout.

But something was off.  It didn’t feel right to me.  So, I rearranged the branches.

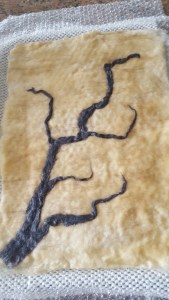
Next was to make white prefelt for the flowers (commercial wasn’t white enough) and cutting out the shapes in several sizes.  This was not an easy process. Here it is a wet look. The neat thing about the layout is that the branch can be down or up.

I didn’t want to felt it too hard.  But I may have to steam it before or after I add either hand or machine embroidery for details.

Actually the photo shows more texture than with the naked eye.

How do you like the branch, down or up?


Felting With Viscose Tops

Felting With Viscose Tops

I was tidying away some felt the other day and remembered that I’d planned to make some felt pieces like the textured nuno pieces I made, but with different fibres instead of fabric. I laid out a couple of pieces the same way, but different sizes. I laid out two layers of dyed viscose fibre, then 4 fine layers of 23 mic Merino. I felted and fulled the first piece, then got my bead board out to full it more. I fulled until it was quite firm, but not stiff/rigid:

I got the texture I was expecting:

Considering the textured nuno, I didn’t expect so much migration, probably because the soft/fine pieces I’ve fulled really hard with fibres before were using white 18.5mic Merino, I thought it’d be less obvious this time:

I changed my plans when I got to the felted stage of the first piece, it looked and felt so nice. So, I decided I would just felt the next piece ‘normally’. Even if I hadn’t already decided that, I don’t think I could have ‘ruined’ this piece by fulling it lots:

The colours and the sheen are just gorgeous, so is the softness and drape, even though it’s only a small sample:

Those ridges/crinkles are because I squeezed it in a towel, then hung on the line to dry! If you look at the blue parts you might see a crease along the edge too, it’s such a light piece, the pegs weighed it down and bent it. Here’s a close up:

You can see the differences in sheen and texture when the pieces are next to each other:

This is the soft piece on the template I used, it started out just a bit bigger than the small box it’s on top of:

And the small piece started out the size of the largest outline on the template:

And yep, those are the same template!

Surface Design Elements

Surface Design Elements

I made an accidental landscape picture last week at the well-being centre. I’d taken lots of the wool kebab tubes in for a play around and thought I’d see how laying them in 2 different directions worked out. I put the middle lot of tubes on first, then the diagonal ones at the top, then filled in the gaps at the sides with a couple more on each end. We were talking about the bag of dyed embellishments I’d taken in and I pulled out some cotton and fluffed it up, and noticing some gaps on my layout, thought I’d add it to show how it felted. It looks kind of futuristic, in a non gloomy or dystopian kind of way:

The mix of fibres is more apparent on an angle:

One of the grey angled tubes was made from weird tops I got in a mostly grey bag of Botany lap, it is a soft natural wool blended with something like Angelina. I never thought I’d find a use for it, but wrapped around a skewer it looked kind of industrial, like something with copper wires poking out. I tried to get a good close up:

I thought I’d try making a piece with the tubes kind of crammed on, instead of laying them out neatly next to each other, because they tend to move a bit and leave gaps. I didn’t over do it, just added two or 3 more than if I’d positioned them. I also wanted to see what the tubes looked like if they were stretched, so I pulled some of them from each end until they were the right size to fit accross the layout:

On an angle:

I liked the contrast of the shiny red and yellow bamboo on the Sapphire blue of these:

These next couple of pieces are made with wool and fibre twists. I used quite a lot of the tops from my weird grey/black and white botany lap waste bag for the twists used on this, plus a few blends of my own:

An angled pic of course:

And a sideways close up:

I thought it’d be nice to show twists used simply because not everyone wants to make something which looks ‘real’, I cut the twists in half, and then made some little woolly balls to go in the gaps:

It has a kind of swaying seaweedy feel to it:

**EDIT: I realised it isn’t easy to visualise making the wool tubes with the kebab skewers, so I’ve done a quick video:

The Tale of the Stubborn Crocheted Bowl

The Tale of the Stubborn Crocheted Bowl

Remember the floppy crocheted bowl I made?  I posted about it here:

https://feltingandfiberstudio.com/2017/05/28/more-crochet-adventures/

Lyn suggested I full it to make it sturdier.  So I tried and no change other than being fuzzier. I checked the label on the yarn ball, but I was pretty sure I didn’t buy superwash.  No, 100% wool.


So, I thought I would try boiling it. No change.

Lyn also suggested I decorate it.  I tried  using a thin wool, but didn’t like it.  So, I used beads in little clusters around the bowl.  But it was even more floppy.

The next step was to bring out the GAC 400 stiffener.  I had bought it, but never used it. Why not give it a try?  I used an empty mayonnaise jar for the shape, then painted on the GAC and let it dry.

When it dried it was perfectly solid and clear.

Now I had to decide what to use it for.  There are a million things I could put in there, but it  wasn’t too hard to decide.

My favorite treat close at hand.

What projects have you saved lately?


Felted Wool Kebabs

Felted Wool Kebabs

There weren’t very many of us at the Well Being centre last week, but the idea of ‘wool kebabs’ went down so well, I think it could become an art form in itself! We’re carrying on this week, so I took the opportunity to make a few wool kebabs and a few felted examples to take in. I mostly made lots of black/white/grey combinations for the kebabs. For the first sample I used black Merino and blend I got from a Botany Lap waste bag. The shiny fibre looks like bamboo or viscose. I just used 5 pieces on this:

From this angle you can just about tell, that they aren’t exactly flush with the surface:

For this sample, I covered the whole pices with wool kebabs, these were mostly quite ‘hairy’ rather than smooth because I used some coraser blends. The neat rectangle really changed shape with the areas of different shrinkage according to how thick/thin it was in places:

I thought I’d used all the ‘same’ type of kebabs, but I think I picked up a couple of different ones next to each other, which made a nice patch of dark/shine contrast:

I think the blend I used for these had a few brownish shades of wool in. These were quite texturey too. I don’t know which wool I used for a base. I think that was from a Botany Lap bag too. I think this is my favourite:

I think another ‘rogue’ kebab got in with these too, one of them has a bit more grey and a definite sheen:

I bought some stripey wool from wollknoll a couple of years ago, and thought this would make some nice wool kebabs. I used them on Black Merino, and they turned out really nice too:

You can see more texture on these, I think:

Even closer:


I got quite addicted to making the wool kebabs, something very soothing about the process: blending, laying out the wisps, rolling, sliding the tube off, repeating, and watching the little pile of similar tubes grow 🙂