Jan has still not got any power/electricity at her house so I am filling in with a post. We have a menu item for tutorials but not all our ‘how to’ posts are included. So I thought I would bring your attention to some of the past posts that are mini tutorials. Enjoy!
I hope you enjoy all the posts and hopefully, there are some that you haven’t seen yet. I am sure that I probably showed a post or two that’s on the tutorial pages but I got carried away looking at old posts. It’s funny how you don’t remember what you posted about!
This week has been hectic. I haven’t had much time to do any felting. I did a little bit of stitching on my seascape, but not enough to show you and a little bit on a set of shoelaces. Mostly I made pasties for the market. They are more popular than we anticipated and we are down to the last few. This is a few about to go in the freezer. They get bagged once they are frozen.
I thought you might like to see this post from way back at the beginning of our blog journey. This is one of the first posts I did.
After you have carded your wool and it is still on the drum you might like to have it as roving instead of a batt. This will show you how to use a simple diz to do that. You can make a diz out of almost anything. mine is a piece of plastic cut from the side of a plastic sour cream container, it has a hole in the middle for the wool to come through. you pull a small bit of the carded wool through the hole and turning the drum backwards slide the diz around the drum pulling the wool through in a long rope as you go. the diz rest directly on the drum. You control the amount of wool in the rope by how fast you slide it across the drum as you go around. If its too hard, you are trying to pull too much wool through the hole.
Another old post from me. This is one of the most visited posts we have, so thought everyone might like to see it again.
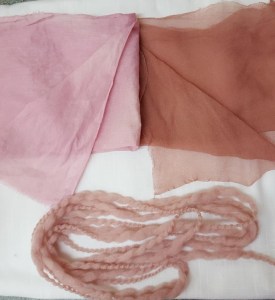
I have been wanted to make a cat cave for sometime now. I decided it needed to be bright. I picked some Blue Faced Leicester wool so it would be strong and dyed it chartreuse. Then I picked some purple and magenta for the spikes.
Spikes and Wool
I wanted an oval cat cave. I used my oval hat form to get the shape and gradually sized it up.
Drawing the Resist
I laid out 4 layers of wool for strength and even shrinkage. I put the first side aside and after laying out the second side I poked holes to put the spikes through.
Spikes in the Wool
After wetting it all down I wrapped each spike in plastic wrap so it would not get felted down flat.
Spikes all Wrapped Up
I covered it with a sheer curtain and rubbed both sides for a while and rolled it for a while and then wrapped it up and put it in the dryer twice, changing the position of the felt each time. It was starting to shrink so I cut out the resist and switched to rolling it in a stick blind. I find the stick blinds to be very aggressive and shrinks felt quickly. I did do some throwing too. Finally I rinsed the cave out in a bucket of alternately hot and cold water being quite aggressive with it. I then had to stretch the top so it would be domed up. I steamed it to heat it up and make it easier to stretch. Mostly I used a wooden spoon to push in a sliding motion to get the shape. Here it is on top of the resist so you can see how much it shrank.
Finished Cave on top of the Resist
Here it is in use, it didn’t take long for one of my cats, Wu, to take up residence.
Cat in Cave
As a foot note Wu ( queen of all things) is no longer with us. This is one of my favourite pictures of her. She really like the cave and we buried her in it, here on the farm.
I got a request for a felted flower class after some people in my guild saw a picture of some very delicate flowers on Facebook. It is going to be a short class done in the evening. I haven’t made any in a while so I had to do a sample.
I made a stem
I also did some stamen. I wrapped them in plastic wrap so they wouldn’t stick to the rest of the flower while I was rubbing and rolling.
For the body of the flower I used a silk hanky and added a very thin layer of merino wool.
and this is the result
I also made some little rose like flowers to show them.
Flowers are fun to make and do not take long. I am going to work on some other methods and see what they want to do at the class. We will make them 2 different way in the class do to time constraints. I will take pictures at the class to show you how the students do.
A little while ago I received some T-pins. I had never used them before. I haven’t mad and hats with folds for some time as they are difficult to get the folds where you want them. As you try to put the second fold in the first one can easily get pulled out and so on. with the T-pins it was much easier. I could put a fold in and then pin it and then work on the next one.
The hat block is a hard foam raffia hat block. the only place I know that sells them is Franks, http://www.franksupply.com/raffia/hatmaking-supplies.html I left all the pins in while it dried. Here it is after is is dry. It is merino wool with silk lap on accents
I am quite pleased with it. I haven’t yet decided if I want to leave the organic edge or if I want to trim it smooth and even.
There are two kinds of prefelt. One is needled prefelt. Commercial prefelt is done this way. It is needled just enough to hold together. I use this sometimes, it works very well. I get it in small pieces and by the yard from Dreamspin Fibers. http://www.dreamspinfibres.ca/ (shameless plug for a friend).
The second is wet felted and this is easy to make yourself. Lately that is what I have been doing. You layout your felt as usual but you stop when it is just holding together. Rinse it out carefully and let it dry. it is till fragile but strong enough to cut out shapes when you don’t want the fuzzy edges that traditional layout gives you. I have been making small pieces and some from the ends of some batts that are not big enough to do much with. They are very helpful when you want very definite shapes.
I don’t have any exact plans for them but they are very handy to have around.
In the spring I made some shrug jackets using a pattern I saw in a book about making simple garments with your weaving. I don’t weave but I can felt a rectangle instead of weaving it. You would think that I would read what to do instead of just going from memory but that would have been too easy. I made some nice looking shrugs.
Orange shrug after over dying
They look nice enough but they didn’t really fit as well as I would have liked. They were to puffy at the back so not very flattering. I think the problem is the rectangle they are made from was to wide making the shrug to long. I decided to change them. I unpicked them and gave them a wash to get rid of all the thread holes.
I folded the top down about 1/3 to create a kimono sleeve. You end up with something that is more like a shawl that doesn’t fall off as you use you hands and go about your day.
If you would like a larger collar you can wear it the other way up.
You could also just sew a line down the edge or just the other direction to have a larger sleeve opening. I like these much better. I hope other people like them too. I am going to my guild exhibition and sale this weekend and I will have them there. On that note if you are in Ottawa this weekend Drop by the Glebe Community Center to see what we are up to.
I thought a hat making class last saturday. We had a great time and everyone had a wonderful hat at the end. I forgot to take pictures till the end. After a year of blogging you would think I would be used to taking pictures of everything I do. However I do have some pictures from the class I taught last winter. They were given to my by Jan who is in the class. I lost most of my pictures in a computer crash. The hard drive is off hopefully getting my pictures recovered.
Trolley for class materials.
This is my trolley that I use for class. My bins of wool for embellishment and my tub that has the little buckets, pool noodles, bubble wrap, resist material and other odds and sods.
Jan starting to layout of the wool.
Here is Jan starting to cover her resist with wool and the 2 halves of her hat finished and ready to put together.
Laying out the wool for a pill box hat
Here is another student who decided to do a pill box hat in cow print.
This is a red and white hat with a few embellishments to help it not look so Christmasy.
Red and white hat ready to wet.
Getting the wool wet using a ball browser. It is a bonsai watering tool that felters are using now. It sprinkles the water just where you need it.
Sorry no pictures of the felting everyone was to busy to take pictures. They did some rubbing and then some rolling then some kneading and throwing.
This is Jan’s hat ready to do some shaping.
The 2 pieces of the cow hat are ready to sew together once they are dry. The sides are a bit floppy with being wet.
Jan modeling her hat form 2 sides. She did more shaping and ended up twisting the tale and inserting inside the brim.
Jan’s hat finished
and now the red and white hat
Red and White hat finished
And last but not least is the picture of my student from last Saturday wearing their hats
Hat Class Oct. 2012
Everyone had a good time and ended up with a hat that fit them in a style they wanted. Whenever I here someone saying their head is small or large of too round or flat or whatever I always say well come to a class and make a hat tat fits you. The best hat block you have is your own head. So give it a try on your own or in a class make the hat of your dreams.
I have a show coming up soon and I am almost out of felted soap. They are always popular at Christmas time.
Here you can see some of my bins of small amounts of different colours, the pieces of nylon stocking I use for felting in and the first soap wrapped up in wool.
first a wrap a thin strip of wool around the edge of the soap then roll it up in a wider strip of roving. Next I pic a complementary or contrasting colour to wrap around the soap. I usually do a spiral from one side to the other.
I use small pieces of nylon stocking to put the wool in for felting. It’s the only thing I use nylons for these days. The reason I put the soap and wool bundle in a stocking is to keep it under control. the first thing that happens when you wet the wool is it gets bigger and its hard to keep it all in place.
Here is a soap with some silk added. this is silk roving that is teased apart. I also us pieces of silk hanky to give it a marble like appearance.
I managed to get this far yesterday but I didn’t manage to get them felted. so here is a picture of a different batch all finished. there are 2 with silk hanky on them.
That’ s the way I do it. If you have any questions or tales of soap making tell us about it.
A while back I went to a felting friends for a few days fun. She showed me how to make bubbles and cut them open to great effect. Here are the pictures of what I did.
First of course I laid out some wool to felt. But these are samples so plain felt won’t do . I added silk threads and a silk square and some silk roving and other wools to see how it would all go. This is the underside.
This is what the top side looks like
Then of course there was the usual rolling and fulling.
rolling rolling rolling
Here they are all finished and ready for the marbles.
The next step is to put marbles in while it is still damp. You pull the felt tightly around the marble and secure it with an elastic and now it is a bubble. We used the elastics they use to put braids in horses tails and manes because they are small, stretchy, strong and cheap. You put in as many as you like and what ever sizes you like. You can also use felt balls. the felt balls are good if you want to leave them uncut. Marbles are to heavy for that.
Here they are all tied up.
Felt with marbles tied in to make bubbles
Here they are cut. I cut the tops off , I cut x’s and star patterns and some I tuned inside out. if you cut more off you see more of the inside and you can stretch them flatter too.
Bubbles cut open
You can see how the underside becomes the inside of the bubbles. These samples started out about 6×8 inches and the finished pieces are about 1.5 by 2.5 inches. They take up a lot of room. I only have 2 of them left my friends dog ate one. I think I will glue them to some leather and make broaches out of them. They are lots of fun to do. I made some wrist cuffs with this method and I will blog about them next week.


 and now the red and white hat


