
Needles and Their Uses
“Comment: Hello! I am a beginner who just started 2D needle felting, and I have a few questions that I wanted to ask. When do we use each type of felting needle and what kind of design works best for each type? Also, are there any tips on how to felt yarn (especially for single strands that are used to outline shapes) so that the yarn doesn’t split? I’ve been having some trouble with the yarn splitting into thin fibers and not staying properly on the fabric. Thank you so much!”
___________________________________________________________________________
Needles and their uses.
This week a question was passed on to me about felting needles. The question was from someone who has recently discovered the wonders of 2D picture felting in wool. In the first part of her question, She wanted to know what each needle was best used for and when to use them. Needles are a Huge topic and not just a quick email so I thought maybe I better do a blog post since there may be more questions about needles out there. I am not an expert but as you know I love to research and this is one of the topics I have investigated before and I keep returning to.
So, first, let’s Welcome this new felter to the amazing world of fibre! I am sure you will find it as fun and addictive as I have! if you have more questions, yes I will likely inspire more questions, please ask. Don’t be afraid to jump in and experiment you may find something absolutely wonderful and will be able to share it with the rest of us. Now back to your questions.
Instead of thinking about what each needle does best individually, we may have more success if we think of needles on a sliding scale of how much fibre each style of needle will move or how aggressive it is in moving it. I will chat about that in a moment. Like wet felting tools, which are often repurposed for our use, our needles were not originally designed to be used by hand. Let’s look at where our needles come from and what they were meant for originally.
Where our tools came from
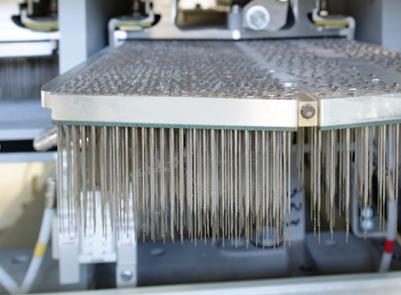 1) Andritz – needle board
 2) Groz-Beckert – needle board
What we are using are actually industrial needles meant to go into industrial felting machines. There are two main ways to make industrial felt; one is with steam and agitation and in the second the fibre stays dry and the industrial felting needles are used.
The industrial machines make (non-woven) fabrics used in car interiors, acoustics (sound dampening), padding, landscaping cloth and other uses. I had read that the first needle felting machine was patented in 1857 but I remember seeing a picture of a needle patent from the end of the 1800’s, that isn’t too important for us just that the needles were originally designed to fit into the beds (boards) holding hundreds of needles which would be raised and lowered into the fibre passing through the machine.
The German Company Groz-Beckert claims to make over 2000 Needle variations for different applications and the machine used. These are changes in the barb placement and/or barb type, length and size or gauge of needle and the shape of the working part. Groz-Beckert is not the only company making needles although they make very nice needles. I have also used needles by a company called Doer sold out of China. I can’t seem to get much info on them but so far the needles I have ordered have been fine. (Be careful if you are ordering needles online and they are described as “short, medium and long”, you may get all the same gauge just in different lengths!)
For us, it’s the needle that is important, not the machines that hold them so I will try not to get off on a tangent. All needles have common elements with some variations. Let’s start by looking at the common features of Felting needles.
 3) parts of a felting needle
The crank – the 90degree bend at the top of the needle. It seats it in the bed/board of the machine. It’s used in some holders to keep the needle stabilized but at least one holder requires it to be cut off. (Not so easy to cut needles so I did not buy a second of those holders.)
The Shank, the tapers (either one or two) and sometimes an Intermediate section are all parts that are important to the various machines that the needles are designed to fit in. For us, it’s a place to hold onto or stick in a holder.
The working part has a number of variations which will change the type of non-woven fabric the needle makes commercially. This is the part that as a hand needle felter we are more concerned with. It can be divided into the cross-section shape, the placement, number and shape of the notches (barbs).
Shape – Originally, the triangle shaped needle was what was most commonly available. Over quite a number of years we have many more types available, as re-sellers and felters became aware of the options in the industry.
Triangle – (3 sides) most common needle and use for both pictures and sculpture. This is a good basic needle and can be used in most applications. They tend to be a bit less expensive than some of the newer needles that have been more recently introduced.
Star(Cross STAR) – 4 sides – will move more fibre faster since it has one more side than a triangle.
Tri-star – 3 sides with an indented triangle cross-section.
Eco Star. – 3 sided. With a profile of an indented and rounded triangular side. Both of these 3 sided stars are said to have less resistance upon entering the felt. I have not noticed a difference but I am not working with hundreds of needles at a time.
Twisted (triangle shape). The blade is twisted, it does not twist as you poke the wool. The advantage is that the barbs are dispersed more evenly around the needle, which engages fibres more evenly adjacent to it.
Crown needles are usually found in finer gauges and are used for detail work. The barbs are only on one level and are placed near the tip of the needle. You don’t have to stab deeply since the barbs engage soon after the point enters the felt.
Fork needle – these are in a group called Structuring needles and are used in industry to make ribbing or as part of the process to make velour textures. These are just starting to appear and I have not tried them. I will look forward to seeing one in person and seeing what it can do. (I will let you know if I find one to investigate in person.)
Reverse needle – this needle has the barbs positioned in the opposite direction to the other needles. As you poke the needle into the felt nothing seems to change, as you pull the needle out, some of the underlayer (whatever depth the barbs are at) will be grabbed and pulled to the surface. This will create a surface nap or it can be used to blend the transitions between colour changes. The nap created can be reduced by using a regular barbed needle to smooth it.
Conical needles which have a tapered working part. I have only just received this style of needle and have not yet had a chance to investigate it. I am suspecting this will be a good finishing needle if used with the needle making only shallow contact with the felt. Or as a go-to needle if I am trying to increase the stiffness of the felt in a delicate area of a sculpture.
Ones we do not yet see out of industry are:
Vario barb needle Graduated barb size per edge: The closer to the point, the smaller the barb
Teardrop working part – this one has barbs only on one side and there are usually 4-8 of them. This one might be of use to hand needle felters but I have not seen it available yet. It may be worth investigating if it appears. This one will depend on how much surface distortion (that pitting effect) the rest of the body shape of the needle makes.
“Barb” (ok it’s more notch shaped but if the industry is calling it a barb then it’s a barb). This is where a lot of our needle re-sellers are not giving us all the info. There are 4 different barb styles from the German Needle manufacturer alone. Each has unique features, which will affect how the wool is grabbed and pulled into the felt. Some barb shapes are more aggressive. Some are designed for longer wear in the machines (not quite as important to us since we don’t poke our work millions of times…. well I don’t think I do. I never actually stopped and counted…. Maybe I should some time… no, maybe not.) Some barb shapes are designed to be gentle on the ground fibres. I have found that the needles I get from different re-sellers, in the same shape and in the same gauge, can still vary in aggression. Which suggests the needles have a different barb on them. I would like to know so I could request a 40 or 42 with a slightly more aggressive barb when I get the feeling they just don’t have enough enthusiasm sometimes.
 4) parts of the barb or notch.
The number of barbs per side is also an issue. Each side may have 1 (as in a crown needle) or up to 3 barbs per side. On the end of a box of needles, you will see as part of the code 111, 222, or 333, denotes how many barbs are on each face of the needle. Again 3 barbs per side will move more fibre than 2 or 1 per side. Having more sides will also increase the amount of fibre the needle engages with.
 5) boxes of Doer Needles T32’s, T36’s and Crown40’s.
By now you may suspect I have a bias towards the 333’s but It’s not just all about speed and how fast you move fiber. Sometimes you want to isolate just a few fibres and get them to sit exactly where you want, so a 222 or a crown (111) may be just the needle for you.
The last barb consideration is their spacing on the working part. Look at your needle and recognize that you are moving fibre only where the barbs are. So barbs close to the tip do not have to be plunged deep within the piece to work you only have to go in a bit to entangle the fibres. This is often helpful for people with muscle strain from over enthusiastic stabbing.
Finally, we have reached the end of the needle and gotten to the point (literally) which commercially also has a number of options depending on the required non-woven fabric being made. There are conical-shaped points, tapering points, rounded points and chisel points. What we usually want is something that will pierce the work entangling but not breaking fibres. So far, all the re-seller’s needles I have come across have been fine.
I did a few quick checks online as I was putting this blog post together. I spotted that the new Surface coatings for needles that had been hinted at a couple of years ago in the industry are now listed as being manufactured. Most of the coatings are to increase the life of the needles in the machines (make them more hard wearing) but some are now listed for use with other fibres (non-wool) and others to expand the Geotextile line.
Needles come in different overall lengths. This is very important to the machines they are to fit in and can be important to us if we have certain needle holders like the clover tool with a guard or the fake clover tool copy. If you are using an open ended holder (no guard to be shorter than) or using your fingers this is not too important. Unless you find one length less comfortable than another one.
Our last variable with needles is a very important one to us, their Gauge:

 6-7) here are two ways to visualize the gauges of needles
Needles come in a number of gauges. Like wire, the smaller the number (32 gauge) the larger the needle is. So a 40ga is much finer than a 32ga. Industrially speaking, there is a much wider range of gauges than we usually find for hand needle felting. Commercially I have seen from 16 to 46ga but we tend to use a smaller range (36-42).
32’s would be used for coarse wool or moving a large amount of fibre quickly. It is good for attaching a limb to the body but it will leave a more noticeable surface dent than a needle that is finer. (Think dents in a grapefruit or orange skin!) This is not a needle commonly use in picture felting since it creates surface distortion. You might use it in quickly tacking together a base for your picture but you would likely move to something finer very quickly.
36’s are also good for moving fibre quickly and leave less of a dent than a 32. I use a 36 frequently in the under layers for sculptures and laying in larger base layers of colour in a picture. (I will switch to a finer needle to add more superficial layers of colour over this layer)
38’s are a little less aggressive but also is less distortion of the surface. I use these for both sculpture and pictures. These are good for working on a bit more detailed sections as well as laying in layers of colour. I have used these to work finished details but most picture felters I have chatted with tend to go to finer gauges for finishing details.
40’s are finer still and move less fibre than the larger needles (remember gauges are backwards, with little numbers being bigger sizes) these are good for pictures and for fine details. They are not as fast as working with the larger gauges.
42’s are now getting quite common, they are finer than the 40’s and have even less distortion of the surface. They again will take longer to move fibre than the larger needles. Using them in a multi-needle holder may improve your speed if you are just firming up an area and is an option if you are working 2D. I did a review of some of the different holders I have collected earlier this year (it’s all been a bit of a blur) I would suggest looking at the clover or fake clover tool with the guard and the metal bar needle holder from the Woolery for picture felting and painting with wool. Both are very helpful.
 8) The Woolley’s 10 needle mettle bar tool
 9) the fake clover tool (the really clover tool is green)
Usually, you buy needles by their gauge, depending on what you are going to work on and then fine-tune that by the shape. You may also consider the number of barbs to make the needle more aggressive or less, again depending on what you want it to do. You will also likely find you tend to favour and use a couple of your needle options predominantly but its still helpful to have a good selection for the occasional time that a different needle would just be perfect!
Some needles are colour coded by the re-seller. This makes it easy to see what you’re working with. Or you can mark the edge of your working surface and store different gauges in different spots. Most of my needles are not marked. I can tell if it is a finer or larger needle by looking at it or carefully running my finger over the working part and feeling it. If I am not sure, I tend to poke my project somewhere discreet and out of the way. The feel of the needle entering the felt will tell you if you have the correct one.
(Needle palpation– how to feel through your needle)
-did it feel like it grabbed a lot of fibre? Was there a lot of resistance to enter the felt? Are there large surface dents and you want to do finishing details? Then you may want to try a finer needle.
– did you poke the felt but nothing seemed to happen? Have you been poking the same spot but you don’t seem to be getting anything to stick? Time to move to a heavier gauge
– did the needle break? (and it wasn’t because you changed direction from entering to exiting) Try a finer needle. As you felt the density of the felt increases and shifting to a finer gauge will help let you keep felting if you need to make the felt denser. Some felters do not felt that firmly and this is not a problem they would likely encounter. Although it is VERY important to make felt that is appropriate to the use it will be put. This means both using a fibre that is appropriate to the use, and felting to a density that will withstand the intended purpose. As an example, Merino, while lovely and soft, will not wear as well if made into slippers. Finn fibre would be stronger and the slipper made with it would be longer lasting. If you only lightly felt the slippers, they will also not last as long as more densely felted ones. For pictures, if you are framing them behind glass (I want to talk about that at some point) you don’t need the density that a 3D sculptural figure would. If you do not want to have glass your felt must be able to withstand dusting or even the horrors of a possible vacuuming (don’t trust someone won’t try that after you sell your work!).
If you are working on finishing details and you are pretty sure the 40-42 gauge is correct but it’s still not quite feeling right, try a different working part shape. The stars are more aggressive than the triangles, the twisted will affect fibre more evenly around the needle. If you want to focus on the surface then a crown might be right. The other advantage to the crown needles is not having to push them too deeply to entangle the fibres. (Less deep poking can equal fewer muscle complaints – maybe I should have another chat about ergonomics? Or maybe Ruth can give us some tips!) If you have switched from a triangle to a different working part shape but still want to increase the amount of fibre you are engaging with the needle, you may want to then consider looking at more barbs per side or fewer if you require a more delicate touch.
So it wasn’t quite as simple a question as it looked. My suggestion is to get a sample pack of needles from one of the re-sellers. Check your local fibre sources and felting supply stores first, then look farther afield like Etsy or Amazon. Look for a pack that has a couple of each of the main needle gauges in a few different shapes. You will likely have a few of the 222’s and 333’s in the collection so you can get an idea of how that affects the needles. Most of the re-sellers now are colour coding their needles so you can see what is working best for you and order more. If you have un-coloured needles you can make your own colour code using Nail polish, tool coating dip, permanent coloured markers or spray paint for mettle (just don’t get any of that on the working parts!!)
 10) a few of the needles sets I have collected. Fibre Craft had full sets similar to Olive Sparrow’s sets but I seem to have used them.
Another tip is Instead of stabbing frantically, slow down and feel how the needle interacts with the wool. Having a couple of needle holders that have different needle gauges in them is handy too. I still love the metal bar tool from the Woolery for doing background laying-ins quickly (I think I have T36’s(333) in it at the moment). If you read an earlier blog you may remember the fun I had with the (3 needles) holders I bought from china. They are worth having because of the needle spacing and you can always mark with painters tape what gauge is in them (I do forget and really should remember to mark what I put in when setting them up! With a couple of pokes you can always tell if I filled it with 40’s or was it 36’s)
 11) it’s good to have different needles in holders so you don’t have to stop and switch needles. These are all needle holders sold out of China
From my workshop notes, this might help too.
REVIEW REALLY IMPORTANT STUFF:
1 – Working depth; look at the distance the barbs extend up the working part of the needle. Maximize the fibre movement and minimize work, try to work only as deep as you need to and not poke through your work (unless it is very thin). It will push fibre out the other side. If you push past the piece too much you will get the look of a reverse needle (Fuzz) on the backside.
Even though you don’t need a huge selection of needles it’s nice to have a choice, especially when working on small parts.
2 – Change needles when you need to. If you are feeling increasing resistance in the piece you’re felting (the density of your felt is increasing) if you need it firmer then shift to a finer gauge needle.
Needles with more barbs (3 vs 2), larger gauges or sides (Star vs Triangle) move more fibre but tend to produce more surface pitting. This isn’t important if you’re adding a fur coat to your piece but maybe if you are working on a face or working on a picture.
3 – Stay Focused (and slow down). It’s much easier to avoid the finger if you are not distracted by a movie or TV show. Audiobooks and Music work better since you can keep your eyes on your needle and your fingers so they don’t cohabitate. (that can require Band-Aids)
12-23) A few of the pictures I have done or am working on. I seem to have a bit of trouble keeping some of my pictures flat. I hope they will inspire you to jump in and have fun with fibre!
Now the yarn question.
I don’t do a lot of outlining or drawing with yarn but what I have done I found that I started at one end and poked towards the part I had already attached, laying down and attaching a bit at a time. If you are finding your yarn splitting see if you can find a bit of wool of a matching colour and add a bit of that to tack it down. (a bit like a staple.) Make sure your yarn is wool. It is much easier to work with than acrylic. For gauges, I tend to use a 38 or 36 gauge with the size of yarn I have played with. You may also try felting the yarn in on more of an angle. So poking closer to parallel to the surface you are attaching it to. (The direction the needle moves is the direction the fibre will move too). This also increases the likelihood that you will be engaging with both ply’s. if you are stabbing straight down you may increase your chance of having the needle land in between them, increasing their chance of splitting.
Yarn considerations:
-Size of the yarn (DK to lace weight) try the finer needle with the finer yarns.
-Tightness of the spinning (loose spun may be more prone to splitting than a tighter spun yarn) This could be an interesting investigation! So many thoughts, so little time to felt lately!
-Fiber content (other than superwash) wool is narcissistic and will want to be with itself or other wools, some other fibres are not so enthusiastic about entanglement with others.)
I tend to lay in fibre rather than yarn when I am drawing with wool. I find I take short thin bits of top or a small amount of a lock then anchor one end with the needle and draft it just a bit more so it’s finer than I think I will need. (Thin lines seem to want to be stronger than I intend them). I start directing my needle at a shallow angle back in the direction I have affixed the fibre. There will be a little take-up but it is from the end with the loose fibre rather than the part I am trying to attach. I have the fear that this may be a clear as mud but I know other blog readers may be able to add more suggestions since they may have investigated yarn more thoroughly than I have.
If you are excited about where our needles come from and the scope of options available you might like to read a PDF put out by the Groz-Beckert company. https://www.groz-beckert.com/mm/media/en/web/pdf/Felting_and_structuring_needles.pdf (no it’s not homework it’s just in case this topic is as exciting to you as it is to me!!)
I hope this has helped our new felter with the needle question and has been a review for the rest of us. Looking back through past blog posts will give a vast amount of information too! Search under “Needle felting” or “Picture felting” or maybe”Painting with wool”. I promise I will show you how Dragon’s wings are coming along soon! Dragon now has silk highlights!! How Posh!!!
Have fun and keep felting!!!
21 thoughts on “Needles and Their Uses”
Have only started needle felting …. needle supplied in kit…. so how little i know…. but this blog is certainly wising me up to the intricacies and the possibilities. Thank you
Welcome to the fun of Felt!! its a bit distracting, wet dry or damp (a bit of both)!
the needles are critical to working dry and they are getting to be numerous options in what types are avalible, it can get overwhelming. finding a multi-pack or sample pack of needles will give you a good idea of which ones will be your go to needles for most things but it is helpfull to have access to some of the others for those times there just the right tool. (i started with a T36, T38 and later got a T40! so you can do quite a bit with just a few basic needles, the rest make felting faster, more efficent or the surface of your work smother.)
if you think of the needles as starting at the guage and then addon features you want from there. you want to ether affect more fibers or focous on fewer. you then can deside what shape (add one more side), or add more barbs to incress the needles agressiveness or go the other direction reducing sides or barbs to the most unagressive fine gauge crown needle with only 1 barb per side.
i hope this has given you a bit of an overvew of the topic and made it a bit more aprochable. Kits are a grate starting place. you mite also like to check out some of the felt-alongs on you tube or online workshops (i am looking forword to inperson workshops!). it is a lot of fun to pickup some wire (aluminum usualy) bend it, add secondary supports, then start adding wool and poof suddly you have a Dragon demanding upgrades to his wings and silk on his spines! Oh my!
Have fun and if you need help ask question in the forum! there is a lot of information in this blog post so scrole back or peruse the topic options in the Catagory surch box. and i do apoligize for the spelling it is extreemly dislexic and i have almost broken my spellchecker who is now at work!
As usual Jan, a really informative post. Thank you.
I purchased my first needles from Wingham Woolwork about 20 years ago and got some of each they were offering at that time – 38 star, 36 triangle and 19 triangle. That last one I couldn’t get to go into the wool it was so course. According to their website now, it is for really course fibres like Flax. I’ve never used it since. They do now have a wide range of sizes and shapes.
For replacement needles for my embellisher (which takes 8), I buy 36 triangle and get my engineer husband to cut the crank off and make them all the same length. It’s a lot cheaper than buying needles purposely sold for machines.
I have been trying to find The Woolley’s metal needle holder on line, but google can’t find it. Can you give us a link on where to look please?
I rarely outline parts of pictures, usually allowing a slight change in surface level to indicate the “edge”, or a change of colour. If I do need to add fine lines, I tend to use a needle and thread.
Looking forward to seeing the blue dragon.
Ann
thanks Ann! needles are so much fun (as long as their not the one with allergy or flue shots in them!!!) not that i would want my Doctor to try my needles on me! i dont think that would go well ether! when i started here it was just triangles i think it was a few years before stars turned up. (Ottawa may be the capital but it was not the best for shopping. it has improved over time!)
SHOPPING!!! here is the link for the 10 needle bar tool it was harder to find this time when i looked too! i hope its not getting discontinued or suppy chain challanged! i am not afiliated with the woolery they just have this fab itum. https://woolery.com/feltcrafts-ten-needle-tool.html
there are a few times that an outline would be usefull. (something more graphic and less repeisentational) if i was wanting to add a line this time i might try laying in wool where the line is to be then back filling it with the adjacent colour leaving the under layer visible at the edge in the width i wanted the line. that way i would not have to lay in after words and worry about getting the line thin enuff? (there was an illustrator who did a red under drawing then left bits of it showing through as he painted it was quite strikeing) we are lucky with felting there is usualy more than one way to aproch a problem. there may be an easyer or quicker otpion but i bet there is an equilly doable way that mite just take longer or use difernt steps. when i teach landscape felt pictures i use the wool more like a combination of pastels and watercolours. background to forground, wahses of colour. but you can treat felt like gwash acrilic or oils. aplying thicker patches of colour that has been blended to what you want. both will work its just the way you aproch it and what you are trying to acheave.
Dragon is having a nap in his project box, i put the bag of silk under his head as a pillow. he should be comfotable if he is stuck in a box and it is a see-through plastic box so its not as bad as it sounds. maybe i should felt him a quick blanket? no i still have to keep working on cleaning up my studio,
Very informative post, Jan. Thanks for taking the time to put all this helpful information in one place.
Your welcome Ruth! its a topic i am quite intersted in. i had hoped that even the experinced felters mite see something thay hadnt thot about and still help some of the newer felters. (i do tend to look at the world a bit diferntly then many people.) its good to ask questions once you have a few answers you have an idea of what questions to ask next or what you can try and experiment with. its also good to re-examen the basics. from what you have lurned over time dose this change your perspective on how or why you work in a serton way. this was an interesting project and i lurened the new coated needles are now in production! one of the protypes had been to give a needle more flex so the macheens could run faster with less needle brakage. i didnt see that listed so i hope that one will be comeing too. it would hopefuly lessen our needle brakages due to changes in angle of enterence and exit from the felt.
I’ve read quite a few articles on felting needles over the years, but you still managed to teach me a lot in this article!
Your post is so thorough and it’s an interesting read.
Jan, you really should write a book – your acculmulated knowledge is amazing.
thankyou both! it was fun to re-look at needles and try to give an overvew of both why thay are made as they are and how the needles types relate to eachother even though there original perpouses were not what we use them for. (we are just a vary creative group who see potential in things they were not deisnged to do. look at a lot of the wet felting impliments a lot were ment for something vastly difernt than what we do with them! oh that sound a bit kinky i should try to reword that. no time got to get back to working on the office clean up! – if i cleen up i have promised myself i can felt)
i have been browsing at a new book in guild library it was bylingual, i think it was finish and english. i would love to do a bookin my native dislexic (when i am realy tiered its gets even better) with the english translation. unfortunatly i have found i have a super power, yes i can distroy the ability of other to spell with prolonged exposure to my vertion or attempt at english. i distroyed my Mom’s ability to spell by highschool, my husband’s spelling is starting to fail but i have used his spelling apibiltys spairingly as a spellchecker for over 30 years. (i didnt think his spelling would last that long.) humm maybe for the good of our fellow felters i should only have an english vertion?
ok realy i will get back to sorting and cleaning…. well just one more post to answer than rite back to work!
Fantastic post, Jan! Very detailed and I managed to learn a few new things 😀 Thanks for writing it!
i am so glad you liked it! thanks for sloging through to the end… i must remember to rite short posts sometimes too! felting needles are just so intersting its hard to rite a short post about them! Have fun and keep felting!!
So interesting and very enlightening. I have about 6 needles, and I have done a little needle felting with these, but really feel clueless most of the time with them. Your article is so engaging that I want to try to label the needles that I have. Now, I know why there were dents sometimes too. One needle went in my finger, painful, and not to be repeated.
I will revisit this article many times in the future. It is wonderful. Thanks.
i am glad you found it helpful. it takes a bit of playing to find the needles you like best, but if you think of the gauge first and then fine tune your requierments with the shape and number of barbs you will likly grab the most helpfull needle first. its good to have a selection even if its just for a few quick stabs to tack something into place befor switching to your next needle.
i hope you put the vengfull needle in time out for trying to felt you!!! i have stabed myself a few times but if i am going to be working on something that i have to hold i made myself lether finger covers for the thumb and fist finger. thay are like having armor to protect yourself. (i also try not to air felt but sometimes it just seems to be the best way to access a spot. i know i should be scolded for dangerous felting!!!)
one thing i shoud have added was a way to think about the twisted triangle shape. think of it as a spirl stair case with the barbs deispered at the outside edge of the stairs evenly around the center stairway. you can viusulize the stair case decending it dosnt rotate as it decends but each step-barb would ingage sequntaly up the staircase. ok its a horror move now. (ick water) the staircase is being lowered into a vary calm lake. the water would hit each stair one after another around the centeral core. when aplyed to the needle it will engage fiber sequentaly around the needle going up the working part one barb after another. i hope that make sence. i may not see the world quite the same as most of my frends but i think my vew of the world is a lot of fun.
i hope you have lots of fun felting! (and have strong words with that illbehaved needle!)
Wow, you’ve done it again Jan, there is so much interesting info in that post!
Having tried various types and gauges I tend to favour the 40 gauge triangle for the majority of my needle felting, swapping to the 42 gauge for finer detail. If I want to speed things things up I occasionally hold three between my fingers, otherwise tend to work with just one.
thank you Karen! yes a there are quite a few people that lean towords the 40/42 gauge needles for the lessened serface denting and there abuility with fine detail. you can see the improved detail. i think of it like the Magic Realism of Alex Colville with the fine needles vs the English Romantic painter William Turner more painterly with the 36/38’s.
i have a hubby that is a postal worker, i dont have to watch the sidewalk for postal droppings. i occationaly find them in his pockets! take a postal dropping and wrapp it around 2 or 3 needls it gives you a bit more to hold onto and there back to the blue ones so there pritty! (postal elastics can be a felting tool too!!)
have fun and keep felting
Jan this is a masterclass in itself. Thank you for answering so many questions (and then some). Love the slideshow too.
Thanks Helene i was hopeing the info would be helpfull. it such a cool topic and there are so many options in industry it will be fun to see what becomes avalible next.
Picture in felt are lots of fun and can be in so many diferent styles! from high realizum to graphic to painterly. Have fun and keep felting
I so appreciate such an in-depth review of felting needles! There are many of us out here who don’t ask such questions because we assume everyone else knows and we don’t. We all resist asking questions about the obvious (duh! questions). So grateful for the time you took to compose this for the rest of us who are among the “unenlightened”:-)
Needles are never a Duh question! (nither are they dull as a question or in person) if you want to felt and stay dry than thay are your go to tool. its always nice to know how the tool works, why it was made that way and anything else you can find out about it.
a good number of needle sellers are just selling on what thay have been able to get hold of and not always from the original manufuaturer. so they cant always find what your looking for or tell you much about what they are selling. i hope there is an increse in curioustity about the difernt kinds of barbs so we can have an idea of what we have been working with and how we could change the needles charictoristics just by changeing out the barbs to a more or less agressive one. it may not be a big difernce but on a 42 or 43 this could feel like quite a difernce, we will know when we try!
i hope my inthusiasum for this topic hasnt felt like a steem roller runing over top of everyone!
have fun and keep felting!!
I do have a question: how do you manage tracking your assortment of needles? Do you have a system? I pull a needle out to use then cannot recall the number and may not be able to identify the type by looking. I tried the color coded approach with the color always wearing off with very little use. Pulling one needle out and replacing it before pulling another one out leaves me feeling like “a one-armed paper hanger.” I like to park the needles for my project in my treasured Bear Creek wool felting pad. Well, three or four needles parked there together (or apart) leaves me wondering which is which. Maybe this is a neuron problem and not a organizational problem:-)
i often have a number of needles (ocationaly in groups with an alastic or in holders) stuck in my foam garden kneeling pad i usually use for picturs and also sculptural work. also have a chunk of one i have cut off and have needles stored there too.
when i am working i usualy have the needles at the top of the pad with the corser ones towors one side (i think that the left – stupid dislexia) and the finer ones on the right
i tend to start out with the 36’s ether T or Star then shift down to finder gages and shapes as i go from understructure and under layayers to laying in thin wisps of fiber. pen tools /Holders can be marked with pen and masking tape if you think you will forget. (i do forget and then look and compair back to some of the ones i know for shure there gauge.) Rule 1 a needle can come out of a box of (500)needles but it will never go back in – so it cant postibly get into the rong box. i have also perchused full set of diferent needles which will give me a comparison to check a needle agaenst if i absolutly need to know what the gauge is. i usualy only want to know if i am writeing up notes (or want to buy more), i wonder if i should invest in some vary expencive calipers to check the gauge?
i am not as worryed about the gauge as i am how it feels when i insert it in the wool. if it is not agressive enuff i will switch to somthing further to the left and try again. if its too agressive i move right and check the next needle out. it may take a poke or two but i usuly find one that will do what i want.
if you are not sure what needle you have feel the working section, you will be able to tell if its thinker or thiner than another needle, start your sort that way. i have a desk lamp ring light i got to help see gard hairs in quiviot. it has a magnafing glass in the center of the light ring! that or just a magnifing glass may help with seeing the diffencece between a tri star and a quod star. the spiral catches the light difently than a triangle when you rotate it under light. i am beginging to suspect that being so short sighted is actualy a good thing Finaly!
dont worry too much about what each needle is. you can group them more by what you do with them. start with all the needles you find work well to begin working or adding apendages, clump those togther on your work serface, group the sculpting ones together then group the fine detail ones together. you can reduce the number to go through to find the realy rite one that way too.
good luck and keep asking questions it makes everyone think about the answers! and maybe more quetions! i hope that wasnt too convoluded and confusing.
have fun and keep felting!!!