So sliding in on a cloud of dust I have the branch finished just as the quarter runs out. I know we don’t have to get it done in a specific time but it is nice to get it done in the quarter the challenge is posted.
After looking at it and especially seeing it in a photo I decided the larger flowers at the bottom of the flowers should have yellow centres. So I added them. I used mostly french knots with 2 threads. The single french knots are smaller than the colonial knots. The Yellow stands out more in the photo than in real life.
It still looked pretty sparse so I decided leaf buds would help. I looked them up online. It was best to look up flowering trees and look at the buds in the background. It didn’t seem to matter the kind of tree the leaf buds looked pretty much the same. I made all the leaf buds at the same time so I would get them about the same size. It didn’t take long and I only poked myself a few times. That’s the problem of working small.
first I had to make the green I wanted. I had Christmas green, lime green and a very yellow-green. I mixed them with a couple of dog brushes.
I made 2 at a time. Then cut them in half and finished shaping them while holding them. I poked myself working on the pad not in my hand and I know Jan will tell me she just gave me a tool so I wouldn’t do that. But I forgot until after I poked myself, naturally.
I fiddled around placing them. and felted them down…… without poking myself.
I had originally thought I would add a bit of brown near the base of the buds but I didn’t like it and pulled them off.
I am quite pleased with the finished branch. Now I need to steam it a bit, to block it square. The dent on the left is really bugging me.
In my last post I mentioned a few of the projects I was working on with the “Making Waves” theme, along with other members of the Waltham Windmill Textile Group. I’d begun work on a 50cm x 90cm felted wallhanging inspired by the markings on large stone slabs on the beach at Seahouses in Northumberland.
Having recently bought myself a drum carder I carded a variety of left over bits of fibre, mainly blues, greens, yellows and neutrals, to make my background and laid them out with off cuts of hand dyed silk fabric, scrim and large nepps. On the left is how it looked after felting and on the right is where it’s at right now. I’ve added synthetic sheers, machine wrapped cords, hand and free motion stitch and in some areas I’ve heavily machine stitched to push them back and encourage the adjacent areas to stand out. The original bottom left section wasn’t working with those silk circles so they were pulled off and replaced with some stiffened, rust dyed fabric circles, recycled from another piece of work. I’m calling it Going With The Flow because a) it’s inspired by a trip to the beach b) it has flowing lines and c) like most of my work its design wasn’t preplanned. It’s evolving as I work on it, adding bits in and taking bits off until it feels right. It’s got a way to go yet before I can call it done.
One of the other challenges within the Making Waves theme is to make a 3D fish and my immediate thought was to create what many would regard as an ugly fish but which I prefer to think of as a fish with shedloads of character……..one that would get noticed amongst a group of pretty fish!
AnglerfishTasseled ScorpionfishOyster Toadfish
Having typed “ugly fish” into Google I lost many hours over the next few weeks looking at images and some incredible videos of life deep in the depths of the oceans. Each new search revealed yet another fascinating species of fish, some quite honestly didn’t look real while some, like the Tasseled Scorpionfish were strangely beautiful. One of the weirdest I discovered has to be the Red Lipped Batfish. If ever there was proof we descended from the oceans this red lipped, whiskered fish that “walks” on its specially adapted fins has to be it!
Red Lipped Batfish
Last month the Waltham group had a day making felted fish, some are finished, others are still work in progress.
Lucy made a wonderful wet felted Puffer Fish adding recycled plastics, including pipette tips, wine bottle netting and glass beads with recycling symbols underneath, to highlight the plight of our oceans.
Sue is very new to wet felting but she’s taken to it like a fish to water (couldn’t resist!) and has made “Angry Fish”. I think he looks more sulky than angry but he’s terrific!
Barbara’s felted fish is still work in progress but looking great, as is her sketch book and fabric fish purse!
Originally I had intended to wet felt my ugly fish but, after all those hours of studying them and getting excited about what I was going to make, for some reason when I took out my carded Corriedale fibres I found myself felting a cartoon version of an Angelfish…….I didn’t see that coming! Her name is TroutPout and she’s approximately 33cm x 36cm excluding her fins.
I’ve been enjoying teaching 3D Seed Pod workshops recently using wire wrapped with Tyvek fabric so decided to make my Anglerfish from wire rather than fibre. It was only when I’d got the 60cm x 33cm framework made that I sat back and realised I’d gone past the stage where I had meant to start adding my fabric! Time for plan B…..maybe I could use wire mesh to give it “body”?
I looked for some online but hesitated as I wasn’t sure how flexible or suitable the mesh would be. Having put the fish to one side, a few days later I joined the Lincolnshire Textile group and at my first meeting I was offered a piece of silver coloured Sinamay. Sinamay is one of the most popular hat-making foundations. It’s woven from the processed stalks of the abaca tree, a type of banana native to the Philippines. I couldn’t believe my luck……..being silver coloured this off cut looked like wire mesh but wasn’t and if I sprayed it lightly with water I could easily shape it to fit and stitch it with aluminium wire to my framework. So this is how far I’ve got. I’m going to add a few more wire spirals and do something more interesting with the eyes. He should have menacing teeth but I might not go that far!
Wire frame Anglerfish
Another feature of next years Making Waves exhibition will be an Octopus’s Garden so once the fish are done it’s straight on to making lots of coral and a few Octopus. I’m loving this theme and could quite happily continue with it way beyond our event next year…….it has to be the most interesting and enjoyable we’ve had so far!
I have finished my flowers but I don’t think I am finished with the picture.
The last time I had gotten this far
I started adding flowers, thinking that the branch end would be the last to open, I started with a darker colour and fewer threads to make buds. I made smallish french knots.
Next, I went to a lighter shade of pink and a few more strands for the next size-up flower buds
For the next group, I used my final pink colour but added in a few strands of the darker colour. I should have probably used half and half because the darker pink didn’t show up as much as I hoped. I did these at home so you got 4 progress pictures.
Today while I was at the market, I finished, with the lighter pink being for the bigger flowers. I decided to try colonial knots instead of french knots. I am not sure I wrapped them all the right way band I added some extra wraps around the needle to bulk them up a bit.
I liked the way they turned out. I am thinking maybe I should add a little bit of yellow to the middle of the bigger flowers to make them look more open. I also think adding some green flower buds might be a good idea too. So that is next, and hopefully, I will make it before the end of June.
And now just because they are cute, the 2 ducklings that visited our booth this morning. they belong to the Farm and were out for a walk with their youngest.
I have started adding flowers to my branch. It is slow going as I am still fighting my cold but it is started, so that’s something.
I started adding the purple backgrounds for the flowers. I took a picture partway along. I remembered to take pictures before finishing so everyone should clap…… or something. LOL
Taking the picture made me look at it more and wow, dead straight
So I went back and poked them into a more organic shape.
Next was the stems and that’s as far as I got. I am not sure about the blank space bottom right. I can’t decide if I like it or not.
And just for fun, sheep and lambs. theses are bad sheep who escaped in the rain and decided to eat the grass between the two houses on the farm. They are not very good at being sneaky. This was a little earlier in the spring. They are out in the pasture during the day now.
I have moved forward a little on my tree limb. I decided to go with a grey sky as a background so that I had more choice with colour.
I added a branch in brown It isn’t as flat a brown as it looks in the picture but I think I need to add a different brown to it. I will work on that.
Then I sketched the branch to think about colours. I decided on an orange central vein. That is probably not the right name for it but it is what I can think of to call it. Then a purple fuzzy haze with flowers in it. and some idea of budding leaves.
So far people here like the pink ones. I am not sure. Which ones do you like?
After searching my stash for another brown to go with my branch I had nothing. So it was good timing that there was a fibre event near me called For the Love Of Fibre. This is its second year. https://www.facebook.com/groups/1167963160700589
I was looking for brown but it seems I turned the wrong way went in and ended up in Top of the Whorl Spindles https://www.facebook.com/katspindles She had no brown wool but she had these amazing sample boxes that are just the right size for me.
I wandered around and stopped at the Black Lamb https://theblacklamb.ca/ They have lots of wool but not the right brown so I got a piece of Black Felt (it’s more than prefelt but less than felt) It is thicker than the prefelt or felt you typically see. In the picture, it looks like there are lots of white hairs in it but that is just what it picked up in the stack of prefelt. I think if I run the lint roll over it, it will be good. They also gave me a size 40 spiral needle to try out.
Then after doing a full circuit of the room just to the right of the entrance, there was Farfelu Fibreworks https://farfelufibreworks.ca/ and she had the perfect brown. It is a little darker than it appears in the picture but lighter than the pencil roving in the picture with it.
It is Finnish wool so I was surprised at how soft it was. I asked her later and it is a lamb fleece. I asked people at the guild social to guess what it was I got superfine merino, alpaca and angora as guesses. I will have to see how it wet felts as well as needle felting. I think I will be wanting more so naturally she lives on the other side of the province. Oh well, maybe we can get her to come for our guild Sale and Exhibition in November.
I have been thinking about my spring tree for the 2nd quarter challenge. I have decided I will not try to make my tree a real tree but an imagined one. That will give me more scope to play. I did some thinking and the best way to show flowers will be to do a close-up of a branch. I did some sketching on my pad for that. I am not a very good drawer but I think it’s not a bad branch.
I’ve decided I want some long, hanging flowers.
Next, it was off to the internet to look at long, hanging flowers. I think I know how I want to do them.
Then I had to have a good rummage to find the felt I used last time. How do things become lost so quickly? Well, I know really, I don’t put things away. 🙂 I did find it, and some felt I had forgotten about. I will try not to lose it again. It is just a white rectangle at the moment. I am trying to decide if I leave it that way or if I felt it light blue for the sky. I am not sure.
That’s as far as I am at the moment. We are working on clearing things that don’t belong out of my studio. I need to rearrange in the house, to get another piece out. Another job for the list.
After some final fiddling with the width of the trunk and shadow and adding a little red bird for interest, I decided I am done with the winter tree.
Next is spring so I have to figure out what kind of tree I made. I wasn’t thinking of a particular tree when I started the experiment in making a tree. Here is the original tree experiment post. https://feltingandfiberstudio.com/2023/02/22/an-experiment-thinking-about-the-year-long-challenge/ After doing some picture searches I think it is most like an Oak tree. The other option was a Maple but the bark on a Maple is quite grey and Oaks have much more brown and textured bark. Naturally, neither of these makes the kind of flowers that pop into your head when you say tree in bloom. They make droopy green (sometimes red) tassels. Maples make maple keys and Oaks make acorns. What kind of tree do you think it is? I may decide it is a fantasy tree so I can make blossoms anyway. What do you think?
The other exciting thing Jan told you about too. I got my Package from Georgia (Russian Federation whether they like it or not).
Here are some unboxing pictures.
I was surprised it was all assembled. Jan had some assembly required with hers. The other fun thing is it is purple and has a cute little bee. It has 4 what look to be size 36 felting needles in it. It holds 4 of them.
Purple and a bee are all very well but how does it work? It took a little experimenting on how where to hold the machine in relation to the felt surface to get the best felting. It worked well but it is hard to engage all the barbs on such a long course needle. We decided to switch out my big needles for one of the smaller crown needles. This also helps with a comparison of Jan’s machine to mine as hers only holds one. I like it. It is bigger than Jan’s and I like hers too. I like the Chinese one the least. A lot of that is the way you hold it. It is a much slower machine and we all know that patience is not one of my stronger qualities. One thing I would recommend is that you get an awl or sewing stiletto or something similar to use to hold new fibres down so you are not getting your finger so close to the machine. Unless you have long talons like Jan for doing such things.
In this last picture, you can see how much ( the white fibres) gets punched through when you fully engage all the barbs of the large 36 triangle needles and how big the holes are even when you only engage the first barbs( yellow fibres).
You will get to hear about the rest of the testing later. Jan is making a chart and doing some analyzing of data. Better her than me. 🙂
I picked a piece or felt I had and added the sky and snow backgrounds. I used 3 shades of natural white wool for the snow so that it wasn’t so flat. I used Merino, Corriedale and something strong and shiny. the shiny wool may have been BFL or even Mohair.
Then I started working on the tree. I worked on a separate surface so as not to disturb the background too much as it is only lightly needle felted. I decided to work in two layers for the tree so this is the darker back layer. I started by just fluffing it up and then using a knitting needle to move fibres around to get a better tree shape. then gave it a dry felting ( just flattening and wiggling it a bit so the fibres stick together) to move it onto the background.
I picked a redder brown for the second layer. I forgot to take a picture of it when it was separate. I must have been in the felting zone. I put the tree slightly off-center. I tried it in the middle and I didn’t like it.
Here’s a close-up so you can see the 2 layers
I poked the tree all over to tack it in place and started fiddling with the roots, so it won’t fall over in the wind.
and some more snow
And that was as far as I am right now. I will probably fiddle with it more before wet felting it and then fiddling more, of course. I am thinking of adding a shadow but not sure how to tackle it. I am not sure where the sun is. I may have to go out to the field and look at shadows.
Have you started your tree challenge or maybe you’re going with making something useful or both?
We would all like to see photos of challenge pieces and if you are unable to upload photos directly onto The Felting and Fiber Forum ‘studio challenges’ thread, then please use the link below.
One of this year’s challenges is divided into the 4 seasons. A tree in each of the four seasons. Now I like evergreens so I could have cheated and made the same identical evergreen 4 times but thought that was a bit too easy. I had seen online someone say they had been shown how to do a tree by Andrea Hunter, Creating Felt Picturesblackwells.co.uk/bookshop/product/ It’s a great little book. What I saw was just a picture of the finished layout. I thought I can figure that out. That was months ago. On Monday I finally gave it a try.
Monday was a Holiday here, so I gathered up my supplies and headed into the guild to meet Jan. We were going to do our felting machine comparison so she could blog about it and I wanted to try making the tree.
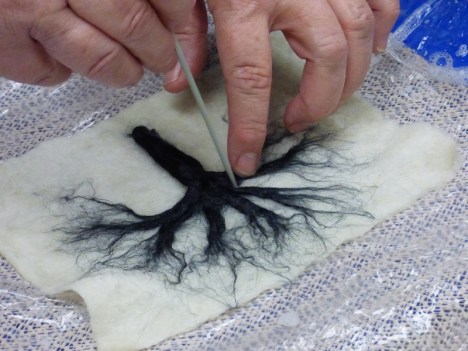
I brought a new rolling mat I had just picked up because it had a nice little lip to help me keep things dry. I was not going to need a lot of water. I used some prefelt for the background and some black merino for the tree.
I decided to do the first one quickly and without any fiddling around. I just held the trunk portion firmly and fluffed out the rest. Part of what I wondered was: would the rolling cause movement that would make some thicker branches?
I think it would have been better if I had taken out the two blobs in the branches but I was quite pleased and if I would going to lay some green over it to make a summer tree it would have been fine.
Finished, wet
Finished dry
Next, I tried wetting the prefelt and the black wool to see if it would spread out any better but it was so terrible I just pulled it off and tossed it before I even started. It would make a good start for a flower.
I squeezed most of the water out of the prefelt and got some new black. I also grabbed a knitting needle to manipulate the wool. the wool picked up moisture from the wet prefelt and that made it easier to have the wool stay where I wanted it.
This is much better I fiddled around with making bigger branches and trying to make it look less like a small child drew it. I was quite happy with it and decided to add a little mixed brown wool for some texture and Jan suggested adding a thin haze of green to give it a spring haze look like just before the trees get their leaves.
I am quite happy with how it turned out. I like the way the thicker trunk area kept some of its 3dness( I am sure that’s not a real word) You know, they stick up a bit. The trunk needs work but I think this will work well for the challenge. Now I need to go shopping for some brown wool or I need to get on with some dying. I have almost nothing in the way of brown wool.
Finished, wet
Tree finished, dry
Oh, and since Jan is always posting pictures of me I thought I would share one of her in her octopus hat at the Chesterville Spin-In a few weeks ago.
I have finally finished my stitching. I think it is definitely slow stitching. last time I had done a practice branch to see how it would go. /2023/01/13/stitching-some-trees/
I wanted to add some snow but felting onto the cotton wasn’t good. and yarn didn’t look right. So I thought, why not make it on some felt and then you can needle on some snow. The branch worked out really well. I do love stitching on felt.
Then I tried to add snow. Nope, it looked terrible. Sorry, no picture and no snow. I was a bit discouraged and was going to give it up as a bad job and then I thought I’d come this far, I should finish the piece.
And here is the finished piece. I used an app that takes out the real background and then you can add a nicer background.
All in all not a bad project with no real purpose other than to slow stitch. I had thought I was doing part of the first quarter challenge but on re-reading it I see I should do the same tree in each season and using an evergreen seems a bit like cheating. I have another idea. I saw a picture of making a tree that looked like it would work well so I am planning to give it a try. so hopefully soon I can show you.
And one last thing as it is valentines day in a couple of days I made a heart.