Browsed by
Month: May 2022

Second Quarter Challenge – The Bird Bath

Second Quarter Challenge – The Bird Bath

Annie and I were having lunch and looking out into the garden where a pigeon was having a good soak in the bird bath …

… and Annie said “he needs a rubber duck” and that’s how inspiration struck for the second quarter challenge!

I decided on a cartoon-like picture because the idea is funny 😊. My plan was to make a simple picture in the form of a ‘jigsaw puzzle’ of nuno felt shapes.

I inserted the photo into a word document, stretched it sideways a tad, then printed it as large as possible on my home printer – 29cms (just under 11½”) wide. Then I traced the main outlines and added the outline of a duck.

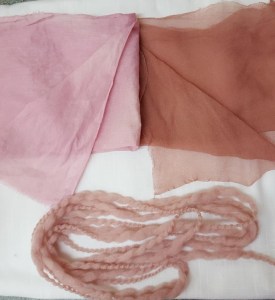
First the difficult part – choosing the fabrics to make nuno felt!  I have many boxes of fabric to sift through so it was a mammoth task – here’s just one box.

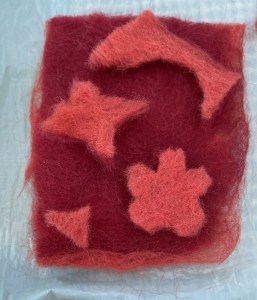
And a couple of days later, here are eight nuno felt pieces.  I made two for the pigeon (top right of photo) because I couldn’t make my mind up about which fabric would work best.

I made a tracing paper cut-out so that I could mark then cut the main outline from the green nuno felt – unfortunately I lost the curve at the end of the pigeon’s beak during cutting.

I put some baking paper on my ironing board then a piece of heavyweight iron-on interfacing (slightly smaller than the green nuno felt) on top of that with the sticky side up.  Then I put the green nuno felt on the top.

I used the freezer paper method to cut out the shapes for the bird bath, duck and pigeon then simply inserted them in place.  (See this blog post for how to use freezer paper to cut shapes from felt https://feltingandfiberstudio.com/2021/05/09/key-dish-and-pot-plant-mat-1920s-style/ )

Once everything was fitted together, I realised I’d made a mistake.  I hadn’t put a board under it to flip it over to iron the backing on (the felt wouldn’t allow enough heat to reach the iron-on interfacing so it had to be ironed from the back).  So I took a deep breath, grabbed hold of the baking paper and flipped the whole thing over.  It worked!  I ironed the interfacing to the back of felt and all the pieces were held firmly in place.

I pushed some thin, black darning wool in the teeny gap between the nuno felt pieces to make an outline – I used a ‘blunt’ needle that is designed to sew up knitwear to push the wool right in.

When I’d finished inserting the black wool I thought it looked too ‘heavy’ so I pulled it out from around the pigeon and duck then replaced it with thin, blue darning wool.

I stood back to look at the picture – what had I been thinking – the birdbath was ’floating’ on the background like a flying saucer!

It needed its stand, as in the original photo.

I cut a stand shape out of the green nuno felt then filled it with a piece of dark blue nuno felt.  I turned the whole piece over and put a patch of iron-on interfacing on to hold the newly inserted piece of dark blue felt.

I wanted to put some detail on the pigeon and I experimented with sewing but it didn’t look right.  So I simply drew a few feather details onto the nuno felt with an indelible black laundry marker pen.

I needle felted blue darning wool to make the rim of the birdbath then needle felted the duck and pigeon eyes directly into the nuno felt.

When I made the green pre-felt I wasn’t tidy with the edges because I had intended to trim it, but in the end I decided that it looked good with rough edges so I left them as they were.

Here’s the completed picture.  The photo below is very true to the actual colours of the nuno felt – unlike some of the process photos above that were taken in varying light conditions!

I put the textile picture into a glass fronted clip frame to hang on my wall.  Job done!


If you’d like to take part in the second quarter challenge, it’s now very easy to upload your photos – just click on this link –  https://feltingandfiberstudio.com/community-photo-submissions/

And should you wish to write a guest blog post about your fibre work, please contact Ruth Lane through the ‘Felting and Fiber Forum’ – https://feltandfiberstudio.proboards.com/


Drum carding to blend and mix

Drum carding to blend and mix

The spring destash was going to provide me with a lot of winter combings from spinning projects.  I comb long locks and keep the residuals for this purpose.  I also have left over bits of prepped wool that wouldn’t fit on the bobbin, plus samples and other miscellaneous interesting fibers. These are set aside and kept in the black hole loving referred to as ‘the safe place’ only to be discovered once a year during cleaning.

The weather was absolutely gorgeous and it was time to take full advantage of what spring can be to drum card outside after what was a disastrous weekend for so many people in this area.

I pick through the different colours and group them in ways that work together.  I liked the way the green, purple and blue shimmered in the sun, so started working with that blend first. 

Once through the drum leaves clear definition of colour and texture of some of the locks.

There is extreme inconsistency between the two batts and they need to be divided and put through the drum carder again to even out the blend.  I weighed them and was pleased to find they weighed 36.5 gm and 37 gm, so splitting them would work perfectly.  I split them and reweighed the bundles and found they now weighed 38 gm each.  Think I might need a new scale, but close enough for right now.


Twice through the drum and the blending is a bit more consistent, but not so much that the locks are getting taken apart.  I can still see one or two bits in the blend, so that’s good for these batts.  They are an overall single colour, but you can still see the individual bits that go to make the whole picture.

I tried to use two different terms here, mix and blend.  For me a mix is a thorough incorporation of the different fibers into one homogeneous mass. A blend is a more gentle suggestion that the fibers and colours work together, but remain individual.

The next batt was a mix of red, blue and purple.  This had bits of different breeds of wool; some merino, some suffolk, some unknown, as well as some silk in red and purple which will give a slight shimmer.  I really wanted to thoroughly mix the colours the way I would mix a dye to get a homogenous result.  Sounds easy enough, but it’s not.

This is the first pass through the drum to show how the colours stand out from each other.  The purple is gone, but the blue and red are clearly defined, some of the silk is blended, but some was very difficult to mix in.

After five passes through the drum carder I had to take a break and modify my standards; this is not the result I wanted, but it will have to do.  I enjoy seeing the colours that compose the overall result, but I wanted a thorough mix just to be able to say I did it.  The wisp of fiber in the center is for contrast to show the before and after of mixing.

There were also several bits of noils and knots some roving that was left.  It was piled into the drum and run through just to see if anything interesting would pop up.  This is really bottom of the sink sort of colours.  I was really pleased with the result!

Reminded me of the Prairies in the spring with crisp blue skies, dry grass, pink clouds.  I might need to take a class from Ann on how to do landscapes in felt.


Throwback Posts: How To

Throwback Posts: How To

Jan has still not got any power/electricity at her house so I am filling in with a post. We have a menu item for tutorials but not all our ‘how to’ posts are included. So I thought I would bring your attention to some of the past posts that are mini tutorials. Enjoy!

How to make a felted bangle bracelet.

How to make prefelt.

Felted Cat Cave

How to Ice Dye Fabric


Stitching a Felt Kindle Case

All about felting needles.

Making Felt Balls in Bulk

Influencing Shape with Prefelt

Textured Felt in the Washing Machine

Making a Felt Feather

Felting Soap

Dyeing with Avocado Pits

Tips on Beading

Color Mixing Wool

Bubble Hat

Batch Editing in Photoshop

Transferring Photos with Matte Medium

Felt Scrap Bowl Tutorial

Degumming Silk Throwsters Waste


I hope you enjoy all the posts and hopefully, there are some that you haven’t seen yet. I am sure that I probably showed a post or two that’s on the tutorial pages but I got carried away looking at old posts. It’s funny how you don’t remember what you posted about!

Another small picture

Another small picture

I am still all packed up so decided to do another small picture. This one is 3.5 x2.5 inches. I wanted to do a sunset. Step one google sunset pictures in the public domain. Well, that was disappointing. It seems that the popular configuration is oversaturated with the blinding sun dead center and if there is anything else in the picture it is a black silhouette. I was looking for something more subdued with lots of colour in the sky but with colour still in the landscape. I tried adding qualifying words to my google search but it didn’t help. I just kept scrolling and scrolling. The further away from the top hits the better it got. Sometimes page 5 has better pictures than the first page.


I started with this small piece of offcut from a long-ago project. I think it was a little bag.

I decided to go with my imagination rather than an actual picture.  Drew in the horizon, the lake, the hill and an indication of trees. I knew the trees would disappear under the sky so not much point to that.


I added some sky using 2 shades of blue.  I used 3 shades of orange and a little white to do some nice sunset-kissed streaky clouds in the sky.


The water was next. It is a combination of Prussian blue and navy.


I added the grass. It is antique, olive green and a puter/brown colour. I was thinking of late in the year when the grass turns golden. I carded the colours together but not too much so I would have some nice variation.


Then I added the cloud reflection in the water.

I wanted some trees on the ridge. I want the ridge to be in the distance with the trees striking up a little. I don’t like them. they look too much like they belong at a Christmas tree farm, so I took them off.


Next, I tried mixing some shades of green and then drafting it thin. I told it in my fingers to give it some cohesion and needled 3 trees on the ridge. I like these better but am still not sure. I think I probably just need to not look at them so closely. The thumbnails that show along the bottom of my photo editing software look better than the big picture but it’s twice as big as the actual picture so it shows too much detail. I would like to add more trees but not sure it won’t just end up looking like a green blob. I may leave it and more onto the flowers in the foreground. Any suggestions for the trees.


For the next one, I hope to go bigger. I always want to add too much detail and it’s just not possible with a small picture.

And one last thing, a cute thing. This is Storm. He was born on Saturday. we have no idea who his mom is. Perhaps the storm spooked her.

We had a huge storm in Ontario it took out power to most of the south of the province. We were out for a little over a day. Many people are still out. You may not see Jan in 2 days. It hasn’t been like this since the Icestorm of 1998. At least the weather is better for this one.

here’s the outage map the darker green is the area the hydro company covers and all the dots are the numbers of outages in that area. London, Toronto, Hamilton and Ottawa have separate hydro companies but they all have huge outages too. if you follow the link you can zoom in and see different areas.

https://www.hydroone.com/power-outages-and-safety/stormcentre-outage-map?bodyOnly=true/


Road Trip Inspiration

Road Trip Inspiration

The second quarter challenge is all about finding inspiration wherever you might be. We recently took a road trip across the US, spent a week in New York City and then drove home again. I hope you will indulge me and take a look at a few of the inspirations I saw on my trip.

Here’s a map of the trip which covers approximately 2,500 miles. The red bit at the end is the trip on Amtrak from my sister’s house in Richmond, VA to NYC.

This was a photo I took coming across the US. I think it might be in South Dakota but I have forgotten where exactly.

Edgar went with us and although he is supposed to stay in the back seat, he loves to look out the windshield to make sure we are going in the right direction.

It was amazing to see how many plants and trees were blooming as we got closer to the east coast. I think this photo was taken in Indiana or Illinois. The redbud trees were blooming all along the highway.

Once we got to Richmond, we took the Amtrak up to New York City. Penn Station was a real mess when we arrived, they are doing a massive construction project. We had a bit of an issue figuring out the correct subway, the one we thought we should take was blocked off due to construction. We had a great adventure walking in the rain, hauling our suitcases and bags for 20+ blocks.

One of our first adventures in NYC was to visit the Brooklyn Botanical Gardens. In the past, we have been to the NYC Botanical Gardens but this one in Brooklyn is beautiful and well worth the visit. I spared you all the photos I took there and just shared the highlights.

After lunch, we decided to visit the Brooklyn Zoo since it is in the same area as the botanical gardens. It was a beautiful day to stroll outside.

If you haven’t been to NYC before, you might not know about all the wonderful mosaics in the subway stations. This is one I hadn’t seen before.

Another fun side trip was taking the ferry to Governors Island. It’s only a short 7 minute ride but it takes you right out of the city. You can even go “glamping” there!

If you were wondering about Edgar, he didn’t go to NYC with us. He stayed with my sister’s neighbor. Here’s a photo she sent of him watching out the window at her house.

Here’s Times Square where they had an installation about design. The metal structure on the lower right was an interesting addition this month. And of course, you can always entertain yourself with people watching.

Walking through Central Park is another fun source of inspiration. We always end up doing a lot of walking when we’re in the city. We also visited a couple of museums but I didn’t get any photos. I did do some research about ancient felt making patterns at the Met’s Museum Watson library. If you ever get a chance to visit the library, I highly recommend it.

We returned on the train to Richmond and then took off on the way back to Montana (another 2500 miles).

Edgar is watching me on the morning we were leaving my sister’s house to make sure that I didn’t leave without him.

The last couple of trips we took across country, we took our camper but this time we stayed in motels. I have decided taking the camper is the best way to go.

If you have been in a South Dakota rest stop, you will have seen one of these structures. There is even one of the rest stops with a statue entitled Dignity that you might want to see. I didn’t get a photo this time as there was construction around the statue. But you can click on the link above to see it.

The next step with these inspiration photos is to come up with some ideas for a sample for the second quarter challenge. Which photo inspires you?


My Second Quarter Challenge Piece

My Second Quarter Challenge Piece

I actually had a plan for what I would write about in May. I planned to circle back, to my crocheted hexagons; discus finishing options and show some new color fun I have had. Then Porter, our 6 month old [Bernese Mountain] puppy delivered his latest woodworking project to the patio door. It was a perfect specimen for the second quarter challenge; “look at what is right around us, and make something.” I shot a couple pictures, of Porter and his woodworking pieces.

Porter and the Original Piece
Cherry Wood Specimen

I was planning to use the “tree knot” in the first photo, but my wool selection wasn’t right. We gathered all his dropped pieces on the patio table and found the perfect replacement: a piece of cherry wood from a previously removed tree. The colors were perfect with the wools I had to work with. I got my drum carder set up, and went to work, blending shades. The batt colors came out better than I expected.

Drum Carder and Wool Batts

I hoped to wet felt a piece that resembled our patio table. First I laid out the gray batt [top left] for the backing. In the opposite direction, I laid the batt blended in the colors of the table. [bottom right] I added wisps of additional colors in areas. Last, and to my regret, I added a brown Alpaca/ CVM yarn for grout lines. I wet it all down with soapy water, covered with fine mesh, and rubbed gently. After a few minutes, I removed the mesh, and replaced it with a second piece of bubble wrap. I flipped the piece over and rubbed on the back a little. The toothy wool was already attached fairly well. I placed this bubble bundle on a bamboo mat, and began rolling 25 times in each direction. When I checked the piece…ugh! I failed to think about what shrinkage would do to those grout lines.

Wonky Lines

Straight lines when felted go wonky! I should’ve thought to needle felt them in later. I look at all these situations as learning opportunities; and I won’t forget this lesson anytime soon. Overall, I am very pleased with my background attempt. All is not lost, I will store the piece away, and cut it up for other projects. My felted cherry wood piece, on the other hand, was a happy surprise! I have done some needle felting, but none of my 3D pieces, turned out the way I hoped.

I started the wood piece, by making a very tightly rolled snake, and stabbed at it only enough to keep it together. I rolled it together between my palms, and once it meshed together, it was longer than needed. I decided cutting the wool snake in half, and placing both halves together, would get me closer to the girth required. I used my 38 star needle to felt the pieces together, then rolled that up tightly, in another piece of the batt.

Needing to create a small protruding piece, I rolled some scraps together, folding in half as before. I stabbed the little piece to the lower part of the twig. Then to hold everything together and create the inner coloring, I rolled the whole piece in a brown/tan batt, splitting the fiber when I came to the knot. This is what it looked like:

Wool wrapped twig piece prior to Felting. Shown with the real piece of wood.

At this point I turned exclusively to my felting needle: felting around, and around, up and down the entire wool twig. Every once and a while, I made a series of stabs, on either end to begin shaping. Once the piece was good and firm, I applied a nice layer of the rusty/blue gray batt I blended with my carder. (photo 1, below) I needle felted the fiber in place, concentrating my attentions on the blue gray, and rust areas. (photo 2) I was really happy with my (accidental) blending capabilities. Lol:-)

1. Blended Batt 2. Initial Felting 3. Knot Area 4. Final Result

I used some brown alpaca yarn, to enhance the area under the knot. I continued to work on either end of the twig, using some lighter bits of wool. I stabbed some deep lines, coming up from the bottom, and tried to add a bit of realness to my specimen. (photo 4) Overall, I am really pleased with my felting experience, this time. I don’t know what I will do with my felted twig, but in the meantime it will hang out with knitted gnomes and the “As You Wish” sprite creature I created before the pandemic.

Gnomes and Capi’s “As You Wish” Sprite


Community Art Installation

Community Art Installation

I was asked by my local community arts centre to run a felting workshop to contribute ‘something’ to a community art installation to celebrate Queen Elizabeth II’s forthcoming platinum jubilee.  The wonderful Horsebridge Community Arts Centre in Whitstable is creating a ‘tea party with a twist’: everything will be hand-made and not necessarily from the usual materials.  Think papier mâché teacups and crocheted sandwiches.  The Horsebridge received a grant from Arts Council England to create their installation which meant participation was free but I would get paid to run the workshop – a win-win!

I mulled over what the ‘something’ might be and decided to run a workshop making wet felted flowers as table centre pieces.

I decided early on to take my colour inspiration from the Commonwealth flag – royal blue and golden yellow. This would reduce the choices people would have to make (which often take a long time!) and would be a change from the red, white and blue of our national flag.

I’ve not made flowers before so set about designing something that was as simple as possible to make. The creators were unlikely to have any felting experience and we were going to do this in 2½ hours – both demonstrate and make.

By now my friend Sue (a ceramicist) had agreed to run another workshop making slab pot vases for the flowers to sit in, so they needed to stand in a vase. I took some wool away on a trip with me and started trying out designs.

Prototype One: a loopy sort of flower made by laying out 5 separate petal shapes of wool (herring-bone style layout) then felting them together with a little wool in the middle.

I thought it was OK but getting the petals even was a little challenging and we’d have to use wire for the stems. I wasn’t sure they’d sit very well in vases and I generally thought I could do better, so moved on to my second design.

Prototype Two: I liked this a little better. It was laid out in a flat circle and the petals were cut part-way though fulling. It seemed pleasingly tulip-shaped. I wasn’t content to settle quite yet, though, as I had a few other ideas to try out.

Prototype Three: a more complex design laying out one larger circle of wool then covering it with a circular resist with a hole in the middle and laying out a smaller circle of wool on top of the resist, ensuring the two layers joined together through the hole.  Not surprisingly, I realised that this was going to be way too complicated to create in the time available. The fulling took a long time. I did like the blue edging on the petals though so carried this through to the next sample.

Prototype Four: I wanted to try adding a felt rope stem so it would sit nicely in a vase without using wire so needed a fairly simple flower shape if there was going to be time to add the stem to the design.  I made a felt rope in blue, keeping one end dry and fluffy to attach to the flower head.  The head was laid out in a single yellow layer, radiating out from the centre, in a similar way to prototype 2. I joined the stem as I wetted down the wool and covered it with a piece of bubble wrap with a hole in the middle for the stem to poke through.  This would prevent the body of the stem felting to the flower.

Once the flower and stem were at prefelt stage and the stem was securely attached, I picked up the flower by the stem and rolled it closed, mostly between my palms, to shape it into a 3D rather than flat flower.

Yes, this seemed just about do-able within the time and was reasonably simple for inexperienced felters to make.  If anyone ran out of time they could skip the petal-cutting stage and make a cone-shape flower so they wouldn’t have to heal all the edges and shape every individual petal.

By the time I got back to my studio the right coloured wool had arrived, along with some yellow tussah silk.  I already had blue and yellow nepps so I could set about refining my prototype.  A few design changes: I decided we’d run a second layer of wool just around the outside of the flower head circle as this would give the petals a bit more body.  Second, I’d add add nepps to the centre and a few strands of silk to the petals. Here’s the new layout.

And here’s the finished flower: advanced prototype 4!

Yes, I was pleased with the improvements and fairly confident the flowers would sit comfortably in their vases. I parcelled out the wool, nepps and silk and gathered together all the equipment ready for the workshop. It took a while!

Normally I teach a maximum of 8 people at a time but as this was a small make I rather recklessly committed to 16 – thinking I could have 2 people per table. Not a problem until I started to seek out 16 towels and 16 mats…..but it seems my hoarding tendencies came good! Cutting out 32 pieces of bubble wrap (16 of which needed a hole cutting in the middle) and 16 pieces of net started to feel like I was on a production line. Happily, though, I got everything together just in time for the day of the workshop.

Here’s the teaching room at the Horsebridge with everyone setting to work – a lovely light, airy and spacious room with people well spaced-out.

A couple of work in progress shots

And lots of happy felters with their beautiful creations.

The workshop seemed to go well and we produced plenty of flowers to add to the installation. I made sure people took photos of their own flowers as they can collect them after the event, if they want to.

Here’s most of them gathered at the end of the workshop.

Lessons: we needed more time! It’s hard to estimate how long it will take to demonstrate something and for people then to make it.  I’d opted for 2½ hours but with hindsight should have gone for 3.  I’ve left myself quite a lot of ‘finishing off’ to do – to make sure stems are firm enough for example – before the flowers go into the installation in early June. I could wrap the floppier stems in florists wire but I’d prefer them to be fully felted. It also took me way longer than I’d realised both to develop the prototypes and prep all the materials. Happily I was able to put the time in and I’m now fully ready for any future flower felting opportunities!

The installation is from 2 June and I’m really excited to see how it all comes together and how the flowers fit in. I took part in a couple of the other workshops: making slab pot vases and monoprint doilies. There’s something really joyous for me in taking part in a community art project and the Horsebridge have done a wonderful job in involving lots of people in the installation. As well as a series of workshops, they’ve sent out lots of making kits for people who can’t get to the centre to make things and worked really hard to involve lots of different members of the community. If you’re interested in the end result I’m sure the Horsebridge Arts Centre will post photos so here’s a link to their website. https://thehorsebridge.org.uk/ and a big thanks too to Arts Council England for providing the project funding. https://www.artscouncil.org.uk/.

Felted Iris Flowers Part 2

Felted Iris Flowers Part 2

Last week we got the petals to the point they were firm and reasonably thin. As I promised let’s look at the new equipment I am about to use.

I ordered a felting pad for ironing. it is a little firmer than the white felting mat I was just trying out. I also ordered the clover craft iron II (with accessories). I spotted it on at a lower price than I had seen it in previous weeks so ordered it. Checking on the day it arrived it was up in price over 10.00, while today the price is back down to 2.00 more than I got it for! Prices are acting very strangely lately.

Let’s look at the Felt Ironing Mat first.

23 Wool ironing mat “14″x14″ Wool Pressing Mat for Quilting”

Yesterday I found out some felters are using these ironing pads as felting mats. Ironing mats, (about .5 inch thick) are thinner than the 1 to 1.2 inch felting mats. The ironing pad is a bit firmer than the white felting mat. It arrived folded, with instructions that include “do not fold”. If I use it as a chair pad I will likely flatten it quickly, but I tried it in its present state. It is about half an inch thick. I measured the white wool mat at about an inch thick. The grey wool mat was about an inch and a quarter. (See Photo below)

24 comparing thicknesses

25 (Ironing mat, White wool mat, Grey wool mat)

I did a brief test with the bad sheep picture. This would let me check the end feel of the needle entering the ironing pad, which is quite resistant but does work.

26 needle test of the ironing felt mat

I suspect using the ironing mat may increase the strain on the arm/wrist/finger muscles with prolonged enthusiastic (stabbing) use for felting. I do not like ironing except for before sewing projects, so I am unlikely to injure myself using this as an ironing pad. This thought may come back to haunt me……

The Clover mini iron II and accessories came with a lot of instructions and diagrams. i read them over when they arrived then put everything away in a nice little box.

27  Clover Mini Iron II

28  I found a plastic box at Dollerama to keep the Iron and its attachment options in.

The iron is usually used with appliqué by quilters. The various attachments will get into small corners and the ball attachment will accentuate dishing shapes. The Iron is designed to flatten and smooth the surface of the felt, more like the commercial hot press felts.  It may be interesting to try starches or misting with this too. (oh no a distracting thought escaped!)

There are other similar-looking devices which are used for Auto body repair and another for taking wrinkles out of leather goods (shoes, bags etc.). Check the temperature range on each type, you don’t want to scorch your felt.

One last thing to remember about the mini iron, from what I have read online, it is very important to keep the iron rest, (the plastic and wire thing that supports the iron tip), somewhere you will not lose it. I read many warnings that this part can mysterious disappearance and happens frequently.

Tiny Craft iron time!

Ok, now I am ready for the next step that I skipped with the prototype.

 29 I plugged in the iron and waited for the iron to heat up

After a couple of minutes, I tried it on the prototype. Hum it doesn’t seem to be hot yet. The wool is not warm? I wonder if it’s working? Did I get a broken one? Let me check…Ooops! OWW! No, it’s hot now.

30  I guess this means the Iron is not broken. Owwww.

I carefully ironed each petal, first the prototype then the new petals I had made. There was a bit of thinning visible. I will have to try pressing a bit harder but i didn’t want to scorch the wool. Next flower I will try to get a wire that is closer to the petal colour since the black and green floral wires are still slightly visible, at least in the photos.

31 Carefully ironing the petals

I took them in to show Ann on Library day. It was not as busy as we had hoped so Ann got her dry felting experiment done and I showed her skinny petals.

32-33 Ann inspects the thinness. She said she had not anticipated them to be so firm.

There was one more step I had skipped in the instructions for making a rose from Tjarda’s Workshop.  She had very carefully trimmed any fluffy, flyaway edgings on her petals. I recently purchased a few more variations on curved bladed scissors. I selected one with a short curve to the blade that seemed to fit the petal and started trimming. I think I was a bit more enthusiastic than Tjarda but did get all the fluff removed and smoothed the curves.

34 trimming the edge fluff

35 close up of scissor blade curvature

36 Here is a before (R) and after (L) petal.

After trimming, I tugged gently on the edge of the petal to give a bit of the frill. The tugging is along the length of the edge.

The next step will be adding the last details to the iris petals and then assembly! But that will be another time, I have a bit more library work to do. So, while I am off doing that I hope you are enjoying spring and getting a chance to have fun felting.

Update; we seem to have had a week of mid-summer weather (not so good for the spring flowers). This weekend we made a trip to the first biggish Fiber Festival which was only a 3-hour drive away in Peterborough Ont!  It was so good to be able to feel fibre in person! if you are interested I took a few pictures (121 actually) but promise I won’t inflict them all on you! I am sorry I did not get a picture of the beaver we saw sitting in the grass beside the highway (i was driving) I thought it was only a groundhog as we approached but saw the distinctive tail as we passed. What a fun Saturday! I hope you are enjoying your weekend too!

Using My Prefelt

Using My Prefelt

Having made the prefelt without needles or water it was time to try using it. here’s the post about doing that: trying-out-a-new-way-of-making-prefelt/ I cut a small square ( 2.25 by 3.75 inches)  and added some cut bits to the top.

Even though as a whole piece, it had been very sturdy, The cut pieces seemed fragile. I wondered if it was because they were small. I decided to try a bigger piece( 3.5 x4 inches). I folded a smaller piece to cut a flower shape and popped it onto the prefelt square

I thought I should try it on a loose wool layout.  I laid out 2 good layers of wool and added some prefelt to the top (4.5×7.5 inches).

I put them on some plastic on a rubbery rolling mat. I did some rubbing but not a lot as I prefer rolling. I had started to wet it when I remembered to take a picture.

This is after one set of rolls, you can see they already look integrated. the small piece looks like the shapes have really blurred.


I rolled it twice more, no more than 50 rolled back and forth each time.

I don’t think it looks very different. The prefelt defiantly incorporated into the prefelt backing and loose wool backing.

Here are the prefelt on prefelt samples after drying


the small pieces lost all semblance of shape. I think they were just too small. the bigger piece faired much better. There was almost no visible migration of fibres on these, even on the back.

The loos wool worked well the shapes stayed better even the smaller ones. They are visibly thicker, a little puffy. I don’t see any migration of the background up through prefelt.

On the back, you can see the outlines of the shapes. the shorter cut fibres of the edge migrating. I have noticed this with regular needled or wet felted prefelt too.

None of these pieces were properly fulled. They have just begun to shrink. The migration may have been more on both sides and with both backgrounds if they were properly fulled but I ran out of time to do that if they were going to be dry for final pictures.

All in all, I would say it’s a faster and easier way to make prefelt than needling or wet felting. I don’t think it would work for cutting intricate designs but they just maybe my bad cutting. I don’t think the commercial stuff works well for intricate things either.

I did try peeling the layers like you can with the thicker prefelt.  It worked ok in the thicker parts but wouldn’t come apart at the thinner edge. A more consistent layout might solve that problem.

Remembrance

Remembrance

I promised after I made a small poppy piece for the first quarter challenge repurposing a piece of nuno felt, that I would make a bigger piece in the same style.

This piece is large, somewhere in the 30″ length and 18-20″ width. This is the layout and I have sprinkled the cut up orange nuno felt over the base layer of green wool. I made sure that the orange bits were roughed up so they would stick down better.

Here is the piece after felting. I have pinned some larger poppies in the foreground made out of painted silk paper. I was distracted by the yellow in the direct center in the sky. I decided to add more yellow so that the one area wouldn’t stick out as much.

I needle felted some yellow across the left portion of the lower sky and a few wisps up higher. I also added some lighter/paler silk paper to the poppies as I felt they were too dark in the first try. Then I added some green locks to the foreground for foliage.

And here it is after finishing and “matting” on green fabric. Now Remembrance is ready to go the framer. Now I just have to find a new gallery to carry my work, easier said than done.