Browsed by
Author: heirloom51

75th Anniversary Events

75th Anniversary Events

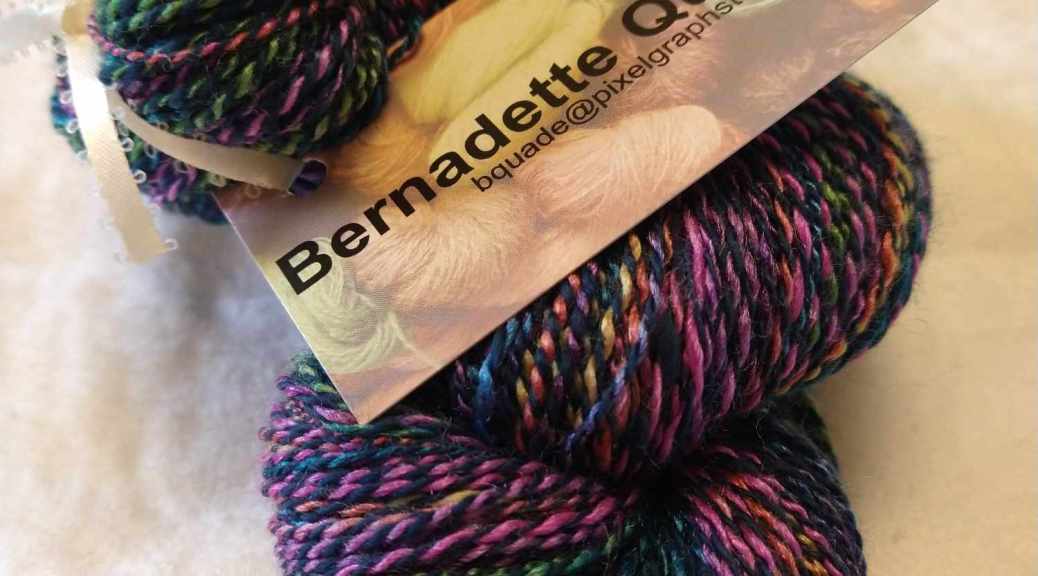
As some of you know this year has been the 75th Anniversary of the OVWSG.  One of the events has been a monthly destash for guild members.  This is beneficial for members on so many levels.  Those with too much can clear out, while those who want to experiment can have the opportunity to try new products.  I’m in the later group.  One of our most talented weavers was clearing out a huge quantity of singles from a very reputable firm, in colours that I loved.  I pounced on them.

The intention is make a rouana or serape.  I’m starting with a piece that is 45″ wide by 90″ long and will work on finishing edges after it is woven and fulled.  The piece will get thicker and narrower, I hope.

The pattern is a basic twill in one inch stripes, very simple and hopefully showing the great colours.

The loom I’m using is not my own.  We are very fortunate to have access to rental equipment at our Guild and for a very reasonable cost we can use the equipment there.  So I opted to rent one of the Guild’s looms for three months.  This will force me to leave the house to finish this project.  Setting some goals and discipline is a good thing in the winter, right?

Warping the loom is slow going because I lost the cross on one section.  This is very disappointing and will be problematic as the threads are wound onto the back of the loom.  It’s not insurmountable, just annoying.

I am going to have to be very careful here, but I think I fixed the problem on the next few sections with some small innovations.

The bamboo skewers are wrapped on either side of the cross and I can pick the threads from alternate sides to stop them from getting tangled.  This was a real time and sanity saver.  Dressing a loom is a series of steps.  Each one needs to be done with an element of care and thought. From the initial calculations and colour selection, to fiber choices and use of end product, then threading the pattern, tie-up, treadling, and finally weaving. It all takes a bit of thought some more than others.  So for now I have left the colour selection and fiber choice to a very talented member of the Guild,  the pattern is mine, the end product will be a rouana or serape in a twill.  It has been measured and threaded through the reed, next it must be threaded through all the heddles, tied onto the back beam, wound on, tied onto the front beam and I’ll be ready to go.

But I’m getting ahead of myself, next step, will be threading through heddles, all 450 or so.  Heddles are those silver wires on the right.  Wish me luck. I have three months to finish this, so I’m good.

About that ‘groove’ …

About that ‘groove’ …

In April I talked about getting my groove back and trying something new.  Groove, rut, six of one, half dozen of the other, right?  Not really.  I had the opportunity to purchase a large quantity of pre-cut jersey rags from the Guild.  Bright yellow was perfect for a summer project and perfect to get me moving again.

The project is all done.

The final weigh-in is 2.5 kilos or 5 pounds.  Right now it needs to rest for a few days.  The plan is to do some minor repairs because there are always small repairs and then decide what to do with the material.

finished rag weave material

Some of the repairs are very small, just need a clip,

Some need a bit more of a reweaving and inspection.

And some really came as a surprise.  I must have been asleep at the switch with this one, but it’s totally fixable and I’ll take care of it.

Once I had used up all the rag I was left with too much warp thread for me to comfortably cut the threads and I was sure there was more to be made from this fibre. Weavers are known for being economical (aka cheap).  The work needed in warping a loom is significant and I hate wasting the time and the fiber.

So I found a bobbin of deep blue cotton and gave it a try. And I liked it, so now the warp is used not just for rags, but for cotton as well.

simple twill weave for cotton cushion cover

The final product is enough to make a great cushion cover or bag, or table drape, or maybe a project bag.  Lots of potential for this fabric. It’s surprisingly thick just as it sits without finishing.  So once it’s been washed it will be even fluffier and more dense.

finished cotton twill for cushion cover    Hem stitched finished edge on woven cushion cover

I did try hem stitching the edge and found it is not my strong suit.  But I’ll keep practising and someday I’ll be happy with the final result.

For now, everything is resting; me included.  The fibres need to come back into their original shape and that takes a bit of time.  I need to do the repairs and inspection of the final product and tie off all loose ends before it goes into the laundry.  Then I’ll see where I go after that.

I may want to leave the huge 7-meter piece for a display our guild is having this fall at a museum, but I’ll talk to our curator about that first. So many decisions, and so much fun for the next project.   Thinking of doing a linen table runner, never tackled one of those.


Getting Your Groove Back

Getting Your Groove Back

How do the rest of you get your creativity flowing when you have no juice left?  I did a lot, and I do mean a lot, of spinning over the winter.  I played with colours, with silks, with blends, mohair, qiviut, camel, linen, all sorts of wools and nothing inspired me, nothing moved me.  I joined a knitting group to relearn knitting.  The group speak French as their primary language, so that was a doubly challenging.  We have a blast and I have to say I’m still a terrible knitter and still not bi-lingual, but I love their company.  Perseverance might be the only way through this arid spot.

We have started cleaning the Guild space and prepping for destashing.  In the 100 inch loom studio was a very large bag containing rags for weaving catalogne blankets.  These are traditional Quebec coverlets to keep sleepers warm during deep winters.  They are thick and heavy.  They are also quintessential recycle projects since they are made from strips of rags.  I was allowed to purchase all the yellow strips.  These are made from cotton jersey and I loved the colour.

yellow cotton rags to be woven with cotton yarn for table runner

One of our guild members made the happy/sad decision to accept a job in her home city and left here to move across the country to Vancouver.  She generously offered her yarn for sale to Guild members.  I love her colours so much that I violated my promise-to-self of no more yarn in the house. If you closely at the picture below you might spot a little loop of thread laying on the yellow spool.  That is all that remains of the mushroom cotton.  That’s yarn chicken at it’s finest, less than one yard remained on a 500gm bobbin.

All the mushroom, yellow and magenta cotton threads are now measured as a 10 yd warp ready to go on the loom and be woven with the yellow rags.

10 yd cotton warp to be woven with rags alternating with magenta cotton.

The final piece of this little “get moving – get weaving” scenario was a bag of warp spacers for a sectional beamed loom.  These spacers really were the topper because they allow me to do a really long warp on my loom. I have no excuses anymore.  This weekend I just need to put my mind to getting on with it and know I’ll enjoy getting creative again.

Experiment with Inktense Colour blocks

Experiment with Inktense Colour blocks

Just before Christmas, there was a discussion about all sorts of ways to modify colour on felted pieces.  The topic of Inktense pencils and paint blocks came up and they fascinated me. So I decided to give myself a gift of experimentation for Christmas.

The basic box has twelve colours.  I didn’t get the box with white.  This might have been a mistake, but the block is available as a single unit so if the need is evident I’ll see about ordering one.

The blocks are water soluble and can be used the same as any watercolour.  They do not re-wet once dry do can be painted over after set.  This is the intriguing bit for me.  I cracked out all the old equipment and some new to test the flexibility of these blocks.

Watercolour mixing bowl, watercolour brushes,

And some fabric that I knew would come in handy for something someday.  This was unbleached cotton, a very fine weave and perfect for experimenting.  I have no idea what its original purpose might have been, but I have loads of the stuff.

The first experiments were just smearing water onto the bars, and then painting the wash onto the fabric.  The wash was thicker and thicker with each brush stroke.  Then I tried stamping with some tiny stamps, to see if thick paint worked better than thin.

I had hoped to use the stamping method to mimic the aurora borealis to use on my 75th Anniversary bag as background for the moose, but getting the aurora right is very, very tricky.  This is the best I could do on the first try.


It needs much more work before I could ever be satisfied with this.  So the next few experiments involved painting on wet fabric, painting with a dry brush, etc, etc. and waiting for the material to dry.  Then washing the goods in scalding hot water to see if everything was colour fast.


If you look very, very carefully, you might see a tiny little bit of blue in the middle. That’s how much the tiny blue stamp transferred to the paper towel I used to blot the test fabric when drying.

The uses for these paints/inks still have me curious.  I want to do a warp with multiple layers of colours.  I just need to work out the logistics of the method.  I can see using them in combination with stitchery and felting to really embellish fine art.  On a practical side, they can repair dye loss in all areas of fiber design from the finest to the most prosaic.  I will be using the hot pink to repair a dye loss on one of my favourite sweaters.  The match isn’t perfect, but close enough

Tools for Pricing

Tools for Pricing

The Guild show is looming and a real challenge is to price the final product. Producing everything is usually accomplished slowly, over several months; it accumulates in boxes and bags, then suddenly you realize the shows are upon you and you now have to price ALL this material! There are lots of discussions on-line and at meetings about competitive pricing in the arts and crafts community. We don’t want to undersell ourselves or price ourselves out of the market. We don’t want to be ‘greedy’ or foolishly inexpensive. Hand spun yarn is very fiber dense, very heavy when compared to factory spun yarn. So a hand knit scarf of hand spun yarn is going to weight more than one from commercial yarn. The benchmarks don’t apply.

But first you have to have a price, for that you need to measure and weight your products. The decision on what to charge is really difficult, but I search on-ine for hand-spun yarn of similar grist, similar fiber content, weight, etc, etc and see if I’m comfortable charging a similar price.

I was fortunate to find a tiny scale that weights from 1000g to .01g. It can be re-calibrated if I have a true weight of 1000g. I’ll look into getting one later this year. This is the only scale I’ve found that can weigh minuscule amounts of silk and cashmere.

The scale weighs in both metric and imperial on the fly, I just have to change the configuration.

So I don’t have to change the position of the fiber and can write the weight on the label right away.

Second I have a voice response computer to convert from imperial to metric and do math so I can keep working with labelling. Google is my friend.

And third, I have a yarn measuring device to measure the length of a specific diameter of yarn. This is the best thing to come my way in ages.

I can set the wraps/inch, mount the skein on the umbrella swift, start winding the yarn onto the niddy noddy and when I’m done the yarn measuring device shows how many yards or meters I have. When I want to convert to meters or yards, I use the voice activation on my computer to do the switch and its all done.

This skein is 20 wraps per inch

There is a plastic card included with the yarn measurer to check the wraps so you can set the device

The viewing screen is very clear and very easy to use.

Admittedly neither the scale nor the yarn measuring device perfectly accurate, the client gets more from both and that’s fine with me.

But the bottom line is to find what both you and the market will bear. We are in a unique position to negotiate with clients who come to our booths, to explain our products and discuss their needs. Pricing is more flexible at the guild sale and if this year looks like its a tough one for clients we can choose to be more willing to negotiate, or not. I will be more confident with my pricing decision once I get to the sale.

The De-stashing continues

The De-stashing continues

De-stashing is going to be a permanent condition I fear.  While trying to purge unwanted and excess fleeces I found a lovely, soft lambswool with gorgeous crimp.  The colour is a slight dusty rose and the handle is so soft it’s nearly like cashmere.

Light rose lambs wool with rich crimp, but looks can be deceiving

This fleece had been washed and then stored in very good conditions.  It was not damaged in any way.  Once I started to process it I discovered a load of problems that made me question the wisdom of proceeding with processing the fleece for spinning.

The first problem was that it was a lambs fleece.  Amniotic fluid can damage the tips of the fleece and make them extremely brittle.  Ann McElroy told me that when she is birthing her lambs the fluid dries out her hands to the point they start cracking.  I don’t doubt her for a second.

The staple is very long, but those tips, so sad to learn how easily they snap off.

Tippy fleece when the length is this long is a fairly easy fix.  Just cut the tips off, and process as you would for any normal fleece, either use carders or combs.


However, there was another problem and it is much more daunting and that is scurf.  Scurf is sheep dandruff.  It is caused, usually, from mites, but I’m sure it has other causes.  I’m mostly interested in the results which are flakes of lanolin mixed with sloughed skin cells.  These harden and are extremely difficult to remove from the fleece.  Since this was a lamb fleece the little critter also played in the field and got into all sorts of mischief with bits of vegetation and dust.  I was two seconds away from throwing this in the trash or compost, but I gave it a deep comb, just to see what results I could get.

There are nebs in there, so I put it through the comb a second time and removed them.  The wastage was massive, nearly 50%.  This wastage is from cut tips, scurf, vegetable matter, dust, tiny bits of straw etc.  When I combed the wool I used a spray of water with hair conditioner mixed in to keep the stress on the wool to a minimum; it really helped.

This is residue from the first combing,

And this is residue from the second combing.

I freely admit the work involved in salvaging this fleece was NOT worth it.  I learned more than I ever wanted to know about sheep dandruff.  This is an exercise not to be repeated – ever!!

That said, the final result is rather lovely, nearly cashmere soft, grey lambs wool skeins.  The yield is an astonishing 12 skeins of gorgeous two ply, that I’m really pleased with.  Not at all sure what I’ll do with it, but someone will have a suggestion, I’m certain of that.


Weaving with my stash

Weaving with my stash

So, what are you going to do with all this – stuff?  Its a valid question posed by my grandson.  He’s helping me clear out the house and storage spaces and there really is a lot of ‘stuff’ to deal with.  Time to get weaving.

I chose a warp that had a khaki base made up of lots of different fall colours so it could handle loads of different colours in the rest of the warp.  Colours don’t have to ‘match’ when weaving. The don’t have to match ever come to think of it.  This is the colour palette I chose.

hand spun skeing of khaki green beside mixed fall colour threads

This warp was longer than usual because I wanted to attach any subsequent hand spun warps to the wastage.  Wastage can be very expensive and finding a way to minimize this loss is good economics.  My plan is to have a yard/meter of extra fiber at the end of the weaving that I can tie the new warp onto.  This will save me wastage of a meter/yard per warp.  The only wastage will be a few inches at the beginning and end of each new warp until that extra yard is all used up.

The colours look great and the yardage I was able to get from my hand spun was really surprising, kind of shocking actually.  Really looking forward to getting started on the threading and weaving.

multi-coloured warp on leash sticks to keep cross in place

When making a warp a cross is introduced on purpose to keep the threads separate.  This cross is maintained throughout the threading process; it protects the warp from turning into a tangled mess.  The oldest and simplest way to do this is by inserting sticks on either side of the cross, tying them securely in place and getting on to the next step of threading the loom. This time I chose to thread from front to back of the loom.  Starting by threading through the reed – the metal comb installed in the beater – and then threading the threads through the four different harnesses.  Each thread has a specific spot on the loom where it fits.  Its a bit like programming a computer by hand, really by hand.

The threads were sett at 10 ends per inch which might be a bit snug, but it looks good and once the scarf is finish it should be soft and snuggly.

repair a broken warp thread with inserting and weaving thread

When a thread broke I was not surprised, it’s almost inevitable, especially with the irregularities of hand spun, so I did a repair by pinning a thread in place, threading it through the reed and it’s spot on the harness.  Then it was weighted in the back of the loom with a small weight.  I use clip on table cloth weights for picnic table cloths. Once the damaged thread is woven in a sufficient length the true thread can be brought forward, pinned in place, woven for a little distance, then the weight removed from the patching thread.  This patching thread can be cut.

If you look at the purple stripe, everything looks fine.  The scarf is done, the length is just what I wanted and then I spotted it.  A whopper of a mistake that will set me back a little on my plans to reuse this warp, save time, blah, blah.

I have been weaving a very simple tabby, over-under, super basic.  It’s deceptive because its very difficult to get an even look to such a basic weave.  The threads had to be pulled into position, not beaten.  This way they would make nice little squares when the scarf was washed and fulled (hopefully).

Then I spotted the threading error, nearly at the end of all this fussing around drats.

Not threading error
Threading error

Not the end of the world, just a bit disappointing.  I’ll have to rethread about half the loom, and be more careful this time! Oh, and fix that single green thread that has errors all the way down the middle of the scarf.


Finishing the hand spun/hand woven scarf

Finishing the hand spun/hand woven scarf

In the fall I wove a scarf using my ‘precious’ handspun yarn.  It’s time to stop thinking of this commodity in such terms.  There is bound to be loom wastage when using any yarn and handspun can’t be saved, so best to get over that reality and start enjoying the enormous gratification to be had in weaving my own yarn.

The excitement didn’t wane even as the finishing process started.  Finishing can be an extremely tedious time, but I really enjoyed it this time.

A metal needle slides the knot into position

Once the warp is woven it’s time to cut it off the back beam.  I did this very carefully and knotted each group of four threads as I went along.  Using a large metal tapestry needle lets me slide the knot into position easily.  I didn’t hemstitch the scarf, nor did I use a fringe maker.  These are two perfectly satisfactory methods of finishing but I chose not to use them, maybe on a later project.  I also left a lot of fringe length to help in the finishing process for later evening up.

Starting the fringe finish on the loom - back edge of the scarf

Here the back beam fringe is all done, now I have to unwind the fabric and start on the front of the material, which is still attached to the front of the loom.

These knots are usually easy to undo, but if they get a bit cranky the metal needle comes in handy for prying them apart.  Again, I just knot them in groups of four as I move along the front of the loom.  Once that is all done, the fabric is inspected for unwoven threads that are hanging loose.  My apologies for not taking pictures of these, but I was running out of hands.  These usually are along the selvage edges and I trim them off or weave them in using my trusty metal needle.  It’s a bodkin so works perfectly for that task.

The plaid of the two different burgundy shows clearly

Once everything is where it should be, the fabric is given a wash in very hot water and mild soap, rinsed and hung to dry.  I was very pleased with how the colours played out to give a subtle change in the plaid.  I hope to be able to replicate this somehow in the future, just have to figure out how I did it in the first place.

Align the knots of the fringe and cut both sides of the fringe

The final step is to even out the fringes; they need to be the same length on both sides.  I find it easiest to pin the fabric together and just cut them at the same time.

Once the fringe is trimmed the two sides are pinned together and the fringe length is verified

Sometimes they need just a little more trimming, just noticed there is a stray bit in the picture, just like a bad haircut.

The final product is going to be used for display purposes at the next Sale and Exhibition.  I am very pleased with the final result.  It will not be for sale.  I did show it to a fellow weaver for a hard critique and I meant it.  I wanted to hear the “hard stuff”.  She was kind enough to tell me the truth.  There are a few techniques that I need to work on before selling my scarves.  I need to open up my work so it drapes better.  I need to get better at math!!!  This ended up very short.  It was a wonderful width, but it did shrink in length and would only work as a dress scarf.  And finally, I need to practice hemstitching.  That said, the colours are great, my use of yarn is superlative, the fringe is perfect and the simplicity of the design is perfect to set off the fibre.  Ta-da, I’ll take that.


Weaving with hand spun, again!

Weaving with hand spun, again!

Jan Scott documented the Sale and Exhibition put on by our Guild in early November, kudos Jan.  It was a great success and inspired me to try to answer a recurring question asked by so many of my clients.  I was embarrassed that I didn’t have the information for them.  Will this skein make a hat, scarf, mittens, socks, etc?  The response was always – ‘that depends’ and it does.  It depends on technique, the width of the weaving, stitch size, needle size, size of hands for mittens, and all sorts of variables.  It’s so frustrating to not have an empirical answer, so I decided to use my handspun and make a scarf, standard 14 inches wide by 40 inches long.

I calculated I had 234 yards/215m of brown and 495yds/457m of burgundy and silk.  I would need 106yds/98m brown for the warp and 214yds/196m burgundy and silk for the other part of the warp.  Based on that I had lots for the weft.  We’ll see. Math and I are not on speaking terms.

Just to keep the learning curve vertical, I also decided to use a warping mill along with my sectional beam.  If you have ever watched videos of industrial weaving facilities you will see huge walls of bobbins feeding into the back of looms.  A sectional beam is one step down from that.  All the threads you want are wound onto a single inch of the back beam of the loom.  So if you want to weave something with 20 threads per inch you need 20 bobbins full of thread to wind onto that little 1 inch spot.  You wind on for as many yards/meters as you want, then move to the next slot in the beam, wind on another twenty threads/inch and continue on.

The warping reel lets the weaver measure a single thread for the whole length of the project, change the colour as needed and then keep measuring for the whole length of the project.  It’s perfect for smaller projects. The craftsperson will have to decide when it’s time to move onto a different warping technique to suit their purposes.  This time I wanted to try a hybrid method of warping.

When using a warping reel you must keep the warp from tangling.  It can become the weavers’ worst nightmare.  I know in my early days I did lose the cross on one of my warps and nearly lost my mind.  It did get untangled but I swore it was never going to happen again, so I do double crosses on all my reeled warps.  Tie the cross at both ends of the warp.  Better to be safe than very, very sorry.

I also didn’t want to waste any of the handspun if possible since it was in very, very short supply, so I used a salvage technique of tieing onto an old warp.  This can save up to 24 inches or nearly 3/4 meter of handspun wool per thread.  That’s a huge amount of handspun. It’s also a ridiculous amount of work, so I’ll have to rethink this, but once done I was pleased with the result.

I still had to check for threading errors and there were some.  Don’t thread the loom late at night, don’t thread the loom late at night….and don’t thread the loom late and night.

The next morning, a quick check of the basic threading by lifting the threads at an angle shows that everything is in order, literally, and the threads are ready to be tied up and woven with a test thread.

And finally woven with the real stuff. I wish you could see this in real light, daylight, oh my goodness, it shimmers.

What a load of work, and what a great result!!  I had no idea my hand spun could be so lovely, I’m so pleased, but there is the last bit of finishing that I need to do and hopefully that will be successful too.  This will make a great display piece for the next Sale and Exhibition!

WHOOSH and now it’s Fall

WHOOSH and now it’s Fall

This summer started out with a lovely leisurely saunter to it, and now that sonic boom I just heard is Fall clambering for attention.  Our guild has participated in at least five demonstrations throughout the region, some lasting for several days.  Some were at historical sites, some were at agricultural events or country fairs, but all were a load of fun.  And a load of work.  So now, we are preparing for our own event.  Our guild will be having our Sale and Exhibition in early November.  I’ll be a vendor so I need to get going on sorting through inventory and (sigh) start labelling and pricing items.

I’ll be having braids, batts, and spun yarn

And being terribly disappointed in how the photos turn out in this horrible lighting.  These colours are not at all grey and sad looking in sunlight, but this is how they will probably look during winter, so I should take that into consideration when I make colours.  Indoor lighting will have an emotional effect on how people view their decisions.

Anyway, you get the idea that there will be a huge variety of different items available at our guild Sale and Ex.  I am partnering with another guild member who weaves.  She took her degree in Fiber Arts from a University in Nova Scotia and does superlative work. Jan will get some of those for you later I’m sure.

Finally, something cheerful!  Well colourful in a Fall sort of way at least.  I’ve ordered labelling cards which should arrive this week, so I can at least get a jump on things by cracking out the scale and start weighing stuff.  Here’s hoping everyone has a great Fall (my favourite time of year, busy though it is) an abundant harvest and lovely fibre to work with.