Browsed by
Month: October 2021

Upcycling a cotton warp

Upcycling a cotton warp

A few weeks ago our guild was offered the estate of one of our more noteworthy weavers.  She had stipulated that all her weaving supplies and equipment were to be sold and a scholarship be set up to help educate and promote weaving. We were deeply saddened by the loss of this talented woman, who was also a great resource for our guild.  Her generosity set a high bar for all of us.  I did participate in the fundraising efforts and purchased a cotton warp to encourage me to get back into weaving.

There was only a small problem with the warp; it no longer had a cross.  The cross in a warp helps prevent the threads from tangling.  This was going to be a huge challenge but one I wanted to tackle along with two other learning challenges.

Because I am self-taught there are huge gaps missing in my weaving knowledge.  Some are very basic techniques.  I desperately wanted to learn how to make a weavers knot.  This is a knot that almost everyone involved in fibre seems to know how to make.  Not me.  I wanted it to become muscle memory, so I wanted to make lots and lots of knots.  Then when the need arises it will be so easy for me to just – poof – make this non-slip permanent tiny little fastener.

Now comes part two of my learning challenge – reusing a threaded warp.  If a weaver is careful and doesn’t remove the remnants of threads from the loom, and if they are long enough, they can be used as a labour-saving tool when threading through the heddles.  The heddles are the little eyes on the loom.  Threading heddles is a bit like threading very big needles and I really don’t like doing it.

I had preserved the previous warp.  I knew it was narrower than the cotton warp I wanted to add, but I didn’t know how many threads were in the cotton warp.  There is only one way to find out, count them.  There are 225 threads by the way.

So I estimated I would need to add three inches of cotton on either side of the existing warp.


Then came the knots.  First I just did overhand knots, but I really didn’t like them.  They were thick and didn’t look like they would pass through the reed with ease.  Then I started working on the weavers’ knots.  Online demos are really interesting, but by the time I got back to the loom I’d forgotten how the loops worked and which way the thread wrapped around and it was all very frustrating.  Finally, after a bit of digging, I found a printable diagram and that worked like a charm. My biggest concern is that I may not have a true weavers knot.  This works, so maybe it doesn’t matter.

weaver’s knot
overhand knot


I had to thread the cotton through the heddles and Because the cotton along the sides was going to be a little shorter than the wool cotton combination in the middle I added a bit of an extender, sorry I didn’t get a picture of that.

And then it was time to start gently getting everything through the reed and the heddles. This was all done very slowly and carefully so that none of the threads would break.  The weaver’s knot worked like a charm.  The overhand knot was a bit thick and need some gentle nudging to make it through, but all in all, it worked.


Once the cotton was safely warped on the back beam it was a matter of untangling the threads and winding, untangling and winding.  At some point, I was very tempted to just chop it all off the loom and throw it out.  It was really getting to be a terrible mess, so discouraging.  Then I would look at the back of the loom and see how ordered it was.  Everything was coming together as it should, everything was aligned and going onto the beam the way it was supposed to, so I would take a break and come back to it a little later.

And then fairly quickly it was all done.  I was a little surprised and definitely delighted.


All this time I had no idea what I was going to do on this warp, not a clue.  Maybe make a table runner or some cushion covers.  I have some really nice linen to use, some great thick and thin cotton or wool.  Then last night it came to me. This lovely textured cotton warp with all its thick bits and thin threads, its ideal length of 4.5 yards (4 m) precise width of 18 in (45cm), it’s ability to take colour like a sponge will be perfect for the recycled kimono project!!  Can hardly wait to get started.


Experimental Archaeology – Swanskin

Experimental Archaeology – Swanskin

I am lucky enough to live in Sturminster Newton, Dorset, England (known affectionately by locals as Stur). One of our Town’s claims to fame is our Watermill. There has been a Watermill on the river Stour here for at least 1000 years. The original mill was a Grist Mill – that is for grinding corn, but in the early 1600s a Fulling (or Tucking) Mill was built adjacent to the Grist Mill.
This was largely to facilitate the greater production of a fabric which had been produced in and around Stur since the 1570s. This fabric was called Swanskin. It was a tough, course white woollen fabric, made from locally spun and woven wool, which was then scoured, fulled and the surface teazed and fulled again. Fishermen working out of Newfoundland, many of whom were recruited from Stur, greatly prized the Swanskin for its all-weather, waterproof qualities, as did the British Army and Navy.
Originally the fulling would have been done by fullers treading the fabric in troughs filled with all sorts of nasty stuff, including urine. Once the fulling mill was built this hard work was done mechanically. The woven fabric, in its troughs of nastiness, was hammered by large wooden stocks which were driven by gears from the waterwheel. Eventually the fulled cloth was hung out to dry along the river bank, stretched out on tenter frames by tenterhooks.
A report about Manufacturing in Dorset dated around 1812 reads:

“There is a manufactory in the neighbourhood of Shaftesbury of a kind of flannel called swanskin, which is a coarse white woollen cloth, used for soldiers’ clothing, and made from 18d. to 2s. a yard; but this is of little consequence to Shaftesbury, the chief trade in this article being carried on at Sturminster Newton, where about 1200 people are employed in it, and where between 4000 and 5000 pieces, containing 35 yards in length, in a piece, yard wide, are annually made.

At present the woollen manufactures are almost confined to Sturminster and Lyme Regis, at which latter place broad-cloth and flannels are made in considerable quantities.

At Sturminster there are four or five clothiers, and about 300 weavers; sometimes 700 or 800 people are employed in the manufactory of Swansdown, (sic.) but the trade is not so considerable as was formerly the case.”

In early 2016 I was asked by the curator of our town’s Museum and Mill Society (now known as the Sturminster Newton Heritage Trust) if I could produce a sample of Swanskin for the Museum since it appears that there is no example of actual swanskin now in existence.  As Swanskin was such an important part of the town’s history, the Museum wanted to create an exhibit for future reference.  This I did, so far as I could, and I also wrote them a report on the process, which I repeat here – it was of course written for the edification of members of the general public, most of whom would not be conversant with spinning and weaving terms, so please don’t think I’m trying to “teach granny to suck eggs”.

“Swanskin – Experimental Archaeology

“In order to try to recreate the processes in the manufacture of Swanskin some research was carried out by Kathleen Sanderson (a member of the Dorset Guild of Weavers Spinners and Dyers). It appeared that the likely breed of sheep from which the fleece was obtained was the Portland. This breed was found in fact over much of Dorset in the 17th Century.
“Kathleen found however that the fleece from today’s much improved breed of Portland sheep was finer and more delicate than would have been the case in 1600. She therefore blended Exmoor fleece with the Portland to obtain as near as possible the coarser, more hardwearing fibres originally used.
Originally the wool would have been spun “in the grease” – that is still containing (inter alia) the natural lanolin. The resultant yarn would have been woven in this state so that the resultant cloth would have had to be washed and treated with fuller’s earth (scoured) to remove the oils and other detritus like plant material and insect life.

Spun and Plied Yarn, with fibres

“The sample shown was spun after scouring because this had been necessary to facilitate the blending of the two fleeces.
The yarn was plied and then twill woven – that is instead of the basic over one, under one, over one – of plain weave, the weft was taken over two and under two on the first pass then over one under two over two on the next. This results in characteristic diagonal lines in the weave.
“When “fulled” twill woven fabric becomes denser than would a fabric with plain weave.

“I wove the sample in this fashion on a frame loom. After the weaving, the sample was wetted and fuller’s earth rubbed into it on both sides, just to make sure that all the grease and oils had been removed. This was rinsed out, the sample soaped and rubbed by hand to start the felting or fulling process.
“This process would have been carried out by “Fullers” or “Walkers” in the 11th and 12th centuries. Though they would have done it by treading or walking on the fabric in wooden troughs rather than using their hands. At Sturminster Fulling Mill swanskin was fulled at the Mill using water power to move fulling stocks. These hammered the fabric until it was fulled or felted sufficiently to make it water repellent.
“The sample was fulled in a washing machine, first at a temperature of 40° with a very hard rubber ball acting as a fulling stock. This was repeated once more and then at a temperature of 90° until the sample was fully felted. When the sample was almost dry it was ironed with a steam iron on both sides and then fully dried.
The original swanskin cloth would of course have been dried on tentering frames in the open air.

“Once the Sample was dry it was brushed with a flick carder (the modern equivalent of using a frame covered in teasels) on one side only in order to raise a nap on the fabric.”

The mill was open to the public again this year, after having had to be closed during lockdowns.  It is possible that, during the first lockdown, some of you may have seen reports about the fact that the mill reverted to milling flour which was provided to local bakers.  Many people over here took to making their own bread so that there was a general shortage of bread flour, and, since approaches were received from people from all over the globe trying to buy bread flour from our miller, I assume that this was the same almost everywhere. 

I have added below some internet links about the Mill and our Society (Sorry – Trust!), and some of the news stories from last year –  Google has lots more.

Oh and a couple of my felt paintings of the mill – adding a bit of artist’s licence!

https://sturminsternewton-museum.co.uk/mill/

https://www.bbc.co.uk/news/uk-england-dorset-52369075

https://www.9news.com.au/national/coronavirus-flour-shortage-ancient-mill-turned-museum-grinds-back-to-life/e1c0fe1b-9ff5-42ec-bbcf-d311325a5f0a

https://edition.cnn.com/2020/04/29/uk/english-mill-flour-resumes-production-scli-gbr-intl/index.html

Sari Silk and Spinning.

Sari Silk and Spinning.

I ordered some sari silk a while back as part of a larger order from World Of Wool. I am ordering wholesale so I ordered 1 kg of each of the colours I wanted. the first 2 look very similar here but the first has a lot of green and red and the second has quite a lot of black. I had expected the pink one to be much more purple. It is called Royal Robe. Every batch is different, so you are always taking a chance. It would be great if they took new pictures for each batch but I suppose that would be a big hasssle for them. And they do warn you so no complaining.

That is a lot of sari silk.

I did make up some small bags of it and sold them on the guild’s Facebook page. I will offer it again soon. I still have lots. I haven’t played with it much at all. So last weekend knowing it would be rainy at the market, so slow and I would be bored, I grabbed some of the silk and a spindle to try spinning it. I brought an older cheaper spindle because I knew I would probably be doing as much dropping as spinning. I was right. It is very short and very frustrating to try to spin, especially since I usually do more of a long draw. I tried for a while then gave up and plied the tiny amount I had spun.

Ta-Da…


I told you it was small. Here is a close up.

It is very pretty and shiny but I will not be spinning more this way.

Next was to try blending some with some wool.

I picked these two shades of merino. I think they are mallard and duck egg. They seem to be the same colour but have different saturations of the dye.

And these 3 sari silks to blend in. Looking now I see I picked the 3 primaries.

First I did the turquoise lagoon. I did a layer of the dark, then the light and then the sari silk. I carded it several times to blend it and then rolled it into a rollag

It is very subtle but I think it will add some shin and interest when I spin it.

Next, I did the Salsa, I did the same thing a layer of each of the wools and then some sari silk

And lastly the wildflower

Now I have to spin them up. They are not the neatest rollags but I think they will work. I will do some recarding if I have to but I hope I don’t have to.

Nuno Landscape Design Continues

Nuno Landscape Design Continues

I have been continuing with work on my green nuno landscape and thought you might like to see how I “play” with the design. I put on layers of sheer fabric, take them off, try another piece of fabric and keep working with the various bits of fabric until I get a composition that is effective.

I’m using a variety of fabric including nylon organza, silk organza and cheesecloth.

I put pieces on, take a look and then rearrange or take pieces off. Or move them around, add more pieces and so on, always stepping back and looking in between steps. What works, what doesn’t? You can see how sheer the  nylon organza is, there is a piece on the top left side sticking off the edge on the right photo.

Sometimes it is hard to tell what changes and it’s a slow process but fun to see what happens.

Once I was happy with the composition, then I pinned pieces in place. I really should have taken the time to baste the pieces in place but I was feeling lazy. On the right photo, I have started to stitch the sheer fabric in place at the top. I didn’t want the stitching to really show that much, so there are tiny stitches in similar color/value thread to hold the sheer fabric down.

These last two photos are of the piece hanging on the design wall. This is really helpful for me, to see it hanging and to be able to back away from the piece and view it from a distance. I had stitched in the three orange flowers in the distance but they were really bugging me. The flowers were too big for the distant hills. They were the size of trees. So unstitching occurred and I removed the far flowers. I haven’t decided whether to add them back into the middle ground or not. The photo on the right is the amount of stitching I have completed now. Once I get all the rest stitched down, I will decide if it needs anything else. I also have to think of a better name than Green Nuno Felt Landscape. Any suggestions?

Time to show, tell and imagine

Time to show, tell and imagine

I just want to give you some background into this little story.

I was so fortunate when I got married all those years ago.  Hubby came with a wonderful extended family.  Lest I leave anyone with the impression of interference on any of their part, these were all formidable, strong women, born in the 1920s and 30s who were interesting and interested but never prying.  Every single one of them was creative and all lived well into their 80s.  Three are still with us and, despite the years, their characters have not changed.   I feel privileged to have known them all for the greater part of my life.

So, back to my story.  One of the aunts, Kathleen, passed a few years ago.  In her working life she was the Head of an Arts and Crafts Department at College (adult) level.  She was a great collector of beautiful objects and when she died she left me her collection of textiles.  I used one of these to line the 1950’s style hat I featured in my last post (September 18th).

All the fabrics filled two cars so I decided to catalogue them when I got them home.  I should mention here that my dining room was out of commission for some time while I carried out this task.  I noted dimensions, cut a sample and categorised each piece.  There were rich silks from her early travels in Asia, beautiful wools (Prato, Italy is embedded on the side on one piece), edgy cottons from the 60’s, fabrics with exclusive stand alone labels included on the selvages – all in all there were over 450 pieces, which I documented and stored in boxes.  Realistically I knew I could never use them all so I shared with various sewing enthusiasts.  My aim was purely to recoup the cost of all the storage boxes I had to buy so excited buyers got to enjoy top class coat weight 100% wool fabric for €15 (this was the maximum charged).  In short, I shared some of the joy Kathleen gave me.

While sorting through all the fabrics I made two other amazing finds and it is one of these that I want to bring to you today.  It was a sampler which my husband’s aunt no doubt picked up in an English or Scottish auction house at some stage in her life.  I suspect it was an examination piece as the name on the side in perfect copperplate handwriting is ‘Edith M. S. Simpson No. 48’.  The date, which is cross stitched into the top of the piece is 1900.  The folder used to hold the pieces looks to be handmade – although a sewing machine has been used to bind the edges.  Yellow silk has been hand sewn into the folder and acts as a backdrop for all the pieces.  The samples are, in my mind, perfection.  I hope Edith scored highly in her exam.  I wonder what became of her.  I hope she had a happy life but given the tumultuous events which would occur in the world throughout the following 20 years, I suspect she faced down many challenges and heartaches like many women of that era.

I hope you enjoy the photos and perhaps pause for a moment or two to think about Edith.  Never in her wildest dreams would she have thought that all her painstakingly beautiful work would one day be shown to a worldwide audience.

With sincerest thanks to my husband Enda for the photography.

The closed pack.  Still beautiful after 120 years.

For scale the complete pack is 22 inches by 15 inches (56 by 39cm)

The young lady herself – look at that copperplate handwriting

Inserting a patch  and teeny tiny knitting.  There are over 15 rows in the middle knitted sample and it measures only 1 inch square.

Cross stitching her initials, knitting on the round and a beautiful sock sample (heel) length 2 inches

More patching, on very fine wool this time.  Look at the size of the cross stitches.  Below decorative stitching gold and blue on linen.

More  fine stitching (gold/blue) this time on fine wool.  Gathering for a sleeve.  A buttonhole the sample measure 3 by 1.5 inches.

Darning on fine knit:

Tiny gathers.  I counted 66 gathers into the cuff:

I think this is a placket but happy to be corrected:

A patch.  Look at the perfect matching:

A patch on fine wool.  Look at the tiny cross stitches.  There are also two rows of tiny running stitch around the triangle.

Not sure what the top piece is called.  The bottom could be a decorative line of stitches for a collar:

A hand sewn French seam.

(Top) more fine gathering. Can you see the tiny little holes created by stitches in the bottom of the gathering?

(Bottom) Pin tucks with a decorative stitch.

Felted scarves

Felted scarves

When I’m felting scarves, I’m trying to play with colours in such a way as nature is changing around us. I love the colours of autumn, spring, summer and the innocence of white winter. It’s important for me that every part of the scarf, fiber, wool, silk and gauze, at the end of the felting process, become colourful art. For the base I usually use hand dyed gauze and silk, and on the top Australian merino wool and wool yarn. After I finish the design, I use the rolling technique. For me it’s a pleasure to felt scarves and I recommend that everyone try!

Continuing on the Cane Dragon

Continuing on the Cane Dragon

After I had written my last blog, I headed back to Oakville to help with my Mother-in-Law who has not been well. It was very busy with lots of appointments and I tried to work on a bit of felting in moments of quiet.

When you last saw the little dragon, I had augmented the wire on the legs, arms, hands and feet. Then started from the tail to add the under colour.

1,  the tail from the last post

I was using a small amount of black, a bit of dark grey and larger amounts of Indigo. Since you don’t usually see solid colours in nature, I did not blend to a uniform new colour but left bits of each tone visible.

My goal was to give me a general base colour to work from and lay in the spinal fringe. I think I will be augmenting that with some silk but after I have created the wings.

2-3, adding the base layer of colour standing on my old laptop.

As I would go off to help with something then come back intermittently to work on the little guy, I discovered that blue cane dragons have an odd interest in Orange dark chocolate.  He had obviously spotted it in the glass dish. I had used the box holding the delicious chocolate as a ruler while making partitions in lists. I just put it in the glass dish so it would not be lost in all the papers with notes on the table.

This slideshow requires JavaScript.


4 -9, the great Chocolate heist

His obvious joy at running off with the chocolate was quickly thwarted with the realization that I had not made fingers appropriate for extracting the chocolate out of the box!!

10 Not having teeth is also an issue.

11, so close but yet so far

I continued to work on the face adding an upper lip, background for the eye area and nostrils.

12, adding more detail to the face

My husband and I took a quick run to a couple of the local computer stores to look for a new laptop since I was to stay for a bit longer and he would be heading home. We found one and brought it back.

13-14, the new laptop

15, the new laptop has problems

Here he is checking out my new laptop. It was fabulous for about 4 days then developed strange pixelation problems in the screen…. It was such a nice clicky keyboard too!! Back to felting, You can see I am starting to add the colour in the mouth, but still no teeth. it may be safer if he doesn’t have teeth.

16 – 17, mouth colour added as well as fringe

You may have noticed the fringe, at the ankle and wrist/forearm, has been added. The next step was to start the wisps of grey in a tone similar to the mandible for the front of the neck, belly and under the tail.

18, adding the grey wisps

By this time one of my Brothers-in-law had arrived and it was time for me to head home for a bit. I will be focusing next on the wing membranes since I suspect that will determine some of the body highlights. However, that will be another post, since we will be heading back to southern Ontario Soon.

Is it October? It feels like the end of August in Southern Ontario.  A couple of quick shots for you to enjoy and hopefully inspire new colour pallets, felt pictures, or sculptures.


This slideshow requires JavaScript.

19 – 22,  End of August weather in October?  A few shots from Oakville.

I hope you are also enjoying strangely nice weather for what the calendar clearly says is October. If you are having our normal October, it’s OK, you can keep it, we really don’t want it back!! Maybe I should try to quickly wash one more fleece before we wake up to snow?

Happy Felting!!


Registration Open for Hanging Felted Spiral by Helene Dooley

Registration Open for Hanging Felted Spiral by Helene Dooley

We are happy to announce that we are now offering an online class with Helene Dooley. The class is all about learning to felt a hanging spiral and will begin on October 29th. There are only 30 spaces available so register now to reserve a space. Register here by filling out the contact form at the bottom of the page. 

Helene has developed a method to create the felted spiral shown in the photo above. You will learn with Helene’s excellent videos and downloadable PDF’s. She will also be available on the class website for questions, sharing of your spirals and to encourage you to experiment with the knowledge gained in the class.

If you’d like to learn how to create a felt spiral, now’s your chance! To register for the class, fill out the form on the information page. 

Please note that Helene’s class is aimed at felt makers who have already developed their technical felting skills.  It is not suitable for felt makers who are at the start of their felting journey. A knowledge of book resists is preferable, though not essential.  Previous experience working in three dimensions is essential.  Also required is a basic knowledge of needle felting and sewing.


If you are a beginner, our online unlimited access Wet Felting for Beginners course, is always available. Please click on this link for further information and to register for the class. 


Revisiting the Yurt

Revisiting the Yurt

If you haven’t been a reader here for very long, you might not know that back in 2013, I made a 16 foot diameter yurt (ger) with my husband. I wanted to try “large” felting and decided a yurt would be a good idea. It was a real learning experience and a ton of work but I had a good time and we ended up with a yurt (ger). Click on any of the links in the post to read the original post which goes into the details of how it was made.

The yurt began with buying 200 pounds of wool in March of 2013 and getting it processed. You can read all about it in my post “Wool Gathering”.

Then we moved on to building the frame. “Yurt Beginnings” explains how we handled the lattice walls.

We continued working on the walls with drilling, sanding and figuring out how it all went together in a big lattice puzzle. In my post, “Sanding and Being Confused”, you can read more.  Then another update about the wall is in the post “Wall Success”.

Then in August, I finally started felting. The photo above shows my sample for thickness and shrinkage which you can read about here. 


Next we started working on the roof structure which is called a tono.  We were on 51 days and counting for constructing the yurt.  Somehow, I’m getting tired just rereading these posts.


Finally, we got into the large format felting. We made our first wall panel and with the help of the tractor, we got it felted and fulled. 


Then because it was so much work, I recruited more labor. We had a felting party! And then we had a day of felting in the rain.

Next up was painting the wood structure orange which is a traditional color for Mongolian gers (yurts).

We were feverishly working into October to try and get this enormous task completed. It was getting cold and as you can see, I got a little muddy. But we were getting closer to the end being in sight.

One of my favorite things about building this yurt was the community involvement. I even had a youngster named Kostya who was born in Kazakhstan who came to learn about the process. 

And we did it! Our yurt raising party was held at the end of October and it worked. We had a yurt. It was really satisfying to complete the project and honestly, looking back now, I’m not sure where I got the energy. Of course I was a bit younger then but I guess determination and perseverance can get you anywhere. I hoped you enjoyed the reminiscence with me.

Autumn Pumpkin

Autumn Pumpkin

It’s that time of year again, when the long warm summer nights are fading and the nights are drawing in.  I love all the seasons, but the Autumn season is one of my favourites as I love the colour pallette nature provides, with its hues of amber, yellow, orange, red, brown and every shade in between.  It’s the time when the earth starts going to sleep, sound in the knowledge of new beginnings in the spring.


As our blog this time falls a few weeks before that famous holiday date at the end of October, we thought we would make something that people would have time to make before the holiday period arrives.  Hense, we made a pumpkin.   I apologise in advance that this blog is not unique, as others have done this before but our original plan did not seem such a good idea once the pumpkin was made.  I had planned to make one that could be used as a ‘trick or treat’ container.  But once it was made, I just wasn’t sure that it would be strong enough to hold up to my plan to cut a 3/4 circle for the lid and still hold its shape.  The idea was to find out who would be brave enough to slide their hand inside, to find out whether they were dipping into a treat, or a trick.  Although the pumpkin held its shape well, I did not feel it was quite strong enough to fulfil the purpose, so I’m afraid I chickened out because I didn’t have enough time to make a second pumpkin if it all went wrong!! But it’s still something I would like to do in the future, now that I know the strength of this 3 layer pumpkin.  So next time, I’ll make it with 4 layers!


I’ve made a small pumpkin before, using the method demonstrated by an American lady, in her weekly tutorials on Living Felt.  That turned out really well so I decided to use this method again, only making the pumpkin much larger.   I searched my house and garden for a circular template, and found a large green planter tray that I use to catch the water underneath some of my bigger pots.  It measured 38cm (15″) in diameter and was perfect for the job.


    Here you can just make out the planter tray, holding my palette of wool batts and merino tops.  Also, you can see my first born little pumpkin that I made last year!  He had to make an appearance (can’t have them feeling left out!)


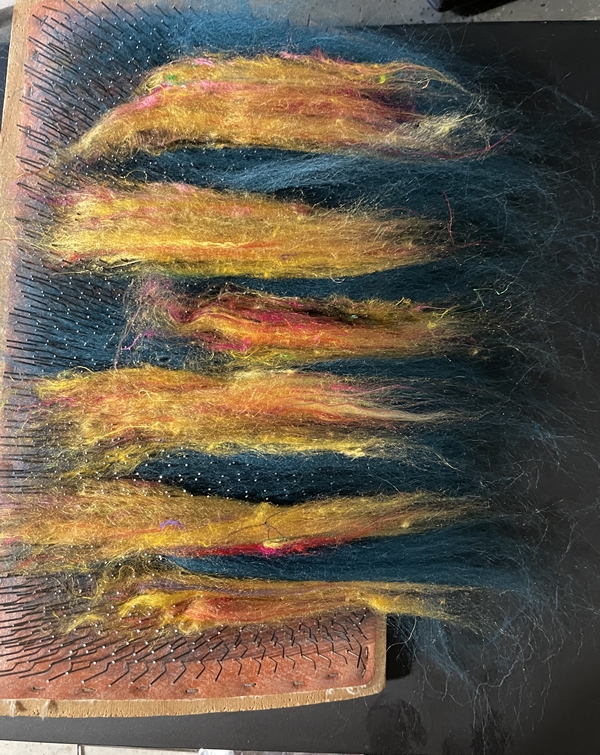
I chose a two-colour wool for the outer layer, that was a combination of a yellow and red carded together.  For the inner two layers, I chose a lighter yellowy colour, so that the inside of the pumpkin would be paler than the outside.  (At this point, I was still planning to make the pumpkin trick or treat pot.)   The red and yellow mix for the outer layer weighed 1.3oz  and the yellow wool for the pumpkin flesh weighed 2.4oz, as I would need two layers of this colour.  The merino tops were for decoration and accent colours on the outside of the pumpkin.  I also wanted to add in some additional bits and pieces, to add interest to the surface of the pumpkin, so I collected some silk hankies that I already had in my supplies, and also some orange neeps and curly tops (which in the end I didn’t use in the wet felting process).

I love these colours!!!!!!!!!         


I then started making my resist.  Making the circle was the easy part, but I then needed to make eight petal-like protrusions, to form the lobes of the pumpkin.  My partner did look at me rather strangely when he saw me rummaging through the crockery looking for a suitable saucer-like object that would fit nicely for the job.  I eventually found a bowl that was a good fit, and used this as a template to make the lobes around my circular resist…


  As usual, Eccles had to get involved!  She is not a problem, but Elliot (her brother) decided to strike while I was looking for the bowl, and pinched three of the merino wool tops off the tray.  By the time I came back, I had three bird’s nests which I then had to card to get them back into some sense of order!  That cat has such a passion for wool, it’s unbelievable!   I don’t have a photo to show, as I forgot to take one but he really made a mess of them!  He also managed to pinch the little pumpkin out of its box where I had safely (or so I thought) hidden it.  I later found it under my dining room table, where he’d left it after playing with it!  I must be mad to have taken in another rescue cat, but she is adorable and I couldn’t resist!  Here is Penny!

I think you can  safely say she’s made herself at home!!!!!                                           


Anyway – back to pumpkins!  I then began laying out the fibre.  I started with the yellow wool batt, putting two layers on each side of my resist.  I added soap and water and covered with a mesh before gently agitating the fibres to start them knitting together.  After a little gentle agitation, I flipped the resist before  folding over the edges of the wool each time ready to start the next layer.

          from this…………………………………………………………………………………………………….to that…             


After putting two layers of yellow fibre on each side, it was time to put the red and yellow mixed fibre….

  Here you can see I have put one layer and flipped the resist ready to do the other side.  You can see the edges of the reddish fibre curled around the edges of the resist.

And now, the final layer…

I love the effect of the two-tone fiber, which shows well in this photo in contrast to the yellow above….       


Now for the fun part!!  Time to start the embellishments.  I used some of the wool top to accentuate the lines in between each lobe, and I wanted to try out some silk hankies to make some sheen on the pumpkin.  Here are the different designs I made on each side.  I wasn’t sure how dark to go with the wool top lines, so chose a brown for one side, and a redder colour for the other.  I went with an olive green for the silk hanky.


            I left ‘tails’ at the edges, so I could wrap them around the other side.


Now to start felting.  Recently, I purchased a sander because I do suffer a little with my joints.  I hadn’t tried using it yet, but thought I would give it a try on this project.  I would say at this point, that anyone considering the use of a sander in felting, needs to do their research.  I was quite scared at first, as electricity an water (as we know) don’t mix.  Also, some countries don’t have the safety systems built into their domestic electricity supply, so doing your research before embarking on using an electric sander is a must.  But having done my research and purchased my sander, I thought I had better try it out.  I only used it at the beginning of the process, and I was careful not to take the sander up to the edges of the resist, only using it in the middle and in between each lobe.  But it certainly helped considerably, and after I had finished the project, I didn’t feel my usual pain and fatigue, so that’s good!

  I can’t wait to make a scarf next!!!!!


After using the sander, I hand-felted the edges of the pumpkin, to make sure it was all nicely knitting together before I started rolling it.  Once I saw the felt was starting to shrink, I removed the  resist from inside  the pumpkin.  Easier said than done!! I didn’t want a large hole left in the pumpkin, but my resist was quite thick and firm, so it took some time to remove it as I also wanted to keep the resist for future use (I know, I’m a skinflint, but I’m also ecologically conscientious).

After the rolling was finished I fulled the pumpkin by throwing it a little until I was satisfied with the shrinkage.  Then it was time to rinse the soap out, give it a quick soak in vinegar water to restore the PH levels and I always like to give a final rinse in water containing a nicely scented essential oil.  I love to hold my small pumpkin and smell the fibre, as it often helps my emotional wellbeing at times when I am stressed.  Is that strange?! But it works for me!


After removing the excess water by wrapping it in a towel, I then stuffed it with a shredded bed sheet.  Wow – I was surprised to find I could fit a whole king-sized bed sheet in that pumpkin!

    and then I tied string in between each lobe, so accentuate the shape as it dried


Once it had dried, quality control arrived for his weekly Chinese Takeaway!  Alex checked my work and told me that he really liked the pumpkin.

By the look on Alex’s face, I can see I’m going to have to make another one because his sister Lizzy has been patiently awaiting a pumpkin for her new home!!


Once it was fully dry, I removed the copious amounts of shredded sheet from inside.  It was at this point, I had cold feet about cutting a lid in the top.  Although it kept its shape well, I was not sure how cutting it open would affect the stability of the structure so I decided at this point, just to stuff it and keep it intact.  I will try this idea another  time though, because I would like to make a felted ‘creepy hand’ to poke out from under the lid.  Seeing people’s reactions would be funny!


I decided to make the stalk out of needle-felted wool.  I chose different shades of green, charcoal grey and yellow to felt together to make the stalk.  I also put a pipe cleaner inside, so I could bend the stalk into the shape I wanted.  I also needle felted a leafy-looking base at the bottom of the stalk, just for effect and added some bright green curly tops to look like tendrils.  I did make a pumpkin leaf for it, but in the end I didn’t like it so did not use it.


I quite like the yellow accents on the stalk……..           


It didn’t take Elliot long to get involved!  But then again, he’s the right colour isn’t he?!!


And here’s a photo taken in natural light for colour comparison……


We hope you like the pumpkin.  Happy Autumn!!

Lisa and Alex