Browsed by
Tag: yarn

Bags of Inspiration

Bags of Inspiration

Having just read Kiki’s tutorial  https://feltingandfiberstudio.com/2023/11/19/left-overs-yessss/ on using up prefelt scraps, it occurs to me that I may not have mentioned something we used to do at our Guild (Dorset Guild of Weavers Spinners & Dyers) mainly to raise funds for the Guild but also for fun.

When I attended the Stitch and Creative Crafts Show at the Bath and West Showground in Shepton Mallet (Somerset, UK) back in 2010  – I saw a stand selling (for £8.00 each) bags containing 35gr of silk fibres, yarns, fabrics scraps, carrier rods and cocoons in various colours, left over from old projects which, when put together, made a fascinating collection for future projects.  So fascinating that I bought three of them.

They must have made quite a bit of profit on them because they appeared mainly to be the “waste” from artwork.

At that time (when I was part of the sub-committee organising the Guild’s Exhibition and Sale of Work) we were looking for a Guild Project which could be part of the exhibition or something hopefully to help raise some funds.  Well, I thought, our weavers must have lots of off-cuts of hand woven fabric, not to mention warp ends.  Then there were the spinners who would have odd bits of spun and unspun fibres of all types and colours.  We also had members who were dressmakers, beaders and embroiderers, and a soft furnisher, who were bound to have the odd bits and pieces that they didn’t really need.  So, with the blessing of the committee,  I put it to the members in the next newsletter that if they would donate to the Guild any odd bits of fibres, yarns, threads, warp ends, bits of fabric, beads, button, feathers, felt, cords, braids, tassels, sequins, sequin waste, ribbons, silk flowers and any other bits and pieces they could think of, we could make up some “Bags of Inspiration” and sell them to members of the public at our open days and outside demonstrations.  (I don’t know about in the rest of the world, but in the UK the word “bags” means “lots of” as well as “containers”, so the punning name “Bags of Inspiration” seemed apt.)

We used A4 sized polythene bags (which I was able to buy quite cheaply from our local green grocer) with an A4 sheet of card inside for stiffening, and I made up some stickers with the Guild’s logo on and a brief description of the contents, and posters also giving details of the contents.

Image of a poster detailing contents of a Bag of Inspiration
Bag of Inspiration Poster

We arranged a few bag making days at a pub in the village where our then President lived.  She had persuaded them to let us use their skittle alley at no charge, and we had a great deal of fun making up the bags and tucking in to “refreshments” from the bar and kitchen.

The members who came to these, brought with them all sorts of goodies which we spread out on tables, so that we could make collections of pieces which seemed to go with each other.  Those who didn’t think that their colour theory was good enough, could pick out a picture from a selection of magazines and have a go at matching colours from this  It was amazing how compulsive making the bags became.  You could pick up a piece of fabric that looked so dull and dreary and be amazed how it perked up and positively shone with life when paired with different fabrics, yarns, trimmings etc.  You just couldn’t stop picking up likely bits.  The difficulty was keeping the weight of each bag between 80gr and 100gr, so we quite often ended up making up at least 2 bags with similar contents.

image of tools and accessories for making up Bags
Equipment & Extra “Bits” for making up Bags
Prospective contents of a Bag of Inspiration - fabrics, yarns, fibres etc.
Prospective contents of at least one Bag of Inspiration

We put a price of £3.50 on each bag and they went like hot cakes – we sold out on their first appearance at our exhibition and sale of work.  Embroiderers and mixed media artists in particular liked them.

After a couple of years, we didn’t get so many volunteers to make up bags but we still had mountains of “stuff”.  So we added another string for our open days – Pick and Mix Your Own.  I had remembered that Woolworths (now there’s a blast from the past) used to have a counter full of different sweets and you could take a bowl and pick and mix what you wanted, and in the process buying a lot more than you would have if just buying a ready filled bag.

Boxes of different sweets to be picked and mixed
Pick and Mix Sweets.

It worked with our stuff too.  We gave the visitors the polythene bags and they could wade through all the bits and pieces picking what they needed, and we weighed them when they’d finished, charging £3.50 for 100gr.

We had had a lot of fibres donated so we started making up what are now called Art Batts and selling them as “Batts of Inspirations”, but because we were mainly selling these to Guild spinners and felt makers, they didn’t do quite so well as they were mainly able to make their own.

In all we made around £1000.00 for the Guild in the four years we were doing this.  Eventually though the members got fed up with spending time on making up the bags and the whole thing was shelved, as the Guild seemed to be relatively well off at the time.

Some time after that I took the idea back to myself and I was making up Batts to sell at Guild meetings, using luxury fibres as well as merino and synthetic fibres.  I made up some bands to fix around the Batts detailing the various fibres included in each.

This slideshow requires JavaScript.

I was also making up and selling Bags, mainly at a Needlework Festival in Dorset where most of the vendors were selling materials and equipment for crafters, as well as various craft fairs and so on.

This slideshow requires JavaScript.

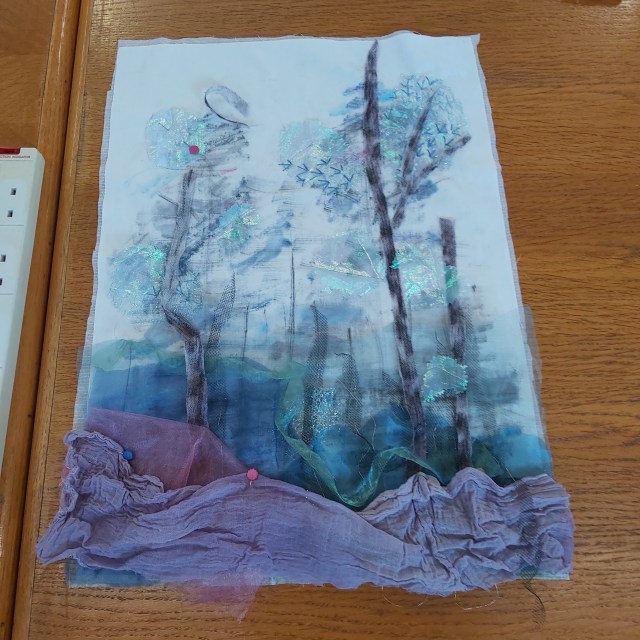
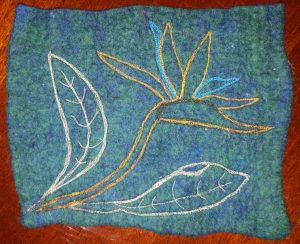
I was getting the odd question like “they’re lovely but what do you do with them?” and  “can you make a bag out of what’s in here?”  So I made a sign from images of items that I’d made myself over the years and that helped.

Image of items made with contents of Bags of Inspiration
Some of the things I’ve made with the contents of BoI over the years

However, once Covid started causing problems, my selling opportunities dried up.  I had been intending to try selling Bags and Batts via my website, but it was very difficult and too time consuming to photograph the Bags so that the contents were visible, because of reflections on the polythene bags.  So that sort of died a death too and I’ve now shelved that project, and am using the bits and pieces I’ve collected over the years on theatrical costumes and props.

Perhaps some of our readers’ organisations, like Ann & Jan’s OVWSG, might use this idea to raise funds?

Getting Creative in Cosby

Getting Creative in Cosby

Last week I was invited down to Leicestershire to visit the Cosby Quilters to give a talk on the Tuesday evening and run a textile workshop on the Wednesday. The workshop they chose was “Tall Trees”, based on one of my early art quilts, which involves painting fabrics such as cotton, interfacing and muslin which are then layered with organza and free motion stitched.

Normally this is a two day class but occasionally, as with Cosby, it’s booked for one day with the students happy to finish in their own time. The ladies have made a great start with their pieces and I’m looking forward to receiving photos as and when they get finished.

Pat Screaton, one of the Cosby Quilters, lives in the village and is also heavily involved with the Cosby Yarn Bombing. It’s a joint effort by members of the Cosby Crafters & the social enterprise Gather Create Grow, which uses arts & crafts to improve wellbeing & reduce isolation.

When the workshop ladies stopped for lunch Pat said she needed to pop out for a few minutes to go round to “the barn” and suggested I go with her to get an idea of the scale of their yarn bomb activities.

The barn itself was crammed with box after box of knitting/crochet wool and there were ladies sitting on the grass all around knitting, crocheting or sewing granny squares together…..it looked a proper cottage industry! It turns out that there are regular sessions for folk to attend as well as the group reaching out to the wider community, including schools, to get everyone involved. What a fantastic enterprise!

They don’t appear to do anything on a small scale, all the characters, animals, plants, etc, etc, that they create are life size.

Everything is carefully stored between events and everything gets recycled over and over again, being reincarnated as something, or someone, different the following year.

This is their life size model of our Queen, complete with Corgi’s, made to celebrate her Platinum Jubilee…….I love the detail they include such as the Queens monogrammed gloves and the royal “posh poo” bag!

…..and a few photos from last years Nativity Scene……

The local community are currently well on the way with their 2022 ‘Make a Splash’ themed installations which will be decorating the beautiful village of Cosby this August. Back at Pats house I was given a sneak preview of a few of the pieces and they are looking impressive…..including schools of fish, a massive crocheted coral reef and a huge wet felted Lochness Monster!

The “Make a Splash” Yarn Bomb will run from 13 August to 4 September 2022 and will stay up for 25 days. It’s all outdoors, it’s going to be spectacular, and it’s completely free so if you are in the Leicestershire area it’s well worth a visit.

What is a balanced yarn?

What is a balanced yarn?

Weaving and all its assorted challenges were starting to get me frustrated, coupled with the instability we all have faced made me step away from any challenges.  So I went back to my spinning wheel and a delicious bag of dyed locks from my favourite indie dyer.  The breed remains a mystery, but the length of the locks, softness, crimp is fantastic.

I seldom do lock spinning with anything this long.  I know other spinners do amazing work with long wool, but I’ve never mastered the skill, so I flick card the fibers on my hand cards and use the opened locks to spin a worsted/semi-worsted yarn.


The locks were anywhere from 6 in. to 9 in (16 cm to 23 cm) and spun a single that was more than forty wpi, so it was extremely fine. Just as an example of what 40 wraps per inch looks like …

When I get a single this fine I do not use a centre pull ball for plying.  The tendency for tangles to form in the core of the ball and pull out in a nasty mess are constant and dealing with that just ruins the spinning experience.  I much prefer plying from two bobbins, which is what I did to get my puzzling results.

Balanced yarn, as defined by just about every book and online tutorial hangs in a nice loop.  This is done after taking the wool off the ply bobbin and soaking it in warm water to set the twist. The yarn is hung to dry, naturally without weights; it might be twirled to remove excess water but it’s left to dry on its own.  If the final product twists counter clockwise it is under spun, and can benefit from some added twist.

Technically, this rather dark image is of a balanced yarn.  It hangs in a perfect loop, just like all the books/instructors say.  Initially, I was really pleased with the results, for the first time in ages, I’d hit it bang on with the ply. But on closer inspection, not so much.  The yarn was really not usable for knitting and probably not usable for weaving either. 

There are far too many gaps in the ply, needles would get stuck and for all that it’s lovely and fluffy, it still had loads of areas that were not evened out of their excess twist.

The only choice was to run it through the wheel again to try to fix the problem.  I gave it more twist, hot water soaked it and hung it to dry as before.  The results are really great and I’m pleased as can be. Except… these results gave an over twisted yarn.


The over twist is really minimal but just the same it’s there.  I don’t know if it will have a negative impact for knitters or not.  I think as a weaver it will be just fine.  The colours as shown here are very misleading.  They are in fact deep heather tones, so I’ll be using black and brown to weave them into something dressy for my son’s.  They both expressed a strong dislike for the original colours but love the final yarn.

This is a very brief posting to allow all of you to get back to enjoying your New Years celebrations.  Happy New Year to everyone.  I hope it brings great things to you all.


Pandagirl’s Year End Round Up 2017

Pandagirl’s Year End Round Up 2017

I’m always amazed at what I accomplished at the end of year. This year I took a few classes in order to expand my creativity in addition to experimenting on  my own. I also tried to use up more materials and finish some UFOs.

Here is a bedside case for odds and ends made with some merino inside and unknown fiber batt with silk embellishment.

Experimenting with different types of yarn to make a table runner.

Our First Quarter Challenge – Fauvism.

Weaving then felting.

A Valentine gift for granddaughter Lisa.


Teri Berry’s Snail hat class.


Finishing and hanging an eco print.                                                  Crochet around wire bowl.


Framing the felted weaving.

I did a lot of experimenting with crochet stitches.


Practicing for Ruth’s Free Motion Embroidery class.

Crochet hats for my granddaughter and her new premature brother Ken.

A dimensional potholder.

Learning more crochet stitches.

Making a crochet hook case from a crochet sample.

A bowl for the Second quarter Challenge – Celtic

Using yarn on a resist for a vase cover.

Adding dimension to the hummingbird/tiger lily picture.

Crocheting scrubbies.

Felt and crochet earrings.


Crochet beaded bowl with stiffener.

A Pumpkin for Ken.

The Third Quarter Challenge – Edo Period; felt and hand embroidery Sakura.

Ribbon embroidery and framing.


Playing with thickened dye for Ruth’s class on felt.


Finishing  a case from UFO pile and FME Butterfly


Maneki-Neko for Third Quarter Challenge Edo Period.

Framing the Rooster.

More stencil play with acrylic and thickened dye.

The Fourth Quarter Challenge — Suprematist

Penguin’s Poinsettia Holiday card.

A couple of scarves for my daughter in laws parents in Japan where it’s as cold as Chicago.


I want to let everyone know I am taking a leave of absence to focus on my health and family.  I will be around just not posting weekly.  We have a lot of talented artists that will be filling in starting with Tracey Thompson next week.

I want to thank everyone for helping out to give me this time.   If you or someone you know has something to share — it doesn’t have to be felt but anything fiber related including paper, please contact me or one of the other moderators on the forum and we’ll get you on the schedule.

I hope everyone has a Happy, Healthy and Prosperous New Year!  Happy Creating in 2018!

Funky Vase Cover

Funky Vase Cover

I had purchased a ball of yarn at a clearance sale. It’s a combination of wool, acrylic and nylon and has a bit of sparkle to it. I wasn’t sure what I wanted to do with it until I found an orange vase I had laying around.

I made a resist then covered it with with two layers of odds and end batts with similar colors.

Then came the fun – wrapping the yarn around the resist in lines.

It was a bit fiddly flipping from side to side and then at the top and bottom to keep the yarn from falling off.

When I was satisfied I was ready to felt it, I went slow and easy checking frequently to make sure it was all staying together.  I purposely didn’t leave spaces between the lines thinking the yarn would felt to the backing and itself.

As you can see it’s a bit lumpy in spots and didn’t shink as much in height, so it’s a little taller than the vase.

I did a little needle felting to straighten things out and attach a few stray yarns.  But I was happy with the wavy texture.  I did also have to shave it a bit.  Then I had to decide what to do with it.  Here is one use:

I’m sure I could also use it for flowers, paint brushes or a number of other things. What would you use it for?

More Crochet Textures

More Crochet Textures

I continue to be fascinated with the variety of textures that be created with crochet.

While some look similar there are subtle variations that make them unique.

This is the Crunch stitch.  It is a tight pattern that looks similar on both sides. I especially like it with the shiny yarn.

The next two are the Spider stitch. Both were made with the same hook, but because of the difference in yarn, look slightly different.

The Raised Treble Diagonal stitch.  I completed this sample with the same first row just to give it a finished look.  The back of this one is plain.


Another favorite is the Primrose stitch or maybe its the color.


The Aligned Cobble stitch has two different sides. Its been overcast here, so the photos aren’t the greatest.  The second one on the dark background is the back.


The Textured Combo stitch has an interesting texture and is the same both front and back.


So, my crochet adventure continues.


Shaping up the Crochet

Shaping up the Crochet

Now that I’ve learned the crochet basics, I’ve challenged myself to follow instructions to learn to make shapes.

I guess I’m really thinking spring because I first tried flowers using two different methods.  I like the yellow one better since the hole is less noticeable.

A little fancier flower which wasn’t as hard as I thought.

Then a circle.

Feeling more confident I did a triangle motif. Since I’m using medium weight yarn it ended up larger than I expected and kind of floppy.  I may try again with a smaller hook and tighter yarn.

Of course, I needed to try  a heart.

And my favorite shape an octagon.

By accident in making an octagon,  I made a nonagon (a nine sided polygon) which I didn’t know existed.   There is a cool animation of how a nonogon is calculated here. It’s not perfectly balanced, but I like it.

All of these were made with combinations of the basic stitches.  It was interesting re-learning how to follow instructions to create these shapes.  I thought the videos would be better, but found I kept referring to written instruction. Probably because I could reread instead of rewinding. That is if the written instructions are accurate which in a couple cases they weren’t.  I did a lot of tearing out and redoing, but that’s how we learn.

Have you tried something new recently?


Relearning to Crochet

Relearning to Crochet

I’ve been trying to think of projects that weren’t labor intensive since I’m having back problems again.  My son and his family gave me a set of ergonomic crochet hooks for my birthday.  Then for some reason I started getting crochet posts in my Facebook news feed. I’ve been intrigued with some more complicated textures and dimensional stitches.  But I haven’t crocheted in years and figured I’d start with the basics.

I do have a book on crochet, but the Internet is loaded with tons of videos that keep calling me.

I’ve been practicing, but not have gotten my tension mojo just right.  So, bear with me. For these samples I used a medium weight (worsted) acrylic yarn I had on hand with a 5 mm, (UK 6, US H8 hook.)

Next to making the chain (ch) for a sample, the Single Crochet (sc) is one of most basic stitches.

20170301_115738

Next I tried the Double Crochet (dc).

20170301_115804-1

Then I made a sample with the Half Double Crochet (hdc) which I don’t remember ever seeing. A little more intricate and I liked the added texture.

20170301_115832

The Triple Crochet (tc) is more open and less dimensional.

20170301_115915

Then finally, the Double Triple Crochet (dtc.)  Very open and airy.

20170301_120009

While they aren’t perfect and I’m getting the tension a little more consistent with daily practice, I’m far from making a project.  I try a new stitch everyday to keep my hands on fiber and learn something new.  Which I’ve learned helps spark creativity when you learn a new skill.

Have you tried something new lately?

Finishing the Panels

Finishing the Panels

Last week I showed you two large panels I made using scraps.  Since then I created three more.

One long panel.

20161116_145808  20161118_122459

20161118_122511Two short ones.

20161116_145815 20161118_122422

20161118_12244120161116_145808

20161118_122349 20161118_122404

Here they are laid out on the floor.

20161201_214933-1


Here’s the final project.

20161204_142831 20161204_143117 20161204_143049 20161204_143029 20161204_143002 20161204_142938 20161204_142841


So, whats underneath?

My Simplicity Needle Felting Machine naked.  Sorry about the lighting, this was our first snow and kind of cloudy.

Now you see it.

20161204_142455Now you don’t.

20161204_143002

I was amazed that I got the sizes right.  I purposely left the edges organic.  Its a little lopsided but the top of the machine is narrower than the bottom.  Now I can change it around for a different look when the mood strikes.

Did you see that coming?

We have three spots left for sponsorship to keep our forum ad free, if you’re interested, please visit the forum and leave a response under 2017 Sponsorhips.  Thanks!

Creating Panels for a New Project

Creating Panels for a New Project

I had such a good time using my scraps and embellishments for my coupon case, I decided to do a larger project using panels.  And using up more of my scraps.

Here is the first large panel.  I started on white prefelt and added  bits of leftover batts creating a cloud effect for the background..

20161113_155937

Then I added silk selvage, pieces of cheesecloth, silk pieces,  scraps of scarves, metallic fabric, yarns and a little of this and that, topped with threads  and a bit of wool wisps to secure the threads.

20161114_140636

The next panel I forgot to take a pic of the cloud background.  But for this one I used silk selvedge, silk scraps, cheesecloth, boucle yarn bits, mohair, prefelt offcuts, and pieces of leftover roving amongst other things including threads.

20161114_140725

It was fun just picking out things from bags and literally throwing it on. The textures are great.

20161116_144454

Closeups:

20161116_144517 20161116_144529

I love the way the threads cross over and look like roadmaps.

Here is the first one finished with closeups.

20161116_144611 20161116_144649 20161116_144633

I was surprised the prefelt just grabbed everything.  I had to shave each panel to get some of the glittery stuff to shine again.

Three more panels to go, so stay tuned.

Have you done your 4th Quarter Challenge yet?