Browsed by
Category: Scarves

September Adventures

September Adventures

September has been a busy and exciting month in contemporary textile art (specifically felting art) in Ireland so I thought I would feature what I got up to, I will call it my September Adventures.

Weather wise, the month started as we hoped it would continue (it didn’t by the way) with a return to fine warm weather – something we had not seen since last June.  So I took the opportunity to visit our National Botanical Gardens (https://www.botanicgardens.ie/) which are situated on Dublin’s north side.  The gardens (there’s free entry, if you ever visit Dublin, Ireland) opened in 1800 and are an oasis of calm with restored glass houses, magnificent specimens, bee hives and, of course, a tea room.  There’s also a pedestrian access to the historical cemetery next door which I suspect is not seen too often.    Glasnevin Cemetery also houses a genealogical archive for anyone wishing to trace their Irish ancestors (https://www.dctrust.ie/genealogy/home.html).

But, I digress.  Let’s go back to the gardens.  My visit coincided with their annual exhibition ‘Sculpture in Context’.  The exhibits feature artworks in various media including ceramics, wood, metal.  I decided to focus purely on the textile element of the exhibition and to photograph any pieces I came across as I wandered around.  I was aware that some of the members of Feltmakers Ireland had pieces accepted for the exhibition; Clare Merry (http://www.merryland.ie/index.htm) an exceptional artist who quietly creates her pieces was featured.  If you would like to see some of Clare’s work please check out her website, which, she tells me, is not really up to date, or Google her and feast over the images; Fiona Leech (https://www.instagram.com/feltathome/?hl=en) had three beautiful pots which were originally housed in the cactus house.   Annoyingly two of the three pots were stolen within a matter of hours of their arrival and the remaining one was moved to a safer spot in the garden’s gallery.  I thought I would show you the three pots as they were originally grouped together.

Fiona Leech’s three pots (source: Fiona’s Instagram page)

I searched but could not find Leiko Uchiyama’s beautiful work but here is a link to her website if you would like to check her out: https://www.leikofelt.com/my-felt-work/  I found two other exhibits from members of the guild.  Their featured work while not through the medium of felt were equally stunning.  Congratulations Mel Bradley (https://melbradleysilks.ie/)  and Mette Sophie Roche (https://metteroche.com/)

I put together a slideshow of my textile finds in the gardens which I hope you enjoy.

We had our first meeting after summer in Feltmakers Ireland and as usual the committee put an incredible amount of preparatory work into making it successful.  It was a busy morning as everyone beavered away felting flowers to create a tapestry as part of the 20th anniversary celebration for the guild.  Much to everyone’s delight, the guild’s founder Elizabeth Bonnar joined us. I thought I would feature Elizabeth here as without her it is doubtful that there would be such a vibrant community of feltmakers today.   Here she is with her granddaughter and with the committee.

Feltmakers Ireland founder Elizabeth Bonnar and her granddaughter
Feltmakers Ireland committee with founder Elizabeth Bonnar (3rd from left)

Here are some photos taken on the day.

The finished tapestry was revealed at Feltmakers Ireland ‘Bountiful’ juried exhibition which opened on 30th September.

Feltmakers Ireland members: The Floral Tapestry to celebrate 20 years.

The exhibition also saw the launch of the new book “Exploring Irish Wool for Feltmaking”  The book is the product of a collaboration between many members of Feltmakers Ireland guild, sheep farmers, shepherds, shearers and suppliers and not forgetting the various washers and carders who took the raw fleeces, converting them into usable fibres for testing.  I think this approach was quite unique and it will certainly be a worthwhile and useable addition to any textile maker’s reference library.  Understandably it was a huge project so congratulations are due to all, especially Annika (Berglund), Breda (Fay) and Sinead (Doyle) who collated all of the findings into an invaluable resource on Irish wool.  It’s so full of well written practical advice and it was made extra special by the presence of one of our Government Ministers, Pippa Hackett an ardent supporter of the project, who officially launched the book and the exhibition . Here is a quick look at the contents page to give you an idea of the scope of the book:

Exploring Irish Wool Contents page

An added bonus is that feltmakers/wool artists can now make direct contact with numerous artisanal suppliers so there is no excuse for any of us not buying closer to source and of course for anyone overseas who wishes to use Irish wool fibre in their work purchasing from source.

It is available to purchase from the following link and I understand will also be available in eBook format shortly:  https://feltmakersireland.com/exploring-irish-wool-for-feltmaking/

I hope you have enjoyed my September adventures.   It has been an exciting month.  Once again I would like to thank Feltmakers Ireland and their hard working committee who work tirelessly to maintain this vibrant community – it makes such a difference that, as textile artists, we can gather together and create regularly. I take my hat off to Elizabeth Bonnar and her decision to found Feltmakers Ireland twenty years ago; the catalyst for lifelong friendships, masterclasses, collaborations, exhibitions, networks and travel.

To complete September’s birthday celebrations, I thought I would produce a slideshow of the Bountiful exhibition which is running for the month of October in Phoenix Park, Dublin Ireland.  I took photos on the day so I apologise where the light may be shining on the artwork.  There are over 30 pieces of art and it will give you an indication of where Ireland’s vibrant felting community is at in its journey.  I hope you enjoy it!

Finishing the hand spun/hand woven scarf

Finishing the hand spun/hand woven scarf

In the fall I wove a scarf using my ‘precious’ handspun yarn.  It’s time to stop thinking of this commodity in such terms.  There is bound to be loom wastage when using any yarn and handspun can’t be saved, so best to get over that reality and start enjoying the enormous gratification to be had in weaving my own yarn.

The excitement didn’t wane even as the finishing process started.  Finishing can be an extremely tedious time, but I really enjoyed it this time.

A metal needle slides the knot into position

Once the warp is woven it’s time to cut it off the back beam.  I did this very carefully and knotted each group of four threads as I went along.  Using a large metal tapestry needle lets me slide the knot into position easily.  I didn’t hemstitch the scarf, nor did I use a fringe maker.  These are two perfectly satisfactory methods of finishing but I chose not to use them, maybe on a later project.  I also left a lot of fringe length to help in the finishing process for later evening up.

Starting the fringe finish on the loom - back edge of the scarf

Here the back beam fringe is all done, now I have to unwind the fabric and start on the front of the material, which is still attached to the front of the loom.

These knots are usually easy to undo, but if they get a bit cranky the metal needle comes in handy for prying them apart.  Again, I just knot them in groups of four as I move along the front of the loom.  Once that is all done, the fabric is inspected for unwoven threads that are hanging loose.  My apologies for not taking pictures of these, but I was running out of hands.  These usually are along the selvage edges and I trim them off or weave them in using my trusty metal needle.  It’s a bodkin so works perfectly for that task.

The plaid of the two different burgundy shows clearly

Once everything is where it should be, the fabric is given a wash in very hot water and mild soap, rinsed and hung to dry.  I was very pleased with how the colours played out to give a subtle change in the plaid.  I hope to be able to replicate this somehow in the future, just have to figure out how I did it in the first place.

Align the knots of the fringe and cut both sides of the fringe

The final step is to even out the fringes; they need to be the same length on both sides.  I find it easiest to pin the fabric together and just cut them at the same time.

Once the fringe is trimmed the two sides are pinned together and the fringe length is verified

Sometimes they need just a little more trimming, just noticed there is a stray bit in the picture, just like a bad haircut.

The final product is going to be used for display purposes at the next Sale and Exhibition.  I am very pleased with the final result.  It will not be for sale.  I did show it to a fellow weaver for a hard critique and I meant it.  I wanted to hear the “hard stuff”.  She was kind enough to tell me the truth.  There are a few techniques that I need to work on before selling my scarves.  I need to open up my work so it drapes better.  I need to get better at math!!!  This ended up very short.  It was a wonderful width, but it did shrink in length and would only work as a dress scarf.  And finally, I need to practice hemstitching.  That said, the colours are great, my use of yarn is superlative, the fringe is perfect and the simplicity of the design is perfect to set off the fibre.  Ta-da, I’ll take that.


Doing Some Teaching

Doing Some Teaching

The last couple of weekends I have been teaching some workshops. Last Sunday was Nunofelt Scarves. This was originally scheduled for December. But I caught whatever nasty head cold was going around, it came with a very annoying cough. I did a test for Covid and it was negative.

Anyway, after a couple of years of no workshops and a delay, it was good to be able to teach people in person again. I am still rusty when it comes to taking pictures during class, so there are not very many of this one.

rubbing nuno felt scarves

students with finished nuno felt scarves


Yesterday I taught Wet Felt Birdfeeder/house.

This is the picture we use to advertise it.

Everyone in the class chose to do a feeder( larger opening) in a gourd shape.

I remembered to take a few more pictures but I still had a hard time remembering.

Laying out the base wool.

laying out wool for a felt birdhouse Two people laying out wool for a felt birdhouses two people laying out wool for a felt birdhouses


Decorating


The finished birdfeeders. I think some of the holes may need to be enlarged. They have balloons in them to hold the shape while they dry.


All in all, we had a great time on both days. It was so nice to teach again to interact and answer questions and see people be amazed when it really does work.


Weaving a Cowl for a Christmas present

Weaving a Cowl for a Christmas present

Hello!  I am Carlene and a new poster here on the Felting and Fiber Studio blog.  I live in Carp which is part of Ottawa Canada. I am a member of the Ottawa Valley Weavers and Spinners Guild; the same guild that Jan Scott, Ann McElroy and Bernadette Quade belong to.

I am interested in a number of fiber arts including: crochet, knitting, spinning, felting and weaving.  I will admit that spinning is my biggest passion and where I spend most of my time.  I have been dabbling in weaving for a bit, using rigid heddle looms and taking some classes at the Ottawa Valley Weavers and Spinners Guild.

In June 2022 I managed to purchase a used Saori CH50 loom and since then my weaving has really taken off.  I love the Saori philosophy and how well designed the loom is.  Saori weaving is a free form style of weaving developed in Japan.  You can learn more about the history of Saori online from Saori Global.

Here is my Saori loom.  It is a cute little 2 harness loom with a small footprint similar to a card table.  The official specs are as follows: Width: 69cm (26″), Depth: 61cm (24″), Height: 98cm (38″), Weight: 15.7kg (34.5lb), Weaving Width: 60cm (23″).

One of the neat innovations of the Saori looms is using a square back beam that allows you to slide a pre-wound warp onto the loom and speed up the warping process.  You can buy pre-wound warps in a number of different thread counts (50, 100, 150, 200, 250 and 300 threads), lengths (3m, 6m, 12m and 30m) and fibre types (cotton, wool, or mixed fibers such as wool, cashmere, silk).  The most affordable warps are plain black warps in either wool or cotton.  This is a 100 end cotton warp that I recently put on my loom.  The warp threads are taped to the square tube, then wound on under light tension with spacers inserted occasionally.  At the end of the warp the ends are again taped down.

After putting the warp onto the back beam, I lifted the reed and beater out of the loom and set it aside.  Then I untaped the warp threads from the roll and lifted them up over the back beam, over the middle castle of the loom and taped the threads to the loom shelf using green painters tape.


Next I did some quick counting and inserted some chip clips as markers.  I wanted to thread from the middle outwards so that I could easily position the warp threads in the middle of the reed and the heddles on the shaft.  After counting out the threads I carefully snipped a single thread from the tape, then threaded it through the inserted eye heddle on the rear shaft.  I repeated this process with the the next thread and then threaded it through the inserted eye heddle on the front shaft.  I then skipped a heddle in each shaft and then repeated this process to thread the next thread, all the way across the loom.

In this next picture you can see all the black warp threads have been inserted through the heddles.  I have used chip clips to keep the threads neat and tidy.  There is a spare empty heddle between each of the threads.

I decided to add some supplementary warp threads to experiment with adding a bit of colour to my warp.  I bought these Kumihimo bobbins to try.  I wound cotton thread in various colours onto the bobbins.

Then I positioned the bobbins at the back of the loom and slowly threaded them into some of the empty heddles between warp threads.  The placement of these threads was somewhat random.  After adding in the supplementary warp threads I was ready to thread the reed.  So I put the beater bar and reed back into the loom.

I used my threading hook to thread the reed and I did groups of 4 threads, then one empty space in the reed, then the next set of 4 threads.  Chip clips were again used to keep the threads tidy.

After completing the threading it was time to tie onto the front beam and then start weaving.  The warp threads are knotted onto the front beam.  The blue yarn you see is a bit of scrap yarn at the beginning of the project to help space out the warp threads.  The weft threads (the back and forth weaving threads) is some self striping wool/acrylic sock yarn (Kroy Socks Stripes in the colour Burnished Sierra).  When you look at the back of the loom the Kumihimo bobbins with the supplementary warp threads are hanging off the back.

I wove a piece that was about 64″ on the loom.  After taking it off the loom the piece measured 60.5″ x 20.5″.  After washing the dimensions will shift again and there will be a bit more shrinkage.

After removing the blue waste yarn I trimmed the warp ends, knotted them together, then twisted the fringe.  The result is a cowl for my Christmas gift pile.  I still have one last step to do though.  The fabric still needs to be washed to set the cloth and after washing it’ll need a quick press with the iron to make it look beautiful again.  I have a stack of Christmas weaving waiting for washing and ironing.  Luckily there is still a bit of time before Christmas to get it all done.

I got the stack weaving washed and realized that I had forgotten the step of sewing on labels.  So today I sat down with the pile and sewed on tags.  I have these nice vegan leather tags that I purchased off ETSY from FractalFocusStudios and I carefully sewed one on each item.


After putting the tag on I did a quick try on.  Love it!  My stack of scarves and cowls are now sitting in the pile of Christmas gifts.  Soon they will all be adopted by new owners.


Weaving with hand spun, again!

Weaving with hand spun, again!

Jan Scott documented the Sale and Exhibition put on by our Guild in early November, kudos Jan.  It was a great success and inspired me to try to answer a recurring question asked by so many of my clients.  I was embarrassed that I didn’t have the information for them.  Will this skein make a hat, scarf, mittens, socks, etc?  The response was always – ‘that depends’ and it does.  It depends on technique, the width of the weaving, stitch size, needle size, size of hands for mittens, and all sorts of variables.  It’s so frustrating to not have an empirical answer, so I decided to use my handspun and make a scarf, standard 14 inches wide by 40 inches long.

I calculated I had 234 yards/215m of brown and 495yds/457m of burgundy and silk.  I would need 106yds/98m brown for the warp and 214yds/196m burgundy and silk for the other part of the warp.  Based on that I had lots for the weft.  We’ll see. Math and I are not on speaking terms.

Just to keep the learning curve vertical, I also decided to use a warping mill along with my sectional beam.  If you have ever watched videos of industrial weaving facilities you will see huge walls of bobbins feeding into the back of looms.  A sectional beam is one step down from that.  All the threads you want are wound onto a single inch of the back beam of the loom.  So if you want to weave something with 20 threads per inch you need 20 bobbins full of thread to wind onto that little 1 inch spot.  You wind on for as many yards/meters as you want, then move to the next slot in the beam, wind on another twenty threads/inch and continue on.

The warping reel lets the weaver measure a single thread for the whole length of the project, change the colour as needed and then keep measuring for the whole length of the project.  It’s perfect for smaller projects. The craftsperson will have to decide when it’s time to move onto a different warping technique to suit their purposes.  This time I wanted to try a hybrid method of warping.

When using a warping reel you must keep the warp from tangling.  It can become the weavers’ worst nightmare.  I know in my early days I did lose the cross on one of my warps and nearly lost my mind.  It did get untangled but I swore it was never going to happen again, so I do double crosses on all my reeled warps.  Tie the cross at both ends of the warp.  Better to be safe than very, very sorry.

I also didn’t want to waste any of the handspun if possible since it was in very, very short supply, so I used a salvage technique of tieing onto an old warp.  This can save up to 24 inches or nearly 3/4 meter of handspun wool per thread.  That’s a huge amount of handspun. It’s also a ridiculous amount of work, so I’ll have to rethink this, but once done I was pleased with the result.

I still had to check for threading errors and there were some.  Don’t thread the loom late at night, don’t thread the loom late at night….and don’t thread the loom late and night.

The next morning, a quick check of the basic threading by lifting the threads at an angle shows that everything is in order, literally, and the threads are ready to be tied up and woven with a test thread.

And finally woven with the real stuff. I wish you could see this in real light, daylight, oh my goodness, it shimmers.

What a load of work, and what a great result!!  I had no idea my hand spun could be so lovely, I’m so pleased, but there is the last bit of finishing that I need to do and hopefully that will be successful too.  This will make a great display piece for the next Sale and Exhibition!

Felted scarves

Felted scarves

When I’m felting scarves, I’m trying to play with colours in such a way as nature is changing around us. I love the colours of autumn, spring, summer and the innocence of white winter. It’s important for me that every part of the scarf, fiber, wool, silk and gauze, at the end of the felting process, become colourful art. For the base I usually use hand dyed gauze and silk, and on the top Australian merino wool and wool yarn. After I finish the design, I use the rolling technique. For me it’s a pleasure to felt scarves and I recommend that everyone try!

Where has all the time gone?

Where has all the time gone?

I do not know where time has gone. I remember having time but it seems very elusive at the moment. Most of my time is taken up with preparing things for our farmer’s market. Thursday is cookies and Friday with my husband doing as much as me, are all the fresh baked goods like butter tarts and buttermilk tarts. lemon curd for tarts too and bread. all this is fine but now I am spending the rest of the week making meat pies. Tourtiere and Chicken. selling out as fast as I can make them. Don’t get me wrong, this is all good it just doesn’t leave much time for felting.

To that end, I have only a couple of pictures of my current felt cowl project I was telling you about here: felted cowl part 1

This is making the template. I drew around the finished paper one and then sized it up.

And this is the silk wrapped around it. Is anyone surprised I picked purple?  You can see the line across on the other side. I forgot to take a picture of the other side. I took me forever and many tried to get the silk around it. I was just not wrapping my head around how to do it. Looking at it here I would make the template larger top to bottom and tape it across the middle, around, then around back and across the middle again. I think I was trying to do it like the paper one which has the joined area on the diagonal and the back part strait. This is much easier. I will put in some basting stitches to replace the tape and I can move onto the laying out of fibres. At this rate, it will be a Christmas present to myself.

By the time I got to this point, I was ready to say this will be a one-off experiment because I am not struggling like this for everyone I make. But now seeing it in a picture after several days of throwing evil looks at it on the other table I think it won’t be so hard the second time.

How would you set up for this type of scarf?


An Interesting Cowl Experiment, Part One Design

An Interesting Cowl Experiment, Part One Design

Here is the link to the pattern I used for inspiration. https://catbordhi.com/wp-content/uploads/Rio-Calina-Cowl-1.3.pdf?fbclid=IwAR2sORW3PfXAJ3hP9Rcf_ZGYJM0rMsn5kdSnELmee1ca33VxeaoSSg2HLsw

When I saw it it had been shared form here.  It is a free pattern.   https://www.facebook.com/groups/knitscents/

When knitting this you do it flat and sew it together. I am not a great sewer and it would end up not looking very good. So I want to figure out how to do it over a resist.  It will also take up a lot less room when felting if it is around a resist.

I cut a piece of paper 36 inches by 9 inches.  The pattern is 34 inches long but it was easier for me to measure 3 feet. I have footmarks along the edge of my table. The 9 was a guess.

Next was figuring out the folding. the pattern has the cowl divided into 3 and you join it fold to fold. This is what happens when you try that with paper. You can’t align them properly because the bottom is bigger than the top.

I adjusted the folds until they aligned properly and taped it again. Then I folded it in half along the length.

This is going to be too small. It works with knitting because it has stretch, felt and paper do not. It makes an interesting hat.

I decided to slide it down to my neck. It was just manageable. I turned it over too.

So 3 feet isn’t the right length. I will try 4 feet.

This one worked well. it goes on fairly easy and it is not tight around my neck.  Of course, it won’t be as stiff as the paper.

It won’t be as bulky as the knit one but I think it will still be nice.  I may have it done in time to be another item for the 3rd quarter challenge. https://feltingandfiberstudio.com/2020/07/07/2020-third-quarter-challenge/  There is still time for you to join in too. You can share your items on the forum. https://feltandfiberstudio.proboards.com/thread/4185/2020-third-quarter-challenge


A Spring Shawl

A Spring Shawl

This is a throwback post. We had a very busy first day at the farmers market. The busiest day we have ever had. We had what we thought was a 3-week supply of Pasties and sold all but 2 of them. So there will be no felting this week while I restock 4 flavours of pasties for next week and hopefully enough to last more than one week. So, I hope you enjoy this post from a few years ago.

The museum store wanted some shawls that are more “springy”.  This is the first one.

It is a pastel pink and blue silk with pale pink wool on 2/3 of it. I then added some silk hanky flowers and leaves at each end and in the middle. It was to plane so I added some more leaves down the length. At this point, I remembered to take some pictures.

pink-shawl-silk-flowerspink-shawl-left-end pink-shawl-middle pink-shawl-right-end

The pink wool is in a very thin layer so it will be very lightweight for spring. The finished piece is about 15 inches wide so it can be a small shawl or a wide scarf.

finished-spring-shawl finished-spring-shawl-wool-side-2

finished-spring-shawl-wool-side-1 finished-spring-shawl-silk-side

I like doing shawls with a silk section left to float as you walk.

The pictures are in my studio, taken hastily as my turn to blog snuck up on me. Everyone seems to be complaining about it being too dull outside to take pictures. I have the opposite problem. The sky is blue, the sun is shining and the ground is covered in white highly reflective snow. It is blinding out there.

Are you thinking about spring things with soft colours or are you still in hibernation with warms cozy colours?


Finished Scarves

Finished Scarves

I managed to finish the 2 scarves I was working on,  They are now dry and ironed.

This is the white one. It is nuno felt down the middle. I had wanted to put black locks on the ruffles but what I thought were black locks are purple and they bled when I tested one.  So not going on a white scarf.

Here’s a close up of the end with the white locks. They are Bluefaced Leicester locks.

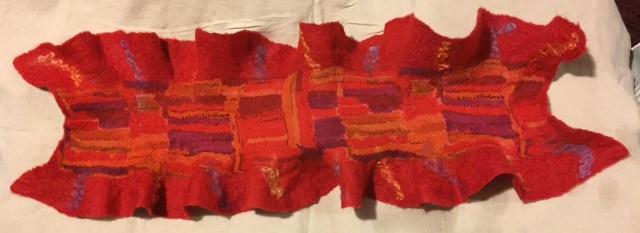
Here is the red one. No close-up, it just bounced a red blur into the camera.

They are a bit of a nuisance to iron. you have to do the edges one at a time, separately from the center. It looks like this when you are ironing.

This is what they look like rolled up, like fancy dumb bells. It does keep the ruffle snice though.

I did mange to get 3 more done this week. I finished them today. They are hanging in the bathroom drying so no pictures yet.  I did start a new one and forgot to take a picture of it until I was wetting it down.

and a close up of the lace and the end. This fabric came from an odd-looking little poncho. I can’t remember where I got it but it must have been part of an outfit. You can see the silk fibres I added to the edge in the first picture. The second picture is when it was flipped over so I could neaten up the edges. the finished edge of the fabric will look really nice sticking over the end I think.

More pictures next week and I hope, at least one finished hat. Hats are tomorrow’s job.

Facebook Event    Web page