Browsed by
Category: Inspiration

Painting with wool

Painting with wool

For today’s blog post, I am sharing with you a workshop I went to, where Dani Ives was teaching how to paint with wool. If you haven’t heard of Dani’s work, I highly recommend you check out her website.

Dani+Ives_Luna+Portrait
Portrait of Luna, copyright Dani Ives (taken with permission from the author)

Before we get started, what exactly is “painting with wool?” It is a 2D needle felting process whereby you pick a theme, copy the design onto flat wool sheets or another type of fabric, and then proceed to “paint” it with different colour wools using felting needles.
This term was coined by Dani Ives when she realised she was essentially using wool the same way painters use paint to represent an object.

IMG_3267
My “classmates” before we started

I was asked to bring an image to reproduce. My main goal with this workshop was to learn how to do 2D pet portraits, so I decided to be ambitious and chose a photo of my cat Marshmallow.

Marshmallow png
I’m being ambitious but not overly so – her eyes are closed

After transferring the image onto the felt fabric with an ordinary pen, it was time to pick the appropriate colours to use. I confess this is the part I have the most trouble with, because you have to think of the colour not only “as is” but also have a little sense of how it will look after it’s been blended with the others around it.

IMG_3268

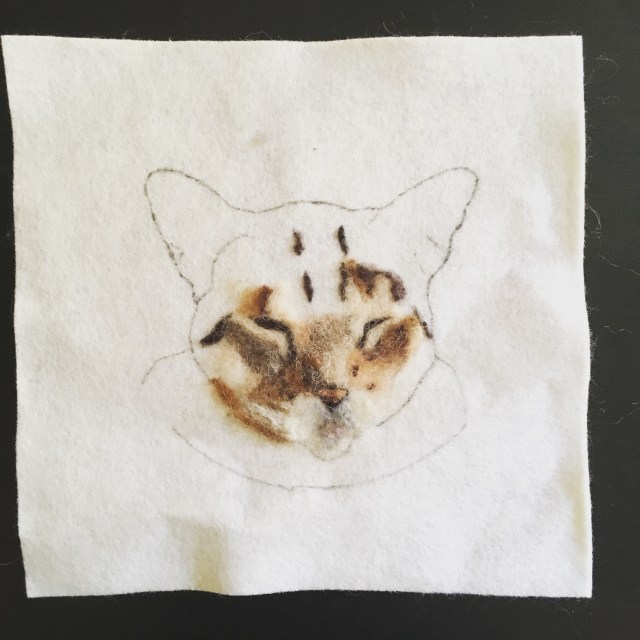
We then proceeded to apply the wool onto the surface and needle felting it in place. You need to keep the reference photo at hand and look at it often, as it’s very easy to get carried away and start using artistic licence – you don’t want to do that when you’re going for a faithful reproduction!

IMG_3273
There’s more hours put into this than I want to admit

This is a slow, laborious process. Obviously you will get quicker as you become better but I sure took long to reach the above phase.

IMG_3315

This is my current progress. It’s slowly coming together. I can’t wait to see this finished.

Finally, I had to share my fangirl moment, a picture of me with Dani Ives herself!

IMG_3270

Have you ever done any 2D needle felting? Let me know how it went for you in the comments section. Thanks for reading!

Techniques for Intermediate Felters Class-The Afternoon

Techniques for Intermediate Felters Class-The Afternoon

Last time I talked about the first half of the class, class-the-morning  In the afternoon they did one large sample of many things. They used foam tubes and lots of inclusions. There were two resists sticking up and spikes They added some silk and cotton squares, yarn,  some scrunched up silk and a silk flower.

See the cool little rolling tool I got recently. It’s a little massage roller. This was it’s first try out. It worked really well. I have some other kinds ordered so I will do a post about them later.


Here are a couple of shots of me teaching. The left one is talking about adding some scruched up silk and the right one I explaining how you make one of the resists into a flower.

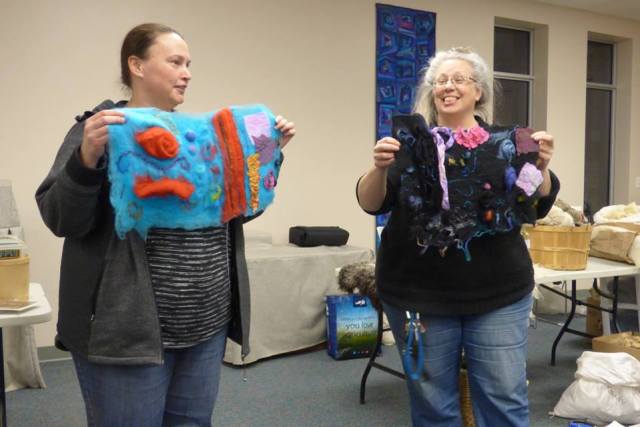
Here Carlene and Jan are showing thier pieces at show and tell at our guild meeting.

and a close up are Carlene’s

We didn’t have enough time to do everything I wanted to do, so at the end I was doing quick how to’s.  The pine needle technique two ways  and I also explained book resists.

So now it’s a matter of deciding what to take out and what to add in for the next time I teach it. There was not enough time. I think adding an hour to the class would be good. I think I will drop the nuno part of the sample to make sure we got to the pine needle part. I am not sure about the book resist. It may take to much time. What would you want to see in an intermediate techniques class?


Jan’s 3rd Quarter 2017 Challenge Part 1

Jan’s 3rd Quarter 2017 Challenge Part 1

My friend Jan really got into the 3rd quarter challenge. She worked on it most of the summer and fall. If you have read other posts by Jan you know she is a great story teller. So, I had to break this into 3 posts. This post and the next 2 will take you on a journey with Jan from concept to finished challenge.

3rd quarter challenge part 1 the Plan

I was instantly intrigued by the third quarter challenge. I have always appreciated the aesthetic of Japanese prints and the Hokkaido wave had been particularly interesting to me. A bit strange when you consider I really don’t like getting wet. Ok, I am a bit hydrophobic. When I look at the Wave I don’t concentrate on the impending death of the fishermen in there precariously tipped boats, the fact that mount Fuji may be plunged into unpleasant wetness at any moment but that the repetitiveness of the design on the inside of the wave reminds me of a Japanese umbrella. Umbrellas are good. They keep you from wetness. A giant umbrella in the middle of the ocean sounds almost appealing, as if you might stay dry surrounded by all the wetness.

OK, I have a theme. Now who would need an umbrella in the middle of the ocean? Hmmm. An octopus!

The Great Wave off Kanagawa also known as The Great Wave or simply The Wave, is a woodblock print by the Japanese ukiyo-e artist Hokusai. It was published sometime between 1829 and 1833 in the late Edo period as the first print in Hokusai’s series Thirty-six Views of Mount Fuji. It is Hokusai’s most famous work.

As you may have noticed I tend to do flat pictures with a bit more thickness than flat pictures usually have. So the concept of taking a print you like and using it to inspire something from it but not make a copy will not be a problem. OK wave as umbrella, and octopus holding umbrella. Other elements of the print to work into the finished pieces. The sky, the other littler waves and maybe the boats with fishermen, or maybe not the boats with fishermen. I have nothing against fishermen, I really do like to fish. But I’m not to fond of boats. They are just tempting fate. Why leave nice solid ground if you don’t have to? So let us leave the boats for a later consideration.

I had a plan and all within half an hour of reading the email. A quick sketch (I thought I had lost it but found it inside my new needle felting box. This is why the original idea and the preliminary execution differs quickly. I lost the sketch by putting it somewhere safe.)

Then a trip to the wonderful internet to “acquire” reference photos and do a bit of research.

I’ve got the wave (I found 3 graphics of the wave one with the fishermen very easily visible) so let’s get umbrellas.

Now for some octopuses/octopi.

Phase 1 Planning is complete.

Tidying, Rediscovering, and Inspiration

Tidying, Rediscovering, and Inspiration

I’ve been having a big tidy up this week, so haven’t had much time to make anything. And not having space to make anything is one reason for the tidy up! It’s amazing how just not putting things away properly can soon build up to one giant mess. One of the few positives to tidying up is re-discovering things. The first thing I was happy to find is a chiffon scarf I must have bought over 20 years ago. I don’t think it’s silk, but it really is nice. It looks like it was made from a larger piece:

The second small scarf I found was a silvery grey silk one which was my mum’s. I’ve thought about making a nuno piece out of it:

I bought a few large silk scarves around November last year. They’ve got sequins sewn on, and I thought I’d try one for a nuno scarf. They’re not the kind of thing I’d usually buy, but they were knocked down from £20, to £2!:

And, if you’re like me, a big part of tidying up invoves playing about with stuff you’re meant to be tidying! For some reason I kept a load of little paper hearts from the hole-punch I use on tags:

And then I found a lens from a small kaleidoscope (I used to buy them for photography!), so had to have a play. This is a soft wispy piece I made at the well being centre recently:

And this is some Kevlar fibre/thread:

One thing I did find got me thinking about Ruth’s first Quarter Challenge. Tyvek envelopes. I’ve only played around with them once, fairly recently, and just held a couple of pieces over the gas rings on the stove:

I don’t know what I’ll do with the unmelted ones yet, but they have potential!

If you have any tips for keeping tidy, feel free to leave them!

Needle felted pictures for the 150th anniversary of Canada art show –Jan Scott

Needle felted pictures for the 150th anniversary of Canada art show –Jan Scott

Today we have a guest post by Jan Scott she is a great needle felter.

The concept of the show.

As you likely read in Ann’s earlier posts the Ottawa Valley weavers and spinners guild was given a proposal to have an art show of 150 pieces of a uniform 12inX12in size to celebrate Canada’s 150th anniversary. The originally the idea had been discussed at socials to decide the rules for the submissions.


The rules were quite simple:

Rule #1 – the artwork could be any medium of fiber arts, spinning, weaving, felting, knitting, were all ok. But the rest of the rules quickly developed as I started to propose ideas I would like to try to Carlene who was going to present the idea at the meeting. My first thought at hearing the format was AH!! Cascading waterfall in felt over 3 canvases!Rule #2 – all 12×12 pieces must not extend past the canvas.                                                         My second question was can we do this in 3 dimensions?

Rule # 3 – nothing should extend above the canvas more than 3 inches.

I’m glad I dint ask any more questions.

Art show Piece 1:


So now with the parameters decided and 3 canvases purchased I started to consider ideas. I had to find something that was quintessentially Canadian to me. I thought of all the places I liked best in Canada and settled on my parent’s cottage and the summers spent with my giant bullfrog friends. So I started to plan frog on lily pad as art work #1 and Lilly pads in flower as my second piece.


My work process seems to have developed as; first research images on the internet. (or looking thorough my photographs no wonder I have been taking pictures of everything through most of my life!). Then decide the general composition with a couple sketches. Do more researching for details of the composition. I created a folder of frog pictures that had elements I wanted to work from. Toes from this picture and the profile of the head of that one. Coloring from another shot. I selected the best bits from various photos and printed out a few reference photos to work from. With the frog covered I looked into lily pads and flowers, did you know they have huge lily pads that are used to photograph baby’s floating on them? I think they were in Thailand definitely not the ones from the cottage so I mostly ignored those.

My next problem as I started to make an armature for the bullfrog (a bit smaller than the life size ones I had played with) was how to make sure he/she was under the 3 inch height limit? Ahhhh. I turned the canvas over and looked at it again. Working from the back gave me almost an extra inch so Froggy could still be crouched to spring and fit in the height restriction!!!


I worked on the armature using mostly pipe cleaners and light gage wire to make the framework. I made an upper and lower skull/jaw, dorsal lines in the back and all appendages with articulating tows. It was somewhat frog like!


I had gone over to Ann’s to get help with carding Free Fleece from agriculture Canada’s experimental farm flock. I had washed the excessively dirty and vary spongy fleece but wanted a really cores carding to make core wool. That is the wool you use for structure but don’t want anyone to see. She put it through her picker which helped immensely and then we carded it on her really impressive electric drum carder. Much bigger than the home use ones we normally see. Ann’s help was greatly appreciated she saved me a lot of time!

So I started with stuffing rolled up balls of core wool (likely a redo Arcott blend) into the center of the frog frame armature. Until I had the body formed and started rapping the legs and the first foot. It was quickly apparent I had miss judged the tow length and had to give Froggy finger extensions in pipe cleaner! After quick osteology surgery to repair his bone structure I continued giving him muscles until I was happy with the overall shape. Next I needed Froggy like colours. I started looking through my stash of spinning and felting wool. Hummm, Green does not seem to be my favorite colour. I have Lots of blue though! I had won at one of the guild auctions a bag of lime yellow green that I had planned to use as a core wool on something but hadn’t got around to it. I did a run to some of the local supply places, bought some more fiber at the Chesterville spin in and begged a bit from Ann’s stash and a bit from Bernadette too.


The horrid yellow green was perfect for the under colour for the lily pads, but I didn’t have quite the green I wanted for the frog colours so it was time to think like a painter and blend my colours.


Maybe now is a good time to tell you a bit about myself. I am severely dyslexic you likely have figured that out by the spelling or lack of it. From Pre-school on I wanted to be a paleontologist but decided you had to be able to spell your profession so gave up on that idea in grade 6 when I realized I still couldn’t spell paleontologist or most of the dinosaurs’ names. My other interest was Art (I can spell that!). I loved technical illustration, I was really bad at it but was good at layout and design and kept being told I should be a fine artist not a commercial one. So I wound up with 3 years of commercial art and 3 years of fine art and art history. With Dyslexia and all the commercial art background I tended to approach my fine art projects at school with a slightly different perspective then the rest of the class. As an example we had a large scale painting assignment. I asked if I could use un-stretched un-gessoed canvas with acrylics applied in watercolor like washes and was allowed. So I arrived each class with my painting folded in my smallest portfolio and some painters tape to tape it to the studio wall. While my classmates tried to figure how to get there monumental pieces on and off busses.

It has become apparent to me over the years that the dyslexic brain does not take a straight line to get to the solutions to a problem. Of the 150 pieces created by members of the guild only 6 canvases were turned and worked from the back. Froggy, Lilly pads, muskox, polar bare, the forge, were mine. The only other one was the Hudson’s bay blanket woven on nails attached to the back of the canvas. So problem solving tends to result in a nonlinear solution not usually arrived at by the majority of the group. This can be a good thing or not. In this case I think it worked out very well.


So now you know why I looked at little balls of coloured wool and was excited about colour blending like my long unused acrylic paints. As well as thinking about layering colours like washes of acrylic used like water colours. My third important concept was grisaille painting technique where you paint you’re under painting in gray scale and then overlay the colour over it. This is used to give amazing depth of colour at the end. I thought about the under structure of the armature and core wool as my underpainting then layered over the colour and shading as the final layer. This make it much easier to get a Froggly look to my Frog.

I tried two technique to bend the colours. The first was very traditional using dog brushes from the dollar store as if they were little carders. This tended to give more uniformity to the blend but dint look quite rite. So method 2; I took little bits (a bit longer than the staple length) of the constituent colours and started to bend them by holding the tips and pulling them apart. Over and over, this produced a more stripy colour which looked much more natural. It took a long time to get the colours blended in this way but I think it was worth the extra work. This blending technique which I practiced on Froggy I think really worked most effectively on Muskox and Pole bare.

I had purchased from Noble fiber last November at the guild exhibition and sail a piece of pre-felt to be used for the backing of a picture. I had chosen a large piece of blues and greens in colours that reminded me of both the cottage and Monet water colours. Unfortunately I should have bot 2 pieces. So I allotted the one to the lily pad background and started colour blending to make the second for Froggy and his lily pads to sit on. I made the background large enough to rap around the frame and attach to itself thus making a form base to work from.

The lily pads were the next to make. I used a mix of both wet and dry felting to create them. I discovered that pipe cleaners don’t shrink at the same rate that wool dose and had to do a bit of patching to cover up the differential shrinkage. I laid in stylized veining and darker edges to the leaves. Then started to bend the pipe cleaners to the shape I wanted the leaves to be. I used thread to attach the leaves to the felt backing.

Next step Froggy must grip the edge of the leaf with his little articulating fingers and prepare for his grate leap to the lily pads in the next picture. So I got to play with bending and posing Froggy until I was satisfied. Than he too was sewn to the lily pads and felt below.


Canvas #2 the lily pads


I created the lily pads as I had the first 2 Frogy is sitting on. Pipe cleaner armature sandwiched by 2 layers of wool on either side. Using again wet and needle felting to get the structure I wanted. Over laying the final colours to give a representation of a lily pad.

For the flowers I made a core that was sort of lozenge shaped with a point at one end. The base of the core wool had 2 entwined pipe cleaners for the stem. I then created triangles with the tip firmly felted and the base left unbelted. I added white over the core wool for the center of the flower then the triangles for the white petals that surrounded the core. The outer layer was triangle of the limey green I had used with the lily pads. I needle felted each petal onto the core and stem until I finally rapped the base of the flower and stem itself.

I made 3 flowers and 3 leaves. I split the pre-felt base and rapped it over the back of the canvas frame attaching it securely. Next I played a bit with the leaf composition, no draping off the frame or flowers poking up too high. When I was finally happy I used button hole thread (since it’s nice and strong) to sew it all down.


I started working on the Froggy/lily pad combination idea in November just after the exhibition and sail and was pleased with parts by the February meeting. Originally Froggy was going to get a lily flower too but it make him too high so all the flowers went on the second canvas frame.

A Zed Inspired Book Cover

A Zed Inspired Book Cover

I bought myself a new sketch pad that is in a book form rather then a flip pad. I decided I wanted to cover it in the way that Zed had last shown us here project-updates-2/

I am lazy and wanted to get to the decorating so I started with a piece of white prefelt. I didn’t take a picture of it but you can see it in the picture of attaching the cord farther down. This is the overall piece just wet down.

Here is a closer look at the flowers and the little resist I put in for a pocket. I want to be able to put a pencil eraser nd pencil sharpener in the cover. I used some of my handspun for the stems.

The area with the pocket will be cut off and sewn in to make the sleeve on one side of the book cover.

I flipped it over and started to layout the purple for the inside when I realised I hadn’t added the cord yet.

I made a hole and stuck it in.

Then I decorated the inside of the flap. I am not sure how this will work out but we will see.

Now all I have to do is find time to do the felting and sewing. Not sure where half the summer has gone already. How much felting have you done this summer?

Second Quarter Challenge Finally Started

Second Quarter Challenge Finally Started

Today is July 3 and finally, yesterday, 2 days late, I got started on the challenge I set: https://feltingandfiberstudio.com/2017/03/31/second-quarter-challenge-3/ I haven’t finished but I did start two pieces.

The first is a vessel. I haven’t made one in ages and thought it would be fun. I really like  a cat motif that came up when looking at the time period I had picked.

I used grey Finnish wool. I had two balls bought at different times and they were slightly different colours and textures. I used the courser wool inside and the softer silkier wool on the outside.

For the vessel I just started with a big circle resist. then added some think wool for the cat shapes.

I used a different colour for the ears and then added some wisps of Fin to help secure it.

I have rubbed and rolled it and I am now in the middle of fulling it.

The second one is the same cat design but in a relief picture. I tried some Mauri wool I had. It feels like a medium wool. I came in small, sort of batts. I don’t know why it wasn’t either roving or a proper batt but I pulled it apart and layered bits until it seemed even. I decided to leave the edges rough so it looked more like a piece of broken pottery or mosaic.

I used some really thick rug yarn thrums that I was given years ago to make the cat. I then covered it in more mauri wool and made sure it was pressed down around the yarn. It is at the rolling stage.

That is as far as I got with both of them. You will have to wait until next time to see how they finish up.


New York Botanical Gardens

New York Botanical Gardens

I was in New York City last week for vacation and thought I would share some photos of the New York Botanical Gardens. The gardens are inspiring even without further artwork but this summer they are displaying an outdoor Chihuly installation.

I have been to the gardens before and really enjoyed seeing the variety of plants and flowers. They have a wonderful collection of water lilies that seem to be in bloom no matter when you go.

The Chihuly glass really added to the gardens with their bright colors and wonderful shapes.

The glass was spread throughout the gardens and some were inside the various buildings. They even had some of Chihuly’s sketches.

So if you’re in New York City this summer, it is well worth it to go and visit the New York Botanical Gardens. Lots of inspiration and gorgeous colors. Doesn’t the close up of the glass on the left above look like fibers?


Nuno Felt Top Class

Nuno Felt Top Class

Hi I gave a private class to Anne last week end. Well really we started earlier with talking about what she wanted to make and what she wanted to make it out of  and then dying her silk. In the end she decided a long top was most versatile and she had one that she really liked so we used it as a template for the seamless garment technique. You can see the outline under the silk. we went from that and sized it up to allow for shrinkage.

Anne Likes sparkle so she added some silk and some super bright trilobal nylon I had dyed. If you click on the picture you can see the sparkle better.

And of course there was lots of rubbing and rolling

This was the first try on . It needed to pull in a bit more under the bust for a better fit.

Ann came back the next day and she made a matching scarf and a bracelet in different colours. I forgot to take pictures of  the scarf on its own or the bracelet at all. We did take a picture of the finished top and scarf on my dress form. I had to take a lot of pictures to get a good one as it was windy.

Ann took some pictures at home later. If you are a member of the wet felt makers group on Facebook you will have seen these.

I really like the way this green scarf works with the purple. And how well it goes with a glass of wine and the great shoes.

Anne was a great student. She listed well and asked lots of questions. I think she had a great time, I know I really enjoyed teaching her. I am looking forward to seeing what else she makes.

Second Quarter Challenge

Second Quarter Challenge

I can’t believe it is  April first tomorrow and time for the second quarter Challenge. We are doing Art periods this year. I decided to  do Celtic art. Well then I started looking and of course it is not that simple. I decided to go with Early Celtic art, a  term used for a  period, stretching in Britain to about 150 AD. The other name for it is  the La Tène period (broadly 5th to 1st centuries BC) this is a period when there were not so many “Celtic” knots and more people and animals in the art along with many swirls. I think of Celtic as being Irish but it starts over in Switzerland and spread out from there. I think, if I am reading it correctly, it’s the romans that squashed it over towards Ireland where it survive because the romans didn’t make it there.

This is a good reference http://www.ancient-celts.com/ancientvsmedievalart6.html these pictures came form this site.

I haven’t had time to make anything yet myself but I do love swirls and spirals.

Wikipedia has a lot more information that I won’t rewrite here for you. https://en.wikipedia.org/wiki/Celtic_art There are links to more information if you want the history part. And her are more pictures to inspire you  art link . I hope you enjoy creating in this style. Please post your creations over on the forum. We like to see what everyone is doing, beginners and  experts alike.