Surface Control – looking at Hair Spray and styling gel, initial investigation.

Surface Control – looking at Hair Spray and styling gel, initial investigation.

Like Ann, I have been having a  busy time since the last post. I was all set to head to Oakville then my trip was postponed to next week. So I am packed, but still need to find the camping cots we bought years ago to sleep on. They are nowhere to be found so we went out to Canadian Tire and bought a new one. I have been refining my notes on the chickadee as I made another armature. (well you just saw that so I don’t think you will be much interested in seeing a second bird so much like the one Mom got and liked! But I fear Ann’s Cookies may have been more appreciated!) The bird is now living in her living room by the window. I did have something I wanted to investigate further and now might be the right time to get part one started. This will have a time component so I will not make a full report now.

Surface Control – looking at Hair Spray and styling gel, initial investigation.

Last week I was wondering about how to reduce the flyaway fuzziness of Mom’s Chickadee. I eventually took matters in hand with a pair of fine sharp pointed scissors. This did quite a respectable job, but I had considered other options. Spray fixatives were used with pastels at school and being cheap art students we often bot inexpensive hair spray rather than proper artist fixative.  Will hair spray work on wool? Let’s Investigate!!

When considering fixatives/ hair spray there are a number of factors to investigate.

  • Does it hold the fuzz in check when initially applied (I was using the product instruction for distance for spraying.)
  • Dose the hold lasts more than a few hours or days?
  • Does it discolour the wool?
  • Are there any other changes in the wool that is noticeable at the time of spraying, or over time?

Off to the Dollerama to find cheap hairspray!  On previous visits, I had seen hair spray and hair gel (Glenn uses it to keep his hair neatly in a ponytail for work.) I found two hairsprays that looked interesting.

 1 the subjects of investigation.

 The “Blue sample” was Finesse – Superior hold Firm Unscented Hairspray, it boasted a weightless, dry finish.  The instructions are shake can then hold 20-30 cm away from hair (in my case wool)

The “Pink Sample” Was Salon Selective all day Volumizing Stay Put, Extreme Hold, enriched with argan oil from Morocco. ( I have no idea what that is but it sounds impressive!) The instructions are to shake the can and hold 20 to 25 cm away from hair/wool.

The “Black Sample” was AXE Styling Adrenaline Spiked-Up Look Extreme Hold Gel. Instructions, use a fingertip amount mix vigorously then style through hair.

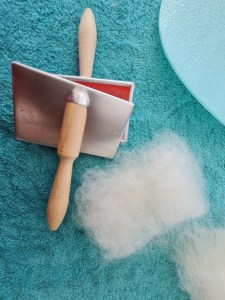
The “None Sample” was Core wool from World of Wool in the UK,  just the wool covered by a piece of card stock to keep the sun off.

What I have learned so far: hairsprays have long names and seem slightly pompous in their extremeness. (No Hair products were harmed in this experiment and all hairspray will go to Glenn at the completion of this investigation.)


Next, I made the test felt pieces using the World of wool Core wool that I had hand carded. I made a sample 7 inches long and about 3 inches wide. I used a bit of light blue merino yarn to mark off the sections.

 2 making the needle felted wool sample

3 dividing the sample into sections for each application and a control or None section.

I masked off the sections that were not getting the spray treatment to reduce cross-contamination of the samples.

 4 Prep to spray the blue sample

 5 Blue spay applied

 6 parted off the excess and tried to compress the wool. Wax paper may have been a better choice, next time!

The Blue sample is unscented (mostly) and it gave a good light coverage at 30cm.

Next cover that sample and on the pink spray.

 7 pink sample was much wetter than the blue spray.

This gave a lot more wetness both on the surface and into the wool but it was also held at the suggested 20-25cm for this product.

Next up was the black sample

 8 I borrowed Glenn’s hair gel from the bathroom.

For this one, since I had to apply it to the surface I made little finger circles on the top half and stroked the felt in one direction on the bottom. It took a couple of fingers’ worth of gel to get the surfaced covered. The circular motions loosened up a few strands of wool but seemed to have stuck the surface down. It remained damp long after both Blue and Pink were dry.

 9 On the back of each sample I sewed on a tag saying which sample it was.

Then I covered the thin “None” sample on the right so it would not be in the sun.

10 the sample

Hum, maybe I should change that to half in the sun half out of the sun so we can see if the plain wool will change colour in the light…. Give me a moment I will fix that.

11 the upgraded sample

OK, now we can check if wool left in a window will change colour in the sun. (It may lighten I suspect, but let’s see if my hypothesis is correct.)

12  L to R; Pink, Blue and Black

Sample fuzz check at application Will the  hold last Is there any discolouration  at the application Is there any discolouration  over time other changes noticeable when applied or over time
None 4th fuzziest N/A N/A N/A N/A
Black Least fuzzy * see other Slightly shiny or more reflective Surface is compacted more than other samples also has the firmest surface
Blue Second least fuzzy Not noticeable Closest to None sample
Pink 3rd fuzziest Not noticeable 2nd firmest surface

13 table

Now we have gathered all the data to begin this experiment. We will have to return to this in a few weeks or a couple of months and see if we can see a change. By then I may have finally cleaned up my desk again, how does it get so messy?

Next week I will be off in Oakville likely working on the project I have started for Glenn. He has had only had one picture felted for him so far so I think he needs a sculpture. Here is the fabric that I hope will be part of his accessories (the sculpture, not Glenn).

14 it’s not the plaid I was looking for but it may work.

Have fun and keep felting!


Not much progress yet

Not much progress yet

It has been a very busy week and I am afraid I do not have much to report.

I added a few rocks to the picture and I built up the bottom edge to be more feeling of depth. it looks a little better in person but not sure if it was worth the effort, but maybe.

I still have to add a thread or fine yarn element. I thought a few dandelions around the rocks would work. I found a nice dark green variegated thread that Jan had picked up for me.

This is a needle felted picture it is squishy, not flat and “solid” like when I wet felt a picture and then add definition or extras with a needle. I think it may make things difficult.  I made a few stitches, making sure to keep them loose because I don’t want the flowers quilted into the picture. As you can see in my mind these are large rocks, good for sitting on and watching the sea.

That did not work. It still looks quilted and I think the thread is too thin. they may have looked better with flower tops but still like they are in the rock rather than beside the rock.  At least they were easy to take out.

Fine yarn is next up. Fine is a relative term, right? Yes, I am sure it is. This doesn’t have a label but I am sure it’s a Briggs and Little sport single.


I will try this next but I think it may be too thick. If this doesn’t work I will look for some green embroider floss. I am sure I have some. If that doesn’t work I may try to think of some stumpwork maybe, something else  I could do separately with thread and then attach to the picture or maybe embrace the squishyness and quilt a simple flower or bird outline, large to cover the whole thing. Or maybe add some fabric like Ruth did and stitch on that.

And one more thing, to make Jan and Bernadette jealous.  My mom bought me a basket.

My husband said, “we don’t have a cobra.” I have a feeling he wants it to stay that way. LOL


Service Berries Appliqued Nuno Felt

Service Berries Appliqued Nuno Felt

I showed you earlier the nuno backgrounds that I had created. I decided to try using the idea of the layered photos that I created in Photoshop Elements.

So instead of going with what the background suggested (pine trees), I thought I would try some fused machine applique over the nuno felt.

I printed out my service berry photo and got out my light box, tracing paper and a pencil. I completely ignored the background in the photo and just concentrated on the branch with berries and leaves. I simplified the design as I went.

Here’s the traced design that I came up with for my applique. Now I needed to choose a piece of fabric, get out my fusible (Wonder Under) and transfer the design to the fabric.

Here’s the piece of fabric that I chose on top of the nuno felt. The photo is not the best as the nuno felt looks black. I fused the Wonder Under to the back of the green fabric with my iron. It’s easy to do but if you haven’t used fusible before, make sure to read the instruction of the type that you have. All of them are a bit different.

Once I had the fusible in place, I transferred the pattern to the paper on the back of the fabric. I had to remember that the pattern would be reversed when cut out and applied to the background. I used the tracing paper to do this by flipping my drawing over on to the fusible paper and drawing on the backside of the tracing paper to transfer the pencil line. This works best if you enhance the original pencil line with a softer lead pencil, I used a 7B. Once the pattern was transferred, I cut it out with a pair of short, sharp scissors. I left the paper in place until after everything was cut out.

Then I applied the cut out fabric to the background by ironing it in place. The fusible melts and holds the fabric in place so that it’s easy to stitch down and add details.

Before I started stitching, I decided to add a little thickened water color to get a bit more definition and shading in the leaves and berries. Then on to the sewing machine.

Here it is after stitching (free motion) on the machine. I used three different greens and a couple of reddish brown threads. It’s hard to get an accurate color representation in the photos as the dark red seems to throw the camera off very easily. This was a fun project and different than most of my other nuno landscapes. Now to figure out what to do with the other backgrounds. More to come!

Tree of life

Tree of life

This a wet felting work, one of my favourites, it was made for customer order. I loved to combine the natural colours. All of these colours are hand-dyed.

First I made the design with wool pencil roving and then filled it in with wet wool. After that, I covered it with 3 layers of wool and with the rolling technique finished the wallhanging.

This tree is reflecting our “road” in life, how we evolve and how we manage to handle challenges, day by day…

It was a great project, with a lot of work but it was a lot of fun, with exciting minutes during the felting progress.

Upcycling a Feline-Destroyed Paper Lantern!

Upcycling a Feline-Destroyed Paper Lantern!

Many years ago, we bought some sweet paper lanterns, that we have used a number of times for birthday parties or other fun celebrations.  They always looked warm and welcoming as the sun set, giving a lovely glow hanging from the gazebo.  As we always loved the look of them, I decided to hang them up in the conservatory so we could use them all year round.  Great idea….but….having little furry felines in the house, they thought it would be great fun one day to play football with them!  Sadly, a number of our sweet little lanterns went from this….

……to this!!!!   

As a person who hates the thought of adding plastic to landfill, and always wanting to recycle or upcycle anything and everything; I decided that I would attempt to create a wet-felted version of the paper lantern reusing the plastic components and light.

I recently treated myself to a lovely little book by Mette Ostman, which beautifully explains how to create round open vessels using a resist.  When I was reading the book, I realised that I could use this method to make a ball, that I could hopefully turn into a woolen equivalent of a paper lantern.  I say “hopefully”, because as a complete novice, nothing I create is guaranteed to work!!!!

Just to add…I was hoping that Alex would be here to help me create this month’s masterpiece, but unfortunately my partner has been feeling a bit under the weather and so I made the decision not to have Alex over this week, just in case.  But fingers’ crossed, next time he will be able to felt and create to his heart’s content.

So…I needed to think about materials and design.  A while back, I purchased some viscose in some beautiful colours.  I hadn’t plucked up the courage to use any yet, so I thought this might be the ideal project to give it a whirl.  I wanted the lantern to look attractive, whether or not the lights were on and thought that the viscose would give a lovely sheen to the surface, that would catch the light and make the lantern radiate and shimmer.   Having measured the original lanterns, I wanted the finished ‘ball’ to measure around 20cm diameter (when flat).  Allowing  for roughly 1/3 shrinkage, I considered following the plan in making the resist 30cm.  But in the end, I made it slightly larger (31.5cm), but kept the total wool weight at 45g, in order to make the felt thinner.  I will admit, this was pretty much guesswork, as I’ve never attempted a lamp before and I didn’t really know how thick the felt could be, yet still be able to allow the light to shine through the felt!

The proportions of wool that I used, were an inner layer of off-white wool batt weighing a total of 25g.  Layer two was pale pink merino, weighing 20g and for the final outer layer of viscose, I put together 10g each of green and turquoise.


As you can see, my white wool was in a bit of a jumbled mess so I decided to card it before using it to enable me to have a little more control over how I laid the wool down.

I began laying the white wool as finely as I could….

  and then wet, compressed & flipped it over..         

After layering and wetting the second side, I began laying down and wetting the pink wool..

  as you can see, with the pink wool I put two very thin layers, crossing each other in different directions.  I repeated this on each side before adding my final layer of viscose…

With the two colours of viscose, I mixed them by drafting them together about four of five times to achieve a merging of the two colours, but not so much that they totally blended together.


     From this…


to this     


I wanted to create some blending of colour, but still allow you to still see patches of each individual colour.   At this point, I was very much using guesswork as I have never made a lamp before and I’ve never used viscose!!!!!!!!  Those of you who felt a lot will probably pick up that I overdid the viscose!!! But it’s all a learning curve hey?!!

Having ensured that all layers were thoroughly wet and compressed, I then started to felt.  I began very gently, in order to allow the fibres to begin merging together.

I will be totally honest with you, i did not have a clue how much light would be able penetrate through the felt.  I was faced with a dilemma…to little wool and viscose, and the lantern won’t hold its shape.  But too much wool and viscose, the light won’t show through!  So this was very much was an experiment on multiple levels for me!

I spent quite a long time working the wool through a layer of bubble wrap before I reached the point where I could start rolling the felt.  It seemed to take forever to felt, but I’m guessing this is something that happens with viscose?

However, I was really pleased with how the viscose was taking shape!

I love the streaky effect I was starting to achieve…

  Do you think if looks rather planetary??!!!

After much felting, rolling, removing the resist and fulling, it was time to allow it to dry.  When I removed the resist, I cut the tiniest hole I could, because I didn’t want to risk ending up with a hole that was larger than my plastic components!  I had quite a struggle to get that resist out, but I won in the end!  I then inserted a balloon and inflated it, before beating the ball with a spatula to even out the surface.  I’m afraid I forgot to take a photo of this part of the process, but it worked because the surface was quite smooth by the time I finished, as you can see from the photo above.  Looking at it, I wish I’d known about felting when my youngest son was little because he was totally in awe of the planets and star gazing…I would have loved to make him a whole planetary solar system!!!

Once it was dry, it was time to start assembling the project.  The light box was in two parts.  The light and battery component, with a lid that fixed it in place through the paper.  Now all I needed to do was clip it together either side of the felt.  I made a hole for the light bulb to be inserted through, and two smaller holes to allow the lugs to penetrate the wool and clip onto the lid, which I put inside the ball.

You can see the light poking through inside the lantern.

And here, you can see the battery component that lies the other side of that light bulb!


The top proved to be a little bit more tricky to incorporate….  There were parts of the lid that had little lugs that held the handle in place.  That was easy, as I could poke them through the felt.  But that only meant two sides were attached!  So in the end, I got my needle and thread out, and sewed some snap fasteners to the top of the felt.  The other part of the fastener, I glued to the inside of the plastic ring.

  Here you can see the glued snap fastener!  Sadly, I was too enthusiastic to try them out, and ended up using them too soon, resulting in managing to pull them off and having to  re-glue them!!!!!!!!  Patience is a virtue!!!!!

And this is how it ended up…..

…and from the other side of the world….

To me, it looks like an alternative version of the Earth!  I’m please with the sheen I got from using the viscose.  To be honest, I’d be quite happy to have this hanging from my gazebo just as a decoration…

But…the million dollar question is, does it work as a lamp??!!


Well…to be totally honest with you, I definitely think I overdid the viscose!!! The photo of it as a lamp, shows it in a much better light (pardon the pun!) than in real life.  In the photo, you can see more light showing through the viscose fibre than there actually is.  When I make the next one, I think I will alter the proportions of the wool and viscose to be more wool, and use the viscose more sparingly to form more of a pattern, rather than as an overall coverage.  But I will say that I like the daytime version, where it makes for a decorative ball!  It does hold its shape, but I think I might opt to make it thinner next time and try using some sort of stiffener to ensure it is still able to hold its shape.  That way, I think I will get a better result for use as a lantern light.

Overall, I am quite pleased with the results considering there were a number of ‘experiments’ going on here!  As a novice, I have learned a lot and think next time, I should achieve a better result.  But at least it wasn’t a total disaster!!


Moms Birthday present.

Moms Birthday present.

Last week (https://feltingandfiberstudio.com/2021/07/28/2021-ovwsg-fiber-poker-felting/) I showed you what turned out to be the Arnold Schwarzenegger of Chickadees! He is Humongous!! (There may have been a robin secretly involved in his parentage. Some illicit tryst perhaps?)  As I said last week, I mostly followed Sara’s instructions and upgraded the wire for Mega-chickadee. The wire gauge was defiantly a success there was just too much of it.

A bit of historical interlude (I will get back to felting shortly I promise)

When I was much shorter and could still climb trees, my parents bought land adjacent to a lake but way up a steep slope, so reasonably safe from lake attacks. (You do not want to ask me about the long weekend before I started grade 13. Never trust water!) A small cottage was built looking out across the lake and we enjoyed watching sunsets, sailboats and the local birds, including the great blue heron and the loon family.  Mom and Dad enjoyed the Chickadees, Wrens and hummingbirds particularly. I spent many years bringing mom wonderful presents, of Frogs, in various sizes and shades of green. I finally gave up on my quest for the perfect frog, when Mom rejected a tree frog. it was perfect! How can you object to those huge cute eyes, the sucker tows and cool colours that made him almost invisible sitting on a tree! But no it was like all the other frogs I had brought her. Mom said, “it’s an outside creature take it outside right now!” “Aw, Mom!!!”  I got the same response for grass snakes, garter snakes and black rat snakes (I did not try the snake that looked like a Mississauga rattler but without the rattle). She even rejected turtles, including the almost impossible-to-catch, soft-shelled Mud turtle!!! Look at the nose on one, it’s soo cool!!!

Mom’s birthday is coming up fast and its going to be one of those big number birthdays. This year will be her 90th! So i will have to chose her present carefully! I know frogs, snakes and turtles are out as presents. She did like the small birds at the cottage, but the chickadee I just made would be unacceptably large. The armature would make a fine robin but she still blames the robin for taking out the original railing on the path down to the lake. The robin was a bit Rubenesque and it often hopped down the skinny birch tree that had been used to create the railing. On one trip to the cottage, we realized the railing was broken and lying on the ground! Stupid robin I bet it was jumping on the railing again!! – so no, I had better not make a robin.

She would like a chickadee; they are always so fun and will yell at you if you didn’t fill up the bird feeder fast enough. The ones in my side yard get particularly annoyed with me if I’m out and haven’t topped up the feeder.  Ok, I will have to make a smaller armature at least half the size, maybe a bit smaller.

I am pleased with the armature wire gauges that I had used for Mega-chickadee and they should work for a closer to normal size bird too. The body is 20ga steel floral wire. I measured from the foot, leg, body the added the length for the neck/head. I wrapped the neck/head in black floral tape and then cut the excess off, Which I used for the shoulder/body and tail.  I used 26-gauge floral wire for the tows and extra leg supports. I was enthusiastic in the wrapping of the legs to provide lots of support for posing the little guy.

1 Mega-Chickadee and 2 smaller Chickadee armatures

I selected a short, superfine, highly crimpy fibre from a fleece I had purchased from the Wool Growers Co-Op, (possibly a Shetland). This is the same fibre I used for the mega bird legs too.  I pulled out my scary-looking Viking combs and put them to use. I drafted out a narrow sliver and wound carefully around the wire. Unfortunately, earlier this morning I was moving small plants in pots in the front garden, one of the pots broke and I broke one of my talons much lower than they normally break. OWW!! ( I trimmed the nail down and had to use the left hand as my primary winder.  (One of the few positives of my particular learning disability is my weakness for the concept of left and right, which means I have two lefts or two rights and can often use the wrong right hand to do things. Silly brain).

2 OWWW!

Ok, the left hand is not as good at photography as the right one is.  It may be because all the buttons are on the wrong side for the left fingers. Can you get a left-handed camera? My thumb should be heeled by the weekend but now I’m curious about left-handed cameras…. Focus, back to felting!!

3 legs done and the first under-layer of core wool added.

4 comparing the two new armatures

I did not use the floral tape with its waxiness to increase adhesion on the legs but the wool stayed in place well. I was starting to worry I had guessed the nose (beak) too long. I can trim the nose back if it seems too long but let’s add more wool and find out if it still looks long.

I put away the Viking combs and pulled out the hand cards. I had made a large purchase, from World of Wool, of 2kg of white core wool. The texture is soft but a bit clumpy so just pulling out of the bag to use was not drafting as well as I would like. When I did a quick couple passes with the hand cards I created a lovely soft, lofty, easy to draft out mini batt. From which I could easily pull a section to draft and wrap with.

I used a bit of Corriedale blending of the colours licorice and slate to wrap the beak.  if you can, most living things will look more realistic if you blend more than one tone or colour. In the case of black if you can make that darkness with slate and a really dark brown or green or even a bit of red you will get a much more interesting black than using the colour “out of the tube” as it were.

Then I added more of the core wool white to build up the chest back and head.

5 It’s amazing how much bigger the bird is than the armature.

6 A bit more wool to the front of the face to get a better shape and the beak now looks like the correct size.

Oh good the nose is not too big!! The head, on the other hand, does look a bit tall and large. I need a quick trip back to check my photo reference to get the shape and angles on the head.

7 Here is Mega-Chickadee, normal chickadee and extra armature.

A bit fluffy but coming along nicely. It is now time to mix up more dark charcoal, this time to add the markings on the head.

8 it’s nice to see where you are going! So, I added the eyes.

9 Still a bit too tall so worked on compacting the top of the head.

The armature is strong enough to hold a pose of the head. The legs are also supporting the body weight. This was a good choice of wire gauge.

10 posing the armature and getting the curl in the toes.

11 I think it needs a bit of a creamy tone to the under-wing and sides of the body.

12 much better.

Now that is what I basically want. The core wool does have a bit of kemp, not a lot just the odd bit that protrudes, as well as a light halo of wispiness.  The poor guy seems a bit harry. Ann sometimes Shaves her wool to expose silk fibres, it works wonderfully. I think some tiny scissors may work for my purpose.  Now, where did I put those fine embroidery scissors? Hummmm……

13   Standing on the scissors will not keep me from trying to trim up the flyaway hairs. Is this a subtle hint not to trim anymore?


Need for more Experiments!!

I think I should make a couple of samples of hairy surfaces and try a thin application of hair spray or fixative to see if that will keep the fuzziness contained.  I would want to do a time test to check for yellowing or other discoloration to the wool if either spay is applied.  But for now, just the very basic trim has neatened up the surface of the chickadee greatly.

14 a view of the back

Next, I am off to IKEA, well in the morning, now it’s quite late since I got distracted again while writing this blog. There are bell display bottles “BEGÅVNING – Glass dome with base 7 ” tall”. Yes that is for the morning, “Yawn” I will let you see what I find tomorrow.


Day 2 the “Framing”

Oh, the Excitement!! A trip to IKEA!! (OK it’s only 5 stop signs away from the house. Well, 4 stop signs on the road and 1 in thier parking lot. It is very close, but it’s been over a year since I have been there!!) I consulted the web page and notice that the cafeteria is open for take-away food. Gravadlax or Poached Salmon? Yummm. Ok grab the camera and the Chickadee and headed off to IKEA!

15 the exciting Begavnings in their natural environment!

16 they come in two sizes!

17 the options at IKEA, If I could do woodturning I would consider the glass covers and make a wooden base.

I decided on the smaller size Begavning. Now off to get lunch to bring home.

As a fabulous treat, I went to the cafeteria and found that it was indeed open and you could eat in if you were spaced apart. I sat way at the back of the dining area in a section all by myself. It felt so odd to be eating in public and so tasty!

18 what a treat!

19 I think someone wants my dry cracker. Good thing chickadees can’t open zip lock baggies!

While i was shopping I also found a wooden articulated hand, a pepper grinder and then an umbrella weighted base in AS-IS! I LOVE trips to IKEA!

I brought home the display jar and tried the chickadee in it. The photo shows more reflection than is seen in person. Yes, that is what I am looking for.

20-21 almost ready to wrap

Do I need a piece of corkscrew hazel to give a bit of height? I tried one piece but was not convinced. I think I should add a couple of sunflower seeds and let that be the narrative.

22-25 The photoshoot

Mom’s 90th Birthday is on the 08th of the 08th, I have ordered Chocolate chip cookies from Ann (her favourite) and I have the chickadee done. It will be wonderful to see her. I hope she will like the little guy. I bet she says “at least it’s not a frog” when she opens it!

PS; Don’t tell Mom what she is getting, its a surprise!! (She doesn’t read the blog!)


My Second Poker Challenge: Felting.

My Second Poker Challenge: Felting.

Last time I showed you my spinning poker challenge. https://feltingandfiberstudio.com/2021/07/26/spinning-poker-challenge/ This time it’s the felting poker challenge

In case you didn’t see it the idea is you pick a card from felting four different category card decks. With felting wool is a given.

My picks are:

Fibre: use thread or fine yarn

Colour: use cool colours

Structure/Technique: needle felting

Other: No Larger Than An Index Card ( 3inches by 5inches, 7.5cm by 12.5 cm)

This one took me a while to figure out. I kept thinking of a cold picture even though I do know cool colours doesn’t mean a cold picture. I don’t usually do needle-felt pictures I usually wet felt and then do a little needling and stitching. I am glad it’s only a small piece.

To start I cut the right size piece of prefelt for the base. I got this to try out From Monica of The Olive Sparrow. I have to say so far it is very nice to use. It’s quite thick and nice to needle into, not too hard and not too soft. Just like baby bears bed.


Next, I picked my colours for a nice scene. Most of it is merino except the two-tone green. It is corriedale.


Laying it out. and tacking it all down. I wanted sky and water and a clifftop.


The sky and sea are blending together. I went online and had a look at some sea and sky pictures. There seems to be a definite dark line where they meet but when I added it to the picture, it looked odd. I decided to pop an island in.

That looks better but it looks lonely so I added another one and greyed them out a bit to make them look a little farther away.

That is where it stands now. You will notice there are no threads or fine yarns. That will be next. I will probably add some grasses and flowers to the foreground with stitching and maybe a tiny lighthouse on the rock. I am not sure yet what I want to do.

Registration Open for Felt Hats and Felt Bags Online Classes

Registration Open for Felt Hats and Felt Bags Online Classes

Teri’s online classes will open for registration tomorrow. The classes will begin on August 19. Teri teaches two great classes, one on how to felt concertina style hats and the other one on how to create felt bags. Both of these classes will teach you methods of improving your felting techniques so if you have felted around a resist before such as to make a felt pod, you should consider taking the next step on your felting journey.

For more information and to register for the felt hat class, click here. 

Have you taken a look at other student’s hats that have taken Teri’s class? There are some really fun hats and the variations are quite creative. Take a look at the student hat gallery here.

Teri’s felt bag class is an excellent way to learn how to create a variety of shapes of bags, as well as features such as straps, multiple compartments and pockets. You can find more information and register here.

And the student gallery for felted bags is here.

So what are you waiting for? Jump in and learn some new felting techniques.

Or if you’re just starting out and want to learn the basics, try our Wet Felting for Beginners class. This class can be taken at any time with unlimited access. For more information and registration, click here. 

Second life

Second life

Anyone who tell you they don’t have a box, draw or even cupboard of failures or “ not going how I wanted to” is either in denial or hasn’t done enough yet. My tale is about one such piece. I don’t even have a full original photo to show you so dissatisfied was I. The picture below is the starting block. To explain the original context of the piece it was two logs of wood at the forefront with a tree and mountain scene as the back drop. The second picture is of the top of the piece. I am sure you can visualise them before the chop.

I already had in my minds eye where the piece was going ,as previously having done a rock pool scene ,I wanted to achieve something similar on a woodland setting.

Although in my minds eye I could see the finished piece getting there was unknown. The piece was a wet felt project using dyed silk to create the logs and silk and fibres to create the moss and ground. I then needle felted to create depth and texture.

After studying it for awhile I decided if I established the proportion in the top left hand corner the rest would flow from there. I knew I wanted it to be multi dimensional but wasn’t sure if it would work. I stand here honestly admitting I am not the best embroiderer in the world but best foot forward added grasses in wool yarn and stalk and leaves in silk yarn to the existing blue flowers which I added at the wet felting stage with nepps. Still at this point I wasn’t happy as it still felt “ flat”. I decided to see if I could have a play and make dandelions which I could sew on top separate thus creating the second dimension I wanted.

But how? Out came my trusty stash of bits and bobs where I found some green and yellow prefelt I had made. With my embellishing machine I added further wool in differing shades of green. I then made a template of a dandelion leaf and cut them out. A final run over with the machine to strengthen them and a trim up and they were ready. I did the same with strips of yellow which I sniped and rolled. Sewing the base tightly together made a very pleasing dandelion shape , well in my eyes at least. After positioning them on the piece I was happy and created the stem with string and couching stitch.

I was happy it was now taking shape. The only area I was unhappy with was the blue flower in the foreground was knocking the whole piece out of proportion. After a tentative test decided to remove part of it completely. With this area removed ( the area between the two logs) it made more sense.

I made more leaves on my embellishing machine in different shades of brown and green and along with stones ,which I had needle felted, I added to creat the woodland base. I also embroidered some clover with bullion knots ( don’t look to closely, I have already explained about my lack of skill and this was my first attempt at this stitch).

And so to the foreground. More leaves were made and added to the blue flower. I’m afraid this flower is not a true but made up flower but at least I had free reign to create. I added french knots to the nepps to add depth.

I must admit the piece is not yet complete as I am now adding french knots to create the moss and will be adding more stones and maybe another clover ( if I can master bullion stitch that is).

All in all I am quite pleased with the piece

My point is never give up on a piece. I find some times just moving a mount around a piece of work completely changes you appreciation of it and can send it off in a completely new and pleasing direction.

If anybody would like to see the finished piece I will give a quick update when next I post.

Playing with my new toy: English wool combs

Playing with my new toy: English wool combs

A couple of weeks ago, I ordered a pair of English wool combs. They were sold out at the time but the people in the shop were kind enough to allow me to backorder. Now all I had to do was wait a few days and let the spiky goodness arrive at my doorstep!

Finally, they were here.


Leonor of Eleanor Shadow holds a pair of English combs and looks chuffed


It occurs to me that these would make great Wolverine claws for Halloween, were I in the mood to risk self-injury… Seriously, despite knowing these are pointy, sharp objects, it still surprised me to find out exactly how sharp they were in a slight moment of distraction. Note to self: don’t daydream when handling wool combs.

If you’re not sure what wool combs are for, these brilliant tools are used to process fleeces for spinning. They work by separating, aligning and combing the wool locks, whilst also getting rid of any vegetable matter (VM). The end result is a fluffy and lovely cloud that you’re supposed to carefully diz off the combs, ending up with a longish sort of roving.


Texel cross wool locks on English combs, ready for processing


Ideally, you’ll place the locks facing the same direction, which in my case was cut side nearest the tines, ends on the outside.
These are lovely locks from a Texel cross lamb’s first shear’s fleece. I washed it myself. They’re so soft and all I want to do is bury my face in them.. (which I definitely have. Don’t judge.)


Eleanor Shadow uses English wool combs to process some wool locks


Next, you carefully start teasing the tips of the locks apart with the other comb, which will transfer a bit of fibre to said comb at each pass. As you keep doing this, the longer staples of wool will move and the shortest bits will remain on the clamped comb. You’re meant to discard these short bits, but I keep them to make dryer balls.


English wool combs processing wool on a table

A hand showing wool waste after using English wool combs


You can see above that the fibre left behind retains some VM. I don’t mind it because it’s clean, and won’t be seen once the dryer balls are covered in commercially processed wool top. Waste not, want not.

You will do this transferring of fibre from one comb to the other until you’re happy with how the wool looks. The one below was on the third pass.


Side view of wool on English wool combs, after processing


There was still a tiny bit of VM but I don’t mind.

Since I wasn’t planning on spinning this wool, I didn’t diz it off the comb, I simply pulled it all off  together very gently, so it all came off at the same time.
After 30 minutes I had a few clouds.


A few soft clouds of processed wool on a table


I’ll be gathering a lot of this fluff into a bag and, once I have enough, I’ll card it on my drum carder and make batts to sell to spinners and felters. Lamb wool really is like a cloud and I’m loving playing with it.

To end this post in my usual tradition, here’s a completely unrelated photo I took a few days ago that I find amusing. This was on a building I happened to pass by here in Edinburgh.

Plaque on a wall saying On This Site in 1897 Nothing Happened

So, what’s your current favourite fibre utensil?