They tell me it’s Summer already. To be honest, I haven’t noticed… I know most of you reading after this post is published might be complaining about how hot it is, but I can inform you I’m currently writing this with a jacket on.
Ah, Scottish Summer…
I had lots of lovely knitting projects in mind for the warmer months of the year, two of which involved making some season-appropriate tops to wear when the sun was out. This would be my first time knitting something Summer-specific and I was very excited about the prospect.
Have I mentioned “Ah, Scottish Summer” yet?
Anyway, since there’s no view to wear these lovely makes anytime soon, I thought I’d share them anyway so you can at least boost my ego and tell me they’re lovely. Ready?
Ripple Halter by Jessie Maed Designs
In another blog post where I mentioned being brave enough to unravel my knitting without a lifeline, this halter top appeared briefly. I finally finished it! Just in time to enjoy it on a hanger instead of on my person… (this is knit in merino wool but it’s still too cool for the current weather, at least for me!)
My other fun knit is not quite finished yet… but my brain being what it is and hating an unfinished project, I can’t move on to another until this one is done – even if I know I won’t wear it anytime soon.
Gelato Tank Top by Gabrielle Vézina
Note the knitting needles on the bottom! The white strip is some leftover yarn I used as a lifeline in case I wanted to frog the whole thing back (which I will, because I want a couple more rounds of stocking stitch before the edging).
I mainly knit this tank top for the front lace panel, which I thought looked fun. The yarn I knit it with is a linen blend, very soft and perfect for warmer weather.
Some of you might be reading this and saying, “But Leonor, you can wear these with a jacket, what’s the problem?” And you’d be right, that’s definitely an option. However, considering how windy it’s been in Edinburgh, I’ll want to button up the jacket, which will hide the layer underneath.
I guess I’m just grumpy this Summer has been nothing like I planned and want some commiserating 🙂
What about you, any fun plans for the season? Share them with the in the comments section so I can live vicariously! And, thanks for reading.
I am still not up to the next step in the phone-carrying project, mega-stega-blob (fibre layout and wet felting come next). No, I am not just avoiding getting wet! I have tried to do non-offensive activities beyond lying down, watching movies and reading my audiobook (mostly not all at the same time). Monday I got to the guild studio and worked on the library (the books felt heavier and more tome like than usual.) Tuesday I pulled photos then pulled weeds, while sitting and started my blog chatting with you! Since I am still waiting for a few items from Aliexpress to arrive, (they may be in a literal slow boat from China) I think I should consider a few other aspects of the topic they will cover. (Ooh I’m being verbose, cryptic and obscure! I am defiantly feeling better!)
Recently I have had a few different questions about aspects of safety. I want to chat about how to keep you and your needles safely not attached to each other, by stabbing, poking and other forms of impalement. I have been making a chart of the different types of options and want to also test them, with Ann, with the enthusiastic needle felting tools we both purchased last winter. The chart is underway, but with more possible safety items on their way, let’s wait on that aspect of safety.
Instead, let’s turn from the sharp pointy blood-inducing excitement of needles to something softer that can also be dangerous to felters. Wool (and other fibres). What could be dangerous, concerning or even caution inducing about wool? It’s so soft and fluffy! It has that lovely sheepy aroma when it’s fresh off the sheep. Sometimes it’s even still warm if it’s really fresh off the sheep.
skirting dirty raw wool at the OVWSG studio.
Ok you can get muscle aches or strains washing it, wet wool is quite heavy and moving big bins of water around can defiantly get painful. When I phoned my doctor to mention my tetanus shot was due and I was about to wash a bunch of dirty sheep fleece, she had me come in the next day to get my booster. (This was near the start of covid when restrictions were most enthusiastically applied, so I was very surprised at how insistent she was that I should come into the office and have the tetanus shot before working with dirty wool. I would rather be safe than sick or sorry. Even if it means getting the other kind of needle.)
Most of us avoid any thoughts of buying aromatic wool, tetanus or the fun of skirting a fleece by just purchasing prepared fibre, usually even pre-died.
So if you are avoiding working with raw wool in your endeavours, have we avoided all potential problems with wool? No, but don’t rush off to throw out your fibre horde of fabulous feeling fibres and colours!! The precautions for wool are quite specific and can be mitigated. As you probably remember I love anatomy, physiology and pathology. I know not everyone is quite so excited about how it all works or how it all can go wrong! So I will not get into the details of alveoli to capillaries’ oxygen exchange (whew, I bet you are breathing a sigh of relief and thankful there is no exam at the end of this post!!) You are likely already aware but I do want to mention a bit about the historical problem with the wool-to-yarn industry.
For many activities or professions, there is a pathology associated with it.
Tennis has Tennis elbow (lateral epicondylitis),
golfers can get golfers elbow (medial epicondylitis) or
Weavers can get Weavers bottom, (a false bursa on the ischial tuberosity). Weavers get their pathology from many hours of rocking side to side while sitting on a hard loom bench.
By the time of the industrial revolution and the introduction of large mills, we see a rise of a pathology with wool (Wool Lung) and a slightly different one (Byssinosis) associated with breathing in cotton dust or dust from other vegetable fibres such as flax, hemp, or sisal. This was exacerbated by working with the fibres in enclosed, poorly ventilated areas (the mill buildings) for long periods of time (working for years, at 6 work days a week).
The pathology wool lung is neither as cozy nor warm as it sounds. (Wool lung sounds like someone kindly wrapped your lungs in a soft fluffy blanket of wool.) The way the pathology works is that small airborne particles lodge in the lung. Over time these partials make breathing increasingly difficult and interfere with the lung’s ability to bring air into the body. A similar problem can develop with breathing in dust from other vegetable fibres. If you are a weaver look under the loom after you have woven a tea towel with tow linen, (for non-weavers, you probably have a lot of dust and bits of broken fibre under the loom to clean up.)
There is another potential problem with wool, (even if you skip working in an early industrial mill, and avoid raw fleece processing), is the nature of the fibre and its ability to get airborne. Think of it as the quality of fluffability. Finer fibres, shorter fibres and older brittle fibres that can break into even smaller pieces will all become airborne more easily than courser, heavier, and longer fibres. I have found that I have the most airborne fibre particulate from older dry short fibres. Fine fibres that attract static can also be problematic.
Grater fluffatude: Fibers and parasitical are more likely to get airborne.
Finer,
shorter,
older fibres that are dryer and prone to breakage,
dusty fibres
less fluffiness: are Less likely to get airborne
course,
longer,
less fragile fibres
In my stash, I have many types of fibre. Some are brand new and recently acquired and some are quite old, second-hand acquisitions or appreciated gifts of often unknown age. I have a few bits in the fibre stash that are brittle and quite suspect but are just the colour I wanted. So if I don’t want to just avoid using fibre that I suspect may have nefarious plans for my health, there are ways to keep us safer. (Re; not wanting to throw away fibre may require Fiber AAA: I have trouble throwing out wool, I know it’s a problem but the first step is to admit it is a problem.)
Most fibre we use is not a problem or is only mildly so. If we have decided to keep a fibre we know or suspect is problematic, that the fibres are likely to get mobile and try to end up in our lungs, what should we do to reduce this possibility?
There are a few things we can do to mitigate getting fibre, dust, and bacterial content from the fibres, into our lungs.
Keep the fibre from getting in the lungs: (its so much nicer when wool is on the outside of the body)
Protect your lungs. We all have N95 masks from the pandemic. There are also wonderful repertory masks, with even finer particulate-blocking abilities. (They are more industrial looking and are not as stylish as the blue medical ones from covid). (There is more about this at the end of the blog)
Improve ventilation. This can be working in an outside studio (when weather permits), or using a good air filter if you are working in a smaller indoor studio. I would not suggest an oscillating fan near your fibre work to improve air circulation, that can go terribly wrong –think parts of your 2-D picture can decide to just wander off as the fan turns farther than you thought it was set to turn!!! I guess that mountain was not inclined to be there, (like the Frank slide the mountainside got up and left!) we will now have to add a grassy plane or maybe more sky?
Label your stash, if you cannot part with something that is problematic, (but the colour, crimp, or lustre is just too good to part with) label it or leave a paper mask with the bag so you will remember to avoid getting wool on the inside of your body.
Be aware of which fibres are likely to get airborne (short, brittle, older, or finer) and protect yourself if those are the fibres you need to use in your projects.
Check with your Doctor, If you are going to be working with raw wool or doing fibre prep, of wool or other fibres, you may want to check your tetanus shot is up to date. We used old slightly rusty hackles when processing flax and I have never seen a sheep have a thorough bath before getting their haircut! So, I suspect the enthusiasm of my doctor to make sure I had mine was not just her wanting to stab me with a needle. (really I don’t bug her very often!)
Reduce static: Ann had a spray bottle to mist fibre as she used her big drum carder. This reduced static and thus reduced the amount of fly-away fibre. Misting wool, if you are needle felting, may be problematic if you get the wool too wet. Wet wool can reduce the life of the needle. I have heard that leaving a dryer sheet, (or a piece of cloth that had been soaked in fabric softener (unscented) and left to dry will work) will reduce the static in fine loose fibres like angora rabbit.
Use the weather to help you. (this is probably more of a sub-point to #6 (maybe 6.1) but it’s nice to have lots of options) Use the weather to help you keep the fibres in line. if it’s humid, as it tends to be in parts of our summers, fibre is not as likely to get airborne as it will if the humidity drops which happens in our winters.
read #1 again and don’t forget to wear a mask if you are working with problematic fibres.
Masks a quick overview of options:
Dusk mask, medical mask and 3 types of fibre (Short turquoise, older dry brown top and unwashed short locks)
Masks come in various options, from large full-face and half-face air filtering masks, (they look very cool and Sci-Fi but may not be the strong fashion statement you wanted to make while working.) I have a half-face mask with the lovely double respirators but took it to a workshop and now I can’t find where it is. If you ask Mr. Google to show you a “Half face woodworking respirator mask” you can see ones similar to what I picked up at Princess Auto on sale. There are other options that are less striking in their fashion statement in case your workspace may be visible to others. (this may be a good option if you have preexisting respiratory issues.)
I also have what used to be sold as a painter or dust mask (possibly for automotive painting?) the Dollar Store used to have them regularly. They hold the mask away from the nose so are more comfortable for some people.
“Dust mask” in packaging N95 designation
You may still have the blue paper filter masks that were very popular (or unpopular in parts of Canada and the States). I was ahead of the crowd and had one hanging by my office desk for use with old dry wool well before covid arrived. I have since used up all the masks I had for work and for wool, stupid covid.
Short fibre, this particular fibre is standing in for some of the equity short but much more fly away fibre that is hiding in the basement and would not come out for the photo shoot.
Not all fibre has this problem, in fact, most do not, but if you bump into some that make your nose twitch and your Kleenex seems an odd colour when you sneeze (the colour of the wool you’re working with) then its time to grab a mask, improve the ventilation, use an air filter in your studio or use the outside studio, and reduce the static/lack of humidity. Once the offensive fibre is well embedded in your wet or dry felting, it should not be a danger to us or others, being that it is no longer airborne. (Well, unless you are using some fabulous aroma added to your felting work and there is a lot of wool sniffing going on!) hummmm….. no don’t get distracted!
I am hopeful I will be back to the Mega-Stega-Blob soon! Have fun, stay healthy and keep felting.
The next step to do for my summer tree is to get it some leaves. I decided I wanted some texture so thought I would use some silk fabric to make some needle felted nuno felt.
I found some of my boxes of fabric and had a rummage for some green I found mostly silk and some stuff labelled nylon which is a very good imitation of silk.
The green and brown was my first thought but best to try them all.
I pulled out my sampling tree. The one that looks like a peg having a bad hair day. 😉
I then thought maybe I could put the dark fabric down and then add some other fibre on top. the dark fabric is the nylon. It’s a very loose weave so it pulls threads when you poke it.
I tried adding some loose threads but they just looked messy. I think they would make great vines in a swampy picture
I decided it was a waste of fabric to put the dark green down first It would be too hard to leave some showing properly and it would prevent any of the branches from showing.
On to the real tree, I did fiddled with the branches in the middle and it does look better naked. Not that much of it will show but still, it was good practice.
I tried adding it all as one piece but I couldn’t scrunch it properly. So I pulled it off.
I added the silk in small amounts
and all done, I left a few holes for the sky and a few branches peek through. I left the edged raggy to add to the texture.
And here’s the finished overall look. I like the overall look. I am going to have to fiddle with the roots. Combined with the slant of the land, they are making the tree look like it’s leaning over. I think a little poking in on one side and poking out on the other should fix it. I am going to have a look for the wool I used for the grass portion of the background to maybe put a little over the roots. I will have to do some googling for pictures of roots.
Next, I think I will add some rocks around the roots and maybe a few around the field in the thin spots. Then maybe some tufts of grass with stitching. I may fiddle with the cloud too. I am still thinking.
I have been continuing to make progress with my large autumn landscape.
I began by looking for silk fabric in the correct colors. I found a yellow orange and a yellow green. But I needed a lighter mid yellow. I didn’t have that in silk fabric but I remembered some rice paper that I had painted yellow and coated with matte medium. I could use that for leaves too. To prevent the silk leaves from fraying as much, I ironed a light weight fusible to the back side of the fabric. Then I cut out a variety of leaf shapes. The secret to making leaves look more natural is just cut them out freely by hand. The shapes will be all different and the sizes won’t be exactly the same but that is what you want. I found a photo online to give me an idea on how the leaves should look and used that for inspiration.
When I was stitching the leaves down, I wanted some movement and the feeling of the leaves about to fall. Therefore, I only stitched them down with one or two straight stitches. This allowed the fabric leaf to come out from the background and be more three dimensional.
Cutting and stitching individual leaves takes a bit of time but I liked the result.
Here’s the piece after adding leaves. I may add a few more in a couple of places but I am evaluating now to see what else the piece might need. I haven’t cut off the bottom edge but I will be doing that shortly. I could add fallen leaves at the base of the background trees. Or I could add a bit of grass here and there. Or I could leave it alone. What’s your vote?
My idea for a name for this one is “Calling Down from the Branches”.
This is a guest post from Diane Coe, one of our readers, who recently submitted a photo for our 3rd Quarter Challenge. Thanks for sharing Diane!
My name is Diane Coe and I live in Featherston, New Zealand. I started being creative at a young age. Drawing, painting, and learning to knit from my Granny. I used to make tiny felt mice and exhibit them at a local annual art show as a young teen. Later on in life, in the 80s, I discovered Leadlight and produced for markets and made windows for houses. Then I progressed to Mosaics which I enjoyed for a while. I discovered a local felting group in 2014, and have been hooked ever since. Mainly I use wet felting with some needlefelt.
I was inspired to create Te Karanga Whakamutunga Ote Ruru (The Last Call of the Ruru (Morepork) from Maori Folklore, in which the Ruru is regarded as a guardian. With much of our planet being endangered, I wanted to portray the Ruru guarding the NZ Bush as a last call, as time is running out unless there is a change and more protection.
I wet felted the background and then needle felted, adding wool roving and balls of wool recycling from Op shops. The Kiwi is a scrap of possum fur. I spread out all my colours and fibres and picked up pieces to needlefelt as I went along, choosing what would work best for what I wanted to portray in each piece of the picture.
This close up photo shows more details of the intricate work.
There is hidden in the picture a Powelliphanta (native NZ giant snail). The piece took months to complete and is framed in native Totora farm posts.
This is the photo that I submitted of the piece for the Third Quarter Challenge. You can click on the photo to enlarge it.
Here I am in my studio, creating another landscape.
I have created other pictures like the portrait of my friends dog.
I have also entered recently a national competition in NZ called WoolOn, in which you can enter anything wool. It will be on the Catwalk and judged later in August 2003. Felting is a beautiful artform and a wonderful natural product. There is always so much to learn and create with.
Thanks so much Diane for telling us about your felting journey.
If you would like to submit a photo for one of our challenges, you can do so here. If you are interested in telling us more about yourself and your fiber art, we would love for you to write a guest post. Just fill out the Contact Us form to let us know of your interest.
De-stashing is going to be a permanent condition I fear. While trying to purge unwanted and excess fleeces I found a lovely, soft lambswool with gorgeous crimp. The colour is a slight dusty rose and the handle is so soft it’s nearly like cashmere.
This fleece had been washed and then stored in very good conditions. It was not damaged in any way. Once I started to process it I discovered a load of problems that made me question the wisdom of proceeding with processing the fleece for spinning.
The first problem was that it was a lambs fleece. Amniotic fluid can damage the tips of the fleece and make them extremely brittle. Ann McElroy told me that when she is birthing her lambs the fluid dries out her hands to the point they start cracking. I don’t doubt her for a second.
The staple is very long, but those tips, so sad to learn how easily they snap off.
Tippy fleece when the length is this long is a fairly easy fix. Just cut the tips off, and process as you would for any normal fleece, either use carders or combs.
However, there was another problem and it is much more daunting and that is scurf. Scurf is sheep dandruff. It is caused, usually, from mites, but I’m sure it has other causes. I’m mostly interested in the results which are flakes of lanolin mixed with sloughed skin cells. These harden and are extremely difficult to remove from the fleece. Since this was a lamb fleece the little critter also played in the field and got into all sorts of mischief with bits of vegetation and dust. I was two seconds away from throwing this in the trash or compost, but I gave it a deep comb, just to see what results I could get.
There are nebs in there, so I put it through the comb a second time and removed them. The wastage was massive, nearly 50%. This wastage is from cut tips, scurf, vegetable matter, dust, tiny bits of straw etc. When I combed the wool I used a spray of water with hair conditioner mixed in to keep the stress on the wool to a minimum; it really helped.
This is residue from the first combing,
And this is residue from the second combing.
I freely admit the work involved in salvaging this fleece was NOT worth it. I learned more than I ever wanted to know about sheep dandruff. This is an exercise not to be repeated – ever!!
That said, the final result is rather lovely, nearly cashmere soft, grey lambs wool skeins. The yield is an astonishing 12 skeins of gorgeous two ply, that I’m really pleased with. Not at all sure what I’ll do with it, but someone will have a suggestion, I’m certain of that.
I had another little oops on Friday. I was sitting and bent forward…and felt a little pop, froze to assess what I might have done. Decided it didn’t seem too bad until I tried to straighten up. That did not go as well as I hoped, but I got myself back to the computer and tried to keep working on a comparison of needle felting safety devices notes I had been working on. That didn’t last long and I wobbled off to lie down. If I had got the memo that bending foreword was forbidden on Fridays I would have abstained from that offensiveness movement.
Instead, I had to accept my back’s indication/insistence that I should wait on the article I was writing and get back to focusing on another short chat about Mega-Stega-bag-blog. So let’s see if I am up to transferring photos and giving you a progress report. (Lucky you, a less verbose me! Since this is the first day, Sunday, that I can type (leaning forward and sitting seems to offend whoever I ticked off greatly, while lying down was the only acceptable orientation the last few days). so to appease my demanding back it’s back to the bag:
A week ago Monday I was back in at the guild studio working on the library, dispersing fleeces and continuing the calculations for the resist for my new phone holder.
1)From 12 bags to 4 bags, with 2 spoken for that should leave 2 left to find homes.
2) This is the modified Dewey architecture we are using for the OVWSG library’s collection.
I went with a process format for classification, if you are curious I can tell you about that sometime. I will try not to get too distracted today or I will not get this blog done. I will give you the topic headings in case the photo is not as clear as I hope. (I have the OK drugs for my back, not the really good ones from the last time.)
000’s Programs, publishing and people (biography)
100’s Law and Business
200’s Studio and Guilds
300’s Fiber Sources and Preparation
400’s Colour and Dyeing
500’s Felt
600’s Spinning and Post Spinning
700’s Fine art/ Design and Weaving
800’s Post Weaving
900’s History of Textiles
I added a few more books to the OVWSG guild library collection. I need to add the new donations to the database before updating the subject, author and title lists on the guild website. Then it was time to take a break and I got started on the stegosaurus expansion to create the purse resist. (It was one of the few days I did not do library work through the social.) See I did get back on topic!
3) Vertical lines have been expanded.
4) You can see how well-folded the paper under the pencil has become.
Now I am ready to work on the horizontal lines.
I used the same technique as the vertical lines; measure the distance along the line inside the Stego-blob on the piece of paper. Fold the paper in half and then fold the half in half again. Take that length and add it to each end of the line on the outside of the blob.
5) Measuring from the edge, where the line and outline meet to add the amount of shrinkage to the shape.
I had to add a bit more paper to my graph to get the head and tail horizontal expansion plotted, but eventually had a spot where the plotting overlapped. If I had wanted to be exact in my expansion I would have added I diagonal element to fix these troublesome transitions. Instead of adding another step, I went with Ann’s suggestion of just estimating, and drawing a line.
7-8) After estimating the line in the two areas where the horizontal and verticals did not agree, I was ready to cut out the new larger shape of Mega-Stega-blob!
9) Remember to use your paper scissors, not your sewing or fibre scissors!!
Ann was very curious to see the difference in size and shape between the original side panel of the giant Stego-bag and the new Mego-Stego-Blob, so we checked.
10) The new shape should make a bit more diminutive purse.
I will add the legs in four extra resist pieces (oh drat I will have to scale that up too), but I did leave the original attachment sites marked on the template. I also have the plate locations marked too. The plan is to add the legs to the body resist to be felted at the same time as the bag. The spines and plates I want to pre-felt partly leaving a fluffy attachment end so I can make them very firm. I had considered wire augmentation for the spines, but have not decided whether to include it yet.
My next step will be to consider the colour so I can lay out the wool. Unfortunately, that will not be this Monday. My goal for the day will be getting to the guild, which I am hoping I will be up to. Possibly adding a few more books, and then getting myself back home! But for now, I think it’s time to go lie down again.
I was looking through some of the simpler backgrounds I had on hand to jump-start my summer tree. I did this agt our guild social so I was too busy chatting to get you a picture before I started.
I decided to use some more of the pencil roving I have. It is sold as Buffilo roving or Brigs and Little Country Roving. It comes as 5 strands of thin pencil roving wound into a cake. It looks to me like it has been prepared to go through a spinning frame and then be plied into usable yarn. Why else wind 5 strands together? https://briggsandlittle.com/product/country-roving/
This is the brown I am using but not a solid colour so it has more depth. I wound off 2 strands to pop into my felting bag.
When I am not sure of my artistic ability ( most of the time), I tend to go small. If it’s little it is harder to see it’s not very good. However, trying to make a small tree in the distance did not go well. It looks more like some sort of demented scarecrow. You can see it’s quite a nice background though.
So I ripped it off and started a much bigger tree in the foreground. You can see how using the pencil roving makes it easier to make branches as you lay them in for the trunk.
I tidied that up top and bottom and that is as far as I have made it.
I like the way the pencil roving forms the tree but I think I need to add a little lighter ( and maybe darker) colour to help define it more. I am not happy with the blob in the top middle of the trunk. I think I will have to open it into the branches more. I will have to do some searching for pictures of winter trees to see how that part looks. It may not matter once I add the leaves. Isn’t it funny how you know exactly how a tree looks until you come to make one? I also have to work out what I want for the rest of the picture. Maybe some rocks, sheep are always popular, a fence?
The only other thing I did this week was to make some felted balls for my goddaughter, for her cats. Again, too much talking and not enough picture taking. they are small styrofoam balls with a bell pushed into them.
I have been continuing work on my large autumn landscape. I added the large tree trunk and branches and was planning on adding leaves to complete the piece.
However, I decided it need darker branches on the larger, foreground tree. I had some black wool yarn that I decided to use for machine cords. I twisted three pieces of black yarn together and then zigzagged over them by machine with a near black thread. Some of the yarn pieces I left apart so that there were narrowing branches of either two or one yarn diameters.
Then to start stitching them in place. I didn’t have a specific plan as to where they would go, I was just winging it. I couched the cords in place and in the thicker areas, I used two machined cords couched side by side.
Here’s the piece after I had couched all the machined cords in place. You might also notice that I have folded the bottom of the piece up to see what it would look like without the bottom four inches or so. I liked the look of it better. It feels like a better scale to me. I haven’t cut it off yet, but I think I will soon.
Then I decided that I needed thinner branches coming off the thicker foreground branches. So I used the same almost black thread in size 12 (Sulky cotton machine thread) and stem stitched the other branches. Click on the photo to see the branches in more detail.
Next up is leaves for the foreground tree. I will be cutting those out of yellow, yellow orange and yellow green silk. My plan is to add fusible web to the backside of the leaves so that they will not ravel at the edges. Then I will probably add a bit of grassiness at the base of the backgrounds trees and call it good. But you never know, I will evaluate to see if it needs anything else when I get to that point.
Going around here in West London and in England, I have come across some textile-based community projects that maybe you will find interesting.
They are crocheting and knitting public projects that use those skills creatively to raise awareness and educate the public, and also inject beauty and fun in our lives of course! Maybe something similar is done in your own neighbourhood and community: it would be nice if you could share other similar projects in the comments.
The first couple of projects that I want to show you are projects that I came across to inside the Royal Botanics Gardens Kew or Kew Gardens.
This is a UNESCO World Heritage site that holds a collection of more than 28,000 taxa of living plants and around seven million of dried specimens in its herbarium, not counting the lovely historical buildings and surroundings that make for an enchanting visit: it is definitely a picnic favourite of Londoners and tourists alike, although the ticket is a bit expensive. I personally always try to go for the Orchids Festival, as I am a fan of orchids, but my kids like the yearly Children Science Festival!
In a small and quiet separate greenhouse very close to the famous historical Temperate House we found two textile pieces: one horizontal artwork about Food Security, and the other a vertical artwork about natural life classification for plants or the Plant Tree of Life.
Both were created as community projects by people coming together to express what the themes meant to them through knitting: the Community Learning group of Kew Gardens is aimed at people who may have difficulty in accessing the Gardens and would like to know more about plants and be involved.
The explanation of the Community Projects at Kew in general, and of the one on Food Security in particular.
Here is a closer look at those photos on the signs: a group photo of the participants and a photo of their works!
Here is the work on Food Security: quite colourful!
This sign explained the Tree of Life project in Kew Gardens.
Here is a close up of the two photos of the sign about the Tree of Life project: those ladies seem to be enjoying themselves!
This is the knitted artwork itself, Plant Tree of Life.
A detail from the Plant Tree of Life, three knitted water lilies.
The bees were quite cute, but the skeleton sure was a bit scary!
The Rosids understandably had some more bees going around.
It seemed quite interesting how they managed to make the Monocots as well. Most monocots are grasses, but this group sees orchids as well: I kind of wish they made some knitted orchids, just to add a bit more colour to this group.
The Gymnosperm group was represented by a DNA chain as well.
Those knitted dinosaurs on the Ferns group were quite cute.
I have no idea why they put a lot of fishes on the Lycopods group, as those plants used to grow as tall as trees, before becoming almost extinct (probably because of drought conditions). They are similar to moss today.
Those Magnoliids sure attract a lot of ladybirds!
If you would like to try your hand at knitting nature, as those ladies did, here is a link to some free patterns on the Community Learning Kew website that you might try. The Community Learning group is the one who created those two beautiful works and it is made up of people who face some barriers to accessing the Gardens and are part of an organisation who applied for a Community Learning Access. Barriers to access may be such as some physical, mental or psychological impairment or social and financial barriers.
The other project is way more informal, has been going on in my Ealing neighbourhood for a while and I recently saw another one in Norfolk, and realised that it is something widespread in England, UK: all British crocheters and knitters, please, let us know about something that you can see around your neighbourhood as well.
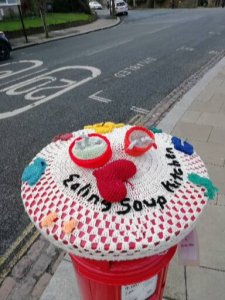
So, now that I have created a bit of suspence, here it is, a Pillar Box Topper: a crocheted or knitted shape is fitted on the top of the iconic red Royal Mail pillar boxes, and on top of that layer there are different clever crocheted or knitted shapes representing a theme, to raise awareness on charity associations or local features or something that takes the fancy of the artist. I gather that it is not usually something that you need to plan with the approval of Royal Mail, as long as you keep well off the critical bits of the post box, and do not cover the hole or the signs.
Here is one that I love, it’s close to where I live.
As you can see it has been knitted in proud and creative support to Ealing Soup Kitchen and it features warm items of clothing (mittens, scarf, jumpers and the like) and of course a cup of tea and a bowl of soup.
This tiny yellow coat with hood is quite lovely.
Here is the sign for this Topper: on the other side it has a QR Code that you can scan to support the Ealing Soup Kitchen.
This one had building works around it, so I could come at it only from one side, unfortunately. It says “When I’m Driving in my car” and it has been made just for fun.
That is the best detail photo that I managed to take of it: the cars are knitted, whereas the topper itself is crocheted.
I came back once the building works were finished and took a couple better photos.
Here is the view from the other side! Clearly an enthusiastic driver.
This is one that I have seen close to Cromer, Norfolk, on the Jurassic Coast, while I was holidaying there. There was a lot of glare, so I did not quite manage to take good photos and also not have my shadow show.
Here is another view of it. The Pterodactyl is attached to the Mammoth top quite cleverly.
Maybe you can catch other details here.
Here is another crocheted one that is close to where I live: it is simpler, with plenty of colour!
Here is a closer view.
And another view, from a slightly different angle.
I like the smiling daisies!
Most of the flowers seem not overly difficult to make, but impressive on the topper, like this rose in bright pink.
We had some quite simple ones for Coronation Day where I live: I guess our neighbours were not overly enthusiastic but made the cheering effort anyway.
Another quite simple one in the colours of the Union Jack for Coronation Day in my area.
There definitely are various charity associations doing this, but it is also used just for a bit of fun and to commemorate events as you see. It is quite popular here: check out its history here on Wikipedia, and here you can find a blog with the list (unfortunately around 2 years old, sorry) of the places where you can find them in UK and links relating to groups of Post Box Toppers enthusiasts.
And, if you wish to try, here is a link to free crochet and knitting patterns for Post Box Topper by the Townswomen’s Guild: of course, those are only the basic Post Box covers, without all the knitted and crocheted embellishments. There are other free patterns online, if you wish to try your hand at one.


 skirting dirty raw wool at the OVWSG studio.
 Dusk mask, medical mask and 3 types of fibre (Short turquoise, older dry brown top and unwashed short locks)
 “Dust mask” in packaging N95 designation
 Short fibre, this particular fibre is standing in for some of the equity short but much more fly away fibre that is hiding in the basement and would not come out for the photo shoot.


 1)From 12 bags to 4 bags, with 2 spoken for that should leave 2 left to find homes.
 2) This is the modified Dewey architecture we are using for the OVWSG library’s collection.
 3) Vertical lines have been expanded.
 4) You can see how well-folded the paper under the pencil has become.
 5) Measuring from the edge, where the line and outline meet to add the amount of shrinkage to the shape.
 7-8) After estimating the line in the two areas where the horizontal and verticals did not agree, I was ready to cut out the new larger shape of Mega-Stega-blob!
 9) Remember to use your paper scissors, not your sewing or fibre scissors!!
 10) The new shape should make a bit more diminutive purse.