Brent goose: making a felt picture

Brent goose: making a felt picture

I love the sea and sea birds of the coast where I live and I often incorporate them into my felt pictures. 


A couple of years ago I was watching some dark-bellied Brent geese swimming in the sea and feeding along the shoreline a few miles east of my house. They’re smallish geese that breed in northern Russia and over-winter in the salt marshes, coast and estuaries of the South and East of England. They don’t populate large areas so are on the ‘amber’ UK conservation status list. I took some photos (one with a bonus curlew!) which I looked at again recently when I was thinking about creating a new felt picture. 


I decided to use as the background a piece I made a few months ago. I’m a little obsessed with trying to capture the many colours and patterns of the sea here. Sometimes they become stand-alone pictures, sometimes they are combined with a bird and other times they hang around waiting for me to decide what to do with them. 


With this one, I made two pieces of cobweb prefelt (one white, one blue) which I laid on top of a pewter-colour (all merino wool) and wet felted them together. 


background layout
Background layout ready for felting


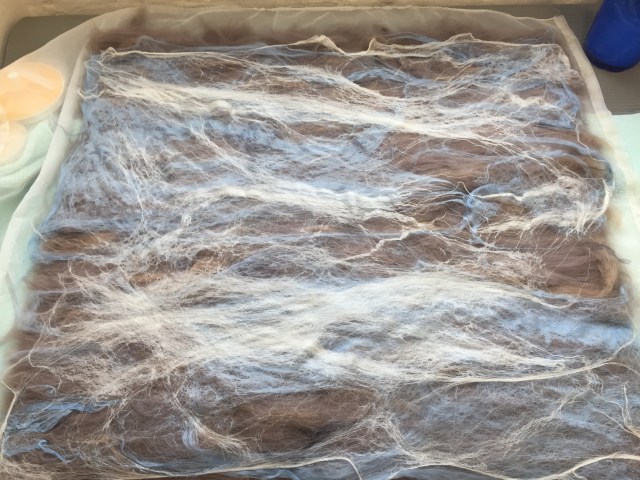
I thought it would serve well for this picture and was pleased to be using something I’d already made: saving time and freeing up storage space.


I did a quick sketch to help me decide on the size of the goose and cut it out to check the size and position and how it would sit in the frame. I realised its head was a bit small but this was only a guide and I’d sort that out later. 


first paper sketch 


I made some light prefelt for the goose’s wing and belly feathers using natural carded Norwegian batts as I wanted short fibres that would give me lots of colour mixing. 


One of the challenges was the potential wool migration between the black and white of the bird’s back half so I made a firmer white prefelt to lay as the top white layer which I hoped would minimise the bleed between black and white. 


Here is the rough layout for the bird (just before I added the white prefelt) and what it looks like after felting and fulling.  I made it bigger than I needed so I could trim it to the final goose shape. It’s easier to take away than to add and it needs to be a bit bigger than the final bird to allow for needling the edges into the background. 

I had a bit less definition in the grey/brown and white wing feathers than I’d hoped for. I should have made the prefelt a bit firmer (note to self). But I thought the white prefelt worked well. I kept checking the composition with the paper sketch, the background and the frame.  


Next I trimmed the goose nearer to size, using the paper template as a guide. 


Normally my felted birds sit on top of their backgrounds.  I needle felt them on which makes the picture more 3 dimensional. I hadn’t really thought through the fact that this one is in the water so some of the sea is in front of the goose. 


I pondered this for a bit. Maybe felt a wave to go across where the bird enters the water? How about cutting the background and slotting the bird into it? Not something I’ve done before and it felt like a rather brave irreversible step but I decided to go for it. 


Once the goose is slotted in, it’s time needle felt it into place and add some more detail. I faffed about with the shadow / reflection for a while, added more definition to the belly and wing feathers, added the white neck pattern then spent a while getting the eye and beak as I wanted them. 


final goose
Dark-bellied Brent Goose

Here’s the finished picture just before I framed it.  Framed it’s 64 x 64 cm (approximately 25.2 inches square).


Do you think cutting the background worked?  I wonder what other solutions I could have tried.  What ‘brave’ decisions do you make in your textile work?


A Felt Solution for a Small Problem

A Felt Solution for a Small Problem

Black thumb drive and black thumb drive and black thumb drive? Which Identical looking thumb drive has the file I am looking for? Silly me I saw them on sale and bought them! Now I again have a handful of thumb drives that I have to open each one to find out what it might have on them…. Well, that’s annoying.

thumb drives Yes, I have a lot of black thumb drives!

I had to pass some files over to Ann and need some way to make this little black drive look different from the rest of them and so it won’t get lost with any that she also has.

Sitting here in front of the computer, with a pile of fibre and lots of needles, I wonder…… can you needle felt directly to an attachment point on the drive? These have particularly small attachment spots for a toggle so a ribbon or leather strip won’t fit. But I think I can get a felting needle in there!

I had bought a pink rose and grey batt from Christine which just happens to be sitting here.  What shall I do? What shall I make? I have no clue… No, I don’t think I want a fish. So I grabbed a bit of fibre and started to poke at it, poke, poke, flip, poke, hmmm, no, not a fish. But it is starting to look like it wants to be a mitt. One of those really big winter mitts gripping the end of the thumb drive. Ha! My thumb drive has a thumb attached to it (with the rest of the mitt!)

OOPS, I gave it to Ann before getting a photo of it.

thumb and palmfingers

thanks, Ann!  the top is the thumb holding on to the hole in the drive and the purple is the back of the mitt. it has a big fluffy cuff. I will have to work more on the palm and wrist when I get it back.

Ah, another day of rain, I guess my fleece washing and drying is now getting an extra rinse again. it’s raining too much to even sit out and felt undercover today.

I grabbed some more of the same batt of pinks, rose and grey and started randomly poking at the wool. After a bit I started feeling like footwear, yes that is definitely a short felt boot. I added a bright pink bit of fibre as the sole and started pulling bits of curls and added them along the rim of the boot and extended the backup and attached it to the thumb drive.

1234567     1-7

I got distracted working on the computer and looked up to see MORE RAIN…. The fleece gets another rinse.

The weekend was busy with getting Mom groceries and birthday cupcake (chocolate on chocolate with chocolate!) She is 89 this year!  I had a wonderful visit with friends, with social distancing and then on to the birthday party and belated birthday presents for my Niece for her 16th birthday (we gave her a starter selection of fibre, needles and an instruction book. She had never felted before and made a very nice strawberry between getting the book, eating dinner and before dessert!

For the next thumb drive, I really wanted to make a wire sheep. I had some of the combed blue locks sitting close to hand so blue sheep it would be! I divided the single piece of floral wire into loops for legs, tail and left the rest for the head. My tiny scrolling plyers had disappeared gain so Glenn stopped into Dollerama to pick up more. I don’t know what I would do without that store, it has most of my not originally meant for felting supplies. I had to wait on the plyers until he got back from work so I hand twisted the legs and used the tail loop at the attachment to the thumb drive. I will tighten that up and make hoof loops later.  I decided to make a nice round little body but leave the legs and neck wire. The head I added ears and a couple of tight curls. I think she turned out quite well.

1089   8-10

The attachment is easier to see with the wire rather than with the boot or mitt felting.

111211-12

Since the labelling of the boot’s drive as a Boot drive gives it other meanings in computer vocabulary I will call this the pink slipper drive, and the other will be the blue sheep drive.

That was a fun little project and has successfully made the on sale black identical thumb drives now look different! Have fun and keep felting (but it may be best not to do wet felting with this one!)

13 13

Felt Basket #3

Felt Basket #3

Yes, I made another felt basket. this one is with some Bergschaf Tyrollean wool I got from Lituania when it was on sale and had free shipping to boot. I don’t know if its the same as the Bergschef that DHG sells.  https://www.etsy.com/ca/listing/532965567/one-of-the-best-wool-for-wet-felting?ref=shop_home_active_7&frs=1&crt=1

I used a little over 300 grams.

I repaired the resist from the last basket with some sheep duct tape.

The wool was in a bat as you can see. I  am not used to working with them. But even with splitting it and fiddling to make it all even, it was faster to lay out.


I rubbed a bit and then rolled it as usual until it was shrinking then cut it out and cut the handle. I didn’t realize how much it had shrunk until I pulled out the resist. this blue foam is much softer than the white I get and you don’t feel it bunching up the same way.

I have a washboard for rolling on but this was t wide for it. I have a great car floor mat that works great. it has a great texture. I wrap the piece in some plastic to protect the surface while I roll.

I also beat the basket into a nice round shape after blowing up a 24-inch beach ball inside it. Beating it with a pool noodle worked great.

I popped it outside to be another alien.

When it was dry I decided it had not been fulled enough. I wet it down and put it in the dryer with some bumpy balls. It shrank some more.

I dried it on a 20-inch beach ball this time. It is nice and sturdy now.

Not great pictures but it is thundering and we are about to get a downpour so I had to be quick about snapping a couple of pictures.

the handle is quite straight across when I roll it up. I think I may have to steam it and let it cool in a rounder shape.  Also, it is quite hairy. part of that may be the fulling with the bumpy balls. Tennis balls would have been a better choice, I think.

Anyway, I like it but the next step will be to try doing what they do for felt carpets in the middle east. use a blow torch to burn off the fuzziness. I was hoping to have pictures of that for you today but I have run out of time. so hopefully next week you will have some pictures of me trying that.  Anyone else ever tried to burn off the fuzzies?

Felt Rope and Structure Part Two or How To Wet Felt A Dill Pickle

Felt Rope and Structure Part Two or How To Wet Felt A Dill Pickle

I showed you my first failed experiment with a felt rope and using it for structure. I got loads of good ideas on how to improve the experiment and took those suggestions and came up with a plan.

First off, I decided to work around a flat resist and use the same kind of wool for the felt rope as the rest of the surface. So I used mixed 56’s that I hand dye. I dry felted a felt rope from the yellow wool. I didn’t add any water at all but just rolled it dry until it was holding together. It wasn’t firm at all. I left the ends loose so that I could make sure the rope was well attached.

I covered the resist with light green wool with a couple of thin layers all running lengthwise to the resist.

I then wrapped the felt rope around the wool covered resist and added a couple more thin layers of wool in the light green. I added a bit of darker green to the ends.

And then I rubbed and felted and began fulling before removing the resist. Here it is after I took the resist out.

And then I fulled it into submission. You can see how much shrinkage there was in comparison to the resist. It is very hard and certainly won’t lose it’s shape.

And here it is after I shaved the surface a bit. It could use a bit more shaving but I haven’t had time to let it dry yet. So once it’s dry, I will shave it again. To me, it looks like a dill pickle or perhaps a small minnow? It is much more in line with what I was thinking when I first tried the experiment. I will have to try it on a larger scale. I’m not sure that the felt rope adds any advantage over prefelt cut in a strip. Perhaps if I have gotten the rope a bit harder, it might have effected the shape more. Next time, I think I will lay the resist wool going around the short side of the resist instead of lengthwise. I would also use less wool on the ends of the rope or just use a cut strip of prefelt.


Cuffs and Stuff

Cuffs and Stuff

A couple of years ago a friend alerted me to the wonderful Australian magazine simply called “Felt”. It’s only published twice a year but I look forward to it eagerly as it’s always crammed with interesting photographs and articles including artist profiles and project tutorials.

One of the artists featured in the latest edition is the Canadian born feltmaker Christianna Ferguson. Christianna’s work is very colourful and textural and, as well as teaching and exhibiting, she also creates what she calls “more functional art: scarves, purses, cuffs, tea-cosies and wearables.”

Examples of the colourful and textural work of Christianna Ferguson

So, having read about her work, when I turned the page and saw the tutorial for making her fabulous little Nuno felted and hand embroidered cuffs I had to have a go!

The fasteners are particularly cute and make an interesting feature but I struggled to get them as firm as I would have liked. For an added twist I’ve included some hand stitching and a bead to my fasteners. I added some hand embroidery to my green cuff but wasn’t happy with it…..looking back at Christianna’s examples I can see that my stitching wasn’t subtle enough! I much prefer the grey one which I left plain.

The good thing to come out of this exercise, having made two in this style, is that I’ve been reminded how much fun cuffs are to make. I designed several Nuno felted & free motion stitched cuffs for my sales tables last year and this has encouraged me to get on and make more.

Some of my earlier cuffs – can’t help but think of bacon rashers when I look at this photo!
Nuno felted and free motion stitched cuffs

I also got thinking about other possibilities and how much more sculptural I could make my cuffs. The next set are based on the design of one of my bangles, using a felt ball as the fastener and keeping the little beaded element.

The bangle that inspired the cuffs
The slits have been filled with half balls and metal buttons

They were all fun to make but I’ve come to the conclusion that I prefer the irregular shaped, Nuno style with the stitched edging (from last year) so I’ve come full circle! These are two I started this morning…..

Pre-felts laid out and wetted prior to felting
Using differential shrinkage creates an undulating surface

And this is them finished. Christianna said that when she makes hers “each cuff feels like a little piece of abstract art” and I couldn’t agree more. Although I love creating larger pieces of work there is something very satisfying about making these little cuffs and ending up with a totally unique, wearable item.

Felting Alfresco (outside! Its Summer!) Pet Two Part 3 She is Naked! We must fix that!!!

Felting Alfresco (outside! Its Summer!) Pet Two Part 3 She is Naked! We must fix that!!!

Felting Alfresco (outside! Its Summer!)

Pet Two Part 3 She is Naked! We must fix that!!!


Now it’s time for me to start adding a bit of colour! this is where we left off last time.

1928

this is the understructure of the manta ray next will be laying colour on top of the structure, like a gresi painting.

12 1-2 laying in the T line so she is an oceanic manta

If you have taken art classes, either commercial or fine art, you may have had a teacher that reminded you that paintings with large black spaces are not as effective as deep shadows with suggestions of something within the shadows. So not a solid black but layers of dark blue, green, charcoals and browns with maybe a bit of pure black. I mixed the darkest charcoal with a very dark green and blue. I also started to add some of the lighter greys in thin wisps over top to give that dappled light effect.

 3-5 base layer of simplified pattern and fibres I was working from

 I kept a zip-lock sandwich bag of mixed greys which I could then make lighter or darker as I needed.

676-7 Zip-lock of greys, a bit of mixed colour sitting on her shoulder about to be added in a thin layer over the dark sections.

Distracted by Princess Auto flyer, the snap ring plyers I have and use to bend the ends of the wire are very tiny and not as smooth as I would like. So I will be off to check these out at next weeks’ sale. I will likely also replace my old wooden bench (the one I was stuffing unskirted raw wool into bags on) while I’m there.

 8-9  This is Next week’s Princess Auto flyer! Another great place for fibre related tools, really! It is where I found the Bee combs! (Yes!! We got the Bench!! However, they were out of the cool plyers)

I added the Dorsal fin, I made the basic shape and added it just above the base of the tail. I then build up the sides of the fin to give it more of the correct shape.

1011 10-11 added the Dorsal fin then built up the sides

After checking with the photo reference I brought the darkness around the edge of parts of the wings

1213

12-13 Bringing the colour to the edge and just around.

Next adjusting the angle on the lower part of the white shoulder markings and adding white to cover thin areas where the understructure was showing through. So far she does not have any under spotting but I may revisit before the end of the entire project.

1415 14-15 Final touch-ups on the back of the mantel.

16-19 looking good, but she will need eyes so she can judge that for herself

Time to add eyes!  Hmm, I think we need a bit more extension on the eye orbs or she will not be able to see around her Cephalic fins. I surrounded the pupil then used the super sharp scissors to cut off the excess. (I found these again at Dollarama, for 4.00 Canadian, they have worked very well so I bought a couple more pairs).  I may leave her for a couple of days then re-evaluate the eyes, they are not quite right yet but close!

  20-24 Adding eyes and the nice scissors from Dollerama

I think the heat was getting to her since she started her photoshoot by stealing my glasses and mask!

  25-27 Mantas seem to be curious and playful and maybe a short-sighted

Oddly, the glasses seem to fit her.  Unfortunately, the mask does not quite cover both her mouth and gills.

So on to the photoshoot!!!

2829

28-29 She seemed a little static in her poses, so l let her loose in the garden to have some fun.

     303132       3335343736  30- 37 A quick swim through the front garden (wait till she finds out there is a back garden!)

I took her out to buy butter tarts and to show Ann. It’s good to get out and meet new people but she forgot to wear her mask!! I think she will need to quarantine before she can play with her Mer-People!!!

38-40 Felting is better with Butter tarts

I hope you have enjoyed the creation of my adolescent female Manta Ray. I still have more to do with this set of sculptures so please keep checking in on how it is going. Have fun and Keep felting!!

3rd Quarter Challenge and Summer Poker Challenge in One.

3rd Quarter Challenge and Summer Poker Challenge in One.

My guild does a summer poker challenge every summer. first, you pick weaving or spinning or new this year felting. You pick 3 cards from a deck of cards to find out your challenge for the summer. The idea is to get you to try something you wouldn’t usually do.  I picked my card in June. I got blue, cotton and metallic.  Then Lyn and Annie announced the 3rd quarter challenge of a personal item to keep you warm. There is more about the challenge here:

2020 Third Quarter Challenge

The first thing I did was dye some open-weave cotton I had.  You can read more about that here in this blog post I did:

Cotton dyed and some new fibre.

All the pictures will open larger if you click on them.

My plan is to make a lightweight poncho for cool evenings. This requires a big layout. the start is 4feet by 4feet. I put the first layer of cotton down and decided to use thin plastic for the resist so it would roll up easily. I don’t need to feel the edge of the resist like you do making a hat.

I added the second piece of cotton and sewed around the edge using big basting stitches.

Then I took it all out and overlapped the edges and sewed it up again. The edge will be visible on the inside and I didn’t want the seam sticking out.

All sewn together

Next, I added a very thin and not perfectly neat, layer of medium blue. I want the cotton to show through. Then started adding the embellishments. Sorry about the pictures not being great but I am holding my phone as high up as I can, trying to get an overall shot.

This one is a bit better. Mostly the embellishments are wool in different colours.  I added the metallic threads to take care of that part of the poker challenge but didn’t get a good picture.

These are the 2 sparkly nylons I used for the metallic part of the challenge; bronze and steel. I only used a little. I don’t want to sparkle very much.

Next is wet it all down, and start felting- rubbing and rolling.

When it was starting to shrink I opened one corner to be the hole for the head and opened the bottom 2 sides.

Here it is finished.

And the cotton sides

Here are some closeups

The cotton side

The wool side

And the metallic bitts, they don’t shrink so they get wiggly.

I am very happy with the result. The wool separated out and let the cotton show through. It has a nice light feel and I think it invokes the feel of moving water or ripples on a pond. It should work well for cool nights.

Slow Stitch Update

Slow Stitch Update

Sorry for the short post but I have been busy with my Level 3 Stitch class this past week. We are continuing online and even though I don’t have to travel, it seems to take more time this way. But at least we are able to move forward.

I have still been stitching for 15-20 minutes per day on my autumn nuno felted piece.


The last time I showed you it looked like the photo above. I continued to add more dark values in the rows of “aspen” trees and also added more dark green to the distant pine trees. Ann had commented that she didn’t see trees in this piece. Hopefully, the additions I made will make them more “tree like”.

Here it is after those additions of darker value.

And here’s a close up that shows the difference in the distant pine trees before and after adding more thinner thread in dark green. The trees on the left are finished as compared to the ones on the right.

So what do you think? Did adding the darker values help the distant tree lines?

I hope you’re staying well and spending time being creative. Thanks for stopping by!

Mad Hatting

Mad Hatting

July has been another crazy moth, since the UK government announced almost everyone must wear a face covering in shops as well as on public transport I have had almost no time for felting. When I started making masks for friends and family in late April I never for a moment thought I would sell more than 1,000 and donate several hundred more. It has been a strange time but I hope my efforts are in some small way limiting the spread of this nasty virus.


In amongst all the furious cutting and sewing my online students have been keeping me sane, unwittingly allowing me to live vicariously through their posts, revelling in their felt-making while I could not make any myself. Thank you all, you have no idea how much solace and inspiration your beautiful felted creations have provided over the past few months.


I hope you all enjoy their works as much as I did….


Liz


Lucy


Amanda


Ellen


Cindy


I am frequently asked about how to make a concertina style witch’s hat so, finally, and long overdue, I got around to making one this week. I am relieved to discover the plan of action I suggested when asked how to make one does actually work in practice 🙂


A new set of class dates has just been agreed, you read it here first!


Registration will open on Sep 15th, with the first felting tutorial posted on Sep 24th and the forum will remain open for sharing, discussion and questions until Nov 15th.


If you would like to receive an email notification just before registration opens please contact us indicating if you would like to hear about the concertina hat or the bag class (or both!).

Felting Alfresco (outside! Its Summer!) Mer-Pet 2  part 2; Parts are missing, She needs her mouth and abdomen!!

Felting Alfresco (outside! Its Summer!) Mer-Pet 2  part 2; Parts are missing, She needs her mouth and abdomen!!

Felting Alfresco (outside! Its Summer!)

Mer-Pet 2  part 2; Parts are missing, She needs her mouth and abdomen!!

Next day it was back to the side yard and I started working on the inside of the mouth

132 1-3  I have to think about this, I have it unfolded. So am I working on the roof or floor of the mouth? I got myself sorted out, wrapped the wire and added the base layer. Let’s look at the details of what the mouth should look like.

   4-7 reference images for mouth

The last 2 manta are swimming upside down. The upper lip looks deeper than the original photos I had viewed.

Consulting the open mouth photos I had found, I added the gill arches and gill rakers.

These poor guys are being caught and killed for the gill rakers which are used as Chinese medicinal products to the point there numbers have dropped significantly. Dive groups are trying to educate governments that live Rays will generate more money through tourism (dives/snorkel tours) rather than what they will get from a corpse.

 8–11 Adding the gill arches and gill rakers

12-13 Glenn holding the parts together.


14

14 I added the dark interior to the upper pallet of her mouth.

I also extended the upper lip which seemed to be longer than I had originally thought from other photos I was consulting. This is likely a mistake. I suspect the image I was looking at was falsely labelled as a manta and was a Mobular of unusual sized and colour. (Another option is that this manta has had Lip Injections to make her look sexier to any male manta who is a lip man?) I may be able to decrease the extension a bit.

Now for the outer gill flaps on the underside of the body.

 15-16 making gill pieces

I used pins to hold the folded edge of the gill pieces. They work well to keep my fingers away from the pointy end of the needles and acted like handy extra hands.  I left the wispy side un-felted to improve attaching the gill covers.

By feeling from the underside, I located the first and last gill arch. I used a bit of grey fibre to indicate the position on the outside of the body. I estimated the position for the gills in between.

17-18 adding gills

If you are going to make a manta and want to add gills I would strongly suggest starting with the one farthest away from the mouth and work back towards the mouth.

Now let’s add the lower jaw/ gills smoothing into the body.

  1919 Checking the back after attaching the abdomen/mouth. Looks good.

2021 20-21 Check the attachment on the underside and the alignment of the mouth

The join to the body on the underside is too severe an angle. I will need to add more fibre to smooth the join between the body and wings. I also noticed that the join between the lower jaw and underside of the Cephalic fins needs a bit of work and the jaw angle is off a bit too.


Back to the side yard and let’s do the final adjustments to the understructure. It’s a bit warm today but there is a light breeze.

22-23 the side yard studio, it was a bit warm.

242524-25 working on her lip problem. I used the edge of the foam I was holding my needles in.

26272826-28 I started to blend the body with the wings. I also thickened the white fibre on the underside of the wings.

It was good to see one of my Guild Friends drop by on her way to do other errands. I picked the catnip behind the big anvil for her furry kids to enjoy.

 29 -30  if you look very closely the slightly rusty coloured thing under the very large plant of catnip is a large anvil.

Now Glenn can use his hammer and anvil again without attracting all the neighbourhood cats! (aromatic hammered catnip not as good as it sounds)

Then it was time to get back to work, but more on that next week.