Brent goose: making a felt picture
I love the sea and sea birds of the coast where I live and I often incorporate them into my felt pictures.
A couple of years ago I was watching some dark-bellied Brent geese swimming in the sea and feeding along the shoreline a few miles east of my house. They’re smallish geese that breed in northern Russia and over-winter in the salt marshes, coast and estuaries of the South and East of England. They don’t populate large areas so are on the ‘amber’ UK conservation status list. I took some photos (one with a bonus curlew!) which I looked at again recently when I was thinking about creating a new felt picture.


I decided to use as the background a piece I made a few months ago. I’m a little obsessed with trying to capture the many colours and patterns of the sea here. Sometimes they become stand-alone pictures, sometimes they are combined with a bird and other times they hang around waiting for me to decide what to do with them.
With this one, I made two pieces of cobweb prefelt (one white, one blue) which I laid on top of a pewter-colour (all merino wool) and wet felted them together.
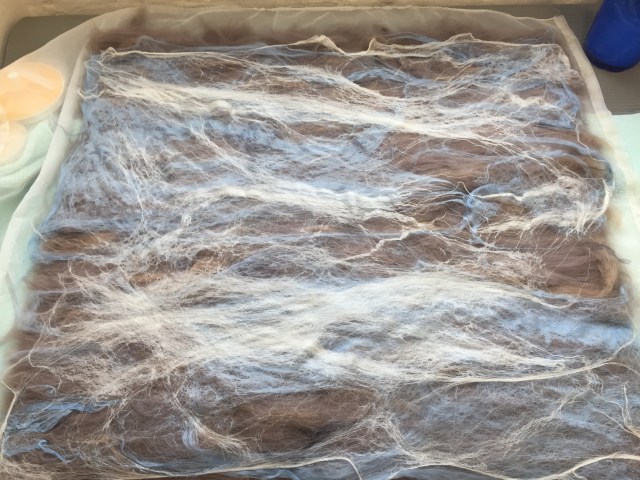
I thought it would serve well for this picture and was pleased to be using something I’d already made: saving time and freeing up storage space.
I did a quick sketch to help me decide on the size of the goose and cut it out to check the size and position and how it would sit in the frame. I realised its head was a bit small but this was only a guide and I’d sort that out later.

I made some light prefelt for the goose’s wing and belly feathers using natural carded Norwegian batts as I wanted short fibres that would give me lots of colour mixing.


One of the challenges was the potential wool migration between the black and white of the bird’s back half so I made a firmer white prefelt to lay as the top white layer which I hoped would minimise the bleed between black and white.
Here is the rough layout for the bird (just before I added the white prefelt) and what it looks like after felting and fulling. I made it bigger than I needed so I could trim it to the final goose shape. It’s easier to take away than to add and it needs to be a bit bigger than the final bird to allow for needling the edges into the background.


I had a bit less definition in the grey/brown and white wing feathers than I’d hoped for. I should have made the prefelt a bit firmer (note to self). But I thought the white prefelt worked well. I kept checking the composition with the paper sketch, the background and the frame.
Next I trimmed the goose nearer to size, using the paper template as a guide.


Normally my felted birds sit on top of their backgrounds. I needle felt them on which makes the picture more 3 dimensional. I hadn’t really thought through the fact that this one is in the water so some of the sea is in front of the goose.
I pondered this for a bit. Maybe felt a wave to go across where the bird enters the water? How about cutting the background and slotting the bird into it? Not something I’ve done before and it felt like a rather brave irreversible step but I decided to go for it.
Once the goose is slotted in, it’s time needle felt it into place and add some more detail. I faffed about with the shadow / reflection for a while, added more definition to the belly and wing feathers, added the white neck pattern then spent a while getting the eye and beak as I wanted them.


Here’s the finished picture just before I framed it. Framed it’s 64 x 64 cm (approximately 25.2 inches square).
Do you think cutting the background worked? I wonder what other solutions I could have tried. What ‘brave’ decisions do you make in your textile work?
16 thoughts on “Brent goose: making a felt picture”
I really like this Lindsay, especially the effect you have of the sea. Yes, slotting the duck into a slit in the sea really works. That’s a lesson to take in – I would have immediately resorted to needlefelting a bit of wool over the base of the goose, without even thinking of doing that.
I don’t think I do “brave” in my pictures, having wet felted a basic background giving a rough idea of the view, I then tend to do the rest with needles of various dimensions, plus some judicious embroidery. I need to start thinking “outside the box” and the posts from everyone on the Studio and Forum here really help. Thanks.
Ann
Thank you, Ann, for your very positive comments. I too have learned such a lot from others on the forum, both from their own posts and their comments on mine.
I sometimes work with a glass fuser and a ceramicist and I always think how lucky we are that our medium is so readily adapted and manipulated at all points of development unlike the finality of putting things in a kiln! So although cutting the background felt sort of brave, in truth I could have covered it over if I thought it didn’t work.
It’s definitely worth pausing sometimes though and thinking through alternative ways of approaching something, even if you end up doing what you normally do.
Cutting worked really well – the goose is firmly in the sea rather than hovering over it. The shadowing finishes the process by anchoring the goose in place beautifully.
What a wonderful picture! We love it!
Thanks very much, Annie & Lyn. I’m glad the faffing with the shadow paid off!
I’ll I really like your goose and your process. It’s funny how solutions come when we’re in the zone.
Thanks, Linda. Yes, sometimes just mulling things over produces unexpected ideas.
Thanks for sharing your process. It turned out great! Also an ingenious move to cut the felt for the bird!
Thanks for the explanation of how you created your felt bird pictures. I had wondered about how you got the birds on there so I really appreciated the explanation. I think cutting the felt was a inspired idea. It really worked to “ground” the bird and then adding the shadow completed the process. The wing feathers and the white on the tail turned out really well and make him look authentic.
I’m always experimenting and I don’t know if that’s brave or not but it gives me the confidence to move forward even if the experiment fails. I can always fix it or try a different approach. I’m not worried if everything I do is “perfect”.
Thank you, Ruth. You are a great experimentor and in my view do lots of really brave, imaginative things in making felt. I think I’m ok with early stage or purposeful experimentation but I’m not so good at doing things I find risky in the later stages of making something, when I might really spoil something.
You have made a beautiful felt picture of the goose and the sea is so realistic. The move to cut into the background and slot the goose into it was very inspirational. When I make something and am not sure on the next step, or how to fix an error, then I just leave everything overnight and some times I wake up at 3 or 4 in the morning with the answer buzzing around in my head!
I am looking forward to seeing more of your birds. (I grew up in Dartford and know your area quite well but now live in New Zealand)
Thanks so much, Jackie. Yes, I completely agree that letting things rest for a while can produce new ideas. I find I have a happy place after I wake in the morning and before I get up when my mind free-ranges and often creates ideas and solutions to issues that I didn’t always know I was working on.
At the moment you can see lots of my bird creations on the banner of the forum and always on my Facebook & Instagram pages. How interesting that you’ve moved from hereabouts to NZ – I’m sure there is lots of inspiration in your new landscape too
Lindsay, as everyone has said, cutting the background has produced the perfect effect.
Your cobweb prefelts have created a great background of sunlight glinting off the shallow water ripples – something I remember all too well having grown up by the sea on the south coast, I also remember that the arrival of Several 100s of Brent geese was never welcomed in those days.
Looking at the detail you’ve created a real sense of movement & direction in the feathers. It is a lovely piece of work.
Fortunately, for the most part, our craft can be forgiving & we can adjust even after it is
supposedly ‘finished’.
Many thanks, Antje, for your thoughtful & kind comments. I just love the water patterns so I’m particularly pleased you think I’ve captured those.
i realy like your finished piece! the needle felting is integrated so seamlessly! the water is vary rippily too! the cutting solution worked vary well!
Thanks for your comments, Jan.