Browsed by
Category: sculptural felt

Werewolf Boy

Werewolf Boy

1Ghost Girl looks lonely 1
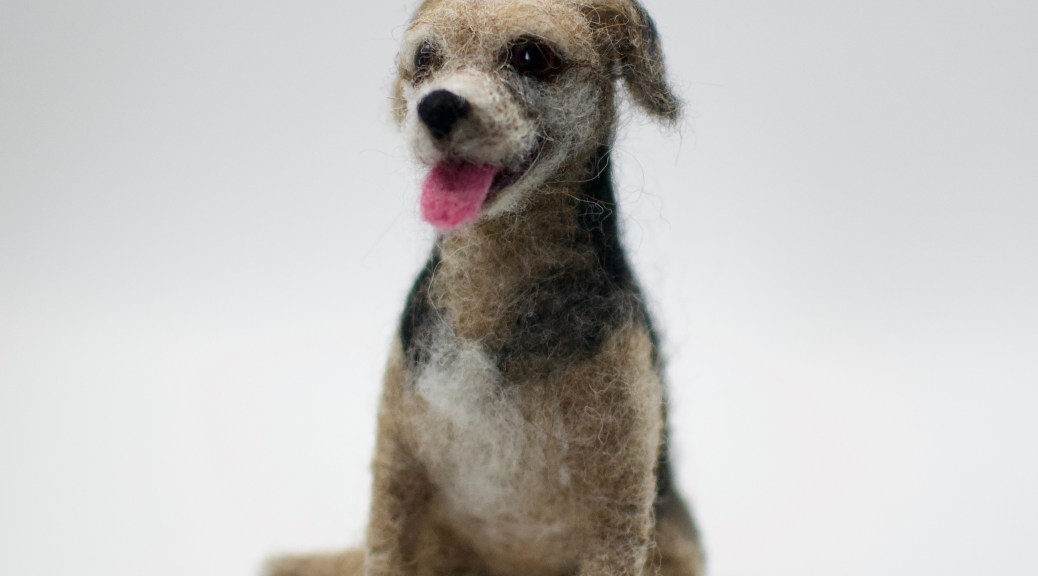
Werewolf Boy:

Last post I showed you the OVWSG sale and exp. between photos I was demoing needle felting.  I brought the ghost girl and had already decided she looked very lonely even with her ghosts on strings. After a bit of consideration I decided on giving her a friend, Werewolf boy.

23Workshop sign up table and the beginnings of a friend  2-3

As you saw before, I made the armature from the same Dollarstore floral wire (no gauge noted on packaging). Learning from experience I doubled up the wire for the legs and arms but the head loop is single. The tail is actually one-piece cut in half and then folded which gave four offset twisted pieces. I made the farther end two strands and the nearer end four strand. I had left a tuft to start the tail and anchor the wire as I was building the body shape.

For this one I wanted to have the appearance of mitts, boots, a hood and muzzle mask, jacket, tail and maybe another basket. Like the ghost girl I wanted the hood to be removable. I still do not have a base. I had wanted to take another wander down the street to the used-to-be-there forest, the crows do not look pleased, but there has been a lot of mud created by the heavy equipment moving tree pieces around into piles. I may be able to get to the scrap pile now that the ground will be starting to freeze. If not I may try to find a piece of firewood and split it. In the meantime, they can enjoy the softness of my working foam (garden kneeling pad from Dollarama $2.50 Canadian.  They should be back in the stores by February).

I made the frame and then decided the shoulders were a bit too wide so adjusted them and started with the boots followed by chest, arms, neck/head and then legs. I am not sure why that felt like the right order. I used wast wool from combing again for the body and primarily locks or teased locks for the costume pieces. The wool is from a dark section of the giant Shetland fleece from earlier this summer.

For the hood and mask I started with the mask, getting the upper jaw then adding the lower jaw. Adding a strap and then worked on the hood. I joined the jaw with the strap and the hood then added the ears. I found the ruff a bit thin and wanted to add as few more curls to augment it. The seam ripper was sitting close by so instead of trimming the locks with the scissors I tried the seam ripper.  Although my seam ripper is sharp it produced a less straight cut then the scissors would have. It also has the advantage of being able to get into spots my larger scissors could not reach.  It may be a useful tool to add to my felting tool box.

Another odd tool was the foam hair rollers which I had picked up in three sizes, again at Dollarama. (No I don’t work there or own stocks in the company but maybe I should look into that?) It made working on the curve of the assembled hood and small basket quite easy.

456

Felting Tools (What you put them in your hair? how odd.) 4-6

78

Werewolf Boy needs a basket for trick-or-treating 7-8

I again got distracted as I was working so there are few pictures (that makes up for the last post!) to make up for such a horrible pho-paw, I had werewolf boy participate in a couple photo shoots so you can see him.

This slideshow requires JavaScript.

Werewolf Boy dose Photos Shoot 9-13

1415Ghost Girl meats Werewolf Boy and its time to Trick-or-Treat 14-15

These small figures were fun to create and then dress in their costumes. Now I have to find them a better base but that may be best left for a later day.

Do Animals Have Emotions?

Do Animals Have Emotions?

This may seem like a rather philosophical title for a textile blog but please bear with me, I wanted to share a new direction and body of work with you.

Image result for animal emotion

These thoughts and ideas have been slowly percolating through the recesses of my mind for about 20 years, since a fairly heated debate with a psychology teacher on whether humans are the only animals who possess cognitive abilities (perception, attention, memory, motor skills, language/communication and visual/spatial processing). She quite vehemently argued that only humans possess all of these skills, I was a veterinary nurse at the time and forcefully argued the opposite, taking it further and arguing that animals also feel emotions too.

Image result for jain temple

This debate was recalled during a trip to India in January 2018 and a visit to a Jain temple. The Jains have an intriguing philosophy and what struck me most about the monks was the extreme lengths they go to in order to preserve and protect all life, they believe every animal is sentient and as such, must not be harmed by their actions (either directly or indirectly). Their vows of non-violence make them the ultimate pacifists, a stance which I thoroughly admire but have to admit, have no hope of ever attaining. They are strict vegetarians and do not eat after sunset for fear of accidentally eating an insect on their food, and the monks pluck out all their head hair rather than shaving it so as not to harm any lice that might be residing there.

While sentience is essentially another word for consciousness and it is relatively easy to argue that most animals, even the smallest, are “conscious” on at least some level, even if it is just awareness of food sources and potential mates. The idea that all creatures are sentient rekindled my thoughts about the cognitive processes and expression of emotions in animals.

Paramecia – are they conscious?

I knew I wanted to explore this idea from a creative perspective but was unsure where to start. Researching colour theory revealed a wealth of information about our emotional responses to different colours and this led me to play a game of “abstract word-association”; starting with a one or two words that described an emotion I worked on small squares of water colour paper, trying to express that emotion with just colour and mark making, these are some of the results:

Joy / happy
Eager / enthusiastic
Calm / relaxed
Jealousy
Isolation
Vulnerable / intimidated
Afraid / Scared
Anixious
Despair
Grief

These little sketches were surprisingly cathartic to make, if you or someone you know is going through a challenging time and finding it difficult to talk about how they are feeling, asking them to illustrate, in an abstract way, a series of emotions (both positive and negative) from a list of words may be helpful.

Taking Gladys Paulus’ mask workshop earlier this year has given this topic, and my approach to it, a whole new lease of life, no longer confined to 2D work I have been having a ball making various animal sculptures, each expressing their own emotion. As each new personality takes shape on my work bench I am finding myself creating whole backstories for them.

I am thrilled to introduce you to 2 new, very special friends:

“Laughing Lionel”

While the king of the beasts has a fearsome reputation, Lionel is really a very gentle, affable soul who likes nothing more than a good chortle at the ridiculous things humans do.

“Indignant Margo”

She isn’t quite finished, but will be a wall-mounted sculpture like Lionel when she is.

Margo is an old soul in a young body, she takes offence at almost everything and wears a permanent look of indignation on her face. She believes her purple spots are a sign that she is descended from aristocracy and therefore everyone is beneath her; if anyone is going to look down their nose at you, it should be the tallest of the beasts!

These two sculptures (and hopefully one or two more if can finish them in time) will be on display at the Art Box exhibition, at Denbies Wine Estate, Dorking RH5 6AA, UK, between September 23rd and 29th. If you are in the area please pop in and say hello, it is a beautiful place to visit and entry to the exhibition (with artworks in a range of media from 8 independent artists) is free.

Which animal and emotion would you like to see paired together?

Do you think I am anthropomorphising (applying human characteristics) the animal kingdom, or do you agree, animals do feel and express emotions, and perhaps some humans are too ignorant to understand when the animals around us try to communicate these emotions?

Another prefelt seedpod

Another prefelt seedpod

This is a guest post by Kim Winter of Flextiles.

A few weeks ago, Ruth posted about how the shape of a seedpod she made using prefelt was influenced by differential shrinkage. I thought I would try out this technique with a couple of variations. 🙂

This is the seedpod I was inspired by. I found it on a beach in Thailand, but I have no idea what plant it is from!

thai seedpod

Unlike Ruth, I didn’t make “fresh” prefelt. I have a box (or three!) of old felt experiments and pieces I don’t like very much, which I am happy to cut up and reuse in new pieces. Technically this is not prefelt but actual felt. However, roughing up the surface with a wire brush usually loosens up enough fibres to allow it to attach to fresh fibre.

For this experiment I decided to use a felt tablet cover that I didn’t like, as it was very thick (I think it was two layers of merino sandwiching a layer of Gotland).

I worked inside out on this piece, partly because I wanted some spikes protruding from inside the pod and partly because I have found that it is easier to attach the prefelt or fabric this way.

First I made some spikes.

felt spikes

Then I cut out some vaguely diamond shapes from the tablet cover and roughed up the inside surface (which was white) with the wire brush. I laid these upside down (that is, purple side down) on the circular resist.

seed pod resist

Then I covered them with a thin layer of orange merino. I laid it in a circular pattern because I wanted the piece to shrink more around the circumference than along its height.

seed pod orange layer

After wetting down and a bit of gentle rubbing, I turned the piece over, folding the felt diamonds over and covering them with more orange merino. After wetting down and minimal rubbing, I added the spikes in the centre with more merino, rubbing very thoroughly to ensure they were properly attached.

seed blog spikes

Once I was sure that the spikes would not detach, I rolled the piece, rearranging the position of the spikes every time I changed direction.

When the felt passed the pinch test and I could see the darker outlines of the prefelt coming through, I cut a hole in the opposite side to the spikes and removed the resist.

removing the resist

I continued to roll the piece to start the shrinkage and firm up the cut edges and then turned it inside out so that the spikes were now on the inside.

seed pod right way out

To help with the fulling I immersed it in hot water and continued to rub and roll, sometimes turning it back inside out to continue the shrinkage and shaping process.

final seed pod

The spikes were actually a little bit short, so I curled the top edges of the vessel down and pushed up the bottom a bit to ensure they protruded properly. Also, I wish I had made them a different colour – maybe red.

And quite a lot of the Gotland has migrated through, so the final piece is a bit hairy. I might shave it.

seed pod

Thanks to Ruth for the inspiration!

I’ve got rainbows on my mind

I’ve got rainbows on my mind

First of all, happy Thanksgiving to everyone reading this in the US! I hope you had a nice celebration.

Today I’m sharing some rainbow-y fibre I created, plus a “throwback” item that I hope you’ll like.

Being an indie dyer means I get to play with dyes fairly regularly, but it had been some time since I adventured into the world of saturated rainbows. I think it was the grey London Autumn that got me inspired, I just needed to get a colour fix. Off to the dye pot I went.

IMG_3780

One of the things I’ve been a little obsessed with lately is how yarns look when they’re in skein format – I love it when colours look cohesive and have a certain progression to them when displayed, so I went for a red “bottom” that would change as the eyes look up. Hopefully you’ll see that this was done consciously.

I knit this into a hat (complete with a pompom) that I think looks very cheery. It’s going to be a Christmas present so I hope the recipient likes it.

IMG_3887

I hope you’re not fed up with bright colours yet…

DSC_1358

Although not technically a rainbow, this wool top came out super bright and happy (to my eyes at least). If you’ve ever dyed wool top or roving you’ll know it can be an adventure to control where the colours go. This is superwash wool (it doesn’t felt) so it wasn’t as difficult to get “right” as non-superwash fibres, but I’m still perfecting my methods. Suggestions are welcome!

This being the Felting and Fiber Studio, there should be some felting, so here is a little Piglet I made a couple of years ago and gifted to a friend. I really loved creating this little guy and think he came out really well. I got to see the sculpture again a few days ago at a friend’s house.

IMG_3863

Have you done any hand dyeing or needle felting lately? Share your experiences with me in the comment sections.

Chico the needle felted dog

Chico the needle felted dog

Hello, Leonor here. My guest post for today is going to be a simple “show and tell” as the weather here in London is too warm for complicated thoughts!

Some of you might be aware that I am a fibre artist by trade. Anything wool and I love it. I got into this business a little by accident, and making custom needle felted dogs was even more unexpected – basically, a friend asked me for a mini of his whippet, I took the challenge, and the rest is history!

I’ve now been playing with wool professionally for around 5 years, and I must confess there was one hurdle I was yet to conquer in my work – creating an open mouth. I’d tried once and it didn’t come out right, so I more or less gave up on it. That is, until I made Chico!

DSC_1102

At first I was going to make his tongue out of polymer clay (the idea of finishing it off with a nice layer of glossy varnish to mimic moisture was very attractive to me) but then I decided not to. I liked the idea of a 100% fibre sculpture better.

DSC_1106

I made the lower jaw separately, making sure the upper section was thin enough to accommodate both parts without looking weird. I added a layer of black around the edge to make it more realistic, and then a little white on the back for teeth. The tongue was made using two shades of purplish pink blended together. I made two mini tongues and chose the one that fit best.

DSC_1110

I received a few reference photos to make this little guy, my favourite was one where he was sitting with his leg to the side and smiling. I just had to make him this way.

DSC_1115

I love the detail of paw pads, the feet immediately look real. You can’t really tell from this picture, but Chico is er… anatomically correct. I like a realistic sculpture!

DSC_1114

Below is a picture of the original Chico. The mini version is off to a Spanish island as a surprise for the whole human family. I hope they like it!

unnamed

Have you ever created a needle felted animal? What wool did you use and how did you like your experience? Let me know in the comments section.
Questions? Happy to help, just leave a comment!

Jan’s 3rd Quarter 2017 Challenge Part 2

Jan’s 3rd Quarter 2017 Challenge Part 2

Part 2 of Jan’s post: 

Part 2 create the base and start the octopus


Layout the background.
I had a bag of mystery white wool and some super wash merino, combining them together, I started my base layer. Then I lay in a line for the sky line and spent hours playing Runescape (AFK stuff like fishing and harassing trees) on the computer while hand blending the golden tan colour for the sky. I worked over the big 3 inch thick foam square I got at Walmart for the 12 x 12 pieces I did earlier in the summer. It again worked great with my wicked multi-needle metal tool to make a quick base from which to start.
     10 Needle Felting Tool – Aluminum

I had to put this project aside to work on the guild library, restructuring the Dewey Decimal Classification project, but was able to return to the Felting Challenge in September as my demo project at the carp fair.

There was a lot of interest in felting and lots of requests for Felting workshops this year. I directed them to the guild website and told them there would be more workshops for 2018 on felting so check the new schedule when it was up in November.

Carp Fair demo – the octopod is created…..sort of.
Carp Fair is an old fashion rural fair on a big scale. The Ottawa Valley Weavers and Spinners guild is in the Antique section. Usually we freeze since it’s the last weekend in September. We have spent many years demoing weaving, spinning and felting there, cursing the cold weather. (I can spin without feeling my fingers but not for too long or too well.) Well this year our pleas were answered. We had the hottest weekend of the summer, we were fine as long as we stayed in the shade of the tent and didn’t stand up! SO I got a lot of felting done.

Using my photo reference I chose the general shape and pose I wanted for the octopus to have. I had brought a package of pipe cleaners from the dollar store and had decided that 2 twisted together would make a good leg support armature and allow me to bend the tentacles as I wanted later.

Math is not my best skill it’s right down there with spelling actually but I can count to 8 twice. So I laid out 8 pairs of pipe cleaners beside me on the table, twisting them together as I put them down. (Are you having awful premonitions yet?) I pulled out my Rideau Arcott core wool and started shaping the slope back for the head, and adding the first leg. Then wrapped it with wool.

Friday is when all the kids come to the fair to do “research” for a questionnaire they have to fill out and to do the games and rides. They usually wander through the antique section in waves, it wasn’t too busy this year. We also had a canon being fired and a tractor parade in our area. So it was a bit busy in the early morning and later in the afternoon, it was quieter at the hottest part of the day.

Got to the last leg and started to build up the tentacles with more core wool to get the more triangular shape. By the end of the day I had what was obvious some kind of octopus like creature.

Saturday morning;
Once I had the general shape to my liking I started with the super wash to lay in the colour. I have discovered that super wash has exquisite colours and take forever to felt…. I will not be lured in by the evils of super wash again! It will felt with needle felting but it is a lot of extra work and it makes felting a lot slower! I will likely just save the super wash and blend it with corriedale or merino that still has all its scales.

One of the woman who was working at one of the other displays in the antique section came over and asked “does your octopus have 7 legs?” No I’m sure I put out 8 sets of pipe cleaners to start with. Oh no, one is missing, too late.


Sunday Carp fair;

The Octopus has its base colour layer, and one-sided blow-hole. I used a few fine skewers to rap the wool then Felted it quite firmly pulling out skewers as it shrunk. Thus making a hollow blow tube which I added to the skin fold just behind his/her eye.

You will have to wait for the next post to see how he/she turns out.

Jan’s 3rd Quarter 2017 Challenge Part 1

Jan’s 3rd Quarter 2017 Challenge Part 1

My friend Jan really got into the 3rd quarter challenge. She worked on it most of the summer and fall. If you have read other posts by Jan you know she is a great story teller. So, I had to break this into 3 posts. This post and the next 2 will take you on a journey with Jan from concept to finished challenge.

3rd quarter challenge part 1 the Plan

I was instantly intrigued by the third quarter challenge. I have always appreciated the aesthetic of Japanese prints and the Hokkaido wave had been particularly interesting to me. A bit strange when you consider I really don’t like getting wet. Ok, I am a bit hydrophobic. When I look at the Wave I don’t concentrate on the impending death of the fishermen in there precariously tipped boats, the fact that mount Fuji may be plunged into unpleasant wetness at any moment but that the repetitiveness of the design on the inside of the wave reminds me of a Japanese umbrella. Umbrellas are good. They keep you from wetness. A giant umbrella in the middle of the ocean sounds almost appealing, as if you might stay dry surrounded by all the wetness.

OK, I have a theme. Now who would need an umbrella in the middle of the ocean? Hmmm. An octopus!

The Great Wave off Kanagawa also known as The Great Wave or simply The Wave, is a woodblock print by the Japanese ukiyo-e artist Hokusai. It was published sometime between 1829 and 1833 in the late Edo period as the first print in Hokusai’s series Thirty-six Views of Mount Fuji. It is Hokusai’s most famous work.

As you may have noticed I tend to do flat pictures with a bit more thickness than flat pictures usually have. So the concept of taking a print you like and using it to inspire something from it but not make a copy will not be a problem. OK wave as umbrella, and octopus holding umbrella. Other elements of the print to work into the finished pieces. The sky, the other littler waves and maybe the boats with fishermen, or maybe not the boats with fishermen. I have nothing against fishermen, I really do like to fish. But I’m not to fond of boats. They are just tempting fate. Why leave nice solid ground if you don’t have to? So let us leave the boats for a later consideration.

I had a plan and all within half an hour of reading the email. A quick sketch (I thought I had lost it but found it inside my new needle felting box. This is why the original idea and the preliminary execution differs quickly. I lost the sketch by putting it somewhere safe.)

Then a trip to the wonderful internet to “acquire” reference photos and do a bit of research.

I’ve got the wave (I found 3 graphics of the wave one with the fishermen very easily visible) so let’s get umbrellas.

Now for some octopuses/octopi.

Phase 1 Planning is complete.

Throwback Post – Texture

Throwback Post – Texture

We were talking about doing some ‘throwback’ posts this year, and while I was giving the site a bit of a tidy-up and adding a new 3D page over the New Year, I came across this one of mine from September 2014, and thought it’d be a good one to start with. Do you ever revisit your old work and get inspired with new ideas?

A while ago I bought a weird fluffy, knitted, tubular scarf from Poundland to try felting with. If you ever buy one, make sure you cut it over a bucket or newspaper or something to catch all the bits! I laid out a couple of layers of very wispy pink Merino tops left over from a book cover I made last year, then I added the piece of scarf, and 2 more wispy layers of wool tops. It didn’t take long to felt. This is one side of it:

OLYMPUS DIGITAL CAMERAThis is the other side:

OLYMPUS DIGITAL CAMERAAnd this is what it looked like holding it up to the sky:

OLYMPUS DIGITAL CAMERAI don’t remember how long after, but I decided the scarf sampler might make a nice sculptural piece similar to one I’d made before. I didn’t make it in exactly the same way, I concertina’d it and stitched in place, then twisted and felted and fulled more. This is the top:

OLYMPUS DIGITAL CAMERAClose up of the ridges:

OLYMPUS DIGITAL CAMERASuper close up of the texture:

OLYMPUS DIGITAL CAMERAThis is the back:

OLYMPUS DIGITAL CAMERAA close up of the back:

OLYMPUS DIGITAL CAMERAAnd a super close up of the texture:

OLYMPUS DIGITAL CAMERANow, what do I do with the other 8 square feet of fluffy knitted stuff? 🙂

Demo Last Weekend

Demo Last Weekend

This last weekend my guild did a Demo at the Carp Fair I went on the Sunday.  I took a blending board to make some more rollags. I had some hand cards with me and I had a spindle I was spinning a rollag on so I could explain it all.  It was very popular with the visitors to the fair. .

Bernadette was spinning Rambouillet on her wheel. In this picture she is Chain plying it.

Jan was working On the Edo Challenge. And Yes that is an octopus. I am hoping to get her to do a post about her progress. Here she is explaining it to some visitors.

Her fish was there on display and tried to eat a passing child.

Julie was weaving. She is doing shibori on the loom. She weaves the draw strings right into the scarf ready to be tightened up and then dyed. She has a finished sample onto of her loom.


And lastly 2 of the display tables.

I didn’t get any of the third table except Jan’s Fish.  We had a great time chatting with people about spinning, weaving and felting.  Have you been doing your crafts in public lately?


Using Resists

Using Resists

I mentioned in my last post that we’d started playing with resists at the well-being centre recently, I showed the piece I’d made using strips and said we’d used flat resists for pouches. This is the one I made, though we all made fairly similar ones:

OLYMPUS DIGITAL CAMERAAnd this is the back:

OLYMPUS DIGITAL CAMERALast week, we used flat resists to make 3D vessels, or at least mostly make, as some of us ran out of time! This is an action shot of Louise, fulling hers:

OLYMPUS DIGITAL CAMERAStill working on it, but it wasn’t far off being done, and this wasn’t much over an hour after starting:

OLYMPUS DIGITAL CAMERAIt looked a lot nicer, but we’re in a basement with yellowy ceiling lights. I had to finish mine off when I got home:

OLYMPUS DIGITAL CAMERAStopping and starting and nattering, and probably general lack of concentration meant my inner two layers of Cheviot were separate from the locks and top two layers of Merino around the top a little bit:

OLYMPUS DIGITAL CAMERAI thought this week, we might do something sculptural, maybe something like this shell shaped piece:

OLYMPUS DIGITAL CAMERAOr maybe something more ‘abstract’ and textural, like this:

OLYMPUS DIGITAL CAMERAI mentioned in the comments to my last post that we’re running out of dyed Merino, the group who originally bought the supplies have moved on to a different centre so we’re going to have to come up with fundraising ideas soon, but for now The Felting and Fiber Studio are our new ‘sponsors’, so I’m going to do a stock-check tomorrow then order some lovely new colours 🙂

If you have any suggestions for future themes for us to explore, post them in the comments 🙂