Browsed by
Tag: silk

Third Quarter Challenge 2015 by Carole Gascoigne

Third Quarter Challenge 2015 by Carole Gascoigne

Today our guest artist/writer is Carole Gascoigne aka Craftywoman.  She also maintains a Facebook page just for fun — Bagsalicious.  Here is Carole’s contribution for the Third Quarter Challenge.

I have to say this is a first all round – first time attempting nuno felting and first time writing a blog for this felting site.

It was a treat to be asked, then came the big challenge: what to write about.

We have a quarterly challenge and this one is to take a photo, take it into a colour palette site and find the colours for a project.

cg 1

I half completed this challenge, in that I found myself trying to capture the image into a nuno scarf or shawl, rather than, as I had originally envisaged, creating something more abstract.

Armed with my 3mm silk chiffon and pre-dyed coloured fibres, I started to develop my scarf.

cg 2

Top and bottom I used merino and silk in greens and blues. To the blue part I added white viscose fibres for sheen, and turquoise locks. The poppies (sorry about the blurred pic) were first a layer of raw silk fabric cut up into random poppy shapes in salmony pinks, with pink locks and fine red merino over laid.

cg 3

All of this, the silk fabric and the fibre design was laid out on bubble wrap – bubble side up.

Then came the hard work. I hadn’t appreciated how difficult nuno was going to be. Initially, I covered my design with net and wet felted the design into place. I then rolled it all up onto a foam roller, tied it together and started rolling. I think I rolled about 400 times, 200 each way – then I removed the net.

I re-rolled about another 600 times, changing the end I started with to ensure all the fibres had a chance to be on the inside and the outside of the rolling.

When I was happy that the fibres had migrated through the silk chiffon I added more hot water and threw the piece on to a towel. I continued doing this until I felt it had been felted enough.

Here is my ‘Poppies by the Sea’ inspired nuno felted scarf.

cg4

Carole, thanks for completing the Third Quarter Challenge and sharing your first nuno felting journey with us!  It was worth the effort the scarf is beautiful!


This and That

This and That

While I haven’t been very active on the forum, I have been busy with small felt projects and traveling.

Everyone had been interested in what I would do with my “denim paper.”  Well, I tore some of it up in pieces and placed them on a piece of black prefelt.  I put wisps of fiber over the larger pieces, just in case.  It felted beautifully.  I doubt I needed the fibers.  I added sides from some black felt and stitched it together to make a glass case.  I added a snap as a closure.

2015-05-20 13.29.05


2015-07-16 15.25.43 2015-05-20 13.29.37

2015-07-16 15.26.12

2015-06-04 11.50.46

Rummaging thru my UFOs I found a couple of spikes I had made in Fiona Duthie’s class last year.  I decided to make a ring holder with one attaching the fluffy end of the spike to a felt circle, covering with additional fiber, felting then forming a star shape while wet and adding beads when dry.

2015-05-21 12.05.29


I also made another clutch for my Florida daughter in law.  Yes, the Nelson women love all things teal. This has three layers using batts of merino Corriedale blend and decorated with yarn, silk hankies, silk roving and silk gauze.  The last pic is the inside lined with silk habatoi.

2015-07-16 15.23.01 2015-07-16 15.22.00 2015-07-16 15.24.39

What little projects have you completed lately?


Stepping Out of My Comfort Zone

Stepping Out of My Comfort Zone

Lately, I’ve tried to step out of my comfort zone with color and fiber and try some new things.

While this first example doesn’t look like it’s outside of my usual color palette, I did use some silk for nuno on this clutch and some coarser fibers like Corriedale that I made for my daughter in law.  The nuno is not as noticeable as I’d like, but I think it still adds a nice texture to it.

2015-04-13 11.21.45 2015-04-13 11.22.27 2015-04-13 11.22.42

Revisiting pods, I decided to really jump out of my comfort zone and use bold primaries on a black background. (It is a bit like some of Pollack style pictures I did for last year’s challenge.)

2015-04-14 16.28.52 2015-04-15 12.33.13 2015-04-15 12.33.19


Another project I’ve worked on was  hand dyed silk I made a while back.  I decided I didn’t want a long scarf so I cut the piece in half.  I used very little wool wisps on one side.  The joke was on me when I was finished felting.  It could be a scarf for a doll!  It had been a while since I did nuno and evidently forgot about the big shrinkage rate for silk gauze.  I do like it though.  I think I could wear it as a collar if not a scarf.

2015-05-11 15.36.46 2015-05-11 15.37.52


Most recently, I decided to play with some neutrals and coarser wools.  Cathy (Luvswool) was nice enough to give me some of the Domestic 56  wool she had dyed in Arkansas with plants. I really liked the colors. I made a batt with cream and brown Corriedale and another with some of the  hand dyed Domestic 56 for added color. I used a resist open at the top and bottom. The cream and brown became my inner layer.

2015-05-09 14.21.55 2015-05-09 14.11.55


I really liked the subtle colors against the neutrals.  The coarser fibers also added to the texture for a natural open look.

2015-05-13 15.27 2015-05-13 15.28


Having progressed through these projects, I have a whole new outlook on textures and colors that I hope to incorporate into my future art.

What have you done outside your comfort zone lately?


Nuno and Stone Sheep

Nuno and Stone Sheep

I can’t remember the last time I got a chance to do some felting, but I got chance again the Sunday before last, and I’d had the pieces laid out for at least a week and half. Two of the pieces were nuno samples. I’d bought some scarves and wanted to see how the fabric felted. For both samples, I laid out two layers of Merino tops and laid the fabric on top. The first scarf I tried didn’t have a label on it, it felt like a synthetic chiffon, slightly ‘rough’. It felted quite nicely, though there were a couple of places along the edges where it didn’t attach securely.

OLYMPUS DIGITAL CAMERAThe nuno texture was really nice:

OLYMPUS DIGITAL CAMERAThe next piece I tried was viscose, it was really soft. It looked like crepe after felting:

OLYMPUS DIGITAL CAMERAA close up:

OLYMPUS DIGITAL CAMERAA supermacro close up, I think I got the colours matched pretty well 🙂

OLYMPUS DIGITAL CAMERAAnother piece I made was with Stone Sheep wool. I first tried this last month, probably the previous time I did some felting. I liked the way it felted and how fast it felted so thought it’d be really good for something I wanted to try out. I laid out a couple of layers of some carded Stone sheep wool, then added a big pile of fake Angora fibre in the centre. I covered it with a circular resist, covered the resist with some ‘Silk Schappe’ that I got from wollknoll (it seems like carded silk noil), then added another couple of layers of Stone sheep wool. I finished it off with some kapok fibre. When it was felted, I snipped a little hole to take the resist out and worked it until I got it how I wanted.

OLYMPUS DIGITAL CAMERAI thought the fake Angora might be a bit fluffier and looser than this, I mustn’t have piled quite enough in!

OLYMPUS DIGITAL CAMERAYou can see the Silk schappe from this angle:

OLYMPUS DIGITAL CAMERA

One Artist’s Journey into Fiber

One Artist’s Journey into Fiber

Our guest artist today is Jill Chadek with Merino and Mulberry in Two Rivers, Wisconsin.  She is also our banner sponsor for May on the Felt and Fiber Studio Forum.

To touch something soft and silky awakens our earliest emotions!
The pleasure of the touch of silk started my exploration of silk painting. A few
years later I was introduced to felting, that magical process of transforming
dampened clumps of wool fibers into cloth! Then, when I discovered that I
could incorporate the two, working the fibers to lock into the silk I was hooked!

12 Sunrise on the Reef20120613_611112 Sunrise on the Reef20120912_6769

Through time, that magical process of felting has inspired and allowed me to
express my passion for color, pattern and texture. Felting, allows me to “paint”
with fibers to create personal accessories such as scarves, shawls, vest, hats
and handbags.

20 Laguna20120804_6493 38 Chimeralure20141112_0973

Prior to felting I had dabbled in many mediums but none have held my
attention and interest like felting has. I love working with my hands, the tactile
experience of painting with the fine and silky fibers. It still makes me catch my
breath when I wet the fibers down and the wool gets all loose feeling. I have to
remind myself that soon the fibers will start to migrate and tangle and the
magic of creating a fabric will happen right in my hands!

G6 Cloud Dreams20121020_6941If you are new to felting, have patience and have fun! It will be frustrating at
times! There are as many different ways to create felt as there are felters, and
you will find that everyone swears their way is best! So many variables are at
play: the type of fibers, water hardness and temperature, soap, pressure,
thickness, and added embellishments, just to name a few. No wonder no simple
equation will work! It is only through exploration and experience that you will
learn the “feel” of the fibers at the different stages. So have fun and play!

H7 Josie20130904_7157 H4 Ginger20130904_7131

Though I consciously have a design in mind when I start a project, my
unconscious, and the fibers influence my hands and the final outcome, which is
usually fabulous!

H32 Clea20141112_0861 H3 Daphne20130904_7115

I enjoy that even after all of my years as a felting artist there is still something
new to learn and to explore. Right now I am loving creating hats! I do not use
any hat forms but instead let each hat tell me what shape it would like to be. I
love that while making a fashion statement they are also keeping it’s wearer
cozy warm! I am truly grateful for the joy that I experience in the creation of
each item and trust that wonderful emotions are also awakened in the wearer.
Please feel free to browse my website www.merinoandmulberry.com. It is my hope
that my creations will inspire you to stretch and grow as a felting artist. Also on
my website you can view a video of me using the E-Z Roller Felting Machine of
which I am the international representative. This machine has allowed me to
continue felting when I was experiencing terrible vertigo and more recently
when I had shoulder and neck problems. It removes the 1 negative of felting –
the physical chore of rolling your project, therefore allowing you to focus on the
fun, creative aspect of this beautiful medium. If you would like to learn more,
just contact me!

Thanks for sharing your artist journey with us Jill!

Wine Anyone?

Wine Anyone?

I wanted to try making a gift bag for wine in felt.  I first made a resist using the wine bottle as a model.  But I wasn’t sure about shaping the bottom.

2015-04-21 13.59.16

The base layer was black corriedale.  Then I used a layer of merino.  And finally I made a batt using forest green, a heather purple, sage and black bamboo for the last layer.

2015-04-15 16.09.08

For embellishments and design I made leaves from a nuno prefelt and used 100% Peruvian wool thick and thin yarn, locks and needle felted grapes.

I finished fulling the bag on the bottle, but because of the narrowing of the design it’s not an easy in and out for the bottle.

2015-04-21 11.19.22 2015-04-21 11.18.57

2015-04-21 11.18.48

2015-04-21 11.18.16

After it was semi dry, I cut holes at the top to thread some yarn through to tighten it around the neck.  Then I turned down the top and sewed extra leaves on and wound the excess yarn from the  closure around a small dowel to emulate the ringlet vines on a grape wine.

Also, the bottom ended up having “wings” so I tucked them under and sewed them to  the bottom. There was a hollow in the bottom of the bottle so it worked out well.

side finish front finish

2015-04-22 14.38

back finish

It was a little hairy so I shaved it.   Next time, I would only use two layers and redesign the shape.

Even with some problems, I think it will make a nice display on a bar.

Have you made anything similar?  Do you think it needs anything else?

Learning to Use a Drum Carder to Make Batts

Learning to Use a Drum Carder to Make Batts

Our guest artist today is Cathy Wycliff aka Luvswool.

After several months of taking a hiatus from felting–due to a work project and family health issues–I was starving to get back into it.

Fortunately, Marilyn suggested a lesson in carding batts. I don’t own a carder and my experience with blending fibers has been minimal, that is, using my dog brushes to blend a few bits of wool roving. Last Friday, Marilyn came over with two carders: a Louet Junior with a very coarse cloth (40 tpi?), and a standard Brother with fine (120 tpi) cloth.

I felt more comfortable beginning with the Louet, and grabbed some neutrals to begin the carding process. I used these fibers with no particular plan for my first batt: Mystery fiber chunks and fibers, possibly some Finn hand-spun; hand-dyed vintage yarn (early 80s); small amount of Domestic 56s and Navajo churro–all in various neutral shades, mostly gray.

IMG_0404IMG_0401


IMG_0395 IMG_0394

Then it was time to move on to the Brother for some finer carding. This time I went for color: Indigo-dyed Domestic 56s, dark blue Merino, hand-dyed mulberry silk, white Tencel, green mystery fiber, possibly Corriedale. The machine was a bit more sensitive, and so the fibers needed to be fed more carefully onto the drum.

IMG_0389IMG_0396 IMG_0400 IMG_0399

I tried the Brother once again, using slightly different fibers and colors: Hand-dyed Indigo Domestic 56s, dark blue Merino, white Tencel, unknown white fiber (possibly cotton), and Milk protein. Marilyn suggested we make two passes through with the fibers.

IMG_0398 IMG_0397

Some things that surprised me about the carding experience: it took a lot of time and was more difficult than I imagined; the fibers don’t necessarily cooperate, in that bits get caught on the smaller drum; and finally, it’s probably a good idea to have a plan of what you want to make with the batts before you begin. This was an experience I really enjoyed and I have made a couple more batts with the Louet coarse carder, which Marilyn generously has loaned me. The neutrals below were passed through three times.

IMG_0406 IMG_0405 IMG_0412 IMG_0410


More mystery fibers in green and yellow.


Thanks Cathy for sharing your first experience with carding batts.  Do you still have carder envy?  Personally, I am happy to have the carders.  They have come in handy more than once.  I love making batts just for fun.  I don’t always have a use for them and often give them away.  Its always a creative learning experience!


Felt Fan Fare

Felt Fan Fare

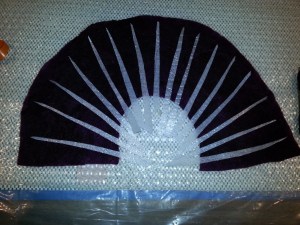
Over the summer I collected a number of items at garage sales and thrift stores to try new projects in felt.  One of the things I was intrigued with was a paper fan.

I removed the paper very gently and used it to make the pattern for the felt using a 30% shrinkage factor.

image


I cut out two sides from prefelts then cut out the rib resists from flooring foam and placed them on the one side of the prefelt then covered it with the second side and decorated it with silk and throwsters waste. The trick of course would be to keep the ribs in place while felting.  I did a lot of rubbing in all directions on both sides until I could see the felt sticking together between the ribs, then did my rolling, rinsing, etc.

image

image

Because the actual ribs were thicker than the resists, I placed wooden skewers in the resist slots then creased the fan the way I wanted it to dry and basted the back with thread and tightened.

image

image

The real challenge was getting the real ribs into the slots since the fan was held together with a non removable pin with two round heads. I’m sure there is a technical name for this, but I don’t know what it is.

I worked on it for hours trying to get all the ribs started then in and up to the top. I even enlisted my husbands help for an extra set of hands, but that didn’t help.  I was very frustrated and left it for a while then came back fresh and finally got it to work. The first and last ribs are glued on to the wood.

While my husband I were in California in July, we visited the Japanese Gardens in Los Angeles and I had purchased a cute little wooden fan stand.

image

I had visions of possibly producing fans to sell, but I’m not sure it’s worth the effort unless I can develop an easier way to thread the ribs into the fan.

What projects have you started only to find it was harder than you thought?

Round and Round I Go

Round and Round I Go

Happy New Year!

One of the things I wanted to do more of this past year was to stitch on felt.  I did one wool painting based on Moy Mackay’s “Anemones”  from her book Art Felt and Stitch that I used free motion embroidery for the first time.   http://feltingandfiberstudio.com/?s=moy+mackay

I was a bit intimidated, but Lyn from Rosiepink encouraged me to keep trying.  So, using Rosiepink’s ebook  I chose to try an embroidered bowl.  http://rosiepink.typepad.co.uk/rosiepink/handmade-felt-and-stitch-bowls.html

I gathered up a lot of my swatches and scraps and decided to use some batik fabric samples I cut up, silk scraps of habotai and chiffon, hand dyed locks, cotton scrim, throwsters waste, hand dyed kid mohair, mulberry silk — dyed and undyed .  One batik swatch that I liked had Oriental fish.  I used that idea for the center of the bowl with handmade prefelt and later in the process I embroidered the details.

Following the instructions, I layed put the circle base and carefully decorated it with my prefelts, scraps and other embellishments.  I used hand dyed mulberry silk on the back to give that some color and shine, but didn’t take a picture. Here is the inner side before felting.

2014-10-19 16.47

After felting I let it dry then put in the embroidery details before starting the free motion stitching.

2014-10-24 09.35

2014-10-24 13.25


I purchased five different colors of rayon Gutterman thread — grape, cranberry, turquoise, light purple and silver.

After getting organized to sew, I held my breath, said a prayer and round and round I went stitching as instructed happily watching the bowl take shape right before my eyes!

However, my eyes were crossed by the time I finished trying to follow the rows of stitching needed.  But the result was worth it.  The stitching isn’t perfect especially in the center.  I found it challenging to do the tighter small circles.

2014-10-28 12.12 2014-10-28 12.16It was hard to get decent pictures of the sides between the angle and the lightning.  But you can see the colors underneath and the shiny rayon threads.

2014-10-28 12.18b 2014-10-28 12.19

Thanks again to Lyn and Annie for such great instructions and your encouragement.  I hope one of these days the free motion will be second hand, but I still need more practice.  Fortunately, there are many more projects in the book to try besides venturing out on my own.

So, one of my resolutions is to continue to challenge myself to try new free motion projects this year.  What fiber resolutions have you made for 2015?


Final Project

Final Project

Happy holidays everyone and to those who celebrate,  Merry Christmas!

As we wind down for the year and start planning for next year, I’ve decided to share my final project from Fiona Duthie’s Surface Design class.   My intention is to use it as a reminder of incorporating more of these techniques in my felt work going forward.

I didn’t set out to use a specific number of techniques, but let the picture dictate which ones to use.  We learned many more than I used here.

I started with making a bridge using the lace technique and decorated it with pencil roving and stitching with yarn on the top  to create a handrail on top and matching decoration below.

2014-05-16 13.41

I added the cracked mud/tile effect to the ends of the bridge.

2014-05-20 16.03
Before adding techniques and felting


The water is fabric manipulation using some silk habotoi with some shadowing under the bridge.  The hills in the background were prefelt cut outs with silk embellishments for texture.  I also used pencil roving to define the shoreline in the distance.

2014-05-24 16.18

On the beach is a tree trunk made using the shibori and carving techniques then added beads, cotton batting  and gems as inclusions under silk gauze.  I used silk and locks for the water rushing over the sand and to embellish the sky.  There is a 3D water lily on the waters edge.

2014-12-07 12.14b

2014-12-07 12.14

I also added loops on the back to be able to hang the picture.   I debated straightening the edges, but decided I like the organic edges.  While its not gallery material, I enjoyed making it and am proud to hang it in my family room.

The class was fun and I learned a lot.  I would highly recommend it to anyone wanting to expand their felting techniques in a classroom setting working at your own pace.

What projects or techniques are on your list to try next year?