Browsed by
Tag: felting

More Fingerless Mitts

More Fingerless Mitts

Can you tell I am on a roll with these. I did this pair a little differently. Instead of doing it around a resist I made a flat piece of black felt and then sewed on some sari waste ribbon.

flat fingerless mitts start

I want them to be sort off raggy looking in the end.

I wanted to put big black buttons to fasten it but I didn’t have enough so I used all different ones. I think it turned out better with the different coloured buttons.flat fingerless mitts finished

And here is what they look like on.

flat fingerless mitts on maegan

I really like the way they turned out and will probably make more this way.


Felt fingerless Mitts Experiment

Felt fingerless Mitts Experiment

I am still making fingerless mitts for the fall shows. I have a wool batt that was made from the leftover bits or browns and natural wools. It looks like bark to me.

brown/gray/black/white batt

Then I thought I want the mitts to have more texture. So I got out my pile of trimmings.

left overs to roll 2

I gave them a roll

left overs to roll 3

I added them to the mitts in the hopes of making it look more bark like.

wood look cuff wood look cuff 2

I put the scraps under the last layer.

It worked out but I think fatter inserts might be better.

wood look cuff 3

It is not that exciting.  I may have to add something to it, I am not sure what. Maybe some twigs sticking up or a knot hole.

I have some other ideas to try out. I will share them with you as they happen. Theses are a great size for trying things out. If they work you have a salable item and if not you learn something and haven’t lost a lot. I am not good at making things that are just samples, I want it to be useful, crazy I know.

Cat Cave

Cat Cave

I should be making more scarves but I wasn’t in the mood so I decide to do a cat cave.  I wanted to make one that looked like a pebble. I used some gray I had on hand. I have no idea what it is but it felt like a medium wool.  I put a paw print on before covering the bottom with the resist,

paw print

I add a spot on the top so I know where to cut the whole later. I rubbed it and rolled it and then into the dryer for a tumble.

wool coming through the cover You can see how the wool migrates through the cover when it comes out of the dryer.  I cut the hole and rolled it up the other way and back in to the dryer. Next I rolled it on a car floor mat. It has nice ridges but they are flexible. I roll it back and forth on the mat. I do not rub it on the ridges. It would got to hard on the surface.


shrinkage paw print finished

I am not sure its hard enough now that it’s dry. I my wet it down and give it a trip through the front load washer. If it works out I will see if I can pass the jury to get into the Shelter Exhibition. http://tangledfiberartscollective.wordpress.com/calls-for-entries/


Online Wool and Fibre Suppliers

Online Wool and Fibre Suppliers

Lots of other fibres
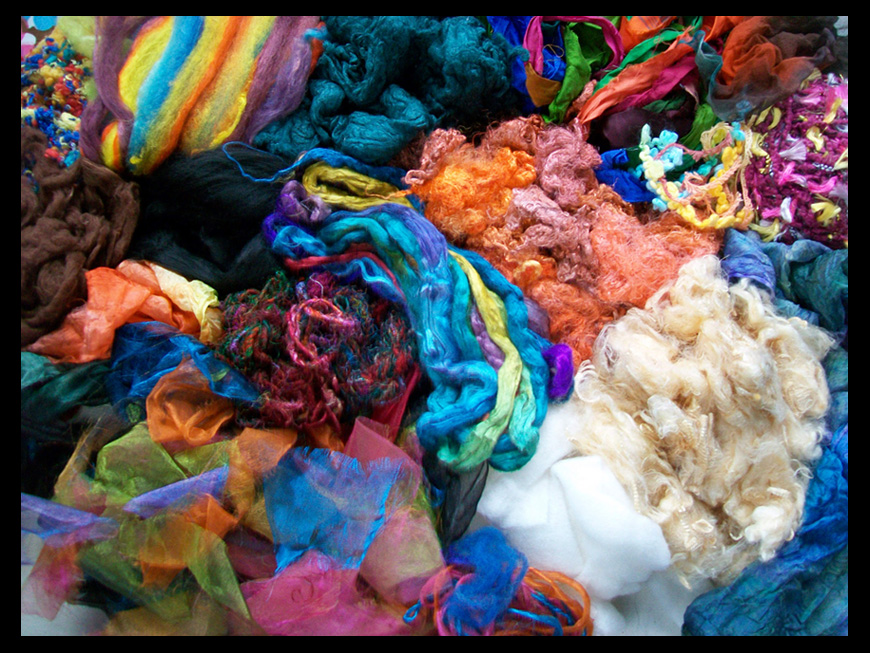
I posted a while ago asking for everyone’s favourite online wool and fibre suppliers with the intention of doing a price comparison. I wanted to see which stores would be the cheapest depending on where in the world you lived and how the prices compared to other countries. (More precisely, US, UK, AUS and Canada as that is where the 4 of us are from).

Well, it took a few days to go through the most popular sites. I had to find 5 items that they all sold, make adjustments for different weights to make sure the comparisons were fair, then convert into different currencies. My original intention was to produce a chart comparing the cost of items from each online store so it was easy to see which was the cheapest depending where you were ordering from. Once I started looking into it though, it seemed a little unfair, I never had the intention of singling out stores for their high prices, I just wanted to find the cheapest.

I can’t say I was completely surprised by the results, but I did think the suppliers would have had more competetive prices for people buying from their own country. Not so. Once all the prices were added up and the currencies converted, there was one online supplier who was cheapest by far, no matter where in the world you live . World of Wool. What was surprising however, was that even when the price of shipping for 500g of fibres was added on, they were still the cheapest. And not by a small amount. The next cheapest online store cost 1.7 times as much, and that’s without shipping.

The biggest surprise was just how expensive some sites are. As well as the 4 main sites, I took a look at all of those suggested. Most of the sites I looked at were charging anything from 6 to 35 times the World of Wool retail price for some common items, such as Silk waste, dyed Bamboo top, Nylon top and even Silk noil. It really put into perspective the prices which small businesses charge, which can seem a little pricey at times. But when you consider that it is often just one person working from home, not having the wholesale buying power of large businesses and often doing every aspect of the job themselves, from degumming silk waste or hand painting dye onto fibres, to taking orders, picking and packing, and then going out to the post office, it suddenly looks like a bargain.

This isn’t how I expected the research to go, but it does tie in nicely with our recent posts about supporting our community of small or local wool and fibre producers and suppliers. Three sites that I looked at particularly deserve a mention: Gemini Fibres in Canada, Sara’s Texture Crafts  and Norwegian Wool in the UK. Gemini Fibres and Sara’s Texture Crafts were the only 2 other suppliers who had a very large range of products (which also goes to reducing our costs as there’s only 1 lot of shipping to pay) and they have reasonable prices too. Norwegian Wool mainly focus on Norwegian wool and yarn and short fibre Merino. Their site is really interesting as you can choose where you are purchasing from to see the prices in GBP, €uros or US$, and their prices are also cheaper for C1 and C1/Pels than I have seen on other sites.

I know it isn’t always easy to work out if we are getting a good deal, especially buying from overseas and in different currencies (World of Wool have all their prices listed in US dollars aswell as GBP), but there are a few things we can do to save ourselves money. Consider the weights of the fibres we’re buying as well as the price, $2.99 might not seem a huge amount of money to pay for a fibre, but if it’s only for half an ounce, that actually works out at $21 for 100g or $23.92 for 4 ounces. 100g or 4 ounces might seem like a huge amount of fibre, but the fewer times you have to replenish stocks, the less you have to pay in postage. Buying between friends can cut the costs down and if there are a few of you, you could get discounts for larger quantities.

If anyone is interested I simplified a couple of the charts that I made for the price comparisons and included a chart of prices for some popular felting fibres and conversions into AU$, CA$, US$ and €uros.

Online Suppliers comparison results

Thanks to everyone who commented in the original post and on the forum and told me what they were interested in and what to look out for.

Scarves

Scarves

I have not been nearly as productive as Ruth but I did finally get an afternoon to do some felting. I did 2 scarves the first is a purple and pink one. First I put the purple wool on but when I wet it the wool completely disappeared in to the silk so I added some pink curls to perk it up. Not a very exiting scarf but I like the way the wool pulled in. I doesn’t show well on the mannequin but it was to windy to take pictures outside.

wool on scarf
wool on scarf
add pink curls
add pink curls
finished
finished

The next one is brass? cream? gold?  and green. I put green leave all over then thought it look pretty boring so added the purple highlight, still I don’t like it so I added the greenish gray leaves with the orange highlight.

close up
close up
full length
full length

It wasn’t very thrilling but I didn’t know what to add so went ahead and felted it. It turned out all right but nothing to get very exited about.

finished
finished

So do you like the colour choices I made? What colours would you have picked for this silk? What would you have added after the leaves?

Bits and Pieces

Bits and Pieces

This week has been about getting things moving towards upcoming shows. I spent an afternoon wrapping soap in wool and putting them in little nylon bags ready to felt.

soap

I sent another afternoon getting sheep parts ready to felt. The body parts are roughly needle felted then wet felted. The legs are wet felted.

sheep parts

This is what they look like when they are all put together and their wool is added.

sheep small

Lastly I have been soaking a fleece. I have no idea what kind of wool it is. it was a bag given to me a couple of years ago. Here it is getting a rain water rinse hanging in my apple tree. That wasn’t on purpose but the thunderstorm came in before I got it back into a bucket for its first rinse.

wool hanging


Nuno Felt Experiments for the Studio Challenge

Nuno Felt Experiments for the Studio Challenge

Every quarter on the forum we do a challenge.   http://feltandfiberstudio.proboards.com/thread/622/second-quarter-challenge  I thought I better get on with it myself before the challenge runs out. I challenged people to try nuno felting or to try it on something they hadn’t before. I decided to try some fabrics that I wasn’t sure would work, to see what would happen. There are lots of pictures. I did shrink them so I hope they don’t overwhelm anyone’s computer connection.

For all the pieces I used merino wool in a contrasting colour so I could see how the wool migrated better.

The first is  a polyester knit that is like t-shirt material. It feels a lot like cotton.

poly knit

this is what it finished like. It worked really well. I think because it is a soft knit the fabric fibers could easily move out of the way letting the wool through.

polly knit felted polly knit felted cloce

This one is from a poly knit dress more like the polyester we used to wear in the 70’s.

polyester dress

It worked fairly well but it is heavier material and the wool didn’t come through as much.

poly dress felted poly dress felted close

These next two are different sides of the same silk fabric cut from a woven silk jacket. it was a pretty little jacket but small and out of date. The texture of the fabric is great, quite 3 dimensional. This is the right side.

silk jacket right side

silk jacket right side felted 1silk jacket right side felted close

I think it worked really well.

This is the wrong side.

silk jacket wrong side

It didn’t felt as well, I do not know why the fiber would not travel through fabric as well in this direction but as you can see not nearly as much wool migrated to the top.

silk jacket wrong side felted silk jacket wrong side felted close

Lastly is a mystery fabric. it is cut from a blouse. Both sewn into the seam together. one said 100% silk and the other said 100% polyester.

maybe silk

It did work very well but you can’t see its shine much at all. You do see it more in person.

maybe silk feltedmaybe silk felted close

There is still time to join in the challenge. Try something new or show us something old you tried that worked or didn’t. I think the failures or things that went sideways are sometimes the most interesting.

Finished Cuffs

Finished Cuffs

This week has been a snatch a little felting here and there week. The cuffs dried out twice before they where ready to have the marbles added.

I use elastics for doing braids in horse manes and tales to put the marbles into the felt.

cuffs with marbles 1 cuffs with marbles 2

After they are dry its time to cut the tops off and pop out the marbles.

cuffs with marbles 3cuffs finished 2

 
After I cut the marbles out of this one with the silk on the back it didn’t look right. You cant see the silk inside.

cuffs finished

So I cut the blobs down farther to open them up more and now you can see the silk

cuffs finished 4

Here are all three finished.

cuffs finished 3

They are quit big.

cuffs on 1 cuffs on 2

I pulled the corners on one side of each end to make it cover a lot of area, mostly to see what it would look like. I like it.


Felt Cuffs in Progress

Felt Cuffs in Progress

This week I am working on a few cuffs. These will have bubbles in them so they have to start out really long as when I put the marbles in them to get the bubbles they shrink fast.

These are made with commercial prefelt.  Then some silk offcuts from other projects and some throwsters waist

cuffs ready 1 cuffs ready 2 cuffs ready 3 cuffs ready 6

The bottom right picture is the back side of one of these. It is covered in silk throwsters waist. The silk will show up inside the bubbles.

The back ground is prefelt and  a green batt  cut  with my rotary cutter to get the nice neat rectangles. There is throwsters waist and some blue faced leicester curls that I dyed.

cuffs ready 4 cuffs ready 5

Next I wanted to try something different.

cuffs ready 7

The red is a thick piece of prefelt form an other experiment. It wouldn’t stay folded over the curls until after it was wet down but I forgot to take a picture of it. I added some throwsters waist onto the top after I folded it.

Can you tell I was in the mood for throwsters waist?  I do love how it shines and goes all curly. The next time it’s my turn to blog I hope to have them done so I can show you how they turned out.

Around the Web

Around the Web

stitching around the web

Lorraine Roy Art Textiles

Ann Wood’s Toadstools

Celebrity Face Dresses by Erin Pearce

Father’s Day Ideas from Rosie Pink

felting around the web 4

Principally Felt Ribbon and Scrim Experiment

Fiona’s Red Textures

Ruth’s Umbrella Felting

Sandy’s Needle Felted Flower

dyeing around the web


Frauke Felt’s Dyeing

fibres around the web small 400


Directions and Photos for Skirting a Fleece