Handmade Book

Handmade Book

I told you in my last post that I had created a handmade book from deconstructed screen printed fabric and paper at our retreat. We followed this free tutorial by Jeanne Oliver. She has lots of free content on her site and some wonderful online classes. This is the book I created.

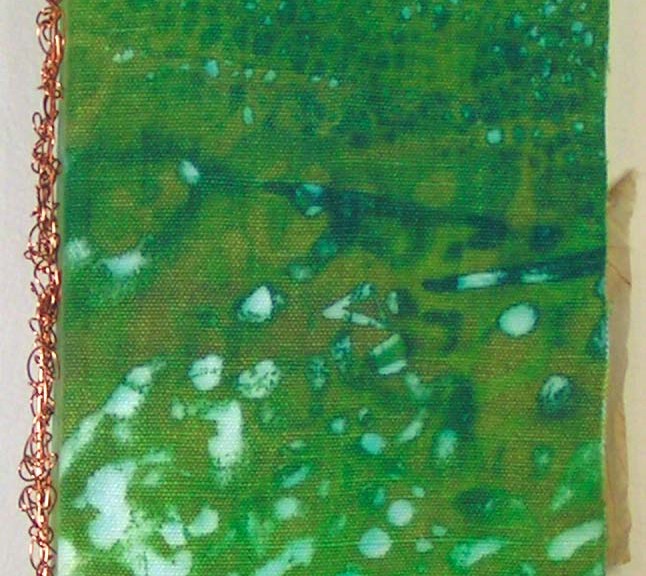
Here’s the book from the front. I used hemp canvas fabric that I had screen printed. The cover was constructed from the hemp canvas, book board and deconstructed screen printed paper.


The book was bound with pamphlet stitch and copper wire. I have created many books with pamphlet stitch but had never used wire. It was a bit tricky but I like the result, plus it’s very sturdy.

Here are the inside front cover (L) and inside back cover (R). I really love the organic feel of the screen printing. I made three signatures and used plaster on canvas pages plus additional pages of various papers and a bit of fabric. The main pages were created with canvas, plaster and gesso.

I didn’t take photos of all the page spreads but wanted to show a range of what was included in the book. The brown paper on the left is a “faux rice paper” that I made with tissue paper, walnut ink and matte medium. The photo on the right shows the inside of the copper wire binding.

These next photos shows a variety of papers that I used in addition to the plaster and canvas pages. Some were painted, some eco printed and I used some specialty rice papers as well.

Here are a few more page spreads. Besides paper, I also added in some hand dyed canvas as well. The book is fun in itself and could probably be left as is. But I want to make it into a book about the forest with sketches, additional ephemera related to trees and whatever else reminds me of the forest. So I will be working on this slowly and adding bits and pieces to it over time.

These are a few of the types of things that I might add. Paula kindly gave me the pieces with definitions and the labels. She has loads of ephemera and is very generous. Thanks Paula! You could easily make this type of book with felt as the cover fabric. I would love to see your results if you give it a try. You can submit photos of your work here and we will post them.

Experimenting with tear-away stabiliser – Part 1

Experimenting with tear-away stabiliser – Part 1

I don’t make New Year Resolutions, there’s absolutely no point as I have the attention span of a puppy at that time of year.  Instead, I opt for trying new things around my birthday.  It’s a good way for me to treat myself to supplies that I normally would not try.  There is a bit of a downside in that I soon won’t be able to open presses without an avalanche of goodies hitting me but we will push that thought aside and bury it, along with the passing years  (under the goodies at the back of the press).

This year, I decided that I wanted to try tear away stabilizer.  It’s one of those products I had heard about but it is not stocked locally.  As a result it had fallen into that category of ‘mmmm that looks interesting’.  Followed by a long period of totally forgetting it existed.  So, when I finally happened upon it on Amazon, I decided I should make the purchase before I forgot all about it again!

I opted for 8 inch square sheets which came in a packet of 100 and cost less than Stg£9.00 (less than $10.00).

I love my sewing machine!  It’s a huge heavy yoke from Janome that I bought comparatively recently.   Like many machines these days, it has the facility for free motion embroidery.  As a sewist, I have lots of coloured threads so I was ready to get to work.

Next, the design.  I opted for copyright free doodles that I sourced on Shutterstock.  I was attracted to two designs which are achieved without lifting the pen too often.  This meant that there would not be too many gaps when it came to the free motion work.

I printed off my chosen designs and then transferred them onto the tear away stabilizer using a permanent marker.  I decided to use some white linen from my stash as my background.  I washed one of these pieces and left the other two alone.

I then pinned cotton batting to the back of two of the pieces of linen – the third piece of linen was left with no backing on it.  I wanted to see if I needed the batting for extra structure.  After this I pinned the pre-traced design/stabilizer onto the fabric and used the free motion embroidery function on the sewing machine to transfer the designs across.  I worked my way slowly along the lines of the drawing going back and forward a number of times to get a thicker outline.  Here are some photos of the back and front sides of my pieces:


I was very pleased with the resulting ‘embroidery drawings’.  The tear away stabilizer came away quite easily on the ‘face’ although I did use a pin to raise the paper on some of the smaller sections of the drawing.  The ‘bird’ (more in Part 2 of this post) was a bit more of a challenge as there were a lot of small areas where the stitching crossed over the design so I needed a bit of patience to make sure these were all removed.  The back of the pictures were quite neat too.

So, I had to make a decision on what to do next.  I don’t have any embroidery thread but I have lots of cotton perle thread so I chose this.

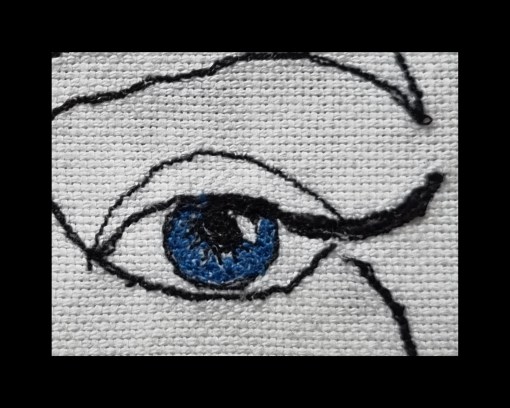
I meant to take photos of my progress but got carried away.    I stitched the eye with the free motion embroidery function.  It is my first attempt at an eye and I am pretty pleased with the result.

Here is the finished piece.


So far, the second face – the one that is backed with the cotton backing, is not filled in.  I would welcome your suggestions on what approach I should take.

Thanks in advance!

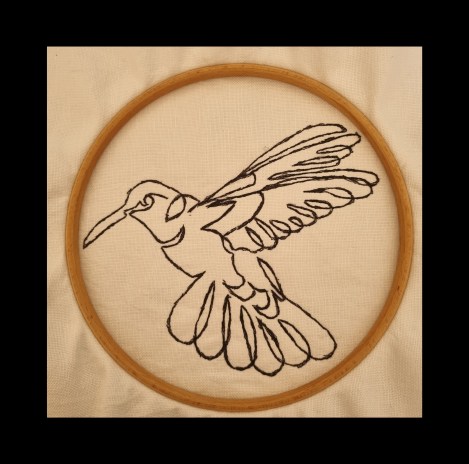
I will show you how I finished the bird in Part 2 (November 20th).  Here’s a preview of what he looked like ‘naked’.

Felted bags

Felted bags

I love to felt bags because I think the size, model or colour of the bag is representative of us. My bag is one of my best friends because she is with me all day long. I will show you some pieces, all of them were made for custom orders. After the bag is felted I use leather and embroidery to create something different and beautiful, my style.

A Crown for Maris

A Crown for Maris

I had hoped to show you my finished Glorious Devon picture this post, but I’m afraid I’m not quite there yet so – (in the well known phrase from the kids’ TV show, Blue Peter) Here’s one I made earlier!

Just before our pantomime, The Little Mermaid, went into the first dress rehearsal, the wardrobe mistress asked me if I would have time to make a finalé crown for Maris.  Maris was the sister of Neptune and Aunt of Serina, the little mermaid.  It is our invariable custom choose specific colours for all the finalé costumes and this year they were to be predominantly royal blue with silver touches and for Maris’ crown I was asked to think of the effect that water makes when something is dropped into it from a height.

I had a look at Google Images for inspiration and collected together my materials ready to make a start.  These consisted of a stainless steel headband, an empty plastic milk bottle, an empty Johnson’s Baby Shampoo bottle (the colourless ones they used before they changed the colour of the shampoo and thence the bottles) some royal blue organza, pale blue organza with silver/pearl embellishments, some silver lacy type fabric and some white/iridescent beads on wires that I had salvaged from old Christmas decorations (on the assumption that I’d find a use for them some day).  You can see these in the pictures below (with substitute shampoo bottle as I’d cut up the original one before I remembered to take the photo).  In the end I did not use the white braid that you can also see.

Materials
Salvaged Christmas Decorations

My idea was to make a double splash – a tall centre splash and a shorter outer splash. (I am pretty sure that I was not going to fall foul of any copyright since I don’t think there’s any such thing as a double splash.)

I cut the outer splash from the plastic milk bottle, stapling the pieces together; and the taller one from the empty shampoo bottle.  As the shampoo bottle was not cylindrical, but flattened, I heated the cut out piece with my hair dryer and squeezed it until it became more cylindrical.  Then I glued some of the royal blue organza onto it.  I found this took quite some time to dry and fix itself so, as time was short, I painted both sides of the shorter piece with royal blue acrylic paint.

Outer Splash Unpainted
Inner Splash with Organza
Both Splashes Tried Out For Size

To represent sprayed water drops, I added some of the salvaged Christmas decorations to the outer splash, having first extended them by twisting two wires together. I used some silver glitter glue on fine wires to make similar “water drops” for the inner splash and added those. I also glued some of the embellished organza onto the outside of the tall splash. Then I fixed it inside the outer splash and stapled them together at the base. After cutting two slits in the lower edges of the crown through which the headband would fit, I covered the base inside and out with some of the silver lace type fabric to cover the staples and soften the edges a bit. I cut out some of the “wave” shapes from this fabric and glued them onto the outer splash.

Finally, I slid the crown onto the headband and it was finished.

Finished Crown

Unfortunately, when I photographed the finished crown against a dark blue background, the silver came out gold in the picture – no doubt a trick of the light.  The second picture was taken against a white background and some of the silver drops appeared black.

The wardrobe mistress was pleased with the crown, as was I, but I think it would have been better to have been much larger.  It was a bit too dainty to be seen from the back of the auditorium.

Maris – 1st Dress Rehearsal – No Makeup

2022 Grape vine altercation (better than 2016 battle)

2022 Grape vine altercation (better than 2016 battle)

It’s been a bit of a sore week, I lifted things I should not have and then got a bit over enthusiastic with the fall gardening (Glenn was very helpful). My brain keeps telling me I am 25 and my body insists I am 90. I would like to find a compromise closer to the lower number but cannot seem to talk my body into that.

Each fall I wander into my backyard and discover the raspberries have made a break for it across the yard heading for the neighbour’s fence. The Grapes have anticipated their troop movements and are waiting for them. Grapevines were draping themselves over the fence, clematis and up into the back neighbour’s tall hedge. This year I found they were also working their way down the fence toward the patio and had stopped to attack my Japanese lilac tree.

Normally I trim and pull the grape vines out of the hedge. Usually, this extraction goes well, except for the one year they threw me on the cinderblock garden edging. I may have been lying partly in the garden bruised, but still won the war since their extracted vines were still clutched in my slightly numb hand.

1- i am clutching the large branch of grape vine I had cut off then pulled from the nabouts hedge, arm is uprased do you can see part of the brews on triceps. The background shows the arber over the compost bin the grape vines are suposto be growing over.1-2016, I am clutching the large branch of grapevine I had cut off and then pulled from the neighbour’s hedge, my arm is upraised so you can see part of the bruise on the triceps. The background shows the arbour over the compost bin the grape vines are supposed to be growing over. (just to remind you that the grapes fight back when extracted!)

2- 2016 War of the Grape vines, I had taken damage but won (this is a close up shot of the brews purple center with blue edges. impressive hematoma. )2- 2016 War of the Grape vines, I had taken damage but won (this is a closeup shot of the bruise purple center with blue edges. impressive hematoma. )

Back to 2022

I do apologize I was not thinking as well as I usually do (I was still quite sore from the garage incident) and did not have my camera ready to document the coming battle and its aftermath.

I was not quite up to that level of physical conflict this year, being already quite sore from having attacked the moving of heavy stuff in the garage. Luckily, Glenn offered his help. With much tugging and a good pair of anvil pruners, the tree was freed from the assaulting grape vines.  Glenn dragged the long pieces of grapevine to the sideyard to await my displeasure.

We (mostly Glenn) filled a yard waste bag of pulled weeds and errant raspberry plants. Then he retreated from the battlefield defiantly the victor of the first battle. (Glenn had a few scratches and I was still aching from previous endeavours)

Now on to the more fibre-oriented part of the day.

For the past few years, I have put my captured grape vines to use by trying to weave grape wreaths. The first few were ok but not substantial enough, not enough vine for the circumference it tried. The last few years have been much better.  I hang the new ones on the gate and on the dog fence. This year the pieces of the vine were longer than usual and I had more of the old stalk as well as a lot of the new growth.  I had a couple of pieces with old stalk last year and had tried soaking it to see if I could make it more pliable. It did not seem to make a difference, but I may not have been patent enough with the time I had left it soaking.

This year I started with the longest piece which had quite a bit of old stalk and slowly started the circumference (bent it to my will- maniacal laughter), weaving in the side and branching parts as I came to it. Sometimes I would have two side branches weaving as well as the main stalk. I would try to wrap them one from the inside and one from the outside as well as routing the main stalk around the growing wreath. I would add a new stalk as I go, to the tip of the old one.

3- close up of grape vines wound into a wreath with leaves left on. The house bricks may give a bit of scale. (big leaves this year 3- close up of grape vines wound into a wreath with leaves left on. The house bricks may give a bit of scale. (big leaves this year)

I know I could get better compaction if I took off the grape leaves but I like the way they look as they dry and the chickadees seem to like the leaves on them through winter.

For this wreath I have only extracted and used about half the errant grape vines from the back yard.  I still have to get the rest out of the hedge. So knowing I will have more I used all the extremely long stocks to make one very big wreath. I did get a picture of the finished project for you.

4 – Large wreath sitting on iron bench and leaning agenst the brick wall of my little house4 – Large wreath sitting on iron bench and leaning agenst the brick wall of my little house

As usual the grapes have disappeared (into the birds, raccoons and the rest of the local wild life), but we did grow very big leaves this year!

5- This is the side of the yard we cleared of the vines. Japaneses lilac beside wooden fence. A pot of Saskatoon berries with red/orange and gold leaves to the side of the picture.5- This is the side of the yard we cleared of the vines. Japaneses lilac beside wooden fence. A pot of Saskatoon berries with red/orange and gold leaves to the side of the picture.

6- hidden by grapevines, the fence the arbor and one end of the nabours hedge. 6- hidden by grapevines, the fence, the arbor and one end of the nabours hedge.

This is part of what’s left to get under control! that hopefully will be next weekend’s work.  There is not much left to do in the garden but harvest the extremely slow growing carrots, the last of the herbs and hope the last of the cherry tomatoes hurry up.

 7- Possibly over optimistic tomatoes it is almost November! Close up of cherry tomatoes the closest to stem is just starting to change from green to orange but not yet red.

But for now its time to head back to bed. Other than ticking off my back last week, I also go my covid shot, was that yesterday or was it the day before? It’s a bit of a blur, which means it’s working.  So I’m heading back to bed feeling like I have caught the flu, give me another day or two and I will be back on line. (Don’t worry, I always react badly to flu shots, covid shots just seems to hate me a bit more. Glenn got his and had no side effects at all!)

So please felt and have fun twice as much to make up for my lacking the last however many days this is/was.

8- Gratuitous marigold flower shot of to inspire you with their Red orange and yellow colours. Even the foliage is trying to inspire with the shades of green and purple where the cold has hit them.8- Gratuitous marigold flower shot of to inspire you with their Red orange and yellow colours. Even the foliage is trying to inspire with its shades of green and touches of purple where the cold has hit them.


It’s That Time of Year Again

It’s That Time of Year Again

You may be thinking No, it’s not Christmas time yet. I am still enjoying cooler days with amazing trees putting on a show. And you’re are right it’s not Christmas time. It’s getting ready for sales time. and that means making dryer balls and soap for the guild sale and the Log Farm Market.

I don’t have a booth this year at our Guild sale, https://www.ovwsg.com/sale/ instead, I am joining the co-op booth where members who only have a few things to sell can put things and the guild takes a small commission.

The Log Farm where we do the Farmers’ Market has a small store, https://thelogfarm.com/karens-kountry-market/ that is open through the lead-up to Christmas. They want dryer balls and soap.

So off my son and I went to find the Corriedale wool and the soap I know I bought and the bag with the pantyhose/nylons/stockings( depending on where you are from).

We found the wool and the pantyhose but no soap. We dragged out the big boxes of wool. One has all my dyed wool in it. I will need that for making soap. I am sure there is soap in there somewhere but that’s enough searching. I will go buy more soap. I will find the other stuff eventually and it doesn’t go bad. The other good thing I found was a box of frames. I hope to get a few things framed for the show too.

On to making dryer balls. Here is one leg of dryer balls ready to go to the washer and dryer.

And this is what they look like after I got them all done.

Monday evening I took my bag of dryer balls to the guild with me and with the help of another guild member( sorry I do not remember your name, sometime between 2 and 10 years of knowing you I will remember it) They were all removed. this means untying the knots between each ball that are now tight and pealing them out. they are stuck pretty good.

Now I am putting them into the pantyhose again so they can have another trip through the washer and dryer to get rid of their fuzzies from being stuck and peeled out of the pantyhose the first time.

After another trip through the washer and dryer, I will need to bag them, put a topper on them, and then label them with a unique number so they can be tracked in the co-op booth. and I then need to make the soap too. and I haven’t started that so they will have to be another post.


Deconstructed Screen Printing Session

Deconstructed Screen Printing Session

My local group had our annual retreat in early September. We go out to a lovely lodge on Little Bitterroot Lake and spend a couple of days creating and playing with art stuff. This photo is from sometime in the past. Sadly, this year, the air was full of smoke and you could barely see the mountains across the water. This year, our activities included deconstructed screen printing, making a book and creating some “faux” rice paper.

These are a few of the paper prints that I created. Deconstructed screen printing is done with a previously prepared screen in which the thickened dye has been left to dry. Then you use more thickened dye or plain print paste to release the dried dye from the screen. It is a serendipitous process and you are never sure what you will get in the final prints. I teach this process on felt in my online class.

I usually use fairly thick paper so that I can wash out the thickener that is left on the paper. That way I can do other processes on top of the paper without it running. These are similar to some of the papers that I used in my recent collage challenge.

One of the fun things about the paper is that you can end up using either side. The photo on the left shows the front side of the printed paper and the right photo is the back side.

Here are some of the fabric pieces that I printed. If you click on the individual photos, you can see what type of fabric I used. The little scraps on the top left photo are what was left over after I used a piece of printed hemp canvas for the cover of my book.

These prints are all on silk. The left side is silk habotai, the middle is silk organza and the right side photo is the silk organza layered over the habotai. You could print on many types of silk and this would be a great way to create your own fabric for using in nuno felting.

I will be using these for my upcoming classes that I am taking as backgrounds for stitching, in collages and wherever else suits my fancy.

Next time, I will show you the book that I created while at the retreat. It’s not entirely finished but you will be able to see the deconstructed screen printed canvas as the cover and a piece of printed paper as the inside covers.

Barnie – part 1

Barnie – part 1

In May, our textile group held a workshop to create a bird portrait using either machine or hand embroidery. Our tutor was the talented artist, Helen Walsh who creates bird pictures using applique and free motion stitching.

These days, I like to be prepared or might that be….‘forewarned!’ So, having researched her website I set about choosing a suitable bird….but, I love Barn owls….therefore, no decision required on that front! The only choosing needed was simply one of finding the right pose, particularly as I only wanted a part of the bird (I’d already realised that for me to complete the entire bird would be extremely time consuming)….Pinterest, Google & Flickr to the rescue.


I loved the curious owl on the right with his tilted head


The background snowy grass scene caught my attention

I created many photomontages of owls at rest, paying particular attention to the details of feathers and face. Two images stood out. One that I felt I could crop but still give me some simple background interest, the second was the angle of head. Some computer fiddling and….Taadaa

Cropped image is on the left

The cropped image now has a tilted head!


Once at the workshop, Helen showed us many samples taking us through the process and gave us many hints, tips & tricks to bring our birds to life.

Our first task was to create a tracing of our bird so that we could cut out suitable fabric pieces and commence our applique/stitching work.

I was so absorbed throughout the day that I totally forgot to take any production photos!


You will notice that the original photo owl’s face was a bit sad looking and his beak somewhat indeterminate. However, luck was totally on my side….literally. My friend, village neighbour and sewing buddy, sitting right next to me, had brought last year’s calendar of wild birds with her – October offered the most beautiful barn owl face. Just perfect.

By the time I remembered to take photos I was well underway having machine stitched all my Bondaweb-backed fabric in place onto a subtle fawn/grey linen, using sheers for the distant pieces of grass, overlapped with more substantive fabric for the foreground. I had already started hand stitching (fly) on top of the FME feather details (with rows of blanket stitch around the head) and was attempting to apply Barnie’s face….Yes, he had now been named!


The end of a busy workshop, but I wasn’t happy with Barnie’s face.  It was all too symmetrical with his wing feathers and just didn’t have the correct all-important inquisitive tilt I wanted, so I had to pull off his beak and one of his eyes….ouch!

At home I was able to reassess the whole face and consider how I could make it more alive. Conclusion – sorry, but Barnie lost his other eye too….ouch, again! This did however allow me to add more feathery details (fly stitch) unhindered.

Aren’t heat-reactive pens wonderful – his face now mostly clean!

From the October owl I traced the face then manipulated it size-wise to fit, finally drawing it onto OHP acetate to ensure the ‘perfect’ placement of Barnie’s new wide eyes.

I hope I have left you sufficiently intrigued as to how he acquires his remaining features….

A patchwork repair for a friend.

A patchwork repair for a friend.

Thankfully, the before and after experience of the abdominal surgery I had in July was not as bad as I thought it would be. But, there were some surprises with the things that we all take for granted, for example, it can be a big surprise to discover that sneezing, coughing, laughing, or even the thought of these things, will remind you to hold onto your belly for dear life, for fear of it splitting open. Similarly, turning over in bed, or getting in and out of bed will have you puzzling about the safest position to do these manoeuvres without your belly once again splitting open. Now, several weeks later, the anxiety of a split belly following a sneeze has gone thank goodness, and only the odd twinge remains to remind me.

 I needed some stitching to keep my mind occupied while recovering, and I had some simple meditative stitching to keep worries at bay. My friend helped me a lot with the usual distractions. She also had a bed coverlet – given to her by ?, but now forgotten relative – and it needed to be repaired. It was a handmade hexagon top stitched onto a background fabric, that was folded over (top, bottom and sides), to the front and the corners mitred. There was no wadding or batting in the middle. She thought this would be a good project to keep me occupied, no time scale, just to do something if I could.

I laid the coverlet on the  floor, there were quite a few missing hexagons, and some torn fragile ones. I was most struck by the variety of fabrics used to make the hexagons, how small they were, and what on earth had I agreed to do anyway? It is difficult to see any missing hexies from this photo above, you just have to believe me. I have placed a 50p coin to show the size of the hexagons.


I separated the hexagon top from the background fabric and set about replacing to torn, missing and damaged hexagons. I found one complete ‘paper’ and that measured 3/4 inch, measured against one of my 1 inch hexies. I replaced about 30 hexagons, and probably restitched that many again where the stitching had come undone. The hexagon top measured 84 inches x 45 inches, and the whole coverlet measured 104 inches x 65 inches when back together; it covers a single bed easily. The green background fabric is 2 pieces joined in the middle, and I think the width of each length is about ?40 inches.

Photos of some of the damaged areas, and fabrics in the coverlet.


When I finished the repair, the coverlet needed stabilising somehow, otherwise it was at risk of further damage. I decided to stitch the hexagon top to a piece of cotton – actually, part of an old duvet cover. This worked well, and then I stitched the top back onto the background fabric, this was probably the most difficult part of the job, trying to keep it straight, and prevent any tucks happening on the back. I wanted to do a sympathetic repair, the fabrics I chose from my bag of scraps fitted in very well, and I really had to look very closely to spot them when I had finished.

I used a few stitches to secure the top to the back in random areas. The above photo – on the right – is from my friend showing the coverlet on the bed in her spare room. I am really pleased with my efforts. I think this must have been started in the 50s or 60s, or even earlier? Maybe some of you can recognise some of the fabrics. I dread to think how long it took to stitch, but I am full of admiration for whoever did spend the time making this beautiful item. I am calling it a ‘coverlet’ because there is no middle layer, as there is with a quilt. However, if any of you know differently do let me know, I would love to have a definitive answer.


Mrs Mer Joins in the Adventures, Gaming (& Felting) Convention!

Mrs Mer Joins in the Adventures, Gaming (& Felting) Convention!

It has been a longer break than usual between posts but it’s also been a busy time.  I am partway through writing about the carp fair (yes, I will tell you if you can felt with gloves on shortly but not today.)  Today I want to tell you of the continuing adventures of the Mer’s.

Was it just a week ago that Mr. and Mrs. Mer and I followed Glenn off to the Kanata Games (and Felting) Convention? I have gone before and happily, spent the weekend felting, listening to my audiobook and watching the convention goers gaming. After a 2-year break, they were finally getting back to the fall tradition.

While Glenn wandered off to play train games (the older trains rust out part way through the game and there is a lot of math, doesn’t really sound fun to me.) the Mer’s and I settled into an empty table in the corner with a view of most of the gaming.

We are a little out of sequence since I had been working on Mrs. Mer at the Carp fair (which you haven’t seen yet!) I had built up her fishy parts to the point I was ready to add the wires for the fins.

1-Mrs. Mer, lying on felting pad, with fin wires for lower fins added to her fish body, needle is adding wool to lower abdomen of fish section.1-Mrs. Mer, lying on a felting pad, with fin wires for lower fins added to her fish body, the needle is adding wool to the lower abdomen of the fish section.

2- Close up of fish part of Mrs. Mer, adding folded wire that will be anal fin, the other fin wires are in place for lower fins and are wrapped in wool.2- Close up of fish part of Mrs. Mer, adding folded wire that will be anal fin, the other fin wires are in place for lower fins and are wrapped in wool.

3-Mrs. Mer viewed from the back showing under structure of wool and adding the back fin wires.  She is lying on a wool pad which is on top of a handwoven cotton blanket of various colours of blue and bits of purple.3-Mrs. Mer viewed from the back showing understructure of wool and adding the back fin wires.  She is lying on a wool pad on top of a handwoven cotton blanket of various colours of blue and bits of purple.

Since we cot Mr. Mer flirting again at the fair  I was determined to get Mrs. Mer closer to completion over the convention weekend.

4-Mr Mer as his arms resting over the handle of my willow basket, he is showing off his chest and smiling.4-Mr Mer, as his arms resting over the handle of my willow basket, is showing off his chest and smiling.

One of the tables designated for overflow games was suggested as a good spot so I was out of the way and it was large enough to work comfortably.

5-Table at back of gaming convention, gaming going on at tables in back ground, Mrs. Mer lies on table showing her back. She has her fin wires wrapped in wool and has a felting needle stuck in her sacrum.5-Table at the back of the gaming convention, gaming going on at tables in the background, Mrs. Mer lies on the table showing her back. She has her fin wires wrapped in wool and has a felting needle stuck in her sacrum.

I finished wrapping the last of the fin wires and was ready to start sculpting more detail into the fish bits and then add the actual fins. I still have work to do on her human parts but am focusing on her fishy bits at the moment.

I am interested in the intersection between human and fish again, this time playing with the echoes of lines that would have been gills.

6- Close up of Mrs, Mer’s gluteal muscles and the transition to fish, 2 ridges are developing reminiscent of gills.6- Close up of Mrs, Mer’s gluteal muscles and the transition to fish, 2 ridges are developing reminiscent of gills.

As I thought about the transition, I decided to move to the tail for a bit as I considered her options.

7- Mrs Mer on wool pad on table. Showing tail fin being built up with white wool over the Alpaca under layer.7- Mrs. Mer on a wool pad on the table. Showing the tail fin being built up with white wool over the Alpaca underlayer.

8- Showing Mrs. Mer on pad on table, with very thin felt being built up between the upper and lower tail wire, there is gaming going on in the background.8- Showing Mrs. Mer on the pad on the table, with very thin felt being built up between the upper and lower tail wire, there is gaming going on in the background.

9- Mrs Mer, lying on felt pad on table, with clutter of mini Chocklet bars, Ice crackers, glasses and extra needles spread around her. I am adding more fiber to expand the thin felted tail fin.9- Mrs. Mer, lying on a felt pad on the table, with the clutter of mini Chocolate bars, Ice crackers, glasses and extra needles spread around her. I am adding more fibre to expand the thin felted tail fin.

I added a lateral line on both her fishiness as well as her hips sort of where her IT band should be.

10- It band integrated with Dorsal line on fish body  anal fin over felt pad with felting needle adding thin wisp of fibre to wire fin armature. Glasses and tiny plyers and cutters are lying on the felting mat.10- It band integrated with the Dorsal line on the fish body anal fin over a felt pad with a felting needle adding a thin wisp of fibre to the wire fin armature. Glasses and tiny pliers and cutters are lying on the felting mat.

11- Close up of anal fin and tale (Caudal) fin both with very thin wisps of felt for the fins.  They are lying on the felt pad with a needle sticking out of it.11- Close up of anal fin and tale (Caudal) fin both with very thin wisps of felt for the fins.  They are lying on the felt pad with a needle sticking out of it.

12 - Starting the Ventral fin one on each side of the lower body of Mrs Mer’s fishy body12 – Starting the Ventral fin one on each side of the lower body of Mrs. Mer’s fishy body

13- Mrs Mer lying on her side on the table with her Ventra fin on the felting pad with a needle stuck in it. There is a bottle of mountain due (pop with a lot of caffeine), reference photos and my audio book player also sitting beside the pad.13- Mrs. Mer is lying on her side on the table with her Ventral fin on the felting pad with a needle stuck in it. There is a bottle of mountain due (pop with a lot of caffeine), reference photos and my audiobook player also sitting beside the pad.

14- Mrs Mer is now leaning on her elbows on the felting pad. I have all the lower fins added as well as the tail, I have started to add a bit of light skin tone to her lower back and glutes.14- Mrs. Mer is now leaning on her elbows on the felting pad. I have all the lower fins added as well as the tail, I have started to add a bit of light skin tone to her lower back and glutes.

The gaming will go on until 11 pm on Friday night, there are still quite a few people that I can see and more in the other half of the hall. Since I have a bit more time I started the Dorsal fin.

15- Mrs. Mer Lying on the table with her Dorsal fin spread out across the felt mat. There are wisps of wool being added to the space between the spines.15- Mrs. Mer Lies on the table with her Dorsal fin spread out across the felt mat. There are wisps of wool being added to the space between the spines.

16- Mrs Mer props herself up on the table with a bottle of mountain due behind her.16- Mrs. Mer props herself up on the table with a bottle of the mountain due behind her.

It is the end of day 1 at the Friday gaming and felting convention and time to send Mrs. Mer back to her project bag,

Day 2 (Saturday) unfortunately I had a previous shopping commitment when I learned about the gaming and felting convention planned for Saturday morning. Therefore, the Mer’s and I jumped in the car very early and headed north not just out of town but also out of province to Wakefield Quebec. They were having a wool day at the market.

17- Photo of community center and the corner of some of the Market stalls with white tents.17- Photo of the community center and the corner of some of the Market stalls with white tents.

We arrived in time as they were still setting up some of the booths.

18 -bin of wool and 5 small bags of tiny locks sitting on small chest freezer, more of market in background18 -bin of wool and 5 small bags of tiny locks sitting on the small chest freezer, more of the market in the background

19- Feme sol Fiber yarn and batting for sail in pretty baskets.19- Feme sol Fiber yarn and batting for sail in pretty baskets.

I found Femme Sol and sorted through some of their fibre, selecting bags with small curls in white and dark brown. The next booth over was Rocks end farm with Icelandic sheepskins and yarn but no fibre this time.

20- Rocks end farms  yarn displayed on table with dift wood support20- Rocks end farms  yarn displayed on a table with driftwood support

I also spotted some colourful wool mitts, shooting mitts (have a finger for the trigger), fingerless mitts and toques.

 21- table covered in batique cloth with colorful mittens on top 21- table covered in boutique cloth with colourful mittens on top

22- 2 ladys looking at mitts one lady selling the mitts22- 2 ladies looking at mitts one lady selling the mitts

Ginger had asked about Mr. Mer so I went back to the car to let them visit.

23- Mr Mer and Ginger Chatting.23- Mr. Mer and Ginger Chatting.

24- Mrs. Mer interrupts Mr Mer’s Flirting.24- Mrs. Mer interrupts Mr. Mer’s Flirting.

There was a dyer of yarn there, Riverside Studio, who had a great selection of hand died yarn.

25- Grid racks of hand dyed yarn, woman with large pink hand bag admires yarn25- Grid racks of hand-dyed yarn, a woman with a large pink handbag admires yarn

I admired the last of the fall flowers in front of the Wakefield community center before heading back to Ottawa.

26- Ornamental grass and brown-eyed-Susan flowers with dark rose colours flower I don’t recognize and general greenery behind.26- Ornamental grass and brown-eyed-Susan flowers with dark rose colours flower I don’t recognize and general greenery behind.

The trees are just starting to turn colour at the higher elevation around Wakefield.

27- fall colour along the highway green, orange, red yellow leaves on trees.27- fall colour along the highway is green, orange, red and yellow leaves on trees.

Did I mention the main highway in Ottawa is getting one of its overpasses replaced this weekend….. that would explain the odd extra traffic. I eventually made it back into Ottawa and then west to Kanata where the convention was underway.

Mr. Mer was very attentive to his wife. It may be she was annoyed with his flirting of earlier this morning.

28- Mrs. Mer on felt pad on table with Mr. Mer leaning over the back of the walker supervising her felting. In the background gaming is going on.28- Mrs. Mer on a felt pad on the table with Mr. Mer leaning over the back of the walker supervising her felting. In the background, gaming is going on.

Today’s focus is to firm up the fins I laid in yesterday.

29- his wife as she lays on the table with her Pectoral fin about to be worked on with the fake clover tool.29- his wife as she lays on the table with her Pectoral fin about to be worked on with the fake clover tool.

Glenn borrowed the camera so I have a picture of myself felting.

30- Jan using fake clover tool on pectoral fin, with Mr. Mer watching over his wife.30- Jan using fake clover tool on pectoral fin, with Mr. Mer watching over his wife.

Many hours pass…

31- Mrs Mer balancing on 2 mountain due bottles on table, gaming happening in the background.31- Mrs. Mer balancing on 2 mountain due bottles on the table, gaming happening in the background.

32- Mrs Mer tries to go for a swim  but it is now time to go home. Glenn had fun and so did i.32- Mrs. Mer tries to go for a swim but it is now time to go home. Glenn had fun and so did i.

As Mr. and Mrs. Mer head home they share a project bag.

33- Mr.and Mrs Mer share a project bag as they prepare to head home. Glenn sits behind the table ready to carry everything to the car.33- Mr.and Mrs. Mer share a project bag as they prepare to head home. Glenn sits behind the table ready to carry everything to the car.

Well, that was a good weekend of felting and shopping! I hope you are enjoying your fall, and that winter doesn’t arrive too soon.