Mossy Driftwood Continued

Mossy Driftwood Continued

Last time I posted, I showed you a piece of driftwood that I had covered in green felt to represent moss. It definitely needed more work to achieve the natural look that I desired.

I took a small pair of sharp scissors and cut out some holes as well as making the ends not so uniform and straight. I then decided to use the left over cut out pieces as padding for stitching. I added the left over pieces in a couple of places and hand stitched them down.

I then decided to try adding more texture with needle felting. I had a pile of little wet felted scraps which you can see on the left and I needle felted those down. Then I added some wool from my carded batts that I had left over after wet felting. I needled those down but not too firmly. I still wanted the texture of moss, which you can see in the right photo.

Driftwood covered with green felt, stitched layers of felt added, needle felted layers added

Here’s what it looked like after I finished the lower layered bits. I left hanging threads as this will be the “grassy” looking bits sticking up between the moss.

Work bench covered with variety of green thread and driftwood covered with felt.

Next was looking for different green threads. Here’s what I came up with. You can also just see on the left side that I found some of my photos of moss and printed those out for reference.

Close up of French Knots stitched on green felt covering driftwood.

I then started adding some hand stitching. These are “wonky” French knots with hand dyed lace weight wool thread. This is going to take a while. I have another “slow” stitch project on my hands.

Next up was to try some machine stitching. I made a sandwich of the threads on the left between two layers of water soluble fabric. I then machine stitched a random branching pattern. The photo on the right shows the result after washing out the soluble fabric.

Close up of machine stitched threads on top of felted driftwood.

Here’s a small piece of the machine stitched moss by the French knot section. I haven’t stitched it in place as I think I will do more of the hand stitching first. I’m loving all the different greens as that is definitely what you find in nature. I will keep you updated on my progress.

Unexpected Finds

Unexpected Finds

Apologies are given in advance of my post. I had my first bout of Covid 3 weeks ago, and now have this years flu variant, despite all vaccines onboard. There will be many photos, and few words this month, as I can’t wait to get back to my bed.

Felted Flower Update

The felted flowers from my last blog post (top) were glued on thin white headbands, with an accent leaf or two. (Bottom photos)
Happy faces at the Fall Harvest Tea Party. (top) More headbands (bottom)

I think this project was a huge success! The ladies were so proud to show off their tea party fascinators, and I was proud that we all made it happen. I originally approached the activities director, to volunteer my services to teach felting to the residents. She totally blew me off! When the ladies of Memory Care came in wearing their lovely fascinators, and big smiles, she said nothing to me…but approached the unit activities coordinator, to teach the other units how to make them. She handled it perfectly, saying she was willing to share the information, but they would first, have to procure all the supples I donated for free.

My Parent’s Treasure Trove of Love

I am currently writing this post in a hotel room. We have been in Phoenix, Arizona for almost 4 weeks now! I’m selling my mother’s house to cover her monthly expenses in Memory Care. Thanks to trustworthy people and technology, 50% of the contents were donated to worthy charities, before we got here. The remaining 50% was placed in the garage for us to sort through. Ugh! A daunting mess, doesn’t even come close, to what we saw before us.

Mom and Dad’s retirement dream home
These are display pieces, designed by my father and assembled by my mother, for our needlepoint shop: The Yarn & I. Needlepointed Bolero style vests (top) painted canvas (left) and Bargello/flame stitch pattern (right). Bottom photo shows 3 different belts available at the time.
Quilts designed and made by father, Don Mettler.
More quilts! Finished, and Unfinished pieces (right)
These are examples of my father’s later works. Fabric Embellishment (quilted art) and Mixed Fiber Art
Fabric Art pieces collected by my parents (top) and a Needlepointed Art piece designed and created by Don Mettler.
These are some vintage pieces I found, going through numerous boxes. Starting at the upper left moving clockwise; a) trivet made of cotton threads, b) vintage needle package, c) needle package opened up, d) hand embroidered tissue cover, e) lace collar removed from a young ladies dress…possibly my grandmother’s.

Thank you for taking a trip through time and treasure with me. The holiday season is quickly coming upon us. Please take care of yourselves as you are out and about – there are some nasty viruses out there. Now, I’m going back under my covers for a rest.

Capi

A Spring Update from Down Under

A Spring Update from Down Under

It has been a very busy few weeks with online teaching, two face-to-face teaching events, a dye day and prepping for the Christmas markets that all seem to be happening in November rather than December this year.

The first event was the Auckland Fun Felters retreat where I planned to teach felted vessels with feet and lids but that soon morphed to include triangular plates with feet, using a book resist. Everyone achieved awesome results, unfortunately a couple of people had to leave before I could get images of their pieces but as you can see from those I did manage to catch, we had a very productive weekend!:

Purple and orange combos were popular
This skull vessel was made by Margaret, she has only been felting for a few months but is already making some incredibly creative pieces

In between the two teaching events Margaret (who made the skull vessel) and I had a dye day, she has been learning to spin and wanted to try dyeing some of her hand-spun yarn.

We experimented with a few different dye techniques, all gave beautiful results

The second teaching event was the Creative Fibre Spring Festival in Orewa. This is a new 4-day textile festival north of Auckland. There were classes from a wide range of textile disciplines (eco-printing, crochet, spinning, weaving and indigo shibori to name just a few) and it has proved to be hugely popular, I am pleased to say a repeat event is already being planned for 2025.

I was teaching a 2-day bag making class, we had a range of experience levels from relatively new felt-makers through to several who have been felting for years but they all did amazingly well. Making well-made felted bags is physically demanding but a couple managed to finish their bags in just 2 days and everyone else was very close to finishing.

This photo was taken half way through the second day.

The grey wool in Jenny’s bag was from 4 different fleeces collected over 4 years from one of her Romney sheep, it is interesting how the wool lightens as the sheep aged.
A few of the sample bags I took along to help demonstrate how some different designs can be achieved

Time I got back to work making stock for those Christmas markets…. how is your holiday prep coming along?

If you are in Auckland over the next month or two, you can find out which markets and events I will be attending here. Would be lovely to see you if you can pop out for a couple of hours and who doesn’t love browsing at craft fairs?? 🙂

OVWSG 2022 Exhibition and sale

OVWSG 2022 Exhibition and sale

Last weekend was the return of our local Guilds Sale and exhibition. It was last held in 2019. The Sale had grown over the years unfortunately the venue had not expanded as we had (Brick and Morter buildings just don’t stretch well!!)

Glebe Community Centre started life as the St. James Methodist Church In the Palladian style designed by Clarence Burritt (It was begun in 1914 and finished in 1924.) due to a merger of congregations it became St. James United Church in 1925. In the early 1970s, the congregation had declined and again merged with another Church building leaving The City of Ottawa to buy the building. In 1974 the Glebe Community Center opened.

outside of Palladian style brick building that was a church and now a community center. 1 The Glebe Community Centre, views from the outside. Large Palladian-style domed church a community centre.

2 Inside the Main hall.  Transom windows around the base and an octagonal apex window in the dome.2 Inside the Main hall.  Transom windows around the base and an octagonal apex window in the dome.

This year we reduced the number of booth spaces and increased the space for the exhibition, demo and Iles which also gave the sale a less squished look.  This worked out well since we had some vendors who were no longer vending and some who did not have the amount of stock for a booth so joined the Guild Co-Op booth.

Ann organized the measuring and taping group that started the setup for the sale. Once the tape was down marking the booth spaces, the tables and chairs were put where requested. The crew was moving so fast that it was hard to get a shot of their hard work!

3 part of the tapping and table and Chair crew. (a blur of activity)3 part of the tapping and table and Chair crew. (a blur of activity)

Just as the last table was set into place the first vendor arrived early.  Wendo had one of the four booths with felting!

4 Wendo arrives first with her car full of Felting4 Wendo arrives first with her car full of Felting.

The rest of Friday afternoon into the evening was spent in a blur of setting up. I had lively music to keep them moving, (including Uriah Heep, Sweet, Placebo, and lots of other lively inspirations ending with the Lords of Acid).

My focus for Friday was to both photo document the activity and find Photos of each of the 21 booths to put up on our Facebook group to inspire Shoppers for the weekend.

Booth 1 was the co-op booth. Members of the guild who only had a few items to sell put them in the co-op booth. Both Ann and I had items in this booth. (Bernadette was sharing a booth you will see some of her batts later)

5 Co-0p Booth Spindles, orifice hooks, stitch markers, Tapestry, Coasters and Mug mats5 Co-0p Booth Spindles, orifice hooks, stitch markers, Tapestry, Coasters and Mug mats

6 Co-0p Booth Handwovens, hand died yarn, Pine needle baskets, Felted sheep heads, felting needles.6 Co-0p Booth Handwovens, hand died yarn, Pine needle baskets, Felted sheep heads, felting needles.

7 Co-0p Booth Felted Soap, Dryer Balls, Sheep ear rings7 Co-0p Booth Felted Soap, Dryer Balls, Sheep earrings

8 Flying Dinosaur!8 Flying Dinosaur!

The booth beside the co-op was Wendo Van Essen’s. Full of whimsical felted animals, kits and pincushions. I was all set to take this guy’s picture face on when he suddenly swung around and showed me his but! I waited patiently, as he slowly continued his rotation until I felt he was showing a better side of himself.

A few booths down was Molly Underhill who also had a booth full of felting. I was captivated by the thin felted bowl. It was even more intriguing when she dropped in a battery-operated candle, which produced this fabulous glow!

9 her booth and the glowing bole9 her booth and the glowing bole

Lona’s Booth also had some Felted items, as well as Wood turned yarn bowls, shawl pins, buttons, art yarn items, crochet sets, handwoven and knitted items.

10 felt picture and roles of felt (I think they were scarves)10 felt picture and roles of felt (I think they were scarves)

Les Belles Bouclettes booth had high-quality mohair from Angora goats.  In both natural colours as well as dyed mohair locks, roving and yarn.

11 Combed Top, Kid Mohair Locks and Died Yarn11 Combed Top, Kid Mohair Locks and Died Yarn

Booth 6 was Judy Kavanagh and Don Haines. Both work with wood. Judy repairs wheels, makes spindles and sells fibre. Don makes doffers, nostepinne, Inkle looms, warping boards and a loom bench with a shelf!

12 fiber atrs tools make by Don and Judy and some of Judy’s fiber12 fibre arts tools made by Don and Judy and some of Judy’s fibre

Booth 7. Studio 3 had hand weaving; hand-dyed clothing, textiles, scarves and fibre art.

13 Handwoven shalls, scarves, stoles, hand died and hand knit Mitts, tam and scarf13 Handwoven shawls, scarves, stoles, hand died and hand-knit Mitts, tam and scarf

Booth 9. Wool, emporium de laine Amélie Blanchard raises cashmere goats. (She is also one of the people who run the fibre festival Twist). She had hand-dyed yarn and fibre, fleeces, and cashmere.
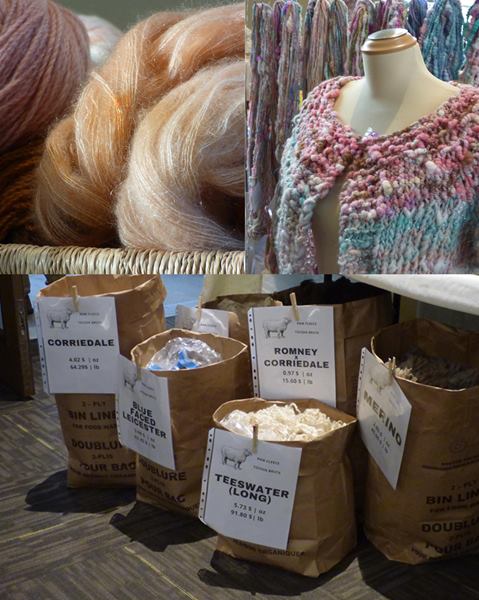
14 Fine yarn, Art yarn swetter with scains of art yarn behind, Fleeces from Rinebeck14 Fine yarn, Art yarn sweater with skeins of art yarn behind, Fleeces from Rhinebeck

Booth 11.Fab Fibre Two (Jean Sharp and Bernadette Quade)

Jean Sharp is a spinner and weaver. She had unique yarns suitable for weaving and knitting projects. As well as handwoven and knit articles.

15Knitting with shall pin and handwoven hand knit15

Bernadette Quade is a spinner and weaver She hand cards, drum cards, or combs the majority of her fibre and tries different dye techniques on her handspun yarn. Her fibre and yarn may include Fine wools, silks, linen, cashmere and angora as well as alpaca, llama and other exotics. (I have used her batts for landscapes and have found them fabulous!)

16 small bats in a hat box and with her business card. There is a depth of colour that flat colour batts can not match.16 small bats in a hat box and with her business card. There is a depth of colour that flat colour batts can not match.

Booth 12. Handweaving by Janet Whittam  Handwoven clothing, fashion accessories, rugs, household linens, and baskets in vibrant colours and always with something unexpected woven in. She also teaches both weaving and basketry.

17 Janet’s booth, rag rugs, jackets, shalls, close up of lace inclusion and fringe.17 Janet’s booth, rag rugs, jackets, shells, close-up of lace inclusion and fringe.

Booth 13. Cavadelo Flax Garden “Established in 2021. Our goal was to spin and weave flax/linen. We started with a (12 x 12) plot and tools replicated by our local Men’s Shed and learned the process of fibre prep, spin and weave. We have a much larger flax crop this year and it should be ready for the exhibition to spin.” They had a display of the tools of flax preparation, a small loom weaving with linin as well as a spinning wheel spinning the prepared flax into linen. It was a fabulous display! They are hoping to expand their production next year.

18 a hank of flax sitting on a woven linen mat, explain the stages of using hackles, small pouches of linin seeds in a handwoven linen bag.18 a hank of flax sitting on a woven linen mat, explain the stages of using hackles, small pouches of linin seeds in a handwoven linen bag.

Booth 14. Beaux Arbres Basketry (Michael Peterson) Basketmaker for about 30 years. Inspiration from historical techniques from various sources to make functional and artistic baskets. He teaches basketry, check his website. It is fun to watch a basket appear out of a pile of wet sticks.

19 weaving cane between the ribs of a small basket.19 weaving cane between the ribs of a small basket.

Booth 16. Wayside Weeds and Wool (Amanda Carrigan) Handspun and natural-dyed yarns, hand-knitted accessories and original patterns and kits. She is published in the ‘101 Lace One-Skein Wonders. She teaches spinning and natural-dyeing workshops.

20 Hand knit gloves, Hand Natural died yarn20 Hand knit gloves, Hand Natural dyed yarn

Booth 18. Yarnsomniacs   Handraised and homegrown sheep and llama fibres and yarns: raw fleece, washed fleece, roving, handspun and hand-dyed yarns, handmade SuperJumbo knitting needles, and more! Rambouillet Merino, Romney, Babydoll Southdown, and crosses of BL/BFL/Polwarth with either Romney or Rambouillet.

21 Many baskets and containers of raw and washed fiber21 Many baskets and containers of raw and washed fibre

Booth19. Cannaweave Weaving and Fibre Studio and Accessories (Laurie Harkin-Chiasson)  Loom weaving articles and baskets, including pine needle baskets, tools for the fibre enthusiast, nostepinne wool winders to mini tools on jewellery chains. Also woven bookmarks of handspun dog fur, spinning wheel hooks, wrist distaffs and rug hooking hooks. All the equipment for Japanese braiding (Kumihimo) including finished jewellery with Kumihimo braids. She uses beautiful exotic woods in many of her tools.

22 Laurie’s Booth, with tools and  baskets. A basket of Kumihimo bobbins22 Laurie’s Booth, with tools and baskets. A basket of Kumihimo bobbins

Booth 20. Off the Loom (Liliane McKennirey)  Hand Weaving using recycled materials for the weft: t-shirts, ribbing, furs, leather, VHS tape and plastics.  Liliane is very well known for her recycling of old fur coats into lap rugs and pillows.

23 Lap rugs, a purse, rag rugs.23 Lap rugs, a purse, and rag rugs.

Booth 21. Lin en ville Weaving eco-friendly linen essentials for the bath and kitchen. If you look closely you will see how fine the yarn she is using for her tea towels is. I could not pass up the lozenge twill pattern in blue and white!!

24 Tea towls in Linin (lozenge twill pattern!!)24 Tea towels in Linin (lozenge twill pattern!!)

We also had an exhibition. The theme this year was Then and Now: A Maker’s Journey. We were to select an early piece and one that was current to show the progress we had made in our creative journey.

 25 a few shots of the exhibition25 a few shots of the exhibition

We also had a make-and-take table (Kumihimo on cardstock, Turkish spindles and Tapestry Necklace)

26 the table showing the moridi and samples, the necklace tapestry pices and the parts to make turkish spindles26 the table showing the moridi and samples, the necklace tapestry pieces and the parts to make Turkish spindles.

There was also a demo area. (Spinning and weaving, I was felting in another corner with the Mer’s while I was taking photos and trying to get the music to run.)

27 the demo team changed over the weekend but had weaving, spinning (wheel and drop spindle). It was quite busy most of the time.27 the demo team changed over the weekend but had weaving, and spinning (wheel and drop spindle). It was quite busy most of the time.

Overall the sale was busy, vendors seemed happy with sales and the shoppers seemed happy with their purchases!  I mainly was distracted by fibre but also impressed with the linen display. Even Ann did a bit of shopping!

28 Ann took her new spindle for a spin!28 Ann took her new spindle for a spin!

Mr. and Mrs. Mer also attended the Sale but did not do any shopping.  I was working on Mrs. Mer but yet again Mr. Mer was caught Flirting!!

This slideshow requires JavaScript.

Magazines

Magazines

The Other Ann had posted about a challenge in a magazine she gets. Inspiration Magazine. https://www.inspirationsstudios.com/product/inspirations-issue-116/ it’s a needlework magazine. It looks really cool. So, I thought it might be an idea to ask people what magazines they read for knowledge and inspiration. Everyone seems to really love the Christmas beetle brooch. So I thought I would edit in the price for the kit, $129.00.  I am assuming that is Australian dollars.

I read Filz fu4n. the guild subscribes and there is an English supplement available. https://www.filzfun.de/magazin/en/

Wild Fibres is another interesting one. Lots of interesting articles and pictures.  https://www.wildfibersmagazine.com/

I look through Ply https://plymagazine.com/ and Spin-Off https://spinoffmagazine.com/ magazines at the Weavers’ and Spinners’ Guild too. They don’t do felting but I spin and there are lots of colour inspirations.


I would love to see Felt Matters but can’t bring myself to pay $65 for a digital and $81 for a printed ( 4 per year) magazine.

I like to leaf through unrelated magazines too when I see them. art quilt magazines are inspiring. They are good at showing you how to break down and simplify a picture. Nature magazines of course are great for inspiration. I have an old National Geographic magazine that talks about wool. It’s packed away but I found a picture


So tell us which magazines do you read to learn, and/or get inspired.

Moss on a Piece of Driftwood

Moss on a Piece of Driftwood

I have had this idea on my to do list for a while so I was glad to give it a try. I have seen several different ideas of felting on a stick or piece of driftwood and wanted to give it a try. Then I am planning on adding further embroidery to give the “moss” more details.

Piece of driftwood behind pile of green wool bits

I have a bunch of driftwood from my friend Deb so this is another way to use it. I pulled a bunch of different green wool from my stash and mixed it by hand. I suppose since this is all made from my stash, this qualifies for the 4th quarter challenge too!

Hand carded green wool

I then used my hand carders to card the colors together but I didn’t want it to be a solid green. I just did a rough card to mix the greens slightly.

Then on to wrapping the wool around the end of the stick. I wrapped it diagonally with one layer, tacked it down with a bit of quick needle felting and then wrapped another layer in the opposite diagonal direction. I then began squeezing and rolling the stick around on a ridged surface before I wet it down getting some air out of the wool. I think if I had wet the stick first, that might have helped with wrapping the wool a bit tighter around the stick. I’ll try to keep that in my brain if I do this again.

Piece of driftwood, one end covered with felted green wool.

Then I wet felted the wool by rubbing and then rolling the stick wrapped in a towel. I also did a bit of “bashing” the stick but had to be careful not to break off any of the wood bits.  This is how it looks now. I am planning on adding a variety of hand stitching to give more texture. I also might cut back the felt in some areas to allow the wood to show through. I haven’t tried stitching on this type of surface so it might be a bit of challenge. But I’ll just give it a go and see how it turns out. Do you have any suggestions for particular stitches or how best to handle the stitching? I’d love to hear your thoughts.


Wet-Felted Bowl Workshop

Wet-Felted Bowl Workshop

I taught a new wet-felted bowl workshop recently so I decided I’d share my thoughts and ideas about developing and running that workshop in this blog.

I’ve taught a few different wet felting workshops over the years.  I really prefer people to start with making good quality flat felt before moving on to other things, but sometimes I bow to the pressure to do something else. I try to remind myself that I’m not the felt police and neither can nor should be in charge of how other people choose to learn. (But, of course, there’s still a little bit of me that would like to be the felt police.  If the vacancy comes up I will almost certainly apply!)

I wrote here in May this year about developing a felt flower workshop for a community art project. Link here if you want to look back at it. https://feltingandfiberstudio.com/2022/05/18/community-art-installation/

This time I decided to go even more 3D and do a basic bowl, working around a flat circular resist. I wanted the workshop to be suitable both for complete beginners and those with some felting experience who were interested in trying out a 3D make.

I dug about in the studio and in my photos to see if I could find some old bowl examples and came up with a few.


I then walked my way through making a new sample bowl with a workshop hat on. By ‘workshop hat’ I mean focusing on what I think are the simplest techniques for inexperienced felt makers to achieve the best and most reliable results.

I decided on my layout: starting with a fanned-out layer from the centre then a second layer following the circumference of the circle. I intended the circular layer to overlap the edge as little as possible to reduce bulk in the middle, with the main overlap to connect the two sides on the ‘fanned’ layer.

I immediately realised I should have done the layers the other way around.  It’s much easier to follow closely the edge of the circle if you can actually see it! I also realised it was better to start laying the wool around the edge and move inwards rather than starting at the centre and moving out.  

I find it interesting how wearing a different ‘hat’ makes me think in a very different way from when I’m just making something myself. It’s a useful exercise.

I thought the sample bowl could demonstrate a couple of different surface design options so added some silk fabric, some locks and a little white wool to the grey area.

Sample bowl finished

It’s not the most beautiful bowl but it did its job. The collection of bowls then got me thinking about the size of opening.  I like a small-holed bowl to look at but it’s not necessarily so useful and it is certainly harder to full, being difficult to work from the inside. I decided that participants could choose.

I gathered together a range of tools and smiled at the weird variety of odd things I own. This is only a small proportion.

Some of the ‘tools’ I use

Something these tools all have in common is that not one of them was designed for felt making. My most recent purchase was a job lot of 15 small plastic rattles bought second hand on eBay. Actually, these worked remarkably well, especially for the bowls with small openings, and the quantity would come in very handy if I was teaching a bigger group. That was £5.35 well spent.

The workshop venue was the Horsebridge Community Arts Centre in Whitstable. The Centre has a lovely workshop area: really light and spacious with good tables and lots of sinks. Ideal for our purposes. After welcoming the 4 participants and a short introductory chat I demonstrated the layout. Jenny, Suzanne, Jane & Ronn then chose their wools and set about their bowls.

I had decided to go for 2 layers of wool rather than 4 as I find most people lay the wool out quite thickly to start with. 2 participants had some felt making experience and 2 did not. All of them went for quite thick layers.

We wet the first 2 layers down before flipping to the other side as I find this helps to get the wool tight around the resist.

Next I showed them how to start to work the wet wool: paying lots of attention to the rim of the circle and encouraging the wool towards the centre to reduce the chance of creating an accidental ridge.

Once they’d reached the prefelt stage we did some rolling using just the bubble wrap and towel. Then they were ready to cut the opening & remove the resist. Jenny went for a small opening, Jane and Suzanne a slightly larger one, while Ronn had something more organic in mind. She made 6 cuts out from the centre to create a sort of flower / leaf shape that would hold a plant pot.

Plenty of chat, a little music and lots of elbow grease later ……..

….here are the ladies at the end of the day, delighted with their finished pieces.

And here’s a better view of their bowls (plus the one I’d made alongside them to demonstrate the different steps – 2nd left). I was very pleased not to see any accidental midriff ridges as I think a smooth transition between the two sides is one of the hardest things to achieve when starting to work with resists. The bowls were felted really well, which made my inner felt policewoman very happy, with just the plant pot holder needing a little more finishing at home to fit around its plant pot.

I always ask participants to complete a short feedback form at the end of the workshop. There’s a bit of admin then 3 boxes to complete: ‘what did you like about the workshop?‘; ‘what could be improved?’ and ‘any other comments?’.

I also make mental notes for myself along the same lines. So, here are my own observations

We had a really nice day. It was a lovely group with a friendly and relaxed atmosphere: everyone seemed to enjoy making their bowls. Judging by the feedback forms, people found me adaptable, clear, knowledgeable and helpful throughout the session so lots of positives there.

What could be improved?

The participants didn’t have any suggestion but for myself I thought the timing was a little generous. I’d allowed 6 ½ hours (including a lunch break). We finished slightly early so maybe 6 hours next time, though that may be different if there were more participants.

I realised I didn’t give enough thought to / instructions on the interior of the bowl design. Because my sample bowl had a small opening the interior isn’t visible so I forgot to think that bit through. In fact all the visible bowl middles were good but definitely more luck than judgement on my part.

My making a bowl alongside the participants worked OK but I had to work very quickly to get it to the next stage while spending most of my time helping and advising the others. It would have been simpler to have pre-prepared another bowl sample to pre-felt stage.

All in all a successful workshop with some notes for myself on how to improve a few things if I run it again. Hope you enjoyed your virtual visit to our bowl workshop.

Experimenting with tear-away stabiliser – Part 2

Experimenting with tear-away stabiliser – Part 2

In the first part of this post I wrote about finally making the decision to buy some tear away stabilizer, using the free motion function on my sewing machine to ‘draw’ some copyright free doodles I had sourced from Shutterstock onto white linen fabric I had in my stash.  I did some slow stitch embroidery on one of the face designs.  Here is a link to Part 1, in case you might have missed it. https://wp.me/p1WEqk-dUs

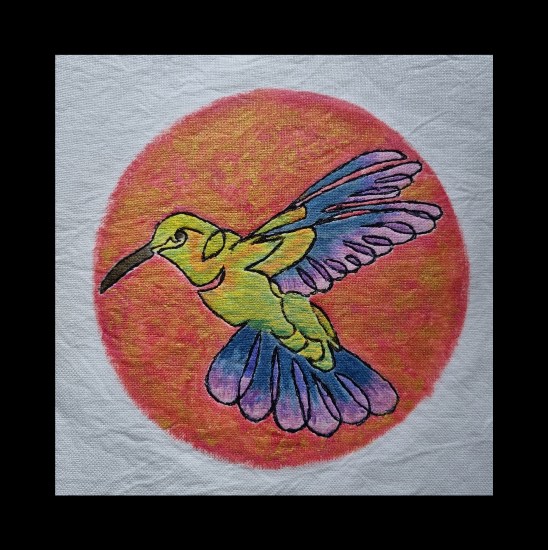
I wanted to do something a little different with the bird design.  My decision is the focus of today’s post.  Here is what the bird looked like once I transferred the design across onto the linen.


Just to recap, I had pre-washed the linen and attached some cotton batting to the back of the fabric prior to letting loose with the free motion embroidery.

It reminded me of a hummingbird and, as a result I wanted vibrant colour to inspire its completion.  I came across a set of iridescent acrylic paints in TK Maxx before the summer.  I thought I might try to use these shiny paints on the embroidered bird.

Before doing so, I needed to play with the paints so that they would work on fabric.  I did not have a Fabric Medium in my stash so I did a bit of research online and discovered that I could make one out of a few household ingredients.  So I thought it might be worth experimenting.  The recipe, which came from Paint topics, https://painttopics.com/can-you-use-acrylic-paint-on-fabric/ called for equal parts vinegar and glycerine mixed with two parts water.  I mixed the home made ‘medium’ and added it in equal parts to the paint.

The first thing I noticed was that the paint became very easy to apply.  I was worried that the iridescence would be lost in the mix but the vibrancy returned once the paint had dried.  Also, the black thread used when at the free motion embroidery stage acted as a barrier between the colours.  The paint itself was absorbed into the top layer of the fabric – there was no soakage into the batting.  I left the paint to dry out for about 5 minutes in between layers. The different colours sat nicely on top of each other.  I then left the picture overnight to dry completely and then ironed it to heat seal it.

I am really pleased with the result.  The cotton backing adds an extra dimension to the work as does the iridescence.  The texture of the paint is similar to what might be found on T shirt prints.   The only issue is, because this is an art piece (rather than a ‘functional’ one).  I have not tried washing it but I am happy that it is suitable for art work.

My only disappointment is that I could not get all the creases out of the pre-washed linen fabric.   Next time I might opt for a cotton fabric.

Have you ever used acrylic paint on textiles?  Have you used it with or without mixing with a textile medium?  Could you let me know how it worked for you.

A last minuet Halloween Door for the OVWSG Studio

A last minuet Halloween Door for the OVWSG Studio

I was up to my ears in layouts for the upcoming guild sale when I got an email that inquired if I could make a door display for Halloween as I had for Christmas last year. Hummm…. Yes, I could probably figure out something. OK, add that to the to-do list!

For Christmas you might remember,  I had made a landscape for the guild studio door with card stalk and wrapping paper. I populated it with 3 sheep representing the spinners, weavers and felters. I should again try to represent the guild in the decoration. I was considering spiders and ghosts, now I just need an appropriate background.

Off to Dallarama!  Sure enough, I found a black commercial lace table runner and a tablecloth of the same cheap commercial lace.

1-2) Black Lace Table cloth draped over front of guild door, with the Black Lace table drape as a swage above the door. 1-2) Black Lace Table cloth draped over front of guild door, with the Black Lace table drape as a swage above the door. 1-2) Black Lace Table cloth draped over the front of the guild door, with the Black Lace table drape as a swage above the door.

I bought a bit more candy and found three googly-eyed “cute” spiders in black and black and silver. Perfect! They will cover the spinners and weavers.  Ann Brought a large purple spider and a couple more of the smaller ones. (you will see those a bit further down).

3-4) One black and one black and silver googly eyed spiders sitting on top of a shopping box and teal plastic bag and wicker basket. Close up of the googly eyed spider with plastic legs. 3-4) One black and one black and silver googly eyed spiders sitting on top of a shopping box and teal plastic bag and wicker basket. Close up of the googly eyed spider with plastic legs.3-4) One black and one black and silver googly-eyed spider sitting on top of a shopping box and teal plastic bag and wicker basket. Close-up of the googly-eyed spider with plastic legs.

I started 2 little people who would be holding up a larger ghost.  To save wool I had Glenn buy a Styrofoam ball as the core of the ghost.

 5 starting one of the little figures, starting to warp wool over head of armature.5 starting one of the little figures, starting to warp wool over the head of the armature.

My original idea was to make a ghost and have the little figures holding it up, sort of like the ghost girl I made in…. was it 2018. This time I was aiming for a larger ghost and smaller figures, I am not sure I got the scale quite what I wanted but it sort of worked. I will show you our door and then show you some of the other doors also decorated in Heartwood house.

6-7 OVWSG Studio Door, Black lace showing spider webs, 6 small spiders, 1 big purple spider and felted ghost and 2 figures underneath running the ghost. Close up of Ghost and trick or treaters (Could it be the ghost is running away with them.) 6-7 OVWSG Studio Door, Black lace showing spider webs, 6 small spiders, 1 big purple spider and felted ghost and 2 figures underneath running the ghost. Close up of Ghost and trick or treaters (Could it be the ghost is running away with them.)6-7 OVWSG Studio Door, Black lace showing spider webs, 6 small spiders, 1 big purple spider and felted ghost and 2 figures underneath running the ghost. Close-up of Ghost and trick-or-treaters (Could it be the ghost is running away with them.)

8 ALSO room 105 black background, ghostly castle and pumpkins with bags of candy stuck to the door.8 ALSO black background, ghostly castle and pumpkins with bags of candy stuck to the door.

 9 Heartwood house office door has paper ghosts 9 Heartwood house office door has paper ghosts

10 the Laundry Co-op has bats and had wrapped there door in white garbage bags leaving large yellow eyes peeking out between them10 the Laundry Co-op has bats and had wrapped their door in white garbage bags leaving large yellow eyes peeking out between them.

11 ALSO Children’s room (it’s a daycare)  has a black background, spider webs, with a witch with purple hair and a bag of candy11 ALSO Children’s room (it’s a daycare)  has a black background, spider webs, a witch with purple hair and a bag of candy

12 World Accord had a creepy tombstone seen and bats with googly eyes12 World Accord had a creepy tombstone scene and bats with googly eyes
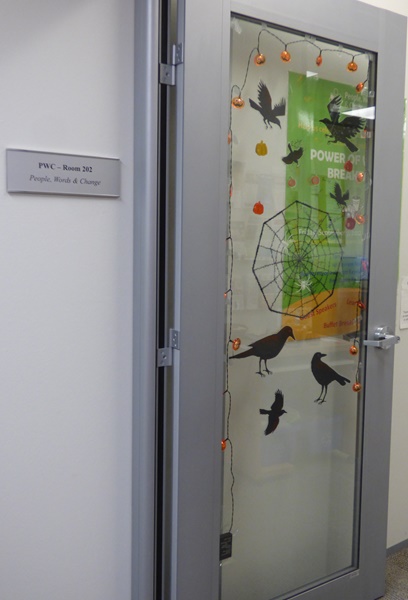
13 PWC ( People, words & Change) door with crows spider web and pumpkin lights13 PWC ( People, words & Change) door with crows spider web and pumpkin lights

14 Multifaith Housing Initiative card with ghosts, cats, tombstones, trees bats cats  on a card14 Multifaith Housing Initiative card with ghosts, cats, tombstones, trees bats cats  on a card

1516 -17 Options BYtown have a number of doors on the second floor (Ghosts, bats, cats and lots of fake spider webs) 1516 -17 Options BYtown have a number of doors on the second floor (Ghosts, bats, cats and lots of fake spider webs) 1516 -17 Options BYtown have a number of doors on the second floor (Ghosts, bats, cats and lots of fake spider webs)15-17 Options Bytown has several doors on the second floor (Ghosts, bats, cats and lots of fake spider webs)

18 the Unitarian Sanctuary Door, 3 Ghosts and black candles18 the Unitarian Sanctuary Door, 3 Ghosts and black candles

19 ELTOC (English Language Tutoring for the Ottawa Community) there door had a purple back ground a scary figure, bats cabbages(?) and a fire. They had a spooky soundtrack playing and were giving out candy19 ELTOC (English Language Tutoring for the Ottawa Community) their door had a purple background, a scary figure, bats cabbages(?) and a fire. They had a spooky soundtrack playing and were giving out candy

When I returned to the guild studio I found that again one of our swag spiders had made a break for it!!

20 I am not sure where the spiders are trying to get to but it is odd the two keep making a brake for it. even stranger they always land on their little legs.20 I am not sure where the spiders are trying to get to but it is odd these two keep making a break for it. Even stranger, they always land on their little legs.

21 All the groups were now ready for the kids from the day care to drop by.21 All the groups were now ready for the kids from the daycare to drop by.

22 one of the black and silver spiders was set to guarding our Swiss milk chocolates in a white wire basket

23 there is a small Werewolf next door!!

24 Yes! It was a werewolf!!! I gave him Some of our Chocolates so the looms would not be chew toys!!

The rest of the day was spent prepping for the Guilds Sale and Exhibition with an early social. I think we are almost ready for next weekend!

25 grids, quilt wrack, boxes of things to go to the sale and one of the signs (we are not sure where the others disappeared too but we have 4 days to find them!!)

I hope you are having fun, have leftover Halloween candy to enjoy and not quite so busy!

The making of ‘Barnie’ – part 2

The making of ‘Barnie’ – part 2

Following a workshop I did with Helen Walsh, I left you all hanging….with an acetate tracing over Barnie’s face to ensure perfect placement of his eyes.

Barnie with his Acetate overlay

Now, I will explain how he got his distinctive features….

Having decided at the very outset on a cropped image, Barnie’s face was going to be the most important element in the overall picture. Um-ing, ah-ing and generally ruminating, I finally decided that to achieve the measure of importance he deserved, his face needed to be 3D. Then came more ruminating, and a good sprinkle of cogitating, to work out the best way to achieve said 3D effect.

I finally settled on padding out his nose using some cotton quilt wadding. Placement, particularly vertically, was critical and took various trial & error attempts….

The wadding (marked with heat-reactive pen) ‘opened out’ to show the final shape

Completely covering the wadding with the same fabric as his head gave the correct amount of ‘lift’ – tiny dabs from a glue stick worked perfectly as it was very fiddly!  This was then stitched and blended into place with more fly stitches.


We all know the eyes are the window to the soul and importantly what makes a crafted being come alive. Sadly, you may recall, the original photo was not ideal in terms of eyes or beak.

Fortunately, October owl was blessed with great ‘wide open’ eyes, so I simply interpreted them in stitch and fluffed out the fabric to create his nostril feathers.

Highlights still to be added

So far, so good – with everything relatively easy and going according to my new plan, which I must admit had now moved very significantly away from first intentions of the workshop….Stop thinking 🤔….Yep, you are now getting ahead of me in my story 😜

Since his face was now 3D, his beak could no longer be the fabric I’d first trialled for use.

This is where suddenly something very simple became very difficult and very time consuming….trying to find the right beak material and how to achieve the right colour. Barnie was no longer a flat appliqué piece having become more representational, so it all had to be ‘right’.

Easy….plastic!

But try curving plastic in 2 directions especially when it is so small!!! Think….coiled spring! ’Ping’….’Where has the blooming thing (or similar 😜) gone this time?’ Hair dryer = no, heat gun = no (total distortion) etc, etc. Hours, of ruminating, later….maybe cutting the piece from the corner of the plastic container would help?….Taadaa.

In the meantime, attempting to get the right colour match to October owl beak, using supplies available in the house, were unsuccessful….even nail varnish was tried! Problem – whilst I was easily able to mix the colour with paint, it just wouldn’t stick permanently to the plastic, neither on the outside nor the inside, and it always looked streaky and way too shiny….totally wrong!

Finally (a couple of weeks have elapsed by this point, with way too much ruminating having gone on….just for….a BEAK!!!) I hit on 2 simple ideas – chocolate and sandpaper. The sandpaper I carefully used to roughen both the inner and outer surfaces….Barnie has certainly lived and been scratching around for his food!

Chocolate?….it was the image from a cardboard box – yes, I did happily enjoy the Chocolate eclairs (shared of course)! Soaking the back, I carefully finger-rubbed all the cardboard away (a great way to hide one’s identity as it stripped my fingerprints away for days) leaving only the very thin printed paper image, which I then successfully glued to the inside of Barnie’s beak. All this time and trouble….I can already hear your cries, echoing mine earlier…. for just a……..BEAK!

It was then onto stitching the very distinctive barn owl feather ‘spots’ (open chain & seed) before auditioning supplies for the snow.

I finally settled on two very different materials, crystal organza and viscose staple fibres which I needle-felted into the linen edge. The organza was too shiny and the colour just wasn’t right. I much preferred the subtle sheen of the viscose which also allowed me to make full use of the interesting ‘matted’ bits. Some might argue that if I wanted to be more authentic my white colours should be swapped – the snow to be more blue and the owl more off white! I’ll just content myself by saying that it is a trick of the lighting.

You can just see the subtle sheen

Finally – mounting time….

After ironing/steaming out the circles left by the embroidery hoop which was an ‘oh boy!’ nightmare….any advice is welcome here!….I did not lace the picture as would be traditional but adopted a newer stretching technique I have learned.

The linen picture was laid, in its exact position for the mount aperture, onto some thin cotton wadding suitably cut to my 37x37cm (14.5×14.5in) frame size. I wanted the finished picture to feel softer rather than tautly stretched, hence the wadding.

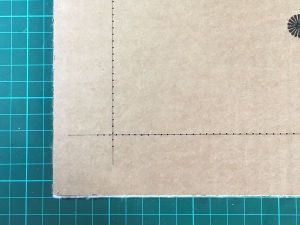
Together this was laid onto thin cardboard (again cut to frame size), through which I had machine stitched (largest stitch length, no thread) a square. The sandwich of cardboard, wadding and linen were then hand stitched together. I even pencilled a line on the linen warp & weft to ensure accuracy….ooops perfectionism struck again!

I hope you have enjoyed Barnie’s journey into being. He is now quietly bemused watching my activities, and he won’t be leaving my side any time soon!

Have you had small niggly details that just needed to be right? Or are you more ‘Laissez faire’?