Whenever Showering, You Need Soap!

Whenever Showering, You Need Soap!

photo layout. shows 6 felted wool, bars of soap, flowered accents applied to top of each
A sampling of 6 felted bars.

This title made me chuckle. 🤭 It sounds like I’m going to lecture, about good hygiene. But no, my post is about felting soaps, as take-away gifts, for my niece Lauren’s bridal shower. The shower was in Phoenix, this past weekend. I declined my invitation, knowing I would surely melt in July’s hot temperatures – never dreaming there would be a triple digit heatwave. However, as her only aunt, I wanted to send something special, to help with the shower. Felted soaps are always appreciated, by any recipient I give them to…so I asked her mother what she thought? I explained they are lovely, and useful, pieces of hand made art. With a few questions, about colors and theme, I was ready to tackle the job.

The theme: Petals and Prosecco.

21 bars of soap, wrapped in wool, then felted
The first 21 bars felted, using assorted carded batts.

I taught soap felting classes, at a fiber show, and a couple fiber retreats. In doing so, I developed a descriptive narrative, to help people understand the process. I experienced many pitfalls, in my learning process. I like to share my mistakes, to prevent my students from experiencing the fate. Felting soap, while not hard to do, can humble any experienced Felter. [Truthfully I had 2 bars fail this time.] Sometimes it just happens!

Generally, the following method works pretty well for beginners. This recitation, is close to what I usually say to my students, as we felt our soap together. I have inserted photos as illustration, where necessary.

1. Use wool that felts well! – For my batts, I try to blend dyed merino, with another easily feltable wool. Add fancy fibers, like silks and angelina, sparingly. I tend to add those fibers to the top of my batts; that allows me to pull small amounts of the add-ins, as decoration. Always try to add a thin web of wool fiber, on top of your silks and fancy fibers. It helps them felt in better.

Photo #2 demonstrates peeling all sharp edges from soap, with a vegetable peeler. Remaining photos, all #3, demonstrates amount of fiber, and wrapping technique.

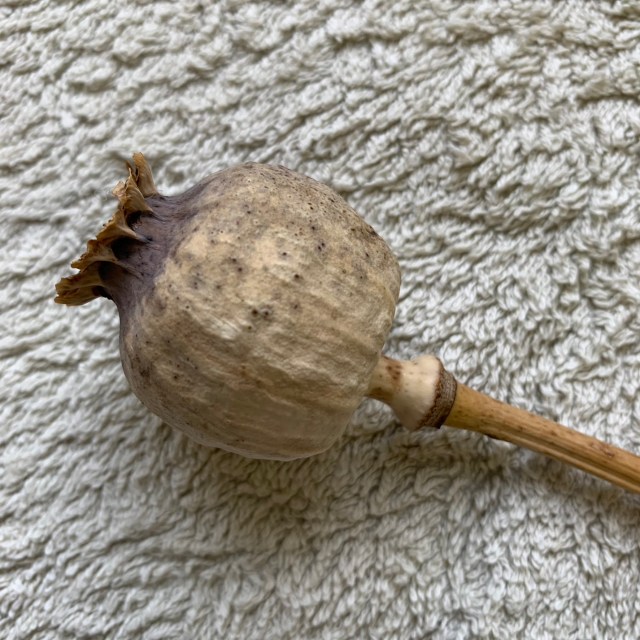
2. Use a vegetable peeler to remove all 90 degree, or pointy edges of your soap.My best advice – use less wool than you think. Lay out 3 very thin layers of fiber; only enough to cover the area of your bar of soap, with a small overlap. (Photos)

3. Wrap bar of soap, being mindful to cover corners of the bar. This is where you can add wool yarn embellishments, if you choose.

Wool wrapped bar of soap.
I wrapped this bar with boucle yarn, and what I thought was wool yarn. It didn’t felt, so must’ve been super wash wool. So I pulled it off and kept right on going.

4. Carefully wrap in a nylon knee high stocking. Better yet, use cheap nylon footies – ones you use to try on shoes with. [Amazon sells them – $8 for 144.] Grab the wool wrapped bar, with your socked hand, and carefully pull it over.

5. Add luke warm water to a 2 quart bowl. Wet wrapped bar – dipping quickly. Pull wrapped bar out of water, and begin pressing air out of the wool. (You will hear the air leaving the wool – sounding like little farts.) Press sides, press edges, press ends…keep pressing as the air continues to bubble out. Do this for a minute or two. As you press, soap suds begin to form. Some soaps foam more than others.

6. Quick dip in water again, begin pressing the fiber as before. Keep pressing. You should be able to feel all of the contours of the bar of soap. The wool should feel so tight, on the bar, you almost don’t feel it present.

*Only after about 5 minutes of pressing and pressing, around the bar…should you attempt to start rubbing. ***This is where the felting problems happen. Ask me how I know this?? When I am in a hurry, and rush the process, the wool says “No, no, no!”

7. When you do rub, imagine your bar of soap is a new-born baby. You wouldn’t rub your baby roughly…start by rubbing very very gently. After a minute or two, your baby is 1-2 months old, so add a little more rubbing for a minute. Rub all the edges and ends too. Now, your baby is older and you can begin building up the rubbing. [Wipe your soapy hands off with a towel – don’t add more water unless you absolutely have to. Trust me!]

8. You can peel your stocking/footie back, to make sure the wool is tight to the soap, and not sticking to the nylon. If still sticking, you need more rubbing, so wrap it back up and rub some more. Otherwise, remove the stocking, and rub all over some more.

9. Here if you feel the need to felt a bit more, you can rub the soap bar on bubble wrap, or something with a little texture. Make sure every edge is tight to the bar, and you’re pretty much done.

10. Start running some warm water, in your kitchen sink. Rinse your hands off, and quickly like before rinse the bar. Press all the water out, dry outside of bar with paper towel, then set aside to dry.

I generally stop at this point feeling satisfied with the beauty of this simple look. But for the shower, I planned to try something different. I decided to use bits of fiber and felted scraps, to needle felt a loose flower shape. I didn’t take pictures of that process, but I did think to photograph my leaf process:

I dug in my bin of felted pieces and off cuts. I found a lightly felted bit of prefelt, in various shades green. Perfect for leaves.

Leaf shape cut from green felt.
Leaf shape cut from a piece of lightly felted green piece.
Leaf shape in hand
I placed the cut shape in one hand, and rolled it back and forth, to round and felt the cut edges a bit.

I placed my rough flower shape on the bar of soap. For this example, imagine a round piece of felt/fiber. I divided the round shape by eye into petals. Then at a petals edge, I grabbed it with my felting needle tip, and pushed toward the center of said flower. I did this 2 or 3 times around the flower. As shown in the photos above, I cut leaf shapes from the green prefelt and rolled it between my hands a couple times. Whenever my leaf rolled on itself, I flattened it out, and kept on going. (Note: that could work well for another project) For the stems, I used a US-E hook and green yarn to crochet a chain of about 10 stitches. Each of these flowers, stems, and leaves were totally different. I let the colors and fibers determine their own destiny.

felting needle inserted sideways, into leaf shape
This photo shows the best way I found to needle felt (applique) pieces to the felted bar surface. Catching the edge and running it between the felt and soap


close up of a flower, to show detail of work
This close up shows how this blob of wool and silk reminded me of a flower. I simply added some tucks from the edges to make petals

I broke 4 felting needles, on this project, before I figured out my mistake. I watched a YouTube video that said to “needle felt directly into the soap.” I beg to differ with them, unless they have an endless supply of felting needles. I found keeping my felting needle between the felt and the bar of soap worked fine. (See the edge of the leaf, photo above.)

While I am sharing tips with you, I should warn you, these soaps took a good bit of time. For these, I chose to use organic, specialty bars of soap, because they were for my niece’s family and friends. If you ever try selling them, as I have in the past, don’t bother using good soap. While purchasers enjoy, good quality soap, they rarely believe you have used it. I did a fiber show in Mississippi, and used “free” 2oz soaps, we got when traveling. I sold them for $5 ea, and they were gone in 40 minutes. I used a better quality, organic soap in my next batch, and couldn’t get people to part with $7.50. As I sit here writing this up, I don’t see these as money makers at all! But, if you have the supplies, and a bunch of soaps hanging around, they make pretty nice gifts, or stocking stuffers. And…they look so pretty on the tables at a shower.


Math take two, Dino-Purse

Math take two, Dino-Purse

Back to the math, Continuing the Dino purse

This will be just a wee tiny post compared to my regular verbose discussions. I have been a bit run off my feet with fun layouts and drafts for various proposals for the upcoming 75th anniversary of the Ottawa Valley Weavers’ and Spinners’ Guild. I am also involved with the monthly summer library days and the guild got a gift of 10 sheep and 2 alpaca fleeces, my car is still a bit aromatic. Since I am sure more changes on layouts are awaiting in my email, I better tell you about the continuation of the Dino bag quickly and then get back to work.

When we last chatted about the Stegosaurus, I had just been dealt a crushing blow by numbers, evil uncaring numbers who thwart my want of a phone-carrying device!!!

From my misinterpretation of Ann’s suggestion, I had wound up with a much bigger carrying device than originally intended.  What do you mean you did not mean 50% added to each side?

1) scaling up, a bit over enthusiastically small paper stegosaurus lying over a stegosaurus twice as big drawn on a resist.1) scaling up, a bit over-enthusiastically

A quick review:

I had created the shape I wanted and then added gussets for the top and bottom. (This is how you can make a sewing pattern. But unlike sewing patterns felt patterns need a lot more “seem allowance” for shrinkage.  Figuring how much was where I derailed.)

After a bit of Consoling from Ann (it was such a cute dinosaur and I had been so careful in the measuring and redrawing!) Ann reviewed the math (ick) half of the distance, then half that again and put the halved half on each side. Ok, I think I can’t screw that up twice (don’t tempt fate but really I think I got it this time. <mutter mutter stupid dyscalculia>)

Next, we considered how to add the gussets to the side section.

2) Adding the belly gusset to the body shape. Ann pointing at paper pattern pieces of body and belly gusset2) Adding the belly gusset to the body shape

Ann suggested lifting up the legs (to be added separately, which I had considered as an option as well) and then drawing in half the belly gusset.

3) talking about adding the back gusset Ann pointing at space between plates.3) talking about adding the back gusset

Again take off the plates and add half of the back gusset.

The plate can be made separately. Which will allow them to be heavily/ stiffly felted. If I then leave a fuzzy end, I can attach them to the body partway through felting.

4) side panel of Stegosaurus with legs and plates folded up, ready to be traced to make a new template. ready to trace onto another piece of paper.4) side panel of Stegosaurus with legs and plates folded up, ready to be traced to make a new template.

Now to create the new pattern.

5) drawing half the width of the belly and back gussets to the side pattern this makes a large slug like shape5) drawing half the width of the belly and back gussets onto the side pattern

I traced the stegosaurs then added the half belly and back gussets to the body shape. I marked where the legs and plate went for reference. I have now achieved Stego-Blob!!

Ok, let’s try again on expanding the pattern:

When I weave, I usually measure my warp length with a string with knots marking the loom waste and the halfway point in it. When I made tamari balls, I used a folded paper band with pins. I am going to avoid the ruler I used last time with those untrustworthy misleading numbers and resort to a reliable piece of paper I can fold in half and then half the half.

6)Drew a grid over the new shape and found a scrap paper to use as a measuring tool. there is a mettle yardstick various pattern pices and a role of painters tape.6) Drew a grid over the new shape and found a scrap paper to use as a measuring tool.

I did use the ruler to make the graphed lines but carefully ignored most of the numbers.

graph overlay on blobby shape letters indicate horizontal lines bisecting shape and numbers indicate vertical lines bisecting shape.7) graph overlayed on the blobby shape made by adding the belly and back gussets to the body.

On each vertical line, I took my scrap paper and matched the distance from one side of the stego-blob to the other along the line. I folded that distance in half on the paper then folded it in half again. That distance was then added to the top and bottom of the line and a point was plotted.

As I got closer to the head and tail you can see (in picture #6) that the increase is greatly lessened. By the time I had all the vertical lines plotted,  Ann was looking a bit concerned by the curvature around the nose and tail.

I explained this was only step one in the expansion plan. Step two would be to plot the horizontal lines next. Then as step 3 would be to average the two plotted dots and figure out the new outline. Ann said she would just estimate and go from there.

Oh no, time to stop!! A tornado warning just went off on my phone. No wind outside but that may literally be the calm before the storm.  When we chat again, I will let you know how the horizontal lines go and then average the points to make the new MEGA-Stego-Blog!!  (only 6 pages in Word, It is a tiny blog today.)

Update: looks like there was a tornado in Barhaven, it’s a suburb in the southwest end of Ottawa and North of Ann, it’s located between us. There is another band of the storm system coming later this afternoon but most of it should be south of both Ann and me, just in case it is more aggressive than it looks on the weather map I better get this posted!!! yep, the tornado alert just went off again but there is sunshine coming in my office window, so I will keep working on this rather than hide in the basement, but I will keep an eye on what’s happening out the window, just in case the weather changes its mind. (There is lots of comfy soft wool to keep me safe in the basement, but just not the specific wool I need for projects I am working on!!)

3rd quarter challenge and Pinhey’s Point

3rd quarter challenge and Pinhey’s Point

I will start with the third quarter challenge.  Onf the challenges is to make something about where you live. I remembered this piece I made. It has a wet felted background, needle felted water and significant roads and stitched secondary roads.  It is about 6×6 inches or 15×15 cm. It was a fun piece to make. It just needs framing, like so many pieces.


I did a little bit of wet felting at a demo we did a few weeks ago at a historical site near Ottawa called Pinhey’s Point Historic Site. https://pinheyspoint.ca/visit-pinheys-point/

I made this little bag for my purse. I will add a few snaps.  One to keep the flap closed and 2 more in the top pouch part so I can keep something in there without it falling out every time I open it.  It is for keeping a power pack and my square point of sale device mostly. I forgot to take pictures during lay out but here it is on the resist to show the shrinkage. I will probably add some stitching at some point. the finished size is 7 1/2 inches x almost 5 inches   or 19cm x 12cm


I did take some pictures of the group spinning and showing how the tapestry and 4-shaft table looms work. these are definitely candid shots that I only just remembered to take so I wouldn’t be in hot water with Jan.   It was a quiet demo with there being a lot of smoke in the air from the fires in Quebec. You can see in the background the faint outline of some hills. That is about 1/2 a kilometre away across the Ottawa River to Quebec.  You couldn’t see that much when we arrived about 10 am to set up.  It was nice to spend time with friends and to chat with the few people that dropped by to see what we were doing.

This slideshow requires JavaScript.

That’s about all I have been up to other than a little spinning on my drop spindle. I will try to get some pictures of my little balls of yarn for next time.

Large Autumn Landscape Continued

Large Autumn Landscape Continued

Nuno felt background with birch tree silk paper trunks stitched in place in background.

I have managed to get some stitching completed on my large autumn landscape. The background birch trees were hand stitched down first. I want to do background leafiness before I add the larger birch in the foreground.

To add the distant leafiness, I looked through my stash for fabric that would work. The photo on the left shows painted nylon organza. The photo on the right is dyed silk habotai.

Nuno felt background with birch tree silk paper trunks and nylon organza background leaves stitched in place.

It’s a little hard to see but I have added the nylon organza at the top. First, I used a wood burning tool to burn out areas of the organza to give it a leafy appearance.

Nuno felt background with close up of nylon organza background leaves.

Here you can see the effect better in the close up photo. I hand stitched all the pieces down with very small stitches to hold it in place.

Nuno felt background with birch tree silk paper trunks, nylon organza background leaves and single silk organza leaves stitched in place.

Next I added some single cut leaves from silk organza. I had these left over from The First Leaf. 

The next step is to stitch down the foreground birch trunk and add foreground leaves. At that point, I will decide how many leaves might be on the ground. I don’t want to make it exactly like the smaller piece. What would you suggest adding to the foreground at the base of the large birch?

Using up supplies: investigating a new fibre

Using up supplies: investigating a new fibre

I was looking around my studio wondering what to write about in this blog. I was remembered Ruth Lane’s recent comment in her blog here about using up supplies. I have a carded batt of merino / A grade mulberry silk from World of Wool that’s been kicking around for a while. I can’t remember if I bought it for something specific that didn’t get made or if I bought it on spec. I was interested to find out how it felted and what I might do with it so I decided to make a small test vessel.

I cut out a circular resist using a small mat as a template then started laying out the fibre outwards towards the edge. Apologies that these pictures are mostly white on light colours – I was thinking more about the making than the photography. I laid the second layer in a circular pattern before flipping it over to smooth the overlap onto side 2. After 2 layers on the second side, I flipped back and laid 2 more layers on side 1, followed by 2 more on side 2. 


After wetting it down I spent a lot of my time working the edge by pulling the voile over the edge so I wouldn’t get a ridge around the middle of the finished vessel. It felted quickly and I was soon able to start fulling – initially without removing the resist.

Once I’d cut out the resist I found, in my vast collection of miscellaneous wooden objects, that the handle of a wooden pestle (as in mortar & pestle) was the perfect size for getting inside the vessel and working it from the inside.

I spent a while fulling it as I wanted it to be smooth and very firm.

I packed the vessel with strips of recycled bubble wrap that I keep for this purpose – you can see it green inside.  Looking at this green bubble wrap made me wonder if I could make a vessel with a coloured interior but retaining the pale colour outside.  I thought maybe if I used silk rather than wool to add colour I’d get less colour transfer, so I thought I’d give it a go.

While pondering this, I decided to try using the same resist as the test vessel but to make 2 small bowls rather than one vessel: so, cutting it in two around the middle rather than making a hole at the top to remove the resist. I dipped into my big boxes full of second-hand silk scarves bought in charity shops and chose a plain turquoise and a patterned blue one.

Supplies for making two small wet felted bowls on a single resist: merino wool and mulberry silk carded batt with two second hand blue patterned silk scarves: one dark blue patterned, one plain turquoise
Carded merino / mulberry silk batt & two silk scarves ready for recycling


I put a circle of silk on the resist and decided to run a small line of coloured merino tops around the edge: partly as I was interested to see how it would look and partly as I thought I might not know where to cut when I was ready to remove the resist and separate the little bowls – I’ve made that mistake before!

I put a circle of the blue patterned silk on the second side. The merino and silk fibre layout was the same as the previous vessel. This time I also remembered to do the circular layer first followed by the radiating layer – I’ve learned that one before and obviously temporarily forgot for the previous vessel. It makes following the resist with the circular layers much easier and I prefer to try not to overlap that layer if possible – again it reduces potential ridges and produces a better join if you only overlap the radiating layer, in my opinion.  I’m sure some of you will disagree but that’s one of the many things I love about wet felting: with experience everyone works out the techniques and tools that work best for them.


I was interested that I could see quite a lot of the inner colour throughout. I quickly began to suspect this was more about the amount of dye bleeding from the turquoise silk as about seeing the silk through the wool. I was getting a lot of turquoise in the felting water.

Again, I fulled them thoroughly. During the fulling, I decided I liked the silk on the outside better than the inside so here they are, still wet.

And here are the 3 items. You can see how green the wool of the little bowls is compared with the vessel. I’m pleased with the bowls’ blue rims  – I like this effect – but the vessel is my favourite. In each of the test pieces the fibre has felted beautifully: it’s very firm and extremely light – it has an almost papery quality about it that I find really appealing.


My imagination is now firing about what I could make next with this fibre. I have a dried poppy seed head sitting in a vase next to my desk. The felt reminded me of the texture and colour of the seed head. I’ve felted poppy seed heads before – one of my favourites. Another thing I have in the studio is some vintage cotton lace I was unable to resist when I saw it in a local second-hand shop.


I thought maybe that the lace would add a subtle surface texture so why not have a try? This time I made a small square sample using just 2 layers of the wool / silk mix batt with strips of lace in parallel lines.


Although it’s subtle, I really like the effect. As you can see in the close up shot, the batt has quite a bit of vegetable matter which in this case adds some interesting specks, enhancing the natural look. 

I was running out of time but decide to start the poppy seed head. The merino fibre length in the batt is very short which makes the layout quite slow but very precise.  In the first photo you can just see the strands of lace which I’ve laid out on top of 4 layers on the under side and are waiting for me to finish the final 2 layers on the top side before bringing them over. 

Circular resist partially covered in carded merino and silk batt
Work in progress: 3D wet felted sculpture with multiple resists laid out, wetted down and partially felted

The second photo shows how far I got yesterday before I had to stop. This is a multi-resist piece that will take a while to make. I’ll show it finished in my next blog.

I enjoyed letting the fibre lead my imagination in what I might do next.  I’ve done mostly production felting recently – making multiples of things for shops and sales – so it was great just to see where things led me and enjoy felt-making for the sheer fun of it.  I’m looking forward to getting back into the studio soon to finish the poppy seed head.

Tools for Wet Felting

Tools for Wet Felting

A few months ago, Mr TB treated himself a new toy, a rather expensive 3D printer….

The look on my face when I discovered what he had done probably wasn’t one of overjoyed enthusiasm. He had spent thousands of dollars on a toy he would probably only use a handful of times….

I suspect he was trying to appease my disappointment when he asked if there is anything I would like him to print for me but at the time I couldn’t think of anything remotely useful he could make.

A few weeks later I was fulling and shaping a felt pod with a tiny opening, the opening was so small I could barely get one finger inside, it dawned on me that a 3D printed tool with a ridged surface at the end would be a huge help.

I sketched out what I thought it should look like and described the dimensions to Mr TB who dutifully translated it in his CAD software and sent it to the 3D printer.

pencil sketch of a felt fulling tool

Ooops – fail! The tool detached from the print bed resulting in a scruffy bird’s nest of filament like this:

a scribbly mess of 3D printing filament from a print that went very wrong

In fact there were lots of fails…. this is just a fraction of the tools that didn’t quite print as they should have.

A colourful group of partially printed and broken felt fulling tools

Try as we might, we could not get this tool to print successfully.

We changed tack, and tried making another design. This new shape I mostly use for shaping the bottoms of bags, but it is also really useful for fulling large, flat pieces of felt (wall hangings, rugs…) and vessels.

a pair of scallopini shape felt fulling tools
Scallopini Tool

I also know at least one felt maker who uses a larger version for wetting out her large felt rugs. She wets out the wool, covers with plastic and uses the tool to “push” the soapy water from the centre to the edges so the water is even distributed.

a larger scallopini fulling tool

For my bags, I like to scrub the inside of the bag while it sits flat on the table, this tightens the felt on the base of the bag and creates a nice flat bottom so the bag doesn’t fall over when it is set down. Tipping the bag on it side while rubbing allows you to full all sides of the bag and give you straight sides too.

In this video I am using a slightly smaller tool because the bag is too small for the scallopini tool but the principle is the same. Just a few of minutes of rubbing shapes the bottom of the bag and 5-10 minutes of rubbing with soap and hot water gives a nice, firm felt, that is hardwearing enough for a bag.

I took my new scallopini tool to a felting retreat and discovered there is a lot of interest in 3D-printed felting tools, this surprised me as I know a lot of felt-makers are faithfully wedded to their favourite Tupperware lids and massage blocks but from chatting with them, most think the handles on their re-purposed tools aren’t all that comfortable.

Buoyed up by the overwhelmingly positive response at the retreat, Mr TB and I set about translating this wooden tool I commissioned from a wood turner several years ago.

a wooden version of the wand tool

This design also proved problematic for the printer, the first half would print well but almost invariably, the partially printed tool would get knocked by the printing nozzle and we would end up with a big squiggly bird’s nest again.

a failed 3D print of the wand tool

After multiple failed attempts, trying different heat and speed settings Mr TB had the genius idea to make the tool in 2 parts. We didn’t realise it at the time, but the interchangeable felting tool had just been born!

We have designed the tools so that all of the heads can be used with any of the handles.

This is the Wand tool in action, shaping a felted flower. These tools are good for getting into narrow spaces, such as inside horns or tubes, shaping and stiffening the feet and handles on vessels etc

I am working the base of each petal to stiffen it and make it stand upright.

2 sculptural felt flowers

Six months on from the initial, failed tool, the family of tools has grown to include 5 different heads and 3 options for the handles. I think it is safe to say I am using his 3D printer far more than Mr TB is! 🙂

The whole family of interchangeable felting tools together

In this last video I am using the medium ball tool and the scallopini to shape and full a child’s slipper. The video is sped up but it took me about 7 minutes to completely full and shape each slipper.

The moral of this story? Keep a lid on your irritation if your other half spends a large chunk of your savings on a new toy, redirect your energy into figuring out how you can turn their frivolous spending to your advantage… 🙂

These tools are available in my Etsy shop, if you cannot see them, please let me know where you live (they are currently only set up for shipping to a handful of countries).

I won’t get the chance to post again next week so will take this opportunity to wish you a very Happy Matariki (Maori / NZ New Year) for next Friday (July 14th) and a joyful year ahead.

a star filled night sky with the words, Celebrating Matariki, Maori New Year


3 New Chickadees for 3 new relatives

3 New Chickadees for 3 new relatives

Now a momentary pause from my last post and the horrors of math gone wrong.

Instead, I shifted gears back to a project I had started working on a couple of weeks ago but the deadline is now coming up quickly. As you may remember reading, as a commemorative of their parents, I had made each of my brothers-in-laws (there are 5 brothers in total), a chickadee.

6 sets of checkadee feet 1)Chickadee feet, birds in progress for the 5 brothers from 2021

We recently had exciting and unexpected news from one of the brothers. He had been contacted by new family members and was able to arrange a first meeting at the end of June.  I wanted to find a good way to have them feel welcome. When we lost both my in-laws, I made each of the five brothers a Chickadee. (There is a post about that somewhere in the blog.)  We all have fond memories of sitting on the back patio, or washing dishes in the kitchen sink and watching the birds, there were only a couple of bird feeders but so many birds!! The blue jays, cardinals, robins, finches, sparrows, other little ones (that I wasn’t too sure who they were) and the determined throng of chickadees. (There were also crows but I think I was the only one who liked them, plus an army of squirrels, oh and the occasional very cute rabbit.) I have inflicted photos of most of them on you already! Well, maybe just one more to inspire more felted birds.

Blue Jay stealing penuts2) Blue Jay steals Peanuts in Oakville

What we found out was that the brothers have gained a sister! (Ancestry has made a match!) And she has sons so we now have two new Nephews!!! (New to us, they are a bit older than brand new nephews usually are).  We knew that Brother #4 and family would be visiting in Ontario and could travel closer to the eastern end of the province so may be able to arrange a meeting. With a flurry of e-mails, all was arranged.

We were grateful to my brother and his wife for lending us their cottage.  This is the cottage from my childhood, where I honed my by-hand-hunting-skills with the local frogs (bull, leopard and occasionally tree frogs), snakes (black rat, Garter and grass snakes) and turtles (Snapping, painted and soft-shelled mud turtles). Unfortunately, I think my hunting days are behind me.) My brother focused on sneaking up and decapitating unsuspecting wildflowers (hunting) which were more appreciated by my Mom than my much more difficult to catch gifts. (Who could possibly say no to a tree frog? Ok, it was my Mom.)

We went up after work on Friday, it was a bit overcast but was forecast to be a hot weekend and it’s always cooler at the cottage than in the city. I packed up my box of chickadee supplies and was determined to finish all three before the new relatives arrived!

It is a fabulous spot looking out into the trees well above the level of the lake. It was a very inspiring spot to work. As you can see I took over the dining table and then spread to the coffee table. Felting is lighter to transport than spinning or weaving but it sure can take up a lot of space when it escapes from its confinement!

needle felting coving dining table in front of big windows at cottage 
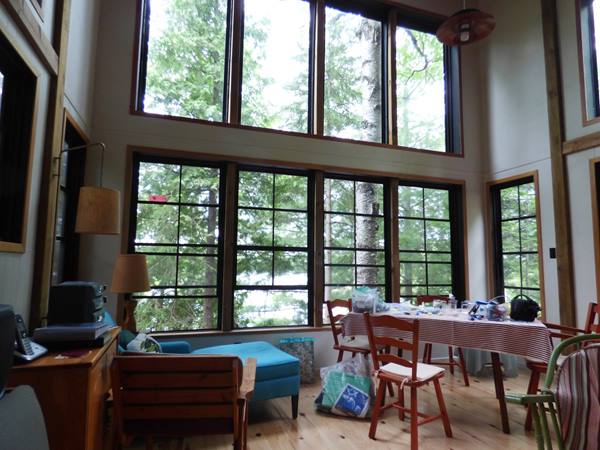
3)Wool expanding to fill the space provided (dining room table). Large windows showing trees and tiny glimpses of the lake, far below.

i left my hubby a bit of space to read as the rest of the table is covered with needle felting suplys4) I did leave my hubby a bit of space to read his book.

The Mer’s had come with us, as well as Miss Manta. The Mer’s tried out the teal chaise longue before checking out the window view. Once the Mer’s were happy, I got to work on finishing the Chickadees.

5)Mr and Mrs Mer, Necking on the chaise longue5) Necking on the chaise longue

Mrs and Mr Mer standing on there fins looking out window through trees to lake

I had gotten all three armatures wrapped in wool and to the point that they were ready to have their top coat added before leaving Ottawa.

This slideshow requires JavaScript.

7.1- 7.5) Adding tail colour and underwing detail

One of the beaks was not behaving as well as I would like. I noticed the wool on the top upper end of the beak was just a bit looser than when I had wrapped it and was looking a bit fuzzy.  This suggests I either did not use quite as thin a bit of fibre or I had not kept wrapping and rubbing the fibres long enough after running out of wool on the beak. Under the wool is floral tape which is embedded with wax but I found it was not quite as sticky as other times (it may be the section of the roll or its age? I don’t do a lot (or any) wrapping of flowers so I’m not sure of all the factors. It could be that I just didn’t pull that section quite as enthusiastically and did not activate the stickiness correctly.

If I have a bit that should be tight (tips of claws, beaks) and is not up to what I would like,  I can add a bit of conditioned wax.  Wax on its own can dry too brittle or not penetrate the wool, so something that makes it more pliable when dry is preferable. I did not have my wax mix from Sara (Sarafina fibre arts) so I resorted to a dip of wax from a blue candle that was conveniently sitting on the hutch. I first tried using the end of a felting needle to transfer the wax but found the wax cooled too quickly and did not penetrate the fibres, instead sitting above the felt. I cleaned off the unhelpful wax and finally just put the tip of the beak into the wax puddle, which worked.  I rubbed the wax as it cools and found it had penetrated into the wool nicely.  (I bet the little bird will not be looking for seeds in wax candles again!)

This slideshow requires JavaScript.

I don’t think I have shown you this, it’s another way to make a line on the surface of your felt.  I wanted a line on the back that was visible, but not as hard-edged as one that is created by tacking down at one end and then drafting out. (I did use that technique along the wings.) For this I started with a wisp of fibre blended to the colour of the line I wanted, laying it over the area the line would go.  I used a needle (I think it was a T-36 or T-38 ( a finer gage would not entrap as much fiber so it would just take more poking and could make a finer more wispy line.)

lay a whisp over the area to add a line and (poke/stab/impale) embedding the fiber in the general line-ish shape you want9) Step 1 lay a whisp over the area to add a line and (poke/stab/impale) embedding the fibre in the general line-ish shape you want.

Lift the fiber up (vertically) away from the felt10) Lift the fibre up (vertically) away from the felt.

If you were wanting a semi-hard edge colour change you could flop the fibre down on one side of the line and blend away, but I wanted to see a slightly indistinct line so I lifted both sides up and used my curved blade embroidery scissors, you can see on the table, to remove the excess fibre.

 11) the excess fiber from the whisp has been cut away leaving a line embedded in the surface of the felt 11) the excess fibre from the whisp has been cut away leaving a line embedded in the surface of the felt

You may already know this way to make lines and have used a similar technique when adding fur to a sculpture but without such enthusiastic trimming.  I figured I should mention it in case you had not yet investigated further and seen further possibilities.  The only drawback to this form of line making is that the wisp can obscure where you are laying the line if the “wisps” is not as wispy as a wisp of fibre should be! (Well, that is the start of a good tung twister I am sure one of you can expand on that thought!) I have been finding the curved blade embroidery scissors work very well on curved felt surfaces. This red handled pair I found for sale online out of China.

When I had the backs ready I created little wing shapes in 3 pairs. I added detail. I had made a special trip to get a brighter white fibre. When I tried it on the first wing, I found that it looked very odd compared to the other tones. So, I went back to the off-white/natural white which looked much better.

12) Once I was pleased with all the wings I added them to the little bird bodies.12) Once I was pleased with all the wings I added them to the little bird bodies.

13) Here all the wings are on and looking good.13) Here all the wings are on and looking good.

One last step to do, now where is the thread, giant bead needle and the little black beads go? Ah! Not to panic the thread and needle were in the bottom of the little toolbox and the beads are in the bottom of the box marked Chickadee!

14) Eldest Nephew of brother #4 joins the Mer’s admiring the lake (through the trees)14) Eldest Nephew of brother #4 joins the Mer’s admiring the lake (through the trees)

Saturday afternoon Brother #4 and his family arrived and were impressed with the cottage. (Thank you again to my brother and his family!)

15) I had just finished putting on the eyes and tucking each bird into his little box when the new members of the family arrived.

I am not sure we were quite what they were expecting. (I hope we didn’t disappoint them too much!) I think my new sister-in-law may have been a bit overwhelmed but they were all fabulous!

16) New Neffue #1, New Ant!, New Nefue #216) New Nephew #1, New Ant!, New Nefue #2

They did seem quite interested in the needle felted birds (as well as the Mer’s and Miss Manta (who seems to have dodged all the photos), so I sent both my new nephews off with a bag of felting needles carefully labelled with gauges for them to try. I am determined that there will be a next generation of felting, spinning or weaving but I had thought it might be my nieces on Glenn’s side or maybe a niece on my side. This is fabulous I may have two more nephews to confuse with fibre!! I wonder what their thots on spinning wheels are? Maybe next visit! (I don’t want to frighten them!!)

It was fascinating to suddenly notice similarities between the nephews and their new uncles. I think nature is winning out over nurture again but all in a very good way.

17) New Sister, New Nephew #2, New Youngest Uncle, New Nephew #117) New Sister, New Nephew #2, New Youngest Uncle, New Nephew #1

We had a wonderful visit on Saturday afternoon and evening, then they returned on Sunday morning for breakfast. It was sad to see everyone headed home, but I am hopeful we will get to see them again soon.  We lingered to do a final clean-up of the cottage. While we were sweeping, vacuuming and collecting laundry, we found the Mer’s were cavorting or maybe that was air swimming, it’s hard to tell.

18) the Mer’s having fun at the cottage.18) the Mer’s having fun at the cottage.

Once we had persuaded everyone into their project bag, we took a moment just to enjoy the quiet (ok there were sea-doos and the loons and some other birds and that daredevil squirrel…) for a moment, before heading back to Ottawa.

19) Hubby taking a moment to relax and read his book.19) Hubby taking a moment to relax and read his book.

The lighting was truly fantastic and the living room made a perfect chickadee finishing spot.

20) one last look before heading out and back to Ottawa.20) one last look before heading out and back to Ottawa.

As we got closer to town, we noticed that haze was back, and then that the smell had returned …. More forest fires still burning. I was hoping so much that all the rain would have dissuaded the hungry flames.

It was a memorable weekend, it’s not every day your hubby and his brothers get a new sister and two adult nephews! They definitely seem like part of the family, Art, Music, and I suspect a lot of reading! I hope they will get to meet the other brothers/Uncles soon. In the meantime maybe I can distract them with a bit of needle felting! Or maybe they would prefer wet felting? Or maybe both!! I have pointed them to the blog, and Sara and Marie’s YouTube felt-a-longs, I can’t wait to see what they make! Maybe some more Mer-People? The Mers should have relatives too!

PS Happy 4 of July to our southern nabours and family!

2023 THIRD QUARTER CHALLENGE

2023 THIRD QUARTER CHALLENGE

The members of this forum are scattered around the world and it would be fun to see a little about where we all live.

This challenge is to portray something that’s special about your home city/town/village – in whatever fibre medium you choose.

Unfortunately Annie and I couldn’t recall making anything that we can give as an example for this challenge! However, we did make this picture of a Finger Post, and had we been inhabitants of Lands End in Cornwall it would certainly fit the challenge!

There is also a ‘tree challenge’ running throughout this year.  It’s really simple – just find a tree that you like and depict it as it looks in this quarter – it can be realistic or representational.

Please share your make on The Felting and Fiber Forum / Studio Challenges and perhaps write a few words about it.

You can submit photos here: https://feltingandfiberstudio.com/community-photo-submissions/

Now the branch is finished too

Now the branch is finished too

So sliding in on a cloud of dust I have the branch finished just as the quarter runs out. I know we don’t have to get it done in a specific time but it is nice to get it done in the quarter the challenge is posted.

Last time I had all the flowers made. https://feltingandfiberstudio.com/2023/06/18/second-quarter-challenge-flowers-finished/

After looking at it and especially seeing it in a photo I decided the larger flowers at the bottom of the flowers should have yellow centres. So I added them. I used mostly french knots with 2 threads. The single french knots are smaller than the colonial knots. The Yellow stands out more in the photo than in real life.


hanging flowers made of felt and french knots .hanging flowers made of felt and french knots, close up

It still looked pretty sparse so I decided leaf buds would help. I looked them up online. It was best to look up flowering trees and look at the buds in the background. It didn’t seem to matter the kind of tree the leaf buds looked pretty much the same. I made all the leaf buds at the same time so I would get them about the same size. It didn’t take long and I only poked myself a few times. That’s the problem of working small.

first I had to make the green I wanted. I had Christmas green, lime green and a very yellow-green. I mixed them with a couple of dog brushes.

I made 2 at a time. Then cut them in half and finished shaping them while holding them. I poked myself working on the pad not in my hand and I know Jan will tell me she just gave me a tool so I wouldn’t do that. But I forgot until after I poked myself, naturally.

making a needle felt leaf pile of felted leaves

I fiddled around placing them. and felted them down…… without poking myself.

placing felted leaves on the branch

leaves felted down


I had originally thought I would add a bit of brown near the base of the buds but I didn’t like it and pulled them off.

adding brown to the base of the leaves.

I am quite pleased with the finished branch. Now I need to steam it a bit, to block it square. The dent on the left is really bugging me.

Making Silk Paper and Beginning a New Landscape

Making Silk Paper and Beginning a New Landscape

Having sold one of my larger pieces in the gallery, I had a request for a new large nuno felted landscape similar to The First Leaf. So if you are reading along and think that you are having deja vu, it is because this piece will be very similar, just a larger size. The new piece will be 19″ x 33″ and will use the same nuno background used in The First Leaf which is only 14″ x 18.5″. The first step was to make silk paper for the birch tree trunks. I had a little bit left in my stash but it was not big enough or long enough.

Silk paper birch trees laid out on netting and plastic with layers of white silk fiber and black accents.

Making silk paper is simple. You lay out silk fiber on to nylon netting, cover with another piece of nylon netting, wet down the silk and then paint on some type of acrylic medium. You are supposed to use fabric medium but I didn’t have any so I just used acrylic medium that I had. The photo above shows a portion of the layout of the white silk with black bits added on top. The nylon netting came in a roll so I could make a giant long piece of silk paper for my big birch tree.

Silk paper birch trees laid out on plastic with layers of white silk fiber and black accents and sandwiched between netting.

I made two lengths of silk paper. Here you can see one side laid out sandwiched between the nylon netting. The left side still needs black added. I actually think that the left side is not silk but perhaps viscose or other man made silk alternative. It didn’t feel exactly like silk but it was white and worked just as well as the real silk. I use up what I have before I buy more supplies, so other options of fiber will work for making paper.

Silk paper birch trees laid out on netting and plastic after being covered with acrylic medium.

Next you wet down the silk fiber sandwiched between the netting with soapy water. The soap helps to break the surface tension and allows the silk to accept the water more easily. You can spray it down or sponge it on, whichever works best for you. Once the silk is completely wet and there are no thicker, white spots left (air), then brush on acrylic medium mixed half and half with water. Flip the net and silk sandwich over and add acrylic medium to the other side too. Make sure the silk is thoroughly saturated with medium. Then peel off the top layer of netting and leave the silk paper to dry. You can hang it up to dry but take note that the water/acrylic medium will drip off and get on the floor if you hang it inside. I left mine flat to dry and it took a full day to dry.

Nuno felt background with birch tree silk paper trunks laid out.

I cut out my nuno felt background to size and played around with cutting the silk paper trees to different sizes to achieve some depth in the piece. These are the approximate layout that I came up with. Next on to stitching!