Playing with Color Mixing

Playing with Color Mixing

I finally had a little time to play with color mixing wool. I don’t usually buy commercially dyed wool but I had some on hand that Patti from Dream Felt had given me when I was writing The Complete Photo Guide to Felting. The wool is Norwegian C1 batts and I had a variety of colors. One of the reasons that I like to dye my own wool is that much of the commercial wool is very saturated in color and therefore really bright. Most of my inspiration is from nature, I don’t see those saturated colors in my landscapes, trees, rocks, lichen etc. A lot of my inspiration is in colors that aren’t as bright and many varieties of one color such as a multitude of greens.

Mixing Color - Three Primaries

So these are the three “primary” colors I started with. I didn’t have a really true red, more of a magenta leaning towards red violet. The blue choices were either this slightly grayed blue or a blue leaning very much to the green side. So these are the colors I chose to mix a color wheel. I used an equal amount of each color and mixed them by hand and carding with hand carders.

Mixing Color - Color Wheel

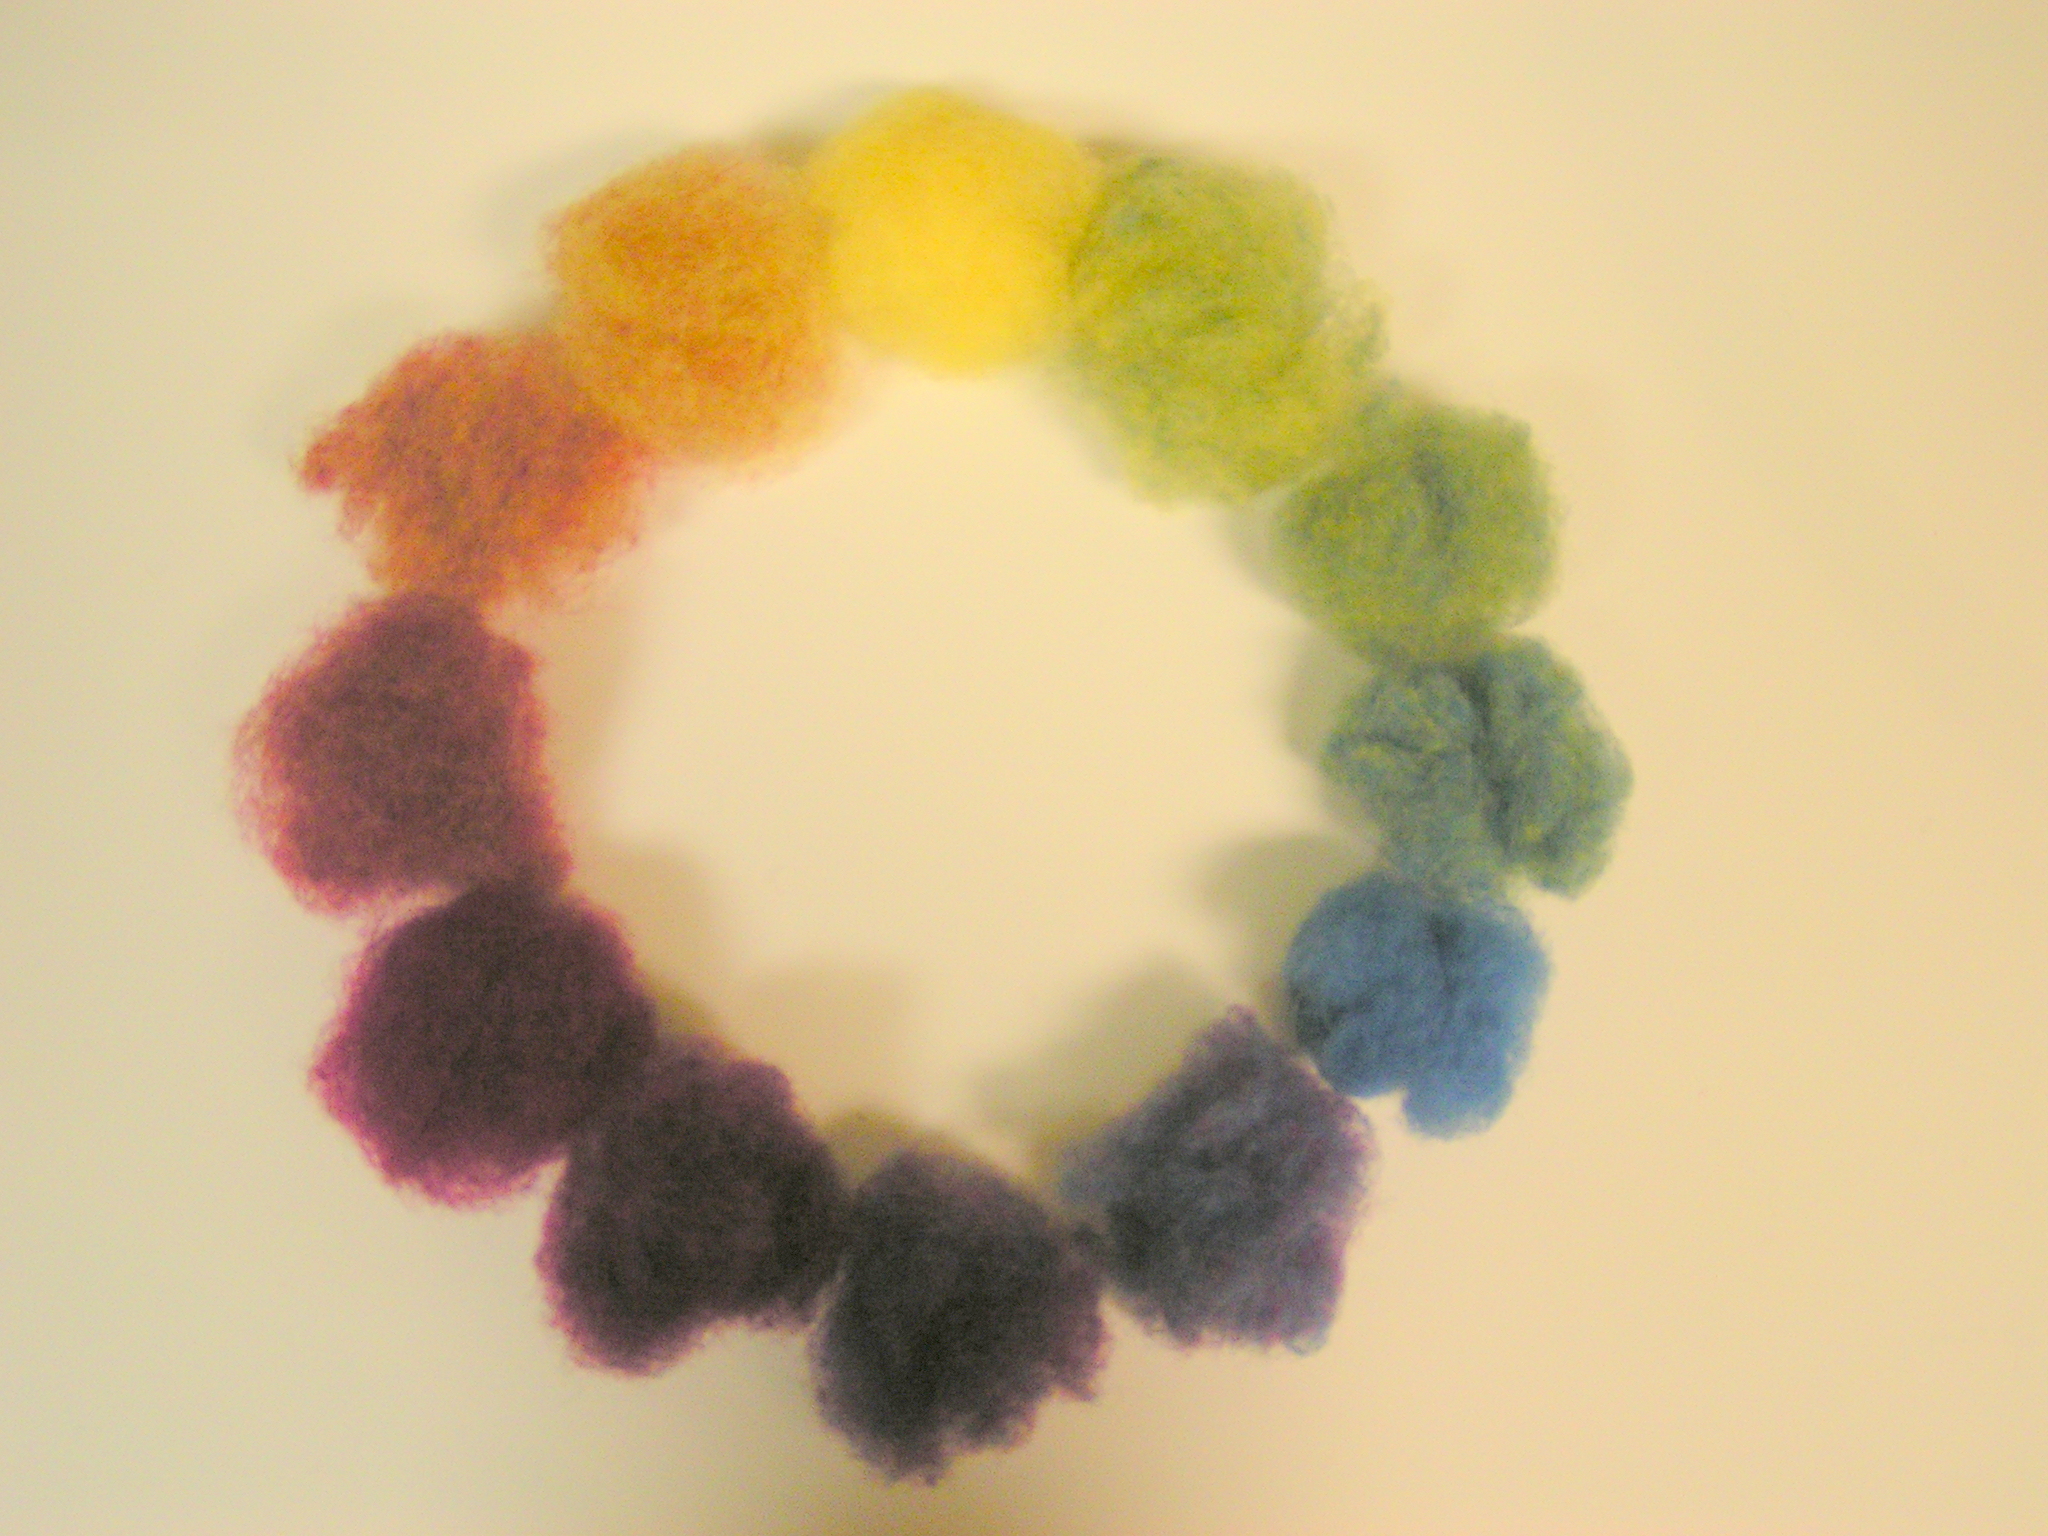
Here is the resultant color wheel. Up close, you can still see the individual fiber colors but because your eyes tend to mix the colors, from a distance it looks more like a solid color.

Mixing Color - Close Up Color Wheel

If you look at the yellow-green, you can still see some blue bits in it. Norwegian C1 is a fairly short fiber with what seemed like little neps mixed in. So the colors didn’t blend together all that easily.

Mixing Color Two Different Greens from Different Blues

I wasn’t all that happy with the greens in my color wheel. So I thought I would try the blue that was almost blue-green and mix that with the yellow. You can see the two different blues on the top row. The two greens that resulted are below the blues.

Two Different Greens

Compared together, the green on the right looks more of a true middle range green to me. What about you?

Mixing Color - Light Green and Red/Magenta

I didn’t have any black or white to make tints and shades, so I thought I would try to “neutralize” some colors using their complement (the color on the opposite side of the color wheel). Here I started with light green and a bit of magenta. I used much less magenta than green.

Mixing Color - Mixed Light Green and Magenta

And here is the result on the left compared to the original green on the right. Do you think this would work in a landscape for spring trees? Would it look more natural than the solid light green on the right?

Mixing Color - Pink and Dark Olive Green

Then I thought I would try mixing the pink with a little dark olive-green. You can see I didn’t use very much.

Mixing Color - Mixed Pink and Dark Olive Green

And here is the new pink on the right compared to the original pink on the left. Which pink do you think would make a more natural skin tone?

Mixing Color - Blue and Orange

Next was orange and blue. I used a small amount of blue to mix into the orange.

Mixing Color - Mixed Blue and Orange

And here are the results with the mixed on the left and the original orange on the right. One of the things I have learned from reading books about painting is that if you want to paint a shadow, you should mix some of the original color of what is making the shadow with its complement. That gives you a darker, more neutral color of the original color for the shadow instead of using grey or black to make a shadow. So for example if you were making a wool painting with pumpkins and had used the orange on the right for the pumpkin, do you think the color on the left would make a nice shadow on the side of the pumpkin that was away from the light?

Mixing Color - Yellow and Purple

Here I mixed yellow with a light purple. Just a little purple into the yellow to get the color on the top left. Many times when you look at something, say a banana, your mind tells you that it’s yellow. Is a banana truly the color on the top right? Or perhaps it is a more neutral color like the one on the left. If you take a piece of paper and cut a square hole out of the middle, put the paper over the banana to isolate the color, then place your wool next to the open hole in the paper to compare colors, you will probably find that the banana is not as yellow as you think it might be. Different parts of the banana when isolated will be different yellows.

Mixing Color - Magenta and Dark Olive Green

Next I wanted to see if I could make a brown or grey by mixing two complements in equal amounts. So I tried the magenta and dark olive-green.

Mixing Color - Magenta and Dark Olive Green

Here’s the result. What color do you see in the middle? Brown?

I had fun mixing colors and hope you can see why it might be useful to know what wool colors look like when mixed together. I’m sure I must not be the only one that didn’t have the exact color that I needed when making a project. But if you know how to mix color, you can create the color you need by mixing the colors you do have to make an entirely new color.

Have you tried anything for the 1st quarter color challenge? We’d love to see what you’ve done over on the forum.


From Raw Fleece to Carded Batts of Wool

From Raw Fleece to Carded Batts of Wool

Our guest author/artist today is Zara Tuulikki Rooke.  She generously offered to take us through the process of preparing fibers from her own sheep to use for felting.

As I enjoy felting, I feel very fortunate to also be able to keep a couple of sheep. My four ewes are crossbreeds, from traditional Swedish breeds including the more well-known Gotland, and the perhaps internationally less well-known Rya and Finull. In any case, they do have really nice locks.

Photo 1

In Sweden, the common recommendation (with exceptions for certain breeds) is to shear the sheep both in the spring (to remove the thick winter fleece before they have their lambs and before the summer) and in the autumn (when they return to the barn and start spending more time indoors). The summer fleece (sheared in the autumn) is considered to be of higher quality. It has been grown while the sheep have been out grazing nutritious green grass, and not full of hay and straw like the winter fleece. Below is a photo of their summer fleece, sheared last autumn. The lighter, brown tips are from bleaching by the sun (and probably some dirt as they are unwashed).

Photo 2

My ram is from an old breed called Åsen. His fleece is straighter, without real locks. This breed can have a variety of fleece characteristics and different colours in patches on the same individual animal. My neighbour also has a ram of the same breed, and the darker fleece (black-brown-grey) on the photo below is from one of her lambs.

Photo 3

In addition, I also buy raw fleeces from pure Gotland sheep from a farm in a neighbouring village. The photo below shows some of the variation you can get between individuals, both in colour and in the size and shape of the locks. The lambs are born black, but later the wool turns grey and the once black tips are bleached by the sun. Or rather, they grown an increasing proportion of white hairs – there are no grey hairs, just different proportions of white or black hairs making the fleece look grey.

Photo 4

To a felter, this abundance of raw fleeces must seem like an ideal situation. And I certainly think it is. But, the process of turning raw fleece into carded wool is quite time-consuming. And that is what this post is really about.

After shearing, the fleece needs to be skirted and sorted, to take away wool that is too short, dirty or tangled. The short wool can either be from the head or legs of the sheep, or the result of what we call double-shearing (i.e. shearing a patch a second time to even it out). You usually also need to remove a fair amount of grass seeds and other vegetable matter that gets stuck in the fleece. That can take a lot of time, but it helps to do the sorting on some kind of wire mesh that allows small bits to fall through.

Then comes the washing. I try to get as much washing as I can done outdoors in the autumn, after shearing, up until the temperatures drop below freezing (in the North of Sweden that can be quite early in the season). I leave the wool to soak overnight in net-baskets in an old bathtub filled with cold water. The next day, the water will be really brown, but that just shows how much dirt you can actually clean out from a raw fleece with just cold water. I change the water at least twice after that, allowing the wool to soak for at least a few hours between changes, until the water no longer looks dirty. In my opinion, washing the wool in just cold water is sufficient if I am going to use the wool for wet-felting. During felting it will anyhow get washed again with hot water and soap.

Photo 5

During the winter, I do the washing in my bathtub indoors (which prevents anyone in the family taking a shower/bath for 24 hours), and then I usually use lukewarm water. If the wool is very dirty, I also add some washing powder (the type used for knitted wool items). The main rules when washing, to avoid felting the wool in the process, it to avoid too hot water, or quick changes in water temperature, and to disturb the wool as little as possible.

After washing comes drying. The net-baskets are easy to just lift out of the water and then I usually hang them up for a while to drip off a bit. If I am washing a smaller amount of wool, I often use one of those contraptions meant for spinning water from salad. Then I lay it out to dry, on a wire mesh or on towels on a clothes drying rack. Drying takes time, usually several days. It helps to turn the wool over each day and fluff it up a bit each time. It may seem dry on the surface, but wool has an incredible capacity for retaining moisture.
Finally, you have your washed and dried wool, ready for carding. However, some locks do need to be teased first. This means pulling apart the locks/fibres – and you will probably find even more grass seeds now. The photo shows washed locks, before and after teasing. It´s an extra step in the process, but if the locks are tangled in the tips, teasing really does facilitate the carding.

Photo 6

I own a drum-carder, which really does save time compared to using hand-carders. The wool is feed in under the small drum, which in turn feeds it onto the larger drum, as you turn the handle. After two or three runs through the drum-carder, you can finally lift off a batt of lovely, fluffy, carded wool. Then you can start felting!

Photo 7

It does take a lot of time and effort, and I do swear about grass seeds through the whole process, but each step also has its own charm. I often find it very relaxing to sort, tease and card wool. It provides an opportunity to really feel and look at the locks – and to plan what to do with them. And at the end of the day, when I look at my washed locks and carded batts of wool, I feel really wealthy. Perhaps, in part, because I know how much time and effort has been invested into those locks and batts of wool.

Thank you  Zara for such a wonderful tutorial with exceptional pictures to show us the whole  process from fleece to wool batts!

Lincoln, Soy, Bamboo and Knitting

Lincoln, Soy, Bamboo and Knitting

This is the back of a piece of felt I made from Lincoln wool tops:

OLYMPUS DIGITAL CAMERAI love the way the characteristics of the different breeds reappear with felting, when they’re not very evident from the wool tops. And you get such gorgeous edges with the curly breeds. On the front, I used a blend of Soy top and black bamboo tops. I just blended the tops by hand and laid them on the top:

OLYMPUS DIGITAL CAMERAThe shape, texture and colours reminded me of finding oyster shells on the beach. This is the bottom left corner:

OLYMPUS DIGITAL CAMERAThis is a close up of the texture:

OLYMPUS DIGITAL CAMERAAnd a close up of the back:

OLYMPUS DIGITAL CAMERAI still haven’t had chance to even look at the wool I ordered from Wollknoll because I’ve had builders in … for fibre addicts in the UK who don’t already know, the Euro is really low against the Pound at the moment (about 73p to €1) so have a look at their site, 100g of wool is starting around 72p… don’t be alarmed at their prices though, they’re usually given per kilo! I did manage to sneak a ball of rainbow Merino out of the box though and do a little bit of spinning, I also used the tufts I’d used for my colour wheel a while ago. I left it on the spindle for a couple of days then knitted a square from it:

OLYMPUS DIGITAL CAMERAHere’s a close up

OLYMPUS DIGITAL CAMERAAnd because I love them, a supermacro:

OLYMPUS DIGITAL CAMERAI’m not convinced I’m casting off properly though, all my squares look like they’re one stitch too short!

Making Mini Birdhouses.

Making Mini Birdhouses.

I got an order for some mine birdhouses for decorations.

I laid out 3 at a time, I get both sides ready then put the resist in.

mini birdhouse layout

Once they are wet I add the decorations

pink mini birdhouse redy to felt pink and green ready to felt

The green dots were cut out of a piece of homemade prefelt. The pink stripe is just a long strip of top.

Here I used a piece of felt that was cut off something else before I started the shrinking. I have I bin of off cuts. This one was quite thick so I spit it then cut it up for the decoration.

docorating minibird house blue decorations

Here is a shot after felting. It shows the size and the shrinkage. The picture on the right  is  with a balloon in so it will dry in the right shape.

mini birdhouse size min birdhouse with balloon

They are getting there strings right now. If I can get them done and get a pictures of them I will edit it in. Otherwise you will have to wait for my next blog post.


Last Call for Online Class Registration and Last of the Peeps

Last Call for Online Class Registration and Last of the Peeps

Registration for the online class Wet Felting for Beginners closes on February 22. So if you’d like to sign up for the class, do so now. You can sign up for the class by filling in the contact form here. We would love to have you join us if you’d like to explore the basics of wet felting. It’s going to be a lot of fun!

wet felting FOR BEGINNERS flyer 1ST March

For all of you who have already signed up – Thanks! We’ll be sending out your class information on February 26th. If you have any questions about supplies, please leave a comment below and we’ll get back to you as quickly as we can.

Cody Stitched

I have been continuing to work on stitching more of Nanci William’s original sketches of people we see every day.

Cody

This is Cody, he was just walking by outside the store with the ever present cell phone.

Georgia Stitched

Here’s Georgia.

Georgia

In her turquoise dress and moon tattoo.

Vince Stitched

And this is Vince.

Vince

The man in black.

Gwen and Rocco

I forgot to get a photo of Gwen and Rocco before I colored them in. But that is all the stitched portraits completed. Now to get them laced over matte board and framed.

Wrapping Up the Baby Shower

Wrapping Up the Baby Shower

As you may know, I’ve been feverishly working on baby booties for shower favors for my son and daughter in law who are expecting a little girl in March. The shower is Saturday and I have finally finished a diaper cake and the booties. Yeah!

Here is the cake before putting the baby items on it.  Don’t judge, please.  It’s harder than it looks to get those diapers in a circle!

2015-02-05 11.39.32

The diaper cake was shipped out last week.  Here are the different sides with little baby items attached.

2015-02-09 10.38.56 2015-02-09 10.38.17 2015-02-09 10.37.44-1


I have glue gun injuries from attaching those items.  All that’s left to do is put a little glitter grass on around the bottom and I’m done!

I made 60 bootie favors.  I found a great way to shape them with an ice cream scoop and a melon baller on a bead board.

2015-02-08 15.24.55

The favors were decorated with tiny white bows and are filled with chocolate mint candies in a tulle net tied with mohair yarn.  I will be making extra candy packs when I get there just in case we don’t have enough.

2015-02-10 16.00.48

Now I hope for great weather and a burst of energy!

Have you felted anything for a special occasion?

Ingeo

Ingeo

I haven’t had chance to get my felting stuff out for ages, so I’ve been working on my epic ‘Other fibres project’, which originally was going to be a simple e-book guide to embellishment fibres, but has turned into something of a 7 year journey to try every fibre with every breed of wool and animal fibre I can get my hands on, as it constantly gets shoved aside for other things. Looking through some of my samples, I found a couple of pieces using Ingeo. I like Ingeo fibre. All embellishment fibres have something which sets them apart from others, and for Ingeo, I think it’s the way it looks soft and fluffy, and slightly matt. Although it isn’t particularly shiny, but it does have a sheen.  This first piece is natural grey Merino.

OLYMPUS DIGITAL CAMERAYou can see on this closer pic how it pulls together where it’s laid out thicker:

OLYMPUS DIGITAL CAMERAGetting in closer, you can see the Merino migration through the Ingeo, and though the Ingeo is thick, it is still smooth:

OLYMPUS DIGITAL CAMERAThis close up of the bottom shows what it looks like when it is sparser.

OLYMPUS DIGITAL CAMERAWhen I used Ingeo on this piece with dark grey Icelandic, I didn’t lay it so thickly:

OLYMPUS DIGITAL CAMERAI like the way it looks so different with the Icelandic, where it’s sparse it even looks a different colour.

OLYMPUS DIGITAL CAMERAThere’s a lot more migration with the coarser Icelandic:

OLYMPUS DIGITAL CAMERAYou can see on this close up where the Ingeo is quite dense, it pulls together in a similar way to on the Merino, but isn’t quite as smooth:

OLYMPUS DIGITAL CAMERADo you have a favourite embellishment fibre or animal fibre and embellishment fibre combination?

Dyeing Some Silk Hankies

Dyeing Some Silk Hankies

I was running out of dyed silk hankies so it was time to brake out the dyeing supplies. before I started anything I had to soak the silk Hankies. They do not like to get wet the way silk fabric does. They really resist. I soaked them for 24 hours in some water with a little soap.

I used MX dye and a low water technique. I smooshed the silk in the bottom of some small containers form the dollar store.

silk ready to dye

Then I mixed up some dye in little measuring cups using only a small amount of water. Just enough so the silk will be covered after I add two colours.

dye for hankies dye sticks

I added the dye and let it sit for about an hour at room temperature. I mixed up some PHup ( the stuff you use for pools, sodium carbonate) 1 spoon full for each cup of water used in the dye and the water you are mixing it in. I poured some into each container and let it sit a while longer, about 15 min.

hankies dyeing

I then rinsed them in room temp water and then some soapy water then clear water. One was to much all one colour so I did a spot dye.

spot dyeing

And here they are drying on the table.

hankies1

I will use them  for surface design on hats and pots and to make flower designs on surfaces by folding and twisting them. you can layer them or stretch them out thin. You can spin with them too if you like.

If you want full instructions on low water mx dyeing I learned about it here http://www.pburch.net/dyeing/lowwaterimmersion.shtml


Here’s Norman

Here’s Norman

I have written several posts about a collaboration between artists which will result in an upcoming exhibition and a coffee table type book. The original sketches that all of these are based on are by Nanci Williams who works at the store with me. We see a wide diversity of people and fashions. It’s getting closer to the deadline to have all the pieces completed and so I’ve finished one more. His name is Norman.

Practicing Free Motion Stitching

I started with Nanci’s sketch and on the left, you will see an attempt to thread sketch Norman without any guidelines. I could have done him that way but I just seem to get the proportions a bit off. So I decided I would try using colored pencil to trace the sketch and then use that to free motion machine stitch over. So that is the middle piece. He definitely looked better than the first attempt. So now to determine size. I increased the original sketch 180% and that is on the right side of the photo. I had some linen that I had dyed naturally and I can’t remember now what it was dyed with. (Note to self – keep better track of experiments.) I backed it with Osnaberg fabric by fusing it down to the back after I had traced the sketch with “Beige” colored pencil.

Stitching Finished on Norman

Then I free motion stitched him on the machine. Here he is after stitching. I actually really liked him without color but I was persuaded that he needed color.

Colored Portrait of Norman in Stitch and Colored Pencil

So I colored him in with colored pencil. And I’m glad I did. He turned out just like I wanted.

Close Up of Norman

So here’s a little closer view. Since I have one more on the list to do, I decided to make the next one with this same method.  But I didn’t have any more of the fabric. So I dyed some heavier cotton fabric with tea and coffee. I dyed more than I needed and I’m sure that was a mistake because now I want to use the rest of the fabric with three extra sketches. Because of course I have nothing better to do! So I’ll see how many I can get done before the March 1st deadline.

What’s in the Box?

What’s in the Box?

Well, it’s not what’s in it as much as what it’s made of. Felt, of course!

A while back I started working on a template to make a box.  I love containers and save all sorts just because.  So, I decided to make a felt box.

I took a cardboard square box I had from a candle and used that to make a plastic template.

I had some interesting batting but unknown fibers.

2015-02-02 14.01.49

Since it was batting I used a nice thick layer.  When I got the general shape and added embellishments on both sides  I started the felting process, then made cuts where the flaps were separate from the box body.

2014-11-15 15.18.08 2014-11-14 16.37.49

I wasn’t really sure how I was going to proceed.  The felt was very spongy and kind of delicate even after fulling.  I decided to try the wash machine and put a plastic cube (baseball trophy case) in it and put the whole thing in a nylon then into the machine.

It didn’t shrink or full much more and remained spongy.  Of course, the sharp corners of the cube cut through the felt.  So, I did some needle felting to repair them and tried the machine again, this time wrapping the cube in bubble wrap then into the nylon.

The fiber wasn’t cooperating much to felt the side flaps together. Perhaps it was as fulled as it would get.  I did use resists to make sure the flaps didn’t stick to the top.  I did some more needle felting to hold it together.

2015-01-22 11.33.48
Bottom
2015-02-06 11.24.04
Front with flap and bottom


It’s hard to tell which sides are which in the pictures since it’s a random pattern.

2015-01-22 11.33.05
Side with pins
2015-01-22 11.33.24
Side


I ironed and steamed the edges to try to get a crease on the sides but the fiber was just too spongy.  To finish it off I sewed on a gold button.  I wanted to use gold thread, but couldn’t find it. Sorry about the photos no sun here the past few days.

2015-02-09 11.29.31

2015-02-09 11.30.24
Front with button on the flap


Even though it’s not felted  very hard, I like the way it looks.  I may have a go at using the GAC to stiffen it up.  Next time I will use a known fiber and try using a flat resist and forming it on the cube.

Have you ever attempted a box?