Spinning for a Purpose: workshop 1

Spinning for a Purpose: workshop 1

Spinning for a Purpose: workshop 1

One of the advantages of being in a local Guild is definitely the people. We are very lucky to have quite a few who have taken the Ontario Handweavers and Spinners (OHS) Master Weaver or Master Spinner programs. It’s a multi-year, very challenging course. If you’re curious, an overview of the spinning program can be found here: https://ohs.on.ca/wp-content/uploads/2017/10/SPINNING_CERTIFICATE_PROGRAM_OVERVIEW_1.pdf .  The master weavers description is outlined here https://ohs.on.ca/wp-content/uploads/2018/03/2018-03-29-Weaving_Certificate_Course_Outline-1-1.pdf

Cindy O’Gorman is one of the guild members that has made it through the master spinners program and is an amazing teacher. She has been very busy at work and has not been teaching too often the last few years but was talked into doing a series of evening practical spinning workshops this year. The concept is to take a type of fleece, add a particular processing technique and spinning technique to form a yarn appropriate to a specific end use.

1 1 Cindy O’Gorman our teacher

Before the Guild shut down due to the virus I was able to attend her first workshop in this series and wanted to share the fun I had taking her evening fibre prep/spinning workshop.

This slideshow requires JavaScript.

2-5

For the first in this series, she chose a fine wool with an amazing crimp (that’s the springy kinkiness you see in the fibre) it was a Rambouillet / Merino cross. She used small mesh bags to wash some of the fleece (which kept the lock structure intact) and had washed some in a clump which did not clean the tips as well. The small baggies show the colour the fleece was before washing.

67 6-7

For the OHS program, she had made a chart of various different ways to classify wool and sample of some of the many types. She also had a yarn size and twist angle gauge. This would be useful shortly as we tried to match the yarn she had used as warp on the rigid heddle loom she had brought for us to sample with.

Next was how to process the wool to prepare it for spinning. We used small fine combs. I had brought my 2 pitch Alvin Ramer Combs, single pitch Viking combs (from Indigo Hound), a few of my Bee combs (Decapping Combs) and a wooden handled dog comb.

88 My combing options.

99 Alvin Ramer 2 pitch combs. I use the blue clamps with them since the original C-clamps stayed with one of the previous owners.

101110-11  Viking single pitch combs (with diz on the green gardening wire). They were a Christmas present from Glenn quite a few years ago.

1212 Bee Decapping combs (Bee combs) these were from Princess Auto but you can find them online. The handle angle is not the best for using as a pair the way normal combs work but can be used singly to tease open a lock.

1313 Dog comb. Again, this was ok to tease locks open but didn’t work as a comb.

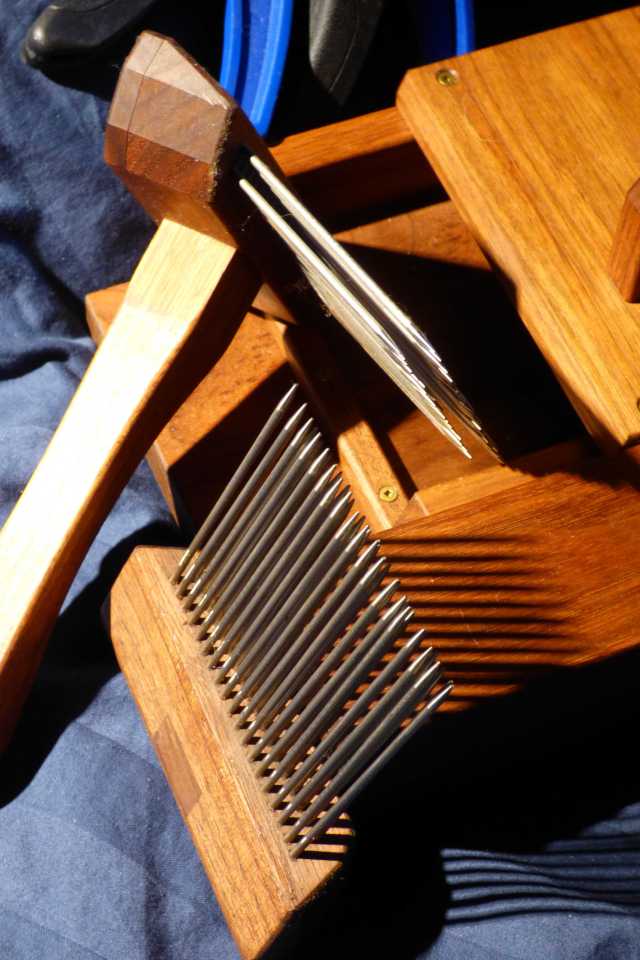
Unfortunately, my selection was not fine enough so we used the Roger Hawkins combs.

14         14

I went looking for a good picture of them online and stumbled across this really nice shot.  Then I thought it looked rather familiar. Yes, that is my picture of a bunch of Roger Hawkins combs! It’s odd to see your own photos show up in an online photo search.

1515

Cindy had two pair of Hawkins combs and had the guilds’ pair of the Louet Mini Combs. Unfortunately, the Louet combs have not stood up well to guild use. The tines have become loose. (watch for the picture of dizing from the comb)


1616

She had us load the combs with the butt end in the tines and the tips exposed to the tines of the second comb. Stressing that it was important to only comb enough to make the fibres parallel and get rid of neps and vegetable matter. We did this by transferring the fibre from one comb to the other and back again.  One comb was held tines up and the other with tines horizontal. Working from the outer tips slowly transferring fibres until we had as much fibre as possible migrate. (Don’t throw away your combing waste that remains on the comb!! Keep it for core felting something later!)

We spun off the last comb, remembering to space the fibre up the comb so it would draft more easily.

1718192017-20

She had us try both short forward and backward drafting directly from the comb.

2122

21-22

We had quite the selection of wheels; an Ashford Traditional, the Matchless, a Louet and a Rook by Lendrum.

Next was on to Dizzing!  What a cool word Diz, to Diz, we Diz, we are Dizzing and we have Dizzed. It may just be the sound of the word or maybe having a plethora of z opportunities is what makes it a great word? Anyways, on to the dizzing. Using a button, shell, or a piece of curved plastic will work as a diz. The size of the hole will change the amount of fibre that is pulled through to make the sliver. A small crochet hook or loop of fishing line will help start the fibre through the hole. For best results, it is important to get the concave curve towards the fibre. (Like this;  spinner —-(===== fibre source)  You can diz from a drum carder too if you were curious.

23242523-25

Again reposition the fibres upwards in the tines if the drafting feels resistant.

2627282930

26-30

3131 I need a button with a slightly smaller hole and I should pick up a tiny crochet hook!

All this work is worth it.  Look at the lovely fluffy clouds waiting to be spun!

3232

Spinning from the slivers was much easier than from the comb (which was actually a lot of fun). We quickly spun up singles with which we could then try weaving.  We wound off the spinning bobbin and directly onto a weaving bobbin using a bobbin winder. A single, being an energized yarn, I put my wheel back away from the bobbin winder to give the twist a bit more space to even out before winding on to the weaving bobbin.

Cindy gave us a quick rundown on how to use the rigid heddle loom (where to find the up, down and neutral position sheds). You can also see the small peg looms to the right on the table. The warp on the loom is Polwarth from Shirley Browsky’s sheep. We had been given a sample of the two-ply and were spinning to match the diameter but in a one ply.

3334353637

33-37

We were getting close to the end of the workshop and were going to take turns weaving off our samples at the next social (which was cancelled due to the virus). So we will have singles that have sat on a bobbin for a bit and that will make them a bit more cooperative (less energized).

3838

Cindy showed us a different way to wind over your hand to make a double-ended ball to spin from. She was winding pretty quickly so I’m afraid the pictures are a bit more “Action shot” than I had anticipated.

42434439-44

I used to snitch Glenn’s paperbacks (usually the one he was reading) to wind a double ended ball. He eventually made me a metal winding tool with his blacksmithing skills so he could keep his books.

I am looking forward to eventually getting back to the guild socials and taking more of Cindy’s workshop series. This first one was called  Spinning in a New Direction – Fine Wool from Comb to Woven Scarf.

The next ones are Spinning in a New Direction – Medium/Fine Wool from Comb to Crochet Vest (Novice), Spinning in a New Direction – Medium/Strong Wool in Two Colours from Comb to Marled Coil Basket (Novice), Spinning in a New Direction – Strong Wool from Comb to Worsted 3 Ply for Rug Hooking (Beginner), Spinning in a New Direction – Angora Blend from Drum Carder to Woolen Style for Knitted Mittens (Novice).

She will also be teaching a fibre prep workshop; From the Beginning Starting with a Fleece.

Since this workshop, I am now watching for 2 more sets of combs, the Viking 2 pitch fine combs and a set of the Roger Hawkins combs. I have 2 fleeces that could use their attention! Oh, the Humanity! My poor fleeces will have to wait until I have the right equipment to really show off their loveliness! I wonder if the Wool Growers Co-Op in Carlton Place has any new fleeces yet? I wonder if anyone other than I would consider wool an essential item to daily life?

Take care, stay healthy, keep your hands in warm soapy water as much as possible!! (I am not implying you should do any dishwashing)

A little Social Spinning.

A little Social Spinning.


Since we are all sitting at home, and not going out to gatherings,  I did a little spinning with some friends from my weavers and spinners guild on Zoom. A social distancing, social. For our first try, it went very well. We chatted about many things while most of us were spinning,  just like we do when we meet in person.


This is part of the batt I used. You can see there are large parts that or very hard to draft along with wool. It is silk fibre, I think.

It was getting close to time to start zoom so I did a few rolags up with my hand carders. Naturally, I didn’t think to take pictures of them until later. Lying in bed I think that’s ok I had 1 or I thought 2 left I will do it tomorrow. But, they disappeared mysteriously. No one took them or moved them. Not even a bit of fluff from them has surfaced so I think perhaps some fairies came in the night and took them off to make soft beds or something.

I do have a picture of the little bit of spinning I did. I will have to make some more rolags and hide them. Although putting stuff in safe places often means I can’t find them either.

This is the P.S. to this part of the post. I made some more rolags after I finished setting the post up. Here they are:

This is some spinning I did earlier in the week form a different batt. This batt is a nice grey and pink. I think I showed it to you before but can’t find where.

I thought I had a picture of it as a single but it’s not on my phone.  This is it plied into a 2 ply yarn and wound into a little center pull ball. It is quite pretty

I hope everyone is keeping well during this stressful time.

Extra Online Classes Now Available!

Extra Online Classes Now Available!

Galina Titova of Deep Felt Textile Art emailed me recently. She felt that since so many people were being socially isolated by the world pandemic, that it would be a good time to offer her Fantasy Felt Fish online class again. I thought this was a great idea and I also contacted Teri Berry to see if she would like to offer both her Felted Concertina Hat and Felted Bag online classes too. So if you’re looking for something creative to do in these trying times, we have some felting classes available.

Felting Fantasy Fish

Learn to make felted fantasy fish with Galina Titova in this three week online class. Each week you will learn to create a different fish and move from a simple design up to a more advanced design and different surface design techniques. Every week Galina will provide more examples of fish with the same elements used in different ways to create various effects. Click here for more information and to register for the class. Class start date will be April 8, 2020. The class is limited to 20 students per session and is filling quickly. Galina is planning on offering another session 3-4 weeks after this class has finished. Students will be chosen on a first come, first served basis.

The April 8th class is now full. Galina will be offering another class in the near future.  If you would like to be notified of the next open registration, please fill out the contact us form here with the name of the class in the comments section.

Felted Concertina Hat

Learn to make felt concertina hats with Teri Berry in a four week online class. This course will guide you through choosing a hat block, to creating the correct size resist for your head and the basics of concertina hat construction. You will also learn how to add embellishments, shaping and how to progress to making more complex hats. Click here for more information and to register for the class. Class start date will be April 16, 2020.

Felted Bags

Learn all about felt bag construction in this five week online class with Teri Berry. Starting with an animal themed smaller case, building on each lesson to create a medium sized bag and finally learning to make a backpack with adjustable straps, multiple internal compartments and internal pockets. This course will certainly develop your felting skills. Click here for information and to register for the class. Class start date will be April 16, 2020.

Wet Felting for Beginners

And if you’re new to wet felting, here’s the perfect course for you. This class is for total beginners who have not done any wet felting before. Learn the basics of wet felting, adding embellishments, calculating shrinkage rates for correct sizing, as well as how wool is processed and tips for other felting methods. Click here for information and to register for the class. You can start this course at any time.

And now because you have read all the way to the bottom of the post, Galina is kindly giving away one spot in her upcoming Felting Fantasy Fish class.

Give Away!

All you need to do is comment below and the drawing for a free class will be on April 1st. You will be notified by email if you win. For those of you that are planning on taking the class, go ahead and register and if you win the free class slot, your money will be refunded.

From all of us at The Felting and Fiber Studio, we wish you good health and please stay safe!

Cabin fever and mock-ups

Cabin fever and mock-ups

Hello. Let me start by hoping you and your loved ones are all of sound health.

In light of recent events, last week my husband and I decided to self-isolate. Not too hard a task for two humans whose favourite activity is staying in their respective studios and create, but once it became a Rule I Must Follow in my brain, I knew I needed a project to stay busy and not rebel.

Before I tell you what that project is, allow me to share a new acquisition – I got a serger!

Brother

Meet Bert. Bert came to me pre-loved on eBay, from a lady that didn’t have much time to craft anymore. Judging by the state of his insides (lint everywhere!), you could tell he was indeed much loved.
I haven’t played around with Bert yet but I’m sure he’ll make a great companion to Marge, my sewing machine.

Now, to the project.
I’ve been down a historical costuming rabbit hole for the past few weeks (because, reasons) and decided to make myself a late Victorian waistcoat. This all may have gotten worse after I bought a magnificent pair of trousers with a very 1910s style, and felt my ensemble wouldn’t be complete without a vest, and later a jacket.

Who knew the internet had sewing websites just for this type of historical thing?

pattern

You’ll see on top right corner that the pattern I bought allows me to choose from 4 different styles. I went for the one shown in yellow. Don’t make me confess how many tailoring videos I’ve since watched on YouTube to learn how to create a proper lapel…

Fearing things might start going slightly dystopian, before I self-isolated I managed to run to one of my local fabric shops and buy the appropriate materials for this.

fabric

I got this beautiful 100% wool tweed for the exterior and a beautiful silky paisley for the lining. The latter is polyester, something I’m not very keen on, so I vowed to find something made of natural fabric for next time.
Both materials have been pre-washed but not yet pressed.

Now, before I get to play with the pretty stuff, I need a mock-up. If you’re unfamiliar with the concept, this is when you test the shape and size of your pattern by first sewing with inexpensive fabric – this is often called a muslin.

Mock-ups save you the heartbreak of finding out the pattern doesn’t fit you somewhere after you’ve cut into the expensive fabric. They are also a great opportunity for you to get to know the construction steps of your project, and train the techniques first. My waistcoat pattern reportedly comes from an original 1890s pattern so you can be sure I’m testing it first!

Good thing I did, too…

mockup

My mannequin isn’t completely true to my size but I can already tell there are some adjustments I’ll need to make to the bust line, plus there are a couple of instructions I’m not sure I’ll be following to a T (I am a rebel, after all).
I also managed to find out the pattern has some mistakes, such as telling me to use 4 pieces of something they only tell me to cut 2 of.

The keen-eyed among you might notice I’ve pinned the pieces together on the outside. This is so I can make easy adjustments and transfer them to my final pattern once sewn.

Unfortunately this is where my experiment is at the moment, so I don’t have any more to share with you. However, if you’re intrigued by this piece of clothing – have I mentioned this will have some real historic-style boning for structure? – I’ll happily share my progress in my next post.

Until then, stay safe and I hope you have plenty to keep you pleasantly occupied.

So much time.  So much to do!

So much time.  So much to do!

So much time.  So much to do!

Almost all the exciting things I was going to tell you about today were cancelled. The first was the Drive to Peterborough for the first big fibre festival of the year. Last year, due to unpleasant weather in Ottawa, we seemed to be the only ones from there to make it. Not only does the Peterborough Weavers and Spinners guild put on a good sized fibre festival they also get Spring before we do! So it’s nice to see it may arrive in our area in a couple weeks more.

This slideshow requires JavaScript.

1-14  From last year at the Peterborough Fibre festival,  a good mix of fibre, yarn, supplies and finished goods.

We also missed the yearly Demo at the Ottawa Valley Farm Show. In the last 2 years, I have felted at the demo, making the polar bear face and then a cardinal. This year it was cancelled but it is better to be safe than sick.

This slideshow requires JavaScript.

15-27  The Farm show demo 2019. this is a demo for excellent questions, talking to hemp growers, and trappers with fur. I am going to miss the sheep shaped car air freshener that one booth was giving away!

Well this stay home/work from home idea may not be all bad (as long as we do not get sick!) So far I have read (yes books with words not available in an audible form), watched felting videos I had not yet watched, also videos on restructuring a Victorian style coat, making a pair of combinations (historical fancy underwear), making an 1887 corset and a video on pad stitching. I also am going through and sorting some of the project boxes I have around the house.

This slideshow requires JavaScript.

28-30   This was hiding in a box between the dining room and the living room. I wondered where that had got. Originally it was going to be a 5×7 but quickly turned into an 8×10 as I grew more interested In the branch. I should keep looking and find its frame.

Best of all I found one of my missing pairs of old glasses that are just the right focal depth to read, type and felt easily!!! (Oh, maybe not being able to see the keys was better, I think I need to dust the keyboard more often)

3131  Hmm, maybe it’s time to clean up my desk too.

I have been spending a bit more time in the kitchen making interesting Dinners since Glenn is still working. In addition, I have a Grocery run for my mom. Last week was milk, which is a bit heavy for me. So the trundle box, that has been sitting abandoned in the kitchen had to be emptied so I can put her groceries in it.  When I emptied the trundle box I found my missing Other pictures for the landscape workshop!!! I have to remember to unpack and put things away!

This slideshow requires JavaScript.

32-34    These are frames I picked up second hand at Value village. The larger one is a memory box, it has a fold down glass front. The second is a shadow box so it has a deeper space between the glass and the artwork. Both are lined with linen fabric so the felt has been pinned to the backing fabric.

Well, now I will have a bit more time since the Guild is closed and I haven’t been working on the guild library projects. Who knows, if I keep puttering on the house I may find that place where I keep putting things so they will be safe!!! (So safe I cannot find them again!)I have done a bit of online shopping some of which will be shared with Ann when it eventually arrives.  I even have felting projects I want to get started before the fleece washing season is back upon us. I hope you are all healthy and since we are instructed to stick our hands in soapy water frequently, at least the wet felters should have a great chance of avoiding the flu! Maybe I will have to wet felt a few backgrounds to needle felt over later. Have lots of fun and use up lots of soap!


1st quarter jewellery challenge

1st quarter jewellery challenge

This is the last of my contributions to this quarter’s challenge. I am looking forward to finding out what the next quarter’s challenge is.

Last time I showed you my circles of silk and wool to be made into flowers.

First, I rubbed and rolled them until they were well felted.  Then I folded them into a cone and started rolling in my hands and pulling on the point. That resulted in this:

Next, I cut some leaves from the flat green piece and needled them onto the flowers.

This slideshow requires JavaScript.

I thought they need some stamen. I used locks. These are Wensleydale cross locks I bought already dyed. The first few I made, I didn’t like. The stamens were too long and they looked more like some sort of horror movie flower monster that was sticking out their tongues.

I shortened them. I think I need to dye some locks yellow for the rest. I should have time as we are all staying home.

I will add pins, probably safety pins, to these. Then they can go on a hat or coat or anything really.

I haven’t found good broach pins yet. The ones in local stores all seem to fall apart after a few uses.  I had a link to a supplier but there was no way to tell which ones were good and which ones were not. I will have to order samples maybe.

I was surprised while editing the flowers on how hairy they look. You don’t really notice them in person. The camera really picks them up. The other interesting thing I discovered was that the lid of my new laptop is great for taking pictures. It is flat black and doesn’t reflect the light.


Refugees for 25 Million Stitches Project….Guest Blogger: Penny Peters

Refugees for 25 Million Stitches Project….Guest Blogger: Penny Peters

I thought you might all like to see an update on the 25 Million Stitches project that I shared before. https://feltingandfiberstudio.com/2020/02/08/25-million-stitches/

Penny has been stitching away and has posted about her progress. Thanks for sharing Penny. She hasn’t finished the piece as she is still working on the background. She said she would share again when the piece is completed.

Felted Jewelery for the First Quarter Challenge 2020

Felted Jewelery for the First Quarter Challenge 2020

This is a guest post by Lyn and Annie who were unable to post today but will be back soon.

Annie decided to make a lariat as she’d never felted one before … she likes a challenge… it’s 350 cm (138′) long!

You can wrap it round and round your neck loosely and you can leave the ends hanging
or tie them or just tuck them in. You can see in the layout close-up below that Annie has used wool fibres, yarns, fabric and threads.

It was quite a work-out to get it all felted bit by bit.

And here it is – still wet from felting.

The close-up below, of the dry lariat, shows the vibrant colours and textures achieved.

Annie was pleased with the lariat but she already has ideas for the next time: it could
have added wrapped threads; tied on fabrics; stitched on beads, both little glass or
bigger felted beads…

Jan needle-felted a beautiful dragonfly for the challenge and that inspired
me to attempt a wet felted dragonfly.

I shaped some dry wool fibres (a mix of merino and corriedale) to form the body then
wet felted it by rolling on a bamboo mat until it was very firm. I also made a small piece
of bright white cobweb felt then stiffened it with a 50/50 mix of PVA and water.

When the cobweb felt was dry, I used a fine marker pen to draw the wings on it – I used
a free clip art picture as a guide – then cut them out. I was disappointed to find that
although I’d used a stiffener, the wings were just a little floppy and actually were far too
delicate to make a brooch.

I spent hours trying to think of a remedy and I attempted to make a frame from very
thin silver beading wire. I won’t go into detail but suffice it to say that my swear box is
very heavy and my floor is littered with bits of wire.

So I rummaged through my stash trying to find an answer and I came across a piece of
thin, clear plastic. Ta Dah! I used clear PVA to stick the wings to it, let it dry, then
carefully cut around the edge. The wings still look delicate but they’re not.

I held the finished dragonfly up to the window, against a cloudy sky, to show the
difference between the solid body and the translucent wings.

It’s not quite finished yet, I need to get a slim brooch pin that I can stitch, or maybe
hot-glue, to the underneath.

There are many simple ways to use felt beads to make jewelery – this hair comb was
easy to make. I gathered together a plain hair comb, a hot glue gun and some mini wet
felted beads.

I made each bead by rolling a few merino wool fibres between my fingers, then when I
had a good bead shape I dipped it in soapy water then hardened it by rolling it firmly on
my kitchen worktop.

I wondered what to write here then decided that the photos say it all.

We hope that you’ve enjoyed this challenge and we’ll be announcing the second quarter challenge on April 2nd.


Needle Felted Landscape Workshop Feb. 2020 part 2

Needle Felted Landscape Workshop Feb. 2020 part 2

When we were last chatting about the workshop we had got the students to the point where the image had been transferred to the felt and they were beginning to work on it.

As with other painting mediums, I had them work from the background towards the foreground. This is common in pastel, and often seen in Oil or Watercolour painting. You can lay-in the required colour by hand blending your fibre then checking it against your reference photo.  The students discovered that very little fibre could affect a significant colour change in the resulting blended fibre.


This slideshow requires JavaScript.

7-10) laying in the background then working forward.

One student using her own picture decided that the figure in the foreground was unnecessary for her landscape and after much debating removed him.


This slideshow requires JavaScript.

11-12) Re-editing image and checking with phone

Kim’s lighthouse image was mostly blues and a bit more challenging. It was a photo taken at dusk, so the colours become more subdued.


This slideshow requires JavaScript.

13-17) the progression of the light house

One student chose the round hay bales picture I had also done.


This slideshow requires JavaScript.

18-22) Winter hay bales progress as more detail is added

Another chose the sheep in a snowstorm shot. It was vary painterly! The sheep are suggestions hidden behind the grasses amongst the snow.


This slideshow requires JavaScript.

23-25) sheep in snow behind branches

The alpaca picture was coming along nicely.  When I checked again it had suddenly gone from 5×7 to the full size of the frame without the mat! (That is twice the felting space of the other pictures.) I like the tree details she was developing.

This slideshow requires JavaScript.

26-27 Alpaca in progress and finished

The students did very well with their pictures and even had time for a relaxing lunch break! It was fun to see them putting the frames on their pieces, which always makes it more of an artistic statement rather than just bits of fluffs of wool.


This slideshow requires JavaScript.

28-34) the students framing their finished paintings!

One student was having so much fun she started her second picture on the remaining half of the wool felt.

35

35) One student was starting another picture at the end of the workshop

This was a fun workshop to teach and the students seem to have had fun too. I still have 3 workshops full of 3D felted sheep coming up this spring. They will be scheduled when we have a classroom available and I am back to fully healthy again.  (ok March has got to be an improvement on January and February Right?) I hope you avoid the flu, both the imported and domestic varieties and instead have lots of fun felting!

This and that.

This and that.

I haven’t done much this week but I did decide to do some stitching on one of the circles I made earlier for the jewelry challenge. Seeing Antje’s post reminded me I had made a few stitching blanks. this one is just over 2.5 inches/7cm. I don’t think mine is quite as artistic but it was fun to do with the bright threads.

Next, I thought I would like to do something a little more 3D. I have a box of stretched silk hankies and bits of silk hankies left over from other felting.

I stretched out some circles from bits to make the flower bases.

And a bigger blog of pieces for leaves.

I added some wool.

And then some more silk hanky bits.

I rubbed them all and then I decided to roll them up and pop them in the dryer while I made a few small landscape blanks for stitching. I cut out some prefelt and added the sky and grass. They went into the dryer too and then it was time to feed the bottle lambs and head of to work.

Next week is our school break so I am hoping to get some felting time in.