I needed to put “wire” on my fence posts so I spun a thin grey single. I took it right off the spindle and onto the fence posts.
I wanted some bullrushes mostly just because I like them.
I really liked them but once I added some sheep they looked much too small for where they were.
I really liked them but I took them off
Next, I added the wool to the sheep and some rocks for interest. Also some shadows so my sheep are not hovering.
I took my piece to the guild social and use one of Jans windows. This one has a 5×7 cutout. The picture is about 6×8 naturally. I tried it in different positions on the picture.
We decided to make a new mat. Jan cut it out of a piece of bristol board. She used to be a framer in your younger days.
Here is what it looks like. I am not sure about the frame but that can be changed.
The glass gives great reflections
I think a black frame but I don’t know about the mat. Now I will Wait for Lyn to give us the next quarters challenge.
Some of you may know that as well as being a felter I have recently developed an interest in basketry. Given that I love making 3D vessels and sculptural felt, this is probably no great surprise!
My preferred method at the moment is random weaving, as I love the organic, freeform texture of this technique. After starting with cane, I moved on to work with paper yarn, which I like much better. I think my textile background has instilled a preference for softer materials! 😉
I can also dye the paper with indigo or other natural dyes, like this piece dyed with eucalyptus. And untwisting the ends of the paper produces some delicate feathery effects.
I had the idea of combining felting with random weaving after seeing a photo of a cape gooseberry.
I thought that if the orange fruit in the centre was made from felt, it would make an interesting contrast with the paper carapace. So I wove the paper case, leaving a hole at the top, and then inserted a small orange felt sphere and stitched the two together with very fine fishing line. I then finished the top with some twining and a little tassel.
Photo: Owen Llewellyn
I decided to develop this further into a submission for an exhibition with the theme of “fragility”. With widespread concern about the human effects on our fragile environment, I read that scientists at Kew Gardens estimate that one in five plant species are in danger of extinction due to activities such as intensive farming, deforestation and construction.
So the idea for my piece, called “One in Five”, was to make five stylised seeds combining felt and paper yarn, to represent the fragility of the environment in general as well as their own precarious existence.
The second pod I made was based on a sycamore seed. I needlefelted the two seeds first before wet felting them, and then wove the paper wings around them.
Photo: Owen Llewellyn
I used a similar technique for the third seed, which was based on a bean pod.
Photo: Owen Llewellyn
The fourth seed was slightly different – no random weaving was involved. Instead, I wrapped several strands of paper yarn together, feathered the separate ends, and covered the wrapped ends with felt to resemble a dandelion seed.
It was a bit tricky to felt around the paper without making it soggy and droopy. So I ended up applying some matt varnish to the paper to protect it before felting, which worked a treat.
Photo: Owen Llewellyn
The fifth and last seed was the most difficult. I wanted to make a spiky seed case, a bit like a chestnut, but it was tricky to work out how. I eventually made a random weave sphere and then looped short lengths of paper yarn all over it. I started feathering all the ends, but then decided that the overall effect was too much and that I should just feather a few randomly. So I had to reloop quite a few bits of yarn!
Photo: Owen Llewellyn
Having finished making the seeds, I had to decide on the best way to display them. They would obviously look better suspended rather than lying on a flat surface, but in one of the galleries where this exhibition will be displayed we cannot hang things from the ceiling.
One of the other advantages of felt and paper is that they are both very light materials – each of the seeds weighs only a few grams. So I thought I could somehow mount a branch on a wall and hang them from that.
I spent days looking for the perfect branch. Luckily, we’ve had a few blustery days recently, so there has been no shortage of branches, even on London pavements! I finally found one that’s not too heavy, is an interesting shape and has some lovely lichen.
So then it was off to a photographer friend, Owen Llewellyn, to take some pictures that would hopefully wow the selectors and persuade them to accept my submission. After experimenting with three different backdrops we finally went for a plain grey background, though there also some interesting experimental shadow pics!
Anyway, it clearly worked, as I have just heard that my submission has been accepted for the exhibition, which will be on display in London at the end of May and Birmingham in October. Phew!
I have several pieces that need to be finished and framed in some manner. It would be handy if I always followed the same procedure but many times I like to show organic edges but my recent piece Sanctuary wasn’t going to work out well framed that way. I needed to crop it and then frame it. It is very thick as it has several layers of felt appliqued to felt. And I didn’t want it to stretch out of shape while I was sewing the edges.
I marked the edges first trying to keep everything square. You can see faint lines around the edges where I marked the line I was going to machine stitch. By machine stitching, I could hold all the layers together as some of the hand stitched edges were going to end up being cut away.
I stitched with a dark brown thread and followed my line. I stitched over it twice to make sure everything was holding together. To keep it even and straight, I added a heavy interfacing to the back and pinned it all together before stitching.
Once it was stitched around the edge, I trimmed off the excess with a rotary cutter. As you can see, I didn’t quite get the top edge straight. But it will have to do 🙂
Then I zigzag stitched all around the edge a couple of times. There were a few white bits of felt sticking out and I fixed that with the appropriate colored Sharpie marker. Now to mount it on a canvas or in a frame.
I could put it in this frame with a white mat but I feel that the white is a little bit too stark and it would look better with a slightly darker mat board. Or on a lovely piece of fabric that I don’t seem to have. I definitely need to dye some cotton fabric backgrounds for several pieces now.
This year one of my brothers-in-law decreed we should not give gifts at Xmas. Oh no! But I love Xmas. It’s so fun to see if I have guessed right what everyone will like.
So this year I did 5×7 Xmas cards for our Oakville Xmas. That technically isn’t a present it’s a card. I had a plan.
OOPS, I took Mom shopping 2 weeks before Xmas and had 3 bags of groceries; one was just a bit heavier than the others. Ok, as soon as I lugged it into the house I knew it was too heavy. I lasted long enough to get everything into the fridge and realized I wasn’t doing anything else. I was much better after spending most of a week in bed being very uncomfortable, frustrated and all caught up on Xmas movies. So I was a week behind on Xmas and sure I had a bit longer until it arrived. (Surprise! It’s still on the 25th!) Drat!
My husband works for the post office so this year was going to be a very short visit. (The Post Office was open on Monday, Dec 24th.) The original plan was to drive for 5.5 hours arrive late on the 24th or early on the 25th drive back on the 26th so he could work on the 27th. He had requested to have Monday off so we could leave earlier but we had to wait to see who else requested because it would go by seniority and there are a lot of more senior people working at his station. Thursday night he found out that he could have Monday off and we had a mad scramble to drop off Ottawa presents (before the freezing rain arrived) and gather everything for the trip.
Friday started out with freezing rain changing to rain. I had collected my portfolio a bag of various coloured fibre and a strip of the felted duvet that had been donated to the guild felters. I think I told you about that a while ago. I finally got to use a bit of mine and it worked very well. So if you acquire a felted wool duvet do not despair take it apart and use it for a base to felt on!
The drive down started with light rain changing to vary heavy rain eventually stopping and changing to decorative wisps of snow north of Toronto but nothing stayed on the very green ground we found in Oakville. There was an amazing decorated Xmas tree and Glenn’s Parents to greet us. so Green Xmas isn’t all bad.
No Snow in Oakville but a spectacular tree!
So Saturday morning I pulled out my bag of fiber and sent Glenn to find a cereal box in the recycling bin in the basement. I cut out part of one side and made a 5 x 7 window and sent the rest back to recycling. Then took over a corner of the dining room table. (My back still wasn’t very happy and decided that living room furniture was not to be tolerated but dining room chairs were fine – stupid back)
Hum, what would my in-laws like on their card? Well, we were definitely having a green Xmas and we hadn’t brought any snow with us (what little we had after the rain and freezing rain in Ottawa) ok, a snow scene it would be.
swirly application of fibre
adding a tree and a snowy slopeanother tree and more swirls to the sky and a winter sun
Again wisps of colour laid down this time in swirls of patterns to the sky, very van Gogh of me! I added bare trees (there is a golf course full of bare trees just across the street) then needed something to balance their weight. The nephews had created a grisly snowman murder seen the last time they had visited but unfortunately no snow so no snowmen. Hum ok, a less grisly snowman with a scarf to blow in the wind.
check with the cereal box frame for balance to the compositionOoh, a frame makes everything look better! One down 2 more to go
Yes, l think that will work.
One down 2 to go!
Next Brian and Alex like birds and there are lots of birds usually here. But this visit seemed to be all about squirrel wars and retrieving the squirrel-proof feeder from where the Raccoons had taken it across the backyard. I hear there is an opossum visiting but I didn’t see it.
Squirrel wars, a momentary pause
Usually, there are lots of cardinals and blue jays, sparrows, chickadees, morning doves and never enough crows for me. Ok, cardinals it is.
A quick trip to the internet since my camera wasn’t as helpful as it usually is and I had chosen a bird.
cardinal underway
Again background blended with wisps of colour then started adding the detail work. Checking the size with the 5×7 window and a lot of poking (but not my fingers!) and I had Xmas card number 2 done.
It was Xmas Eve afternoon by the time I started the last one. Bob and Judy were not expected until about 4 pm Xmas day. So I had to felt my fingers off since I knew we also had turkey dinner, Xmas breakfast and a lot of presents to open!
Christmas Morning! One more to finish!Glenn’s Christmas morning Blacksmithing hat and lots of pyjamaspart of Jan’s Christmas tablet weaving books!
Hummm, now what might they like? I had rectified the lack of snow and did one of the birds that we enjoy here. Oh yes, the rabbits! We see them mostly in the spring and early summer but they’re very cute. Bob would like them and make him think of his parents’ home.
So bunny it was. I didn’t have the photos I had taken of this spring’s bunny visitor but remembered what it looked like so off to the internet for photo reference. Much poking later I had a very painterly interpretation of an Oakville bunny.
beginning of the bunny
adding more detail
Framing of Christmas card #3
You may have noticed I tried a different base to work on. It’s the foam from the dollar store that kids’ play mats are made of. Mine was about 7 inches square and had a puzzle piece in the centre of each square. The puzzle part in the middle tends to want to pull out but I would suggest not using tape to hold it together since the stickiness would transfer to the needle and make a mess. I found holding down the center worked fine and it wasn’t as annoying as it sounds to work on. When the bigger ones reappear I will get more. I did work 3 layers thick so had no poke through even with the top surface deterioration. If you haven’t tried this as a base you may want to experiment.
Dollar store foam pieces3 layers worked well
All recipients seemed very pleased and surprised with their “Xmas cards” I had found frames at Dollarama with a white mat so they looked a lot more polished with the frame as presentation.
Now on to class notes for the 2 workshops I’m doing in January! I can see a lot more felting ahead in 2019! I hope you get a chance to try small format felting, it is relatively quick, doesn’t take much wool and it’s lots of fun!
I have been slowly stitching the tree in my landscape. I am couching down yarns that I have in my stash. These are definitely recycled since they are from old knitted items and the yarn has been pulled apart again. It already has some nice textures and kinks to it making it easier creating a “gnarly” tree trunk and branches.
Here it is when I showed it to you last.
And now, here is the tree filled in with more branches.
And here’s a closer view of some of the texture on the tree. I am thinking about adding just a few more branches. What do you think? More branches or not? I am calling this piece Sanctuary because it reminds me of the trees that the eagles sit on around my house. I see eagles all the time in these old gnarly trees with broken branches.
This is a perfect piece for the new landscape challenge that Lyn posted about a few days ago. But since I already started it before the challenge, I will probably do an entirely different piece for that. But since “scapes” are one of my favorite genres, I am sure I won’t have any problem coming up with a challenge piece. Have you started a piece for the challenge? We’d love for you to share it with us. Just come on over to the forum and show us your landscape.
Last week in Ruth’s post Batik Post she had a scribble tree. I have always liked them so Ruth suggested I make some. Ok them what to make. then I remembered these felt pieces I made a long time ago, I think, because I do not remember making them or what they were for.
They seem to be white felt with black silk hanky on them that were make to the prefelt stage, then cut out and put on some black prefelt(maybe) and felted again. I had no idea what to do with these but then thought why not just treat them like pieces of tile and just make a picture on them like painters do.
First I needed some tree green yarn so bot out my carders. It is some sort of curly fiber maybe Blue Faced Lester as that is what I have most of and the curls are small.
I made some rolags to spin. It is full of lumps and nepps so it will be a textured yarn.
I spun up a single, then plied it and made it into a center pull ball ready to use.
I used the yarn to needle felt a scribble tree onto one of the bigger pieces.
I decided it needed a star so used some embroidery thread to add one. I would like to add some hanging Christmas balls but there really isn’t room for them. The piece is only about 4 inches square.
I decided to try it on one of the smaller pieces too about 2×3 inches. The picture on the right is the back. I love how all the little stabs of fiber stick out.
So thats been my weeks worth of daily doses of fiber.
As It is so close to new year I am going to Wish you all a Fibrey New Year full of creativity. I am planning to do more hangable art work, work out an online workshop and an intermediate vessel class for my guild. But also to learn how to use my new camera to make and document my work. See you next Year(8 whole days form now).
It’s holiday time again and we ran a holiday card exchange with members from the Felting and Fiber Studio Forum again this year. People signed up a little over a month ago. I ran the names through a random name generator gave everyone their partners name and by now all the card should be mailed. I got Ruth this year. I usually just do one card but I hedged my bets and made 2 this year.
Here is how I made it. I started with 2 layers of white prefelt. I added the sky and then the snow.
Then I used some darkish green prefelt to cut out triangles for the background trees. And some light gray to add some shading so the snow wasn’t flat.
Then I added the foreground trees using some blue faced Lester curls fluffed out. The one on the left is the one that ended up as Ruth’s.
And some silk for the clouds.
This is what they looked like felted but still wet. They are very lightly felted. I had planned on felting them more but I liked them as they were and didn’t want to distort them.
Then I added more curls to fill out the trees and to make them stand out from the background. I tried to make them all a little darker on the right side. Then some snow. The snow did 2 things: first, it added some nice high lights but it also made the branches look like the go side to side and not up and down. I added the locks up and down and it was noticeable.
I decided the silk was too shiny for clouds and covered them in a very thin layer of the light gray wool.
I liked the picture but it was lacking something so I added some French knot sheep. They were tricky to do because the felt was not firm at all. The thread didn’t want to stay where I wanted it but pull over or sink in. If I had been thinking I would have put some stabilizer behind it.
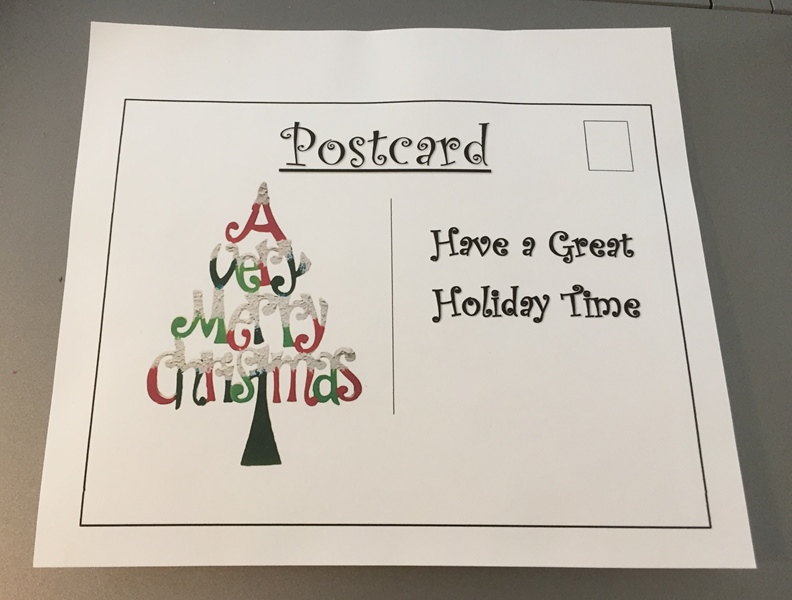
I needed to make it into a card. I chose to do a postcard. I made one up to the right size on my computer following the basic template. I used iron-on facing to glue the card to the back of the felt.
I trimmed it and popped it in an envelope and sent it on its way to Montana. I crossed my fingers it would get there in time. We were having rotating postal strikes in here in Canada. Fortunately, the postal gods were smiling on it and it did make it there in about 2 weeks. I still need to add some sheep or something to the other picture. I do not know what I will do with it. I may just frame it.
First of all, happy Thanksgiving to everyone reading this in the US! I hope you had a nice celebration.
Today I’m sharing some rainbow-y fibre I created, plus a “throwback” item that I hope you’ll like.
Being an indie dyer means I get to play with dyes fairly regularly, but it had been some time since I adventured into the world of saturated rainbows. I think it was the grey London Autumn that got me inspired, I just needed to get a colour fix. Off to the dye pot I went.
One of the things I’ve been a little obsessed with lately is how yarns look when they’re in skein format – I love it when colours look cohesive and have a certain progression to them when displayed, so I went for a red “bottom” that would change as the eyes look up. Hopefully you’ll see that this was done consciously.
I knit this into a hat (complete with a pompom) that I think looks very cheery. It’s going to be a Christmas present so I hope the recipient likes it.
I hope you’re not fed up with bright colours yet…
Although not technically a rainbow, this wool top came out super bright and happy (to my eyes at least). If you’ve ever dyed wool top or roving you’ll know it can be an adventure to control where the colours go. This is superwash wool (it doesn’t felt) so it wasn’t as difficult to get “right” as non-superwash fibres, but I’m still perfecting my methods. Suggestions are welcome!
This being the Felting and Fiber Studio, there should be some felting, so here is a little Piglet I made a couple of years ago and gifted to a friend. I really loved creating this little guy and think he came out really well. I got to see the sculpture again a few days ago at a friend’s house.
Have you done any hand dyeing or needle felting lately? Share your experiences with me in the comment sections.
I had a show on the weekend. It was quite good. We put a big push on advertising on Facebook and Instagram and it looks like it paid off. There were more customers this year. It’s nice that everyone’s efforts paid off.
This is what my booth looked like.
I sat in the back near the mirror and worked on my Moy MacKay class picture. You can see it on the left of the table. People were very interested and it helped to start conversations.
On the second day, I changed the table around a little to see if the little bags would go better. It might have been a little better. people look at them a lot but they are not selling. Maybe the price is a bit high. I need to get my webpage set up to sell or get my Etsy page up and working.
This is what it looked like at the beginning of the day.
I added some more to the fences and some shadows for the ones on the left as the sun is on that side. added some purple to the left backfield to tone it down as it farther away. The big thing I worked on mountains. The wool colours were running across, So they really didn’t look like trees. I added a thin layer of wool going the other way to make it look more like it is covered in trees. I used a greyer green so they will reseed more.
Now I need to add some shading to give the mountains some definition and mountainy shape. It’s coming along. At the moment I am working on the holiday card exchange. What are you working on?


 I think a black frame but I don’t know about the mat. Now I will Wait for Lyn to give us the next quarters challenge.