I haven’t done much this week but I did decide to do some stitching on one of the circles I made earlier for the jewelry challenge. Seeing Antje’s post reminded me I had made a few stitching blanks. this one is just over 2.5 inches/7cm. I don’t think mine is quite as artistic but it was fun to do with the bright threads.
Next, I thought I would like to do something a little more 3D. I have a box of stretched silk hankies and bits of silk hankies left over from other felting.
I stretched out some circles from bits to make the flower bases.
And a bigger blog of pieces for leaves.
I added some wool.
And then some more silk hanky bits.
I rubbed them all and then I decided to roll them up and pop them in the dryer while I made a few small landscape blanks for stitching. I cut out some prefelt and added the sky and grass. They went into the dryer too and then it was time to feed the bottle lambs and head of to work.
Next week is our school break so I am hoping to get some felting time in.
I had a whole day of no work and no grandchildren last week so I got my picture done. Although this is a good thing, I discovered all those little people’s interruptions are actually good. I rather overdid it with the needling and have aggravated my tendonitis again. I need a better needling pad. the one I have is quite dense. It’s good for travelling as it’s light and it does last well but it is too dense to be poking into all day. I know not to poke way into the foam but when you’re doing a picture you always seem to go into it a little. I got several suggestions for alternatives. Jan had a nicer kneeling pad that I will look for not so dense but still lightweight. upholstery foam is popular and a new one to me was rice in a cloth bag. I may try this for home. I think it would be heavy to carry around. What do you use?
On to the picture.
When I put the rock shapes in I wasn’t very happy that the stuck up a lot from the wall so I wet felted it again. It looked much better, more subtle.
Before wet feltingAfter wet felting
After wet felting-close
Next for the wall was some moss and some shadows
Adding moss
Next was some shadow to the bottom of the rocks and to the gate.
Adding shadows -close
I added some sheep, I know you are all so surprised. I added the trees to the place markers and some vegetation to the foreground.
Sheep trees and vegetation
That looks ok but it is kind of bare on the top left and the vegetation is a little boring so I added some more trees, another sheep( you can’t have enough sheep) and some french knots for flowers on the vegetation.
FinishedVegetation closeVegetation close 2
I hope to get a better picture of the finished piece. The camera really doesn’t like the fuzzy white. the piece is 7 inches by 9 inches. It should have been 8 x 10 but when I refelted it I shrank more. it hadn’t originally been very felted because it’s a picture and didn’t need to be. Oh well, I will get a frame and Jan will help me cut a mat to the right size.
The second piece is a fallen tree branch with fungus and lichen. My ideas is that as one thing dies (the branch) it gives life to others (fungi etc). This will tie in with the sprouting seed pod (a new tree) and maybe I’ll add a couple of other things too, yet to be decided.
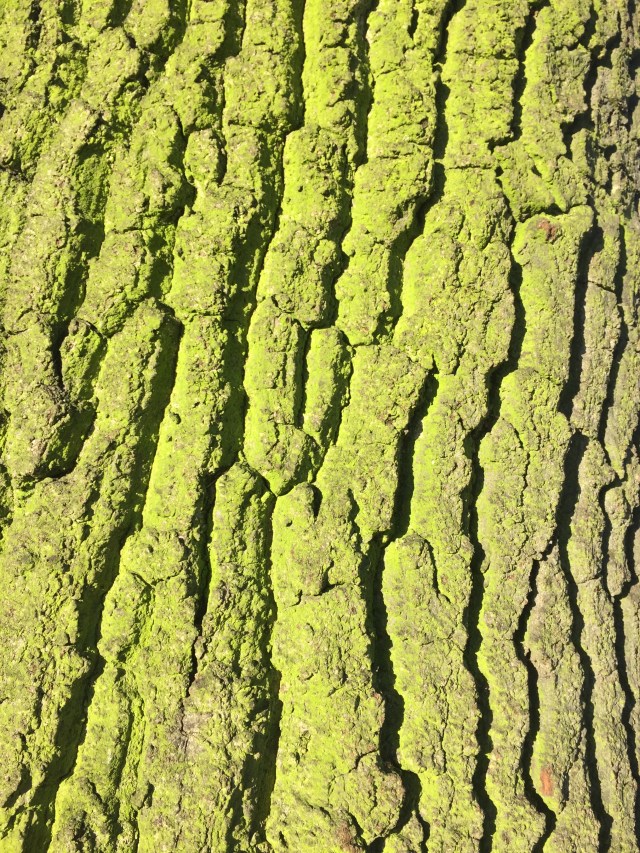
Wondering where to start with the texture I take myself off to the local park to look at different types of bark.
I am particularly taken with these very ridged examples and wonder how I’d go about creating that texture in wet felt. I happen to have some off-cuts from the seed pod on my work table – a piece of fabric, probably linen, I found in a charity shop and felted – so I decide to see what it looks like if I lay those under some new felt. Keen to do things properly (and not waste time) I make a sample.
I am still experimenting with using wool batts from different breeds of sheep (rather than merino tops) so put together natural brown and grey Shetland and Finnish wools plus a little dyed green Perendale including a couple of bits of prefelt. You can just see the ridges when felted but I want more so try cutting into the surface. I really like that effect.
Sample of recycled scarf felted to become lichen
I try out some pieces of a (charity shop) hand dyed silk scarf for lichen and like those too so decide to get on with making the log.
I make a sheet of nuno felt using the recycled fabric which I cut into uneven strips.
Using a large rectangular resist I lay out 3 layers of wool on each side, wet it down, and add the felted linen strips on one side in what I hope is a bark-ish pattern.
I cover these with two more layers of mixed brown and grey wool then add the surface decoration including prefelted discs for fungus and some marbles under the largest green section.
Surface of side one laid out
I would normally lay out the whole thing before starting to felt but there is a lot going on by now that I don’t want to disturb by flipping it over so I start working the first side to try to get it stable before finishing the second side layout.
On the second side I add yarn, locks, nepps, slubs, silk noil, nuno prefelt, pieces from a striped charity shop silk scarf….I am really starting to enjoy this. It’s a good job there isn’t a kitchen sink nearby as I might throw that in too. I’m thinking that as the log will be lying down, this will be the under side so it doesn’t matter if I don’t like everything. I could even cut bits out.
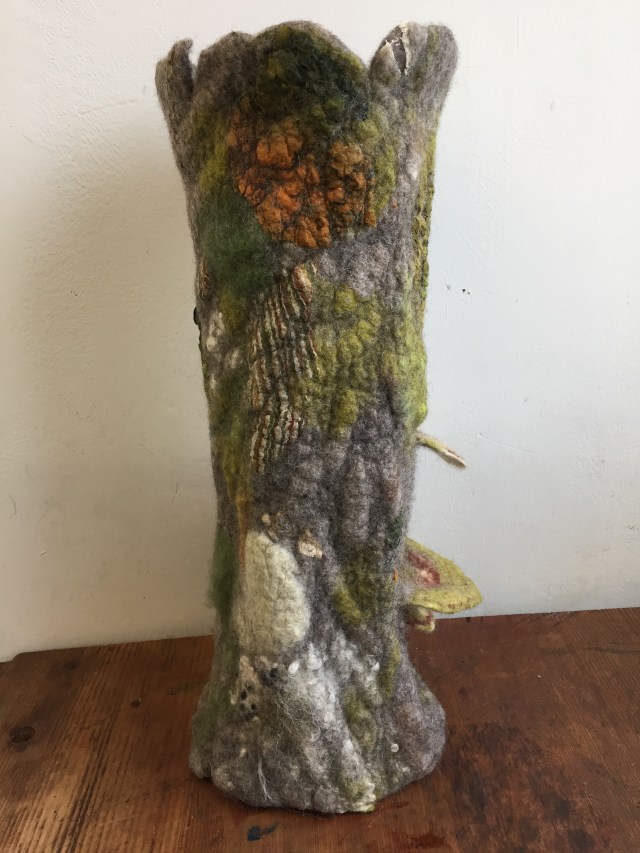
It takes quite a long time to rub and full this woolly smorgasbord, working hard into all the grooves. As I finish working it I decide it looks better standing up and so the log becomes a tree stump.
Final tree stump from the front
In the end I decide not to cut into the surface as there is plenty of texture and I also leave the marbles in as I like the green knobbly bits (visible in top picture).
What next? I’ve been mulling over how the pieces will be displayed together and decide to make a flat piece of ‘woodland floor’ felt for them to stand on. I start with a piece of mixed leafy-coloured prefelt.
I cut the prefelt into rough leaf shapes and lay them on some layers of brown wool. I can’t resist adding a little bit of 3D so felt some thick green rope to look like new shoots emerging from the ground.
Finally I make an autumn leaf to highlight the annual cycle of a tree’s dying and renewal.
Here’s the final piece. Have I captured the idea of life cycles?
Final “Lifecycles” piece
And yes, Lifecycles has now been accepted into the exhibition so will be on display at Beach Creative in Herne Bay from 20 March to 2 April as part of the 3 gallery exhibition ‘Map’. If you’re in the Whitstable, Faversham, Herne Bay area do pop along to the Fishslab, Creek Creative and/or Beach Creative Galleries and check out how other people have responded to the Map challenge (dates vary slightly). I know some of my friends have fabulous work in the exhibitions so I think they will be hugely varied and interesting shows
This week I have been reviewing and putting a bit of polish on my notes for Saturdays workshop. I will be teaching needle felted landscape again. I have 6 students singed up, which is a full class, and have just sent out the instruction note about where to park and what room the workshop is in. I also sent them some landscapes to look at and hopefully they can choose one to create on Saturday.
Since I don’t know the levels of the students I pulled a selected, some that would be easier to do and some that would be more challenging. I also reminded them that they are now God of their landscape and if a trees position offends their WA, they can move or remove it.
I reread my notes and upgraded a few areas.
I had found a colour wheel that was a visual way of suggesting what combination of colours make up the component parts of the colour wheel. I have not seen this representation before and found it visually intriguing.
At the end of my notes I had added some tips on blending and working on a felted picture. I will be showing them how I hand blend small amounts to get the colour I want and how I layer small wisps to build up layers towards the colour I finally want to achieve. This gives more depth and luminosity to my pictures.
Blending colours
I tend to hand blend small batches of colour as I go.
If you need a larger amount of a single colour the dog brushes or hand combs can be helpful
******NB do not use colour that is over-blended especially for your top layers. Nature is not made of flat colour. It is always affected by light. It will look more realistic whether it’s a tree or a fox or a sheep if you leave your colours slightly unmixed.
I have found that using fiber from bats is a bit easier to hand blend and to needle felt than from roving or top. This doesn’t mean I don’t use roving or top if I find the rite colours but I do tend to watch for bats of partly mixed colours in shades of greens, browns, and blues particularly.
I have found a couple of venders at Twist and Almonte fiber festival selling packages of fiber (wool) in a range of colours. (I have had good results from wool from venders like Fibre Craft, the Olive Sparrow and Wellington Fiber.) This makes blending the colour you need easier if you have warm and cool versions of the basic colours on hand. Keep an eye out for packages with shades of red to orange, pink to violet, greens, blues, browns and shades of gray are also vary helpful in blending.
I have also found random died locks can be fun to work with too. (Adele’s Locks of Love and other venders have these.)
Tips on Blending and felting;
– As you work compare the colour you blend with the original image
Take Digital pictures of your work regularly checking the image on the camera or on your I-pad. It is similar to looking in a mere and will give a better indication of how your work is progressing
Remember to look at the negative spaces to check your proportions. But it is your landscape if you want a tree to gain or lose a bit of weight that up to you.
Working with your picture and landscape upside down will sometimes make your brain focus more on the image. Working this way will often give you an easier time with the perspective and negative spaces.
My notes this time were 23 pages plus 10 pages of images for the students to work from. It looks like tomorrow will be another snow day so I will finish printing out the notes and try to figure out why the landscape option keep printing out blank pages.
Next week I will let you know how the workshop goes and will hopefully have a few nice pictures for you. I hope if you are having a snowed-in-winter-day you will have a chance to pull out some wool and make something fun!
On my last post, I showed you my new studio space. I had just moved in and my beloved fibre was still very much scattered around, and I felt a little at a loss as to where I should place my furniture.
It’s been 3 months, so how have things progressed?
The quick answer is, very much as I’d expect – there’s still work to be done! For good reason, however: I’ve been busy working on a new collection and have been concentrating my energy on that instead of changing things around.
I did manage to add a little touch of whimsy to this corner. A few of my for-dyeing fibres are tucked in those cubicles, and I managed a way to show off a few o my hand spun art yarns, as well as some commercial ones I have plans for very soon.
Holes in the walls are a no-no, so I’m buying some MDF, placing it behind the shelves and drilling that instead to keep my vertical storage organised. Having it propped against the walls as is isn’t agreeing with me.
My little reading corner, currently filled with work stuff. When I’m sewing I feel I never have enough space to place my finished items.
I managed to add a little artwork to the walls, to liven the place up. My ceiling is very high and the bare walls looked a little sad. Wish me luck when it’s time to remove them…
Placing the sewing table in front of my window was both smart and silly. I get plenty of light (my initial reasoning) but when it’s windy I can feel the draft from the window ventilation slots. For now, it stays where it is, but I might change it later.
Have I told you I named the sewing machine Marge?
My former dining table can be completely stretched now, which is lovely. It might look chaotic but every item is in use for my current project! Ok, most items are.
Spot the Christmas wreath in the background… it’s needle felted.
I made this wreath for my husband, who had to spend the holidays by himself in Scotland. I wanted him to enjoy a little seasonal joy and made this in a couple of hours. What do you think?
That’s my tour of the studio space. I’m still going to add more artwork to the walls, and might change the big table’s orientation. Other than that, I’m very happy with my work area and have found my energy is higher here, especially now that the days are growing longer. I’m looking forward to working in my corner during Summer.
This may seem like a rather philosophical title for a textile blog but please bear with me, I wanted to share a new direction and body of work with you.
These thoughts and ideas have been slowly percolating through the recesses of my mind for about 20 years, since a fairly heated debate with a psychology teacher on whether humans are the only animals who possess cognitive abilities (perception, attention, memory, motor skills, language/communication and visual/spatial processing). She quite vehemently argued that only humans possess all of these skills, I was a veterinary nurse at the time and forcefully argued the opposite, taking it further and arguing that animals also feel emotions too.
This debate was recalled during a trip to India in January 2018 and a visit to a Jain temple. The Jains have an intriguing philosophy and what struck me most about the monks was the extreme lengths they go to in order to preserve and protect all life, they believe every animal is sentient and as such, must not be harmed by their actions (either directly or indirectly). Their vows of non-violence make them the ultimate pacifists, a stance which I thoroughly admire but have to admit, have no hope of ever attaining. They are strict vegetarians and do not eat after sunset for fear of accidentally eating an insect on their food, and the monks pluck out all their head hair rather than shaving it so as not to harm any lice that might be residing there.
While sentience is essentially another word for consciousness and it is relatively easy to argue that most animals, even the smallest, are “conscious” on at least some level, even if it is just awareness of food sources and potential mates. The idea that all creatures are sentient rekindled my thoughts about the cognitive processes and expression of emotions in animals.
Paramecia – are they conscious?
I knew I wanted to explore this idea from a creative perspective but was unsure where to start. Researching colour theory revealed a wealth of information about our emotional responses to different colours and this led me to play a game of “abstract word-association”; starting with a one or two words that described an emotion I worked on small squares of water colour paper, trying to express that emotion with just colour and mark making, these are some of the results:
These little sketches were surprisingly cathartic to make, if you or someone you know is going through a challenging time and finding it difficult to talk about how they are feeling, asking them to illustrate, in an abstract way, a series of emotions (both positive and negative) from a list of words may be helpful.
Taking Gladys Paulus’ mask workshop earlier this year has given this topic, and my approach to it, a whole new lease of life, no longer confined to 2D work I have been having a ball making various animal sculptures, each expressing their own emotion. As each new personality takes shape on my work bench I am finding myself creating whole backstories for them.
I am thrilled to introduce you to 2 new, very special friends:
“Laughing Lionel”
While the king of the beasts has a fearsome reputation, Lionel is really a very gentle, affable soul who likes nothing more than a good chortle at the ridiculous things humans do.
“Indignant Margo”
She isn’t quite finished, but will be a wall-mounted sculpture like Lionel when she is.
Margo is an old soul in a young body, she takes offence at almost everything and wears a permanent look of indignation on her face. She believes her purple spots are a sign that she is descended from aristocracy and therefore everyone is beneath her; if anyone is going to look down their nose at you, it should be the tallest of the beasts!
These two sculptures (and hopefully one or two more if can finish them in time) will be on display at the Art Box exhibition, at Denbies Wine Estate, Dorking RH5 6AA, UK, between September 23rd and 29th. If you are in the area please pop in and say hello, it is a beautiful place to visit and entry to the exhibition (with artworks in a range of media from 8 independent artists) is free.
Which animal and emotion would you like to see paired together?
Do you think I am anthropomorphising (applying human characteristics) the animal kingdom, or do you agree, animals do feel and express emotions, and perhaps some humans are too ignorant to understand when the animals around us try to communicate these emotions?
I will show you how things have been going with my second quarter challenge piece. If you missed my last instalment it is here. seascape-progress
I finished adding the green for the vegetation.
Next I worked on the flattened serf
First I tried this,
But no, and then this,
I might have been able to make this work by adding something to the edge of the wave but I didn’t like it
And finally I went back to silk throwsters waste. I also broke the water edge up into 3.
Next moved on to the foliage. I added green stitching here and there to give it a more vertical look. It doesn’t show much but does add to it. I added some handspun yellow that a friend Bernadette made up for me on the spur of the moment when I was moaning about not having the right yellow.
After this it was just a matter of adding more stitches. I did add more of the yellow to mingle them more and stop them being a line across the picture.
This is where I am, stitching away and I still need to add a little dark wool between the planks of the path. I had forgotten about that until seeing the pictures. They are more defined in person.
I was going to just keep going with the stitching. The picture if you recall is quite plain but I was finding it boring, and to uniform in proportion. It needs something else. I wondered about a railing. Not this railing I think, it looks like a Japanese character (badly build temple maybe) or something.
I think I will finished the stitching even if I add something else. Anyone got another idea? I have seven more days to be finished in time.
I have worked a little on my seascape so it is progressing. Last time I showed you the beginning 2nd-quarter-challenge-started/
After I felted it, the front wave mostly disappeared and the white for the flowers was gone too. I should have known I would need more. Oh well, onward I go.
I thought the best way to do the boardwalk would be to make some felt and then cut it up. This was the best match I had for the wood. It is not white but it’s not really beige either.
I laid out a small rectangle of the wool and of course that was much to flat so I added the next shade up and some black wisps.
You can see better when it’s wet.
After it was dry I cut it into uneven strips. The pictures above are taken in my studio and these are in the guild studio, much different light. There are fluorescent but also lots of natural light. in the guild studio.
And here they are just lightly attached. I needled them down more after. I may put some black or dark brown between the boards. I haven’t decided yet.
Next, I started adding the greenery. I wanted more texture. The picture had gone very flat and it made the boardwalk look like it was floating.
I will work on the lost wave and add some stitches to help the plants look more vertical and then flowers of course. It should be done before the end of the month. Are you doing the challenge? How is it coming along?
I finally pieced a picture for my second quarter challenge piece. If you remember is it seascape this quarter. this is the picture I chose.
I found it on the internet, where you find everything. It should be ok as I aske for free to use pictures.
I started with a piece of prefelt a little bigger than a piece of paper, with the idea it would shrink to an to be the size of a piece of paper. And for a change I have a piece the right size. It is a mazing what some planning can do for you. You would think I would learn.
Next I layered some more prefelt to make the basic shapes in the picture. the mottled piece at the front was dyed by a friend.
That is v
That looks very boring and flat so now it has to be brought to life. I added some silk hanky scraps to the water to give it some depth and movement.
Then I added the surf using throwsters waste.
And lastly I added some foliage and flowers
Now it is all ready for wetting down, I plan to add the wooden path to the beach later. I am not sure I have the right colour for the wool. what colour is that anyway?
Around December of last year, I was asked by a friend and customer to make a life size sculpture of a raven. I’d never done one before, so it was an exciting challenge to accept.
My husband, a professional painter and sculptor, helped me create a template. I then created the core with needle felting foam rectangles, which I cut and glued to size. I then covered the foam with wool.
Feathers were another challenge for me, I researched quite a bit online to see how other people were making them and tried a technique whereby you add wool top to fusible interfacing, add a wire in the middle and steam iron everything together, but the interfacing was just too white and showed through. Sorry I don’t have any pictures of these, they would have looked very nice in a differently coloured bird. This part stumped me and took ages to resolve.
I left the feathers conundrum to simmer in the back of my head and moved to raven feet. I made mine out of wire that I covered with pipe cleaners and then wool.
Although the feet looked nice enough, they were not too lifelike. As it turns out, the wire was also not too sturdy for something this big, since it became clear it was too soft to hold the raven’s body at the angle I wanted. The poor thing stood too much like a duck!
It became clear I needed to replace the feet, so I did some surgery: I cut the original wire out, then added a sturdier one and repaired the cut site with more wool and felting. I had an idea to use polymer clay on the feet at first because I thought it would look more lifelike but it was an absolute fail: clay, once hardened, has obviously no yield and therefore can’t be posed, which can be a problem depending on the surface you’re placing your sculpted animal on. Back to wool it was.
Enter a magic technique I had never tried before: wax.
Adding wax to wool makes it look less like fibre and more like a proper part of animal anatomy. See below:
You can see by one of the pictures above that I got the feathers to work eventually. After much musing I cut felt sheets to size and put the sewing machine to work to add the central stem you normally see in real feathers. Some of them still had wire in them for structure.
Because I really love how the feet looked after adding the wax, I couldn’t wait to play with this new-to-me material on another part of the corvid: the eyelids.
Here’s an image of my raven without eyelids. The poor thing looks too startled and weird to be real.
Now behold, with eyelids!
What a difference. I wonder how I made it without using wax on sculptures this long.
After making more longer feathers for the tail, my corvid was ready to be unveiled. Photographing black wool is notoriously difficult so I apologise for not having more professional-looking pictures to show, but I believe these show you the end result well enough.
This chap has been named Huginn (old Norwegian for “thought”) after one of Odin’s ravens. I think it suits him.
I felt sorry to send Huginn to his forever home. After spending so much time (5 months!) working on him on and off, I really built a connection with this character. I’m glad he’s receiving much love and will even have a custom-built dome to keep him protected against the elements…
Let me know what you think of him in the comments, and if you’ve any questions about the making process I’ll do my best to answer them. Thanks for reading.