The next step was to do a bit of stitch sampling on the tree trunks. I had been making some wrapped cords that I thought might look nice stitched down to give tree trunk texture but they were too large a scale for the size of the trunks as you can see on the left side. Then I started searching for a stitch that I thought would look nice as texture on the bark. After looking at some complex stitches, I suddenly remembered the KISS principle (keep it simple …). So I decided to try running stitch. It is a much better scale and simple to stitch, the winner!
So I stitched on both trunks. The left photo was taking a look at how they were going to be on the background. I decided they still needed more stitching and added a bit more running stitch. I used a lightweight wool thread as I didn’t want to have a contrast from the wool trunk to a shinier thread such as cotton or silk.
Now on to adding more of the foreground elements. Keeping in mind that I want to highlight the streak of “sunshine” from back left to right foreground, I placed three pieces of felt cut into perhaps rock shapes as well as adding some “moss” with cheesecloth. This is how far I have gotten. I think the rocks need some stitching to add a bit more shadow/darker values. That’s the next thing to sample.
I went through some of my sketchbooks/workbooks from my prior classes recently and found a few pieces that were inspiring. It’s nice to revisit old work and see if there is something there that will inspire new work.
Here’s the forest floor collage that I found. I thought that this would make a nice landscape in fiber/textiles. I can’t seem to find the original photo that I used for inspiration so I’m working from the collage.
Going through my pieces of already made nuno felt, I thought this piece would work. The top right corner made me think of “forest sky” and mottled light, so that’s a good start. The size is 12.5″ wide and 11″ high. Most of you will probably recognize this nuno felt as I have used it for several projects already. But the fun thing with this type of project, is that the background is just the start and the finished pieces will not look alike but would go together well if paired with one of my other pieces.
Next up was to look through my boxes of felt scraps and see if I could find something that would work for the more distant tree trunks. I started with the felt on the left but once I put it down, the value of the tree trunk to the background was too similar and the grey brown wasn’t very “exciting”. The middle felt trunks are actually the opposite side of the trunks on the right. The values were a bit better and I am leaning towards the ones on the right. I am planning on adding some stitched texture to the bark and can add more darkness into the trunks that way. I luckily have enough of this felt to do some sampling and see what kind of stitching will work best. Also, after I uploaded these photos and saw the tree trunks from a distance (smaller photo size), I noticed that it looked like the light was slanting through the trees. I need to remember to leave that lightness in the foreground to give that effect.
I continued to look through my felt scraps and dyed fabric. I found some nice greens, some “fallen trees” or “rocks” and some cheesecloth that will add texture. I kept looking for felt or fabric that would work for the flowers, I couldn’t really find anything that worked. I could felt some small white flowers but I’m not sure it’s worth that effort. The white flower I am showing is cut from watercolor paper (300 pound) and the center is a bit of yellow green cheesecloth. The paper would be simpler as it doesn’t fray and I noticed the contrasting sheen of the paper compared to the matte of the felt. The paper can also be shaped so it is 3D and coming off the surface of the landscape. As you can see in this photo, I have lost that brightness coming through the trees as I have it covered with green. This is just trying out colors and the final layout and shapes of pieces to applique down has not been decided.
Because the nuno felt is thin, I decided I needed to back it with something a bit heavier to hold the weight of the heavier felt I will be stitching to the front. So I cut a piece of rayon wool commercial felt blend to the same size as the nuno background.
Next up was basting these two pieces of fabric together. I don’t always baste but I have found that in general, it’s better to take the time to baste the backing fabric to the background fabric. The integrity of the piece is always better after basting. It holds everything in place and provides support while stitching the foreground items. This is especially true if you are machine stitching as the machine has a tendency to move the nuno fabric in different directions than the backing fabric. Basting rant is now over.
Next, I will be doing some sampling to see how I want to stitch the tree trunks and previewing the green fabrics. More coming soon!
It is time to do some stitching on my visor cover. Stitching on felt is something I really enjoy. It feels nice to stitch on felt, It has texture even when it is smooth. You can feel the needle pass through the thickness of it.
I had people at my guild comment that the actual piece looked a lot more vibrant than it did on the screen. I fiddled with the colour a bit so I hope it looks a little better this time. It looks very bright on my screen. The crazy thing is it is sitting on the black, top of my laptop. I am getting some serious light bounce off the black.
I picked out some threads I think go with the colours. I need to find a “greener” green something in the middle I think but that requires digging in the mostly unpacked studio so it will have to wait.
I am a slow stitcher. I know I am not alone in this. There’s a whole movement called slow stitch. It suits me, stitching when I have a bit of time but with no deadline in sight.
I started with the turquoise green on the forest green part of the leaf. I thought it looked like a nice contrast even if it was still green. then I forgot to take a picture of just that stitching or rather I was probably intending to take a picture of just the stitching and forgot what I was doing. So you get to see the contrasting orange I picked for the next part too. It’s a deep orange leaning towards burnt orange.
I did the first part in rice stitch. It’s fun to do but harder than you think to make it look random.
I tried an uneven long stitch for this part and didn’t like it. It was messy but not messy enough to seem like I did it on purpose just unpractised. Of course it was but we don’t want to advertise that too much, so I removed it.
The other nice thing about stitching on felt is when you take out stitches, it doesn’t show like it would on muslin or cotton fabric. I decided to do something else with the dark orange and a lighter orange for the cross stitching. I am not sure it is busy enough. I will leave it for now. I am also not sure it was worth changing oranges either.
Now I am onto wonder woman. I am hoping to stop it from looking like wonder woman and more like a flower with the stitching. However, I started with the “cape”. I am using the lighter orange. I am adding X’s as I liked the way they looked on the leaf. I tried looking online for open background or filler stitches but I am calling it the wrong thing, I think. Everything that Google gave me, were stitches to completely cover a space. I know I have seen them before. Does anyone know the right term?
That’s as far as I am. Well maybe a bit farther as I am writing a bit ahead as I will be busy baking for the Thanksgiving Day farmers market. In Canada, we celebrate earlier than our American friends and this year is earlier than usual on October 9th. with any luck, I will have a little time to do some stitching.
So sliding in on a cloud of dust I have the branch finished just as the quarter runs out. I know we don’t have to get it done in a specific time but it is nice to get it done in the quarter the challenge is posted.
After looking at it and especially seeing it in a photo I decided the larger flowers at the bottom of the flowers should have yellow centres. So I added them. I used mostly french knots with 2 threads. The single french knots are smaller than the colonial knots. The Yellow stands out more in the photo than in real life.
It still looked pretty sparse so I decided leaf buds would help. I looked them up online. It was best to look up flowering trees and look at the buds in the background. It didn’t seem to matter the kind of tree the leaf buds looked pretty much the same. I made all the leaf buds at the same time so I would get them about the same size. It didn’t take long and I only poked myself a few times. That’s the problem of working small.
first I had to make the green I wanted. I had Christmas green, lime green and a very yellow-green. I mixed them with a couple of dog brushes.
I made 2 at a time. Then cut them in half and finished shaping them while holding them. I poked myself working on the pad not in my hand and I know Jan will tell me she just gave me a tool so I wouldn’t do that. But I forgot until after I poked myself, naturally.
I fiddled around placing them. and felted them down…… without poking myself.
I had originally thought I would add a bit of brown near the base of the buds but I didn’t like it and pulled them off.
I am quite pleased with the finished branch. Now I need to steam it a bit, to block it square. The dent on the left is really bugging me.
In my last post I mentioned a few of the projects I was working on with the “Making Waves” theme, along with other members of the Waltham Windmill Textile Group. I’d begun work on a 50cm x 90cm felted wallhanging inspired by the markings on large stone slabs on the beach at Seahouses in Northumberland.
Having recently bought myself a drum carder I carded a variety of left over bits of fibre, mainly blues, greens, yellows and neutrals, to make my background and laid them out with off cuts of hand dyed silk fabric, scrim and large nepps. On the left is how it looked after felting and on the right is where it’s at right now. I’ve added synthetic sheers, machine wrapped cords, hand and free motion stitch and in some areas I’ve heavily machine stitched to push them back and encourage the adjacent areas to stand out. The original bottom left section wasn’t working with those silk circles so they were pulled off and replaced with some stiffened, rust dyed fabric circles, recycled from another piece of work. I’m calling it Going With The Flow because a) it’s inspired by a trip to the beach b) it has flowing lines and c) like most of my work its design wasn’t preplanned. It’s evolving as I work on it, adding bits in and taking bits off until it feels right. It’s got a way to go yet before I can call it done.
One of the other challenges within the Making Waves theme is to make a 3D fish and my immediate thought was to create what many would regard as an ugly fish but which I prefer to think of as a fish with shedloads of character……..one that would get noticed amongst a group of pretty fish!
AnglerfishTasseled ScorpionfishOyster Toadfish
Having typed “ugly fish” into Google I lost many hours over the next few weeks looking at images and some incredible videos of life deep in the depths of the oceans. Each new search revealed yet another fascinating species of fish, some quite honestly didn’t look real while some, like the Tasseled Scorpionfish were strangely beautiful. One of the weirdest I discovered has to be the Red Lipped Batfish. If ever there was proof we descended from the oceans this red lipped, whiskered fish that “walks” on its specially adapted fins has to be it!
Red Lipped Batfish
Last month the Waltham group had a day making felted fish, some are finished, others are still work in progress.
Lucy made a wonderful wet felted Puffer Fish adding recycled plastics, including pipette tips, wine bottle netting and glass beads with recycling symbols underneath, to highlight the plight of our oceans.
Sue is very new to wet felting but she’s taken to it like a fish to water (couldn’t resist!) and has made “Angry Fish”. I think he looks more sulky than angry but he’s terrific!
Barbara’s felted fish is still work in progress but looking great, as is her sketch book and fabric fish purse!
Originally I had intended to wet felt my ugly fish but, after all those hours of studying them and getting excited about what I was going to make, for some reason when I took out my carded Corriedale fibres I found myself felting a cartoon version of an Angelfish…….I didn’t see that coming! Her name is TroutPout and she’s approximately 33cm x 36cm excluding her fins.
I’ve been enjoying teaching 3D Seed Pod workshops recently using wire wrapped with Tyvek fabric so decided to make my Anglerfish from wire rather than fibre. It was only when I’d got the 60cm x 33cm framework made that I sat back and realised I’d gone past the stage where I had meant to start adding my fabric! Time for plan B…..maybe I could use wire mesh to give it “body”?
I looked for some online but hesitated as I wasn’t sure how flexible or suitable the mesh would be. Having put the fish to one side, a few days later I joined the Lincolnshire Textile group and at my first meeting I was offered a piece of silver coloured Sinamay. Sinamay is one of the most popular hat-making foundations. It’s woven from the processed stalks of the abaca tree, a type of banana native to the Philippines. I couldn’t believe my luck……..being silver coloured this off cut looked like wire mesh but wasn’t and if I sprayed it lightly with water I could easily shape it to fit and stitch it with aluminium wire to my framework. So this is how far I’ve got. I’m going to add a few more wire spirals and do something more interesting with the eyes. He should have menacing teeth but I might not go that far!
Wire frame Anglerfish
Another feature of next years Making Waves exhibition will be an Octopus’s Garden so once the fish are done it’s straight on to making lots of coral and a few Octopus. I’m loving this theme and could quite happily continue with it way beyond our event next year…….it has to be the most interesting and enjoyable we’ve had so far!
I have finished my flowers but I don’t think I am finished with the picture.
The last time I had gotten this far
I started adding flowers, thinking that the branch end would be the last to open, I started with a darker colour and fewer threads to make buds. I made smallish french knots.
Next, I went to a lighter shade of pink and a few more strands for the next size-up flower buds
For the next group, I used my final pink colour but added in a few strands of the darker colour. I should have probably used half and half because the darker pink didn’t show up as much as I hoped. I did these at home so you got 4 progress pictures.
Today while I was at the market, I finished, with the lighter pink being for the bigger flowers. I decided to try colonial knots instead of french knots. I am not sure I wrapped them all the right way band I added some extra wraps around the needle to bulk them up a bit.
I liked the way they turned out. I am thinking maybe I should add a little bit of yellow to the middle of the bigger flowers to make them look more open. I also think adding some green flower buds might be a good idea too. So that is next, and hopefully, I will make it before the end of June.
And now just because they are cute, the 2 ducklings that visited our booth this morning. they belong to the Farm and were out for a walk with their youngest.
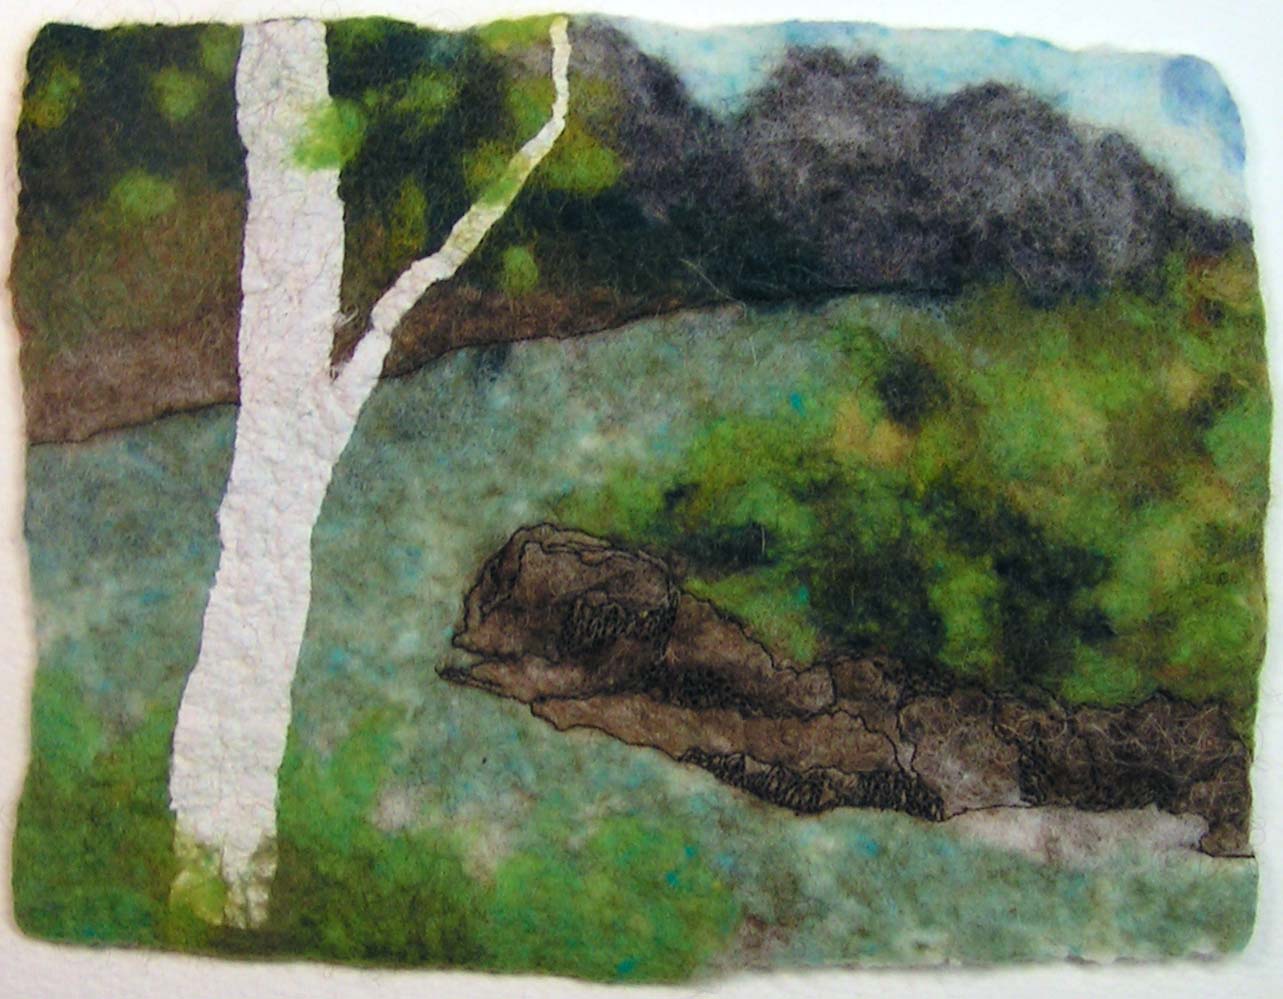
I added free motion machine stitching to the distant shore. Whenever I start FME on a landscape, I always think that the first few areas where I have stitched look like it’s too much. But I keep going and usually, once more stitching is added, the initial lines don’t feel excessive.
The next step was to stitch the rocks across from the tree. I considered adding some stitching into the foliage above the rocks but decided to leave it as is.
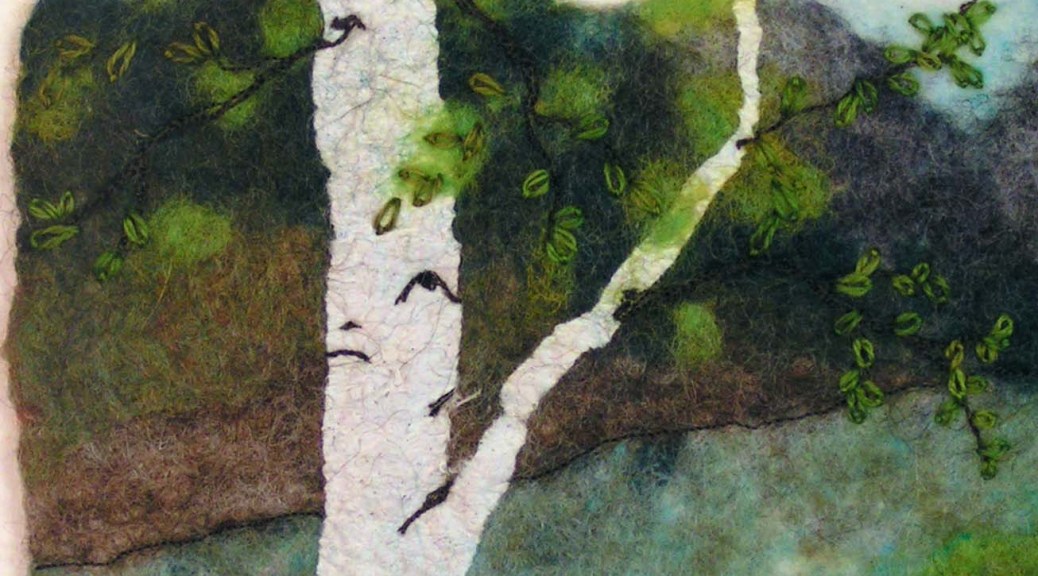
Then on to stitching the tree. I added the dark bits to the trunk and stitching through the felted paper was a breeze, no problems at all either by machine or by hand. The dark branches were added next and then decision time on how to add a few more leaves. I considered needle felting some smaller leaves on the dark branches but then decided I would hand stitch the leaves.
I then hand stitched leaves on to the dark branches using hand dyed lace weight wool thread and detached chain stitch. I added a few bits of grass at the bottom of the trunk as well.
The miracle is that I found a backing fabric, stitched the felt to that and then wrapped/laced the piece around matte board so it’s ready to frame. Since the piece is small (matte size 8″ x 10″), it went quickly and now I have two pieces ready to take to the framers. This piece counts for the year long tree challenge for spring. I have to think about the summer one as it wouldn’t really look different than spring, a few more leaves perhaps?
The winter birch piece is also ready for framing. I used a darker gray hand dyed fabric for the winter birch as it felt “colder” that way. Now on to the next landscape as the gallery wants me to replace the one that sold last month. (Doing a little happy dance!)
This is the piece that sold called Remembrance. Yay!
I have finally finished my stitching. I think it is definitely slow stitching. last time I had done a practice branch to see how it would go. /2023/01/13/stitching-some-trees/
I wanted to add some snow but felting onto the cotton wasn’t good. and yarn didn’t look right. So I thought, why not make it on some felt and then you can needle on some snow. The branch worked out really well. I do love stitching on felt.
Then I tried to add snow. Nope, it looked terrible. Sorry, no picture and no snow. I was a bit discouraged and was going to give it up as a bad job and then I thought I’d come this far, I should finish the piece.
And here is the finished piece. I used an app that takes out the real background and then you can add a nicer background.
All in all not a bad project with no real purpose other than to slow stitch. I had thought I was doing part of the first quarter challenge but on re-reading it I see I should do the same tree in each season and using an evergreen seems a bit like cheating. I have another idea. I saw a picture of making a tree that looked like it would work well so I am planning to give it a try. so hopefully soon I can show you.
And one last thing as it is valentines day in a couple of days I made a heart.
I am continuing with my slow(very slow) stitching. I have accidentally done part of the first-quarter challenge. Last time I showed you my tree trunk. Next, I got some of my handspun to make the evergreen part.
I pulled a lighter green first. it was much too light. I switched to t a much darker green that works much better. it is a thicker yarn too, which I think works better.
The practice one worked out well so onto the good ones.
The trunk on this one ended up a bit fat but I don’t mind
And the third one
And this is how it looks now
I like it so far but I am not sure what to put in the blank corner. I thought maybe a branch so I did a test one. I may try to add some cones or snow. I am not sure what kind of tree it looks like. What do you think? what would you put there?
My next step in finishing the driftwood piece was to create lichen. I had made lichen before from Tyvek but alas, I had none in my stash. So I looked for other materials that could be shaped with a wood burning tool and that would shrink and make interesting shapes with a heat gun.
What I found was a fusible lightweight Pellon interfacing and nylon organza. The interfacing does not need to be fusible to work, it’s just what I had on hand. I can’t remember why I bought it but hopefully, it would work so I wouldn’t have to buy anything else.
I painted the small pieces of interfacing and organza with a light layer of acrylic paint. As you can see here, the paint was not heavy and the shade of blue green was very light in value.
Next, I got out my wood burning tool and a piece of glass to burn on. I made random lichen shapes in the interfacing. I also did the same with the nylon organza. Once they were cut out, I held the small pieces with a pair of tweezers and used the heat gun to make them shrink up and get curly. I also added a bit of brown marker to the edges of the lichen as there are definitely brown bits on the real stuff.
Here’s the result. Yay, it looks like I wanted it to. Success. Now to add it and the dead teabag leaves to the mossy driftwood. I glued the lichen in place as it was mainly on the wood itself. I stitched the leaves down to the felt in a couple of places.
Here’s the result. You can click on the photo to enlarge it.
And the close up views. I’m happy with how it turned out and it was a really fun project.