
Santa Claus is Coming to Town!!
Well it’s definitely that time of the year, when are lot of us are all getting into the holiday spirit. I’ve been making some needle felted gnomes and Santas, which have proved quite popular. As I was making five Santas for my cousin Debbie, I thought I would share them with you. Alex and I got into the Christmas spirit last year with Alex’s wet-felted Santa stocking so we thought it would be good to keep up the Santa tradition!
They are quite easy to make, but a word of warning…. KEEP THEM AWAY FROM CATS!!!!!!!!!!!! To say I’ve had a few disasters would be an understatement. Twice Elliot has managed somehow to get his paws on them and he managed to completely destroy one Santa and had me running around trying to catch the marauding feline, as he darted under the sofas, tables and anything else he could see in a bid to keep hold of his spoils. To see him speeding through the house with a gnome in his jaws, looking like he’d caught the prize mouse was quite a sight. I wouldn’t mind so much if I hadn’t already provided him with a range of felted mice to keep him entertained in the hopes he would leave my felting projects alone!! But unfortunately, one poor Santa has been completely stripped bare of his beautiful red coat and his beard, not to mention the state on the rest of him! I still can’t believe this Ninja cat managed to get his paws on them, considering they were in a sealed bag, up on top of the highest of my stacked felt supply plastic boxes, literally 9″ from my ceiling!! At this rate, I’m going to have to put them in a padlocked box!
I just had to share this….

And here is the culprit…..

Anyway, back to the main topic for discussion, the needle felted Santa! I used some off-white core wool to make the body. It’s very narrow as you can see, so I had to roll it very tightly to make the body, For the life of me I can’t remember what wool it is I’m sorry, other that to remember it was a batch of core wool I bought last year. But it works really well for this kind of project, and it felts quite nicely into quite a firm ‘body’.
 Core Wool

I made the body about 5 1/2″ long – but you can make them as big or small as you like. I don’t tend to weigh the wool as I just ‘go with the flow’ but I would suggest that if you have to make a batch that are all the same size, you would need to be more precise with the quantities you use. I like to firm up the underneath/bottom of the body, so that he will stand up on his own. We can’t have Santa looking like he’s had one to many Sherries can we!!

Once I have the body made, I start on the hat. I like to be quite ‘freehand’ with the hats as well as the coats! Again I haven’t weighed anything, I just like to guess my way through the process. I find that because I have such a busy life, it’s nice sometimes not to worry about being precise about things (as you can see!) The great thing I have found about needle felting, is that it is easy to add extra wool when you haven’t put enough or when you find a thin spot!


I like to use a multi tool, as it felts quite quickly.
Then I start to wrap the wool around Santa’s head..

As you can see, there is a little white poking through, but this didn’t matter as I was able to fold the wool down over that part of his head, to make the tip of the hat. I continued needle felting it into a rough shape that resembles a lop-sided bobble hat.

Once I’m happy with the shape of the hat, I felt it so the tip drapes down the side of the hat. That way, I can attach a nice bobble on the bottom, using a small ball of the core wool again. (I forgot to take a photo of me doing this bit!)


The next step is to give him a nose. I use the same process as for the bobble, using skin coloured wool batt, and folding it tightly upon itself, to form a tubular ball. I needle felt it until it holds its shape, before attaching it to Santa.

To attach it, I like to poke through where the nostrils would be – that way, you can get it securely attached and create nostrils at the same time!

The last step is to make his cloak. Like the hat, I was very laid back about the whole process, so didn’t weigh the wool and guesstimated the amount I’d need (not helpful I know but sometimes it’s so nice just to play with the wool and let it find its course!)

 Apologies for the blurry image!
As you can see, I felt away until I have a rough size that will wrap around Santa’s body.

The next step is to firm up the bottom of the cloak, wrap it around Santa and start giving his cloak a fur trim (enter the core wool again, which is great for this!)….
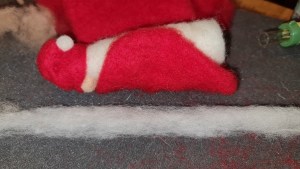

As you can see, I start the fur trim before I wrap the cloak fully around him – it’s easier to tuck in the loose ends of wool that way.

 I work the trim all the way around the cloak, and finally add trim around his hat. It’s important not to ‘over-felt’ the trim, because you want it to look like fur rather than felt.
The final step is to attach his beard. For this I’ve used some lovely off-white locks. They look great as a beard. I attached them by needle-felting them in underneath his snout! That way, they can be firmly attached but still free-flowing.


We hope you like our Santa…


Merry Christmas to you all, may you be blessed with a a wonderful, happy and healthy 2022.
Best wishes, from Lisa, Alex and our Christmas friends xxx

P.S. The gnomes are just as easy to make, using the same method as for Santa!


 1) Wing armature tracings
 2) layout of fibre over the template
 3) transferred to the felting mat.
 4) using the fake clover tool to make the thin felt webbing.
 5) The underside of the wing. Attaching whips over the ribs and working on the leading edge of the wing.
 6) First wing is done and now on to the second wing.
 7) Second wing, “Dragon, Lie down and relax, try not to move!”
 8) Second wing detail
 9) Dragon showed off his New wings
 10) Snoozing comfortably in his project box ready for his trip home.
 11) Yawn and stretch of the wings, maybe a bigger project box would be better, but at least he has a bag of silk as a pillow.


Thank you for the continuous inspiration and sharing so many skills! I’d love to take the Free Motion Machine Stitching on Felt course.
#2 – Linda Prine wins a sari silk pack.
If I win, I choose the sari silk. Thanks, Linda Prine
#3 – Cate Lake Thompson wins an online class of her choice.
Congrats are due for this 10 year anniversary! Wonderful posts!
I would love to learn free motion stichery on felt.
Cate
#4 – Debbie Loveland wins a sari silk pack.
Happy 10th, FFS! I have been enjoying your posts for the last few years. Thank all of you who share your talent. I wish FFS continued success! I would love to win one of the classes. Print, Stencil and Play with Thickened Dye on Felt looks particularly interesting.
#5 – Shoshana Avramovitz wins a sari silk pack.
Congrats on ten years Ruth!!!
Your posts are always such I highlight for me I so appreciate you 💕
I would love the Sari silk as I have been inspired by your work, to try new things:)
Hope to be here with you for the next ten years
Hugs Shoshana 🤗
Congratulations to all of the winners. We will contact you directly by email to get your information and send your prize.