Weaving and all its assorted challenges were starting to get me frustrated, coupled with the instability we all have faced made me step away from any challenges. So I went back to my spinning wheel and a delicious bag of dyed locks from my favourite indie dyer. The breed remains a mystery, but the length of the locks, softness, crimp is fantastic.
I seldom do lock spinning with anything this long. I know other spinners do amazing work with long wool, but I’ve never mastered the skill, so I flick card the fibers on my hand cards and use the opened locks to spin a worsted/semi-worsted yarn.
The locks were anywhere from 6 in. to 9 in (16 cm to 23 cm) and spun a single that was more than forty wpi, so it was extremely fine. Just as an example of what 40 wraps per inch looks like …
When I get a single this fine I do not use a centre pull ball for plying. The tendency for tangles to form in the core of the ball and pull out in a nasty mess are constant and dealing with that just ruins the spinning experience. I much prefer plying from two bobbins, which is what I did to get my puzzling results.
Balanced yarn, as defined by just about every book and online tutorial hangs in a nice loop. This is done after taking the wool off the ply bobbin and soaking it in warm water to set the twist. The yarn is hung to dry, naturally without weights; it might be twirled to remove excess water but it’s left to dry on its own. If the final product twists counter clockwise it is under spun, and can benefit from some added twist.
Technically, this rather dark image is of a balanced yarn. It hangs in a perfect loop, just like all the books/instructors say. Initially, I was really pleased with the results, for the first time in ages, I’d hit it bang on with the ply. But on closer inspection, not so much. The yarn was really not usable for knitting and probably not usable for weaving either.
There are far too many gaps in the ply, needles would get stuck and for all that it’s lovely and fluffy, it still had loads of areas that were not evened out of their excess twist.
The only choice was to run it through the wheel again to try to fix the problem. I gave it more twist, hot water soaked it and hung it to dry as before. The results are really great and I’m pleased as can be. Except… these results gave an over twisted yarn.
The over twist is really minimal but just the same it’s there. I don’t know if it will have a negative impact for knitters or not. I think as a weaver it will be just fine. The colours as shown here are very misleading. They are in fact deep heather tones, so I’ll be using black and brown to weave them into something dressy for my son’s. They both expressed a strong dislike for the original colours but love the final yarn.
This is a very brief posting to allow all of you to get back to enjoying your New Years celebrations. Happy New Year to everyone. I hope it brings great things to you all.
Like many people have been doing since the pandemic started, I have appreciated the availability of online courses to help keep my creative juices flowing. I now own enough online courses to review at my leisure for longer than I will be on this planet! Do I have a problem? LOL, it’s like having enough fabric or paint or whatever medium you work with. We can never have enough or exactly what we are looking for.
My latest online course called Squiggle, Line and Dot was with Susan Purney Mark. She’s a West Coast Canadian living on Pender Island, BC. She has a nice blog (https://susanpm.blogspot.com/) and website (https://www.susanpm.com/). I’ve been interested in learning techniques to make collage fodder (I had to google the word fodder to make sure it was applicable in this context and did find this definition amongst the “feed for livestock” definitions…Raw material, as for artistic creation.)
Susan’s class uses mostly black paint on white fabric so far.
This was my most favorite exercise. Taping a paint brush to a long stick and painting. I was listening to music and got some creative tingles doing this.
This was using a wider brush. I am attracted to the marks where there is not much paint on the brush.
I got a little bored with the black and white although I see potential in the pieces I have made so far. I appreciate how Susan incorporates this fodder into her quilts and want to try it myself. I’ll be getting back to her online class soon.
But I decided to go back to a color class from Jane Dunnewold that I had begun earlier in 2021. Time to work on complimentary color scales. https://www.janedunnewold.com/
Oooohhhh that was fun and so magical. I had done some of these studies while taking my design course from Gail Harker, but it was fun to do them again. https://gailcreativestudies.com/
Jane has her own set of ProChem paints that are “pure” colors so she likes you to mix your own secondary and tertiary colors and she has color cards so you can match your mixtures to them. It’s challenging to know how much paint to put out and I threw away the leftovers from my first two color runs and felt kind of guilty about doing that. That’s when I decided to use the leftovers on fabric and use those pieces for future collage work using some of the mark making techniques learned in Susan Purney Mark’s class as well as other teachers I’ve taken classes from.
These are the tools I used to make my marks. I really like the marks made with the green squeegee type device.
Most of the color combinations are vastly different from what I normally work with in my art quilts. But they are going to be fun to use as collage fodder. Most importantly I had FUN playing with paints. Life is good!
Now to get down to quilt making versus painting and use some of this stuff up!
Best wishes to all for a wonderful, creative 2022!!
It is almost the end of the year, which is good since this one has not been one of the best years I have seen. I must also admit it has had a few good moments. We had tried to keep in touch with family and friends, through calls, zoom meetings and sometimes when we are very lucky in person. There was even a bit of in-person fibre shopping towards the end! (ooh Fiber!!) This year I have been investigating wire and still have the ongoing investigation with samples of hairspray. I added a tiny dragon to the family and have one more nearing completion.
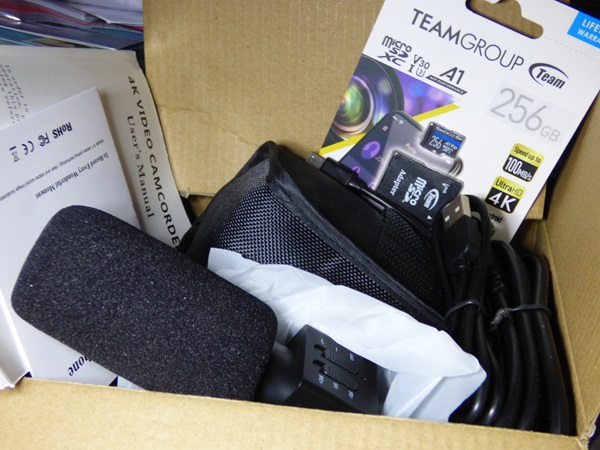
Speaking of Dragon, he was very excited about one of my Xmass gifts this year. It will take another day or two to get it figured out. I think I understand how my friends feel when I type too late at night! What I mean is that the instruction manual while written using English words, and most are incomplete sentences, is still incompressible. However, it is truly amazing how you can have a paragraph of words that are about the battery yet still do not tell you exactly how to add the battery!
It does have the specks I was wanting: 4K Video/Camcorder, 48mp, 60fps(frames per second in the very fine print it only seems to be available at 1080 setting.) it is also light enough to fit on my existing articulating supports.
1-2 Xmas present
Since there was also a gaping lack of instructions as to how to put the macro and wide-angle lenses on as well as the lens hood (not the lens cover that doesn’t actually seem to attach if you have the other lenses on.) it took me a while to figure out how it fits together. I have figured out the remote (YEAH! A remote) can turn the camera off but not on…..I did figure out how to plug in the mike.
I am not sure if the German, French or Spanish sections might be more helpful. So it will take me another day before I am ready to try it out. I am hoping to be able to use it for felting. This is considered a very entry-level camera so I want to try it out and see if it’s got enough function to do what we need. Maybe Ann and I can try it out for some of her study group work.
Dragon volunteered to help me show you it set up at the computer desk. Here is his photoshoot.
3-5 I think Dragon is a bit of a Ham!
I am hoping Dragon will have better luck with the remote than I have had so far. If this works I hope to be able to show you the results at some point!
I also wanted to show you a few Christmas shots of Christmas past to hopefully inspire you with better memories than the last 2 years.
6 -10 Shots from Oakville in 2016 (There was snow!)
Have a wonderful New Year!! I am sure we are all looking forward to exploring an exciting new year (one with a limited imagination on number selection – 2022)
Welcome to Christmas Morning, for those who celebrate, I hope Santa was good to you and maybe brought you some fibery goodness. For those that don’t celebrate, I hope you are enjoying a nice day off and have time to felt.
I was stuck about what to blog about today. I haven’t made any presents or really anything much. I haven’t been feeling very Christmasy until the last few days when we got some snow. But then we had this surprise last Saturday.
Yes, they should not be born now but some of our sheep are able to breed all year and this Ewe and the Ram seem to have plans that were different than ours. Best laid plans and all that.
That was a good start and I bet the cuteness has hooked you to keep reading.
Chatting the other day about sketchbooks, some people said they don’t have one because they can’t draw. I can’t draw but I keep them anyway. I try to write things beside the pictures so I know what I was thinking later. I don’t always do it and later wonder what on earth I was trying to draw. Sometimes it sparks new ideas.
I thought I would share a few pages to encourage people. Sketchbooks are just for yourself, for ideas or inspiration not an art project in themselves. I have seen some that are published, they are beautiful. Mine are not like that. I am sure you will recognize some of these ideas.
I use them to doodle shapes
This slideshow requires JavaScript.
Do sketches. Can you tell I like sheep pictures?
This slideshow requires JavaScript.
And work out how to do things.
This slideshow requires JavaScript.
I like smallish flip pads. These are 6 inches by 9 inches. or 152mm by 229mm. I have some that are a bit smaller A5 size. I think that’s a standard everywhere but in North America. We always have to be different. 🙂 I like them because they fit easily in my basket or a bag. They are also cheap pads. $1.50 at the Dollar Store.
I will be doing some sketches for some Christmasy things for next year. I just need to remember to look at them in October so there is time to work on them.
They may not be pretty but I find them useful. I hope I have inspired you to give it a try. It doesn’t matter if you can draw, once you stop worrying about it, its fun.
Thanks for reading and commenting and joining us all year. You have all kept me going as we all work our way through these difficult times. All’s wool that end’s wool.
I keep telling myself that I won’t “make” any Christmas gifts this year. It always takes more time than I expect but somehow, here I am again, making gifts. This post has very little fiber in it but there is some, I promise. As a maker, I know that I often venture into trying new things including new media outside of fiber art. I find that trying out a new media gives a new perspective to what I usually create.
My friend Deb is moving to Wisconsin and has been clearing out “stuff” in preparation for a spring move. She had boxes and boxes of driftwood that she had collected over the years and was going to take to the dump. Of course, I couldn’t let that happen so all the boxes of driftwood came home with me. And there I was looking at a source of free material with which to create gifts!
The first thought was to make trees out of the driftwood. All I needed to do was layout the right size pieces, drill holes in the center and thread a piece of heavy duty string through the holes. This is the layout for the first tree I created. You can see a couple of the boxes of the driftwood but that hardly gives you an idea of how much wood I had.
Here’s how the first tree turned out. I liked the look of it and so I decided to make more.
Here’s a few more that I got photos of. I ended up making nine trees total, five of which were mini trees. I still had tons more wood left.
My sister had requested a yard art armadillo, so that was next on my list. I looked through all the pieces and found what looked like parts of an armadillo. It’s amazing what the wood pieces start to look like in your mind’s eye once you start thinking of a variety of animals. So the photos above show the base that I glued and screwed together. I could have left him like that but I decided he needed some birch bark skin. I took a quick walk and found pieces of birch bark in the woods.
The birch bark was quite scrunched up and dirty. So I soaked it in water and then tied it around buckets to get it to be more circular. Sorry for the poor photo but hopefully, you get the idea.
I added the birch bark with a combination of glue and staples. It was pretty tricky and some cursing might have occurred.
Edgar was not sure about the new creature in my studio. Who is this? The only issue with this gift is that my sister lives thousands of miles from me and I didn’t want to try and ship this guy. I was sure that he would be “killed” by the shipping companies. Luckily, my sister is patient and we will take the armadillo to her on our next cross country trip.
And finally some fiber. I found this piece of driftwood that looked like a hat shape. I added a nose with glue and painted the wood. Then I glued down locks for the beard and pieces of felt for the brim and pompom on the hat. And there you have it, a Christmas gnome.
I made a total of three Christmas gnomes. I love how they each have their own personality. Do you make Christmas gifts? If so, we’d love to see what you have created. You can share with us over on the free forum.
I want to thank you all for being loyal readers and wish each of you a wonderful holiday season and a happy, creative new year in 2022.
Now it is a long time since any of my offspring expressed an interest in soft toys. That said, I still enjoy making them every now and then.
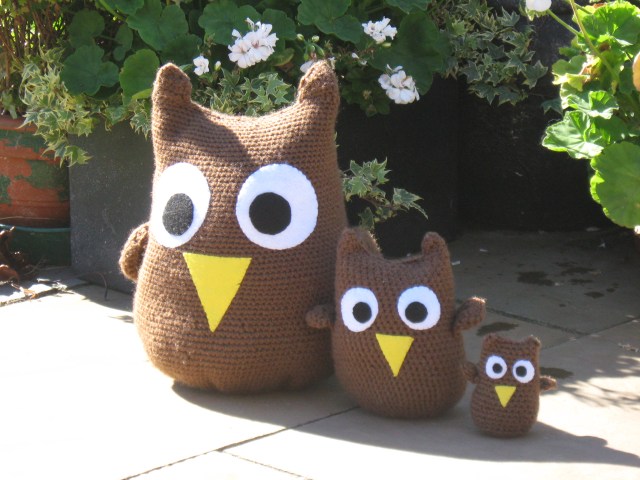
Back in 2013, I was very fortunate to be awarded a trip to Finland. It was under the European Union’s Lifelong Learning Programme. The project brought together European citizens from throughout the Union and the aim of the project centred around new skills’ acquisition and learning/appreciating other countries’ cultures. Subjects covered included spinning, weaving, sewing and crochet and the focus was on reuse and recycling. It was a fantastic week. I got hooked on crochet and when I returned home I enjoyed myself crocheting with and without patterns.
I started crocheting owls, they were great fun to make, I made tiny ones and huge ones – One ended up being used as a cushion by its young recipient. Here are some of the owl family:
These led to a collaboration with a Maths teacher and these three ended up at an international maths conference:
Then came my interpretations of the famous Minions. These ended up being gifted to various households:
When my friend became a grandmother, baby added this bunny to her soft toy collection (made with pattern):
This little guy had to stay here with me as I used teddy eyes (choking hazard). He stands in a corner overseeing my work:
Most recently, I made this little hare for another friend’s little girl (again made with a pattern). He hasn’t left the house yet and our off-spring (age range 25 to 31) reposition him regularly – I am liable to find him in various parts of the house – it is possibly best if I hand him over before he gets lost.
Here’s a few of the toys I have sewed in recent years. The patterns came from a website Bustle and Sew (https://bustleandsew.com/free-patterns/) and are worth checking out.
I made a number of the elephants. Here are a couple of them. The brown material was sourced from the inherited stash – the floral (orange/green base) material came from the days when Debenhams used to sell dress fabric (the name was printed on the selvedge:
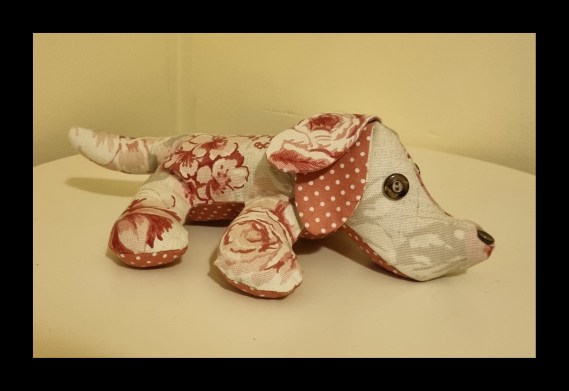
I also made a few of the little dogs. The pattern came from the same website:
I made this little teddy (again, the pattern was free from https://www.lovecrafts.com/en-gb/c/article/teddy-bear-sewing-pattern . I found the fabric while rummaging through my husband’s aunt’s stash which she had bequeathed me. It was an unfinished dress and the fabric is cord. Again this little toy was to keep due to its sentimental origins (and its teddy bear eyes):
A more cuddly version made from fleece suitable for an older child (again the eyes and nose were the issue):
Another friend recently asked me to make her little one a Christmas stocking. Both she and her hubby are visually impaired (she has around 5% sight and he was born without sight). So I thought it would be good to add a very definite colour to the stocking so that she could see it more easily. The stocking was pretty straightforward and measures 16.5 inches (42cm) by 12.5 inches (32cm). I appliquéd the little one’s name unto the front of the stocking. It really was a fun make.
So this is my last post for 2021. I hope some content within my posts got your creative juices flowing in perhaps a different direction. I hope you all get a chance for some R & R over the festive season and I wish each and every one of you good health and much happiness in 2022.
As you may have noticed Ann, Bernadette and I, all belong to the same local guild. The guild has both a studio and a classroom located in Heartwood house, which is the umbrella organization that is Home to 22 Non-Profit & Charitable Organizations. The building we are now in was formally a Giant Tiger store with an attached strip mall and apartments above the mall. Heartwood house purchased the building in 2012 and renovated space for each of the various groups. We all moved in at the end of the summer of 2013. (It was a huge move for the library but that is another story.)
With covid, part of the time the building was closed and no groups could use their spaces. As lock-downs eased, a few people (masked) were allowed into the various spaces (the number depended on the size of the room). We are one of the groups that have been hit hard by the restrictions. Ann and I with help from other members have been keeping the library books circulating (knock on the window and pick up your books by the side door) each month but the weavers have only started to work on the studio looms in the last couple of weeks. We have moved our Monday night socials to Zoom which is fabulous for the easy Commute but not quite as much fun as chatting in person.
Heartwood House has noticed that, with fewer people in the building, the groups are not interacting with each other as much as they would normally. They came up with a plan for festive door decorating and asked the groups to participate. They would bring Coffee and muffins or pizza for lunch to those that did add festiveness to their door.
At our December meeting, the Heartwood house liaison asked if anyone would be willing to decorate our door. I was going to be going in to work on the library anyways so figured it would be reasonable if I volunteered so no one needed to make a special trip in.
The instructions were to decorate the door, something festive. I wanted to represent the main interests within the guild so Weavers, Spinners and Felters (we have basket makers too but I did not have anything in the way of basket-making supplies to represent them. Sorry!!!)
I have never worked in a regular office environment or lived in a cubical world for work so I have never tried to decorate a door before (or a cubical). I had seen two other doors under construction, one was a fireplace with a Santa the other was an upside-down reindeer. Both used construction paper, card stock, stickers, and there was even a garland. The office for Heartwood house had a couple stocking up and looked like something else would be added later.
Scoping out the Neighbours, their doors in progress;
This slideshow requires JavaScript.
I thought about it for a while and decided on sheep, with a star/comet. Maybe some snow? And some pine trees? As a composition, a door is a tall skinny vertical space. I like long horizontal compositions. Oh well, fewer trees and make it a taller tree. Let’s start on the star! Ann will recognize the cookie-cutter snowflake I used for the star shape.
a quick cookie-cutter shooting star!
This slideshow requires JavaScript.
(Oh no! The book I was listening to ended so on to the next audiobook)
I used some of the World of Wool, core wool that I had hand-carded and really cheap felt from the dollar store. (This is not the even cheaper felt that may be made of coloured dryer-lint held together with cheap glue.) Other than being extremely thin, it wasn’t too bad to work with. I embedded it into the wool I was adding into the cookie-cutter from one side then the other. I used both the single 36T as well as the 3-needle handle that seems to hold T40’s in it. I focused on trying to get the edges firm but should have spent more time establishing the crispness of the edge shape. My poor little star is looking more like a flower.
OK, now let’s look at the sheep. I kept to the same fibre, made a body, with handspun yarn legs, and felted feet. Hum….. needs a head. I sculpted a head with ears and felting from the back and sides of the neck attached it to the body. I like the head so much I made 2 more of them!
This slideshow requires JavaScript.
Ok, we have the Felters represented!
At this point the plot of my book got distracting and there may have been a break for YouTube, so I missed the photos of spinning woollen (I usually am a worsted or semi-worsted spinner) while hoping I could make Fluffy Yarn.
For the spinners, I made lengths of mostly lofty 2 ply which I sewed onto a cardboard shape for the sheep body. It was the inside of a Ritz cracker box and worked very well. Sewing the head on was a bit more challenging but I used a curved mattress needle into the center of the poor sheep’s neck and tied it on through the back of the cardboard. I think she turned out to be quite a nice sheep!
For the weavers, I considered a cast-off fragment of weaving I had salvaged from the studio fibre-garbage-bucket. However, it was blue linen and not white like the other sheep. I did not want the weaving sheep to feel ostracized from the flock. So back to the cardboard Ritz box and cut out another sheepish body shape. I had scored some loom waste (thrums) at some point over the last year or so. The warp is a similar colour to the wool I have been working with. I wrapped and taped down on the back yarn over the sheepie shape on the diagonal. If I had done a square or rectangular sheep body it would have been much easier! But it would not look very sheepish. I used a long blunt needle and wove through the warp I had just taped down. After the weaving was done I stabilized the edges and sewed on the head.
I used some of the 2 ply I had spun to make the legs and attached them at the back of each sheep. Now I was all set to head in and decorate the door, well except for a quick stop at Dollerama on the way in for a few more decorating options. (Please don’t be out of Cardstock!!)
This slideshow requires JavaScript.
Yeah!!! There was cardstock, wrapping paper, glue, foam double-sided tape, wooden snowflakes! I also brought more wool, a foam pad, yarn, as well as thread and needles in case I needed them.
Our door
Now the door. With the depression for the window, I wanted to have the cardstock as a base layer. I held up the first blue piece and liked the effect the edge of the door gave. It looked a bit like a matt.
This slideshow requires JavaScript.
I had to do a bit of trimming so the door handle would fit!
Lise, one of the guild weavers, was in weaving and held up one of the wrapping papers I had selected for the sky. We both liked the effect with the blue background.
14 transparent wrapping paper over cardstock
Ok, I know what we are doing for the sky, now let’s look at the snow for the bottom half of the door. This would have gone a bit more smoothly with just one more hand but Lise had already finished up her weaving by then and had headed out. Oh well, I managed to get 3 hills in my snow.
15 snowflakes in the sky and snow on the ground
I opened the solid green paper and found Christmas trees on the inside….. well I guess I could just use that side and make a forest but the trees are a bit small.
16 Surprise! it’s not solid green on both sides
You can imagine my surprise when not only did my solid green have trees but the solid brown has a grid on the inside!
17 Oh my the brown paper isn’t brown on both sides either!
My idea was to make a pine tree-ish shape on the side and have the sheep beneath that. The brown was to be the bark and trunk of the tree. So I squished and folded it length-wise to give it a bit of 3D.
18 a bit of 3D in the trunk
19 background and tree started
It’s still looking a bit pathetic, better add more green bits. I did debate with myself if I should put the trees on the outside rather than the solid green.
This slideshow requires JavaScript.
23 I need a few more embellishments!!! It must be more festive!!
Perfect!! Can you guess what I am making this time? I have the wooden snowflake, some fine wool yarn, a bit of wool and a T36 needle!
24 Ah! much more festive!!
Can you see where I put those festive items? No? Maybe a bit more close-up will help!
25 sheep in their festive attire!
Yes!! I made Festive sheep Bonnets or maybe they are hats? I will have to ask Ann what kind of festive sheep attire she has for her sheep. If she doesn’t have festive hats maybe we can start a new sheep fashion trend!!!
26 Festive Felt Sheep
27 Festive Spinning Sheep
28 Festive Weaving Sheep
Now I need a bit more bling, let’s add more of the wooden snowflakes
This slideshow requires JavaScript.
While I have been setting this up, one of the Guys that works in the Heartwood house Office stopped by to check out how it was coming. He really liked the sheep but said I should put pillows at the bottom of the door in case anyone fell asleep while they counted our sheep! (These must be super strong sheep if they can put you to sleep with only a count of 3!!)
32 all done ready for tomorrow!
All done now off to home and back tomorrow to work on the library.
When I got in the next morning the snow had melted!! The sheep were in a pile at the base of the door! Now I see why we needed a pillow!! (for the sheep!) It must be the unseasonably warm weather that has made the snow unstable and melt. Change of plan, fix the door then work on the library!
33 the snow melted and I had to put it back on!!!
I think I got the middle snow hill upside down but it still looks good (I was rushing!! )
Our Neighbour’s doors
Here are some of the other groups’ doors
This slideshow requires JavaScript.
I did get a small pizza for lunch (which was delicious) and got some work on the library done. There were a lot of people from the other groups throughout the day checking out each other’s doors. It was a fun event and I think they may do it again next year.
I still have more library work to do before the end of the month and hopefully some felting too! I hope all of you are having fun felting and are enjoying the festive season.
I had intended that the next Theatre Textiles post would be about the costumes which I had made for us once we had transferred to our new venue. However in the meantime I had started work on part of a costume for our next Pantomime – The Little Mermaid. No, not the Disney version, but even so the Director has decided that the Sea Witch will be part human/part octopus (to be named Iphelia – pronounced I-feel-ya, which gives an idea of how our pantos appeal to adults as well as children!) and I have been asked to dress her. Other than make the designs and collect fabrics and accessories matching the palette of purple and “sludge” green, there isn’t much I can do until the part is cast.
The piece of the costume that I have started on is the necklace which Iphelia will wear when she takes full human form for part of the panto. So I decided that I should keep detailed notes and photos of what I’m doing so that I could tell you about it. I have designed her “human” costume so that it will have as many references to octopuses (octopi?) as possible. I was inspired by a necklace which I saw on the BBC News website (can’t remember what it was about though) and I did a quick screen clip which I added to my “costume ideas” folder. The necklace is, I think, of a snake about to devour a cabochon stone. I had also spotted, some time ago, part of a piece which appeared to be a tentacle holding a sphere. Nothing like an octopus but the stone made me think of an octopus “head”.
I thought that the tentacles could issue from behind a large stone and form the links to the rest of the necklace. Since the necklace will be worn with a top which is asymmetrical and therefore has an off centre neckline, I wanted a necklace which was also asymmetrical. This would mean that it would have to be very light so that it wouldn’t keep slipping round while it’s being worn. I knew that I could make felt look like something other than wool – I had made the horns for my highland cow from just felt, plus lots of PVA glue and a bit of graphite from a soft pencil, so I didn’t see why I couldn’t make the necklace in a similar way.
cow horns
I want the necklace to look like proper jewellery from a distance, that is a large cabochon for the head with bead eyes, with the tentacles smooth and shiny. Let’s see if I can do it.
Equipment, materials and design ideas
I decided that the best way to make the tentacles bendable would be to use a wire armature and since I still have a quantity of craft pipe cleaners I went for them. I would use my core wools – scoured merino – and some coloured tops for the surface layer.
Starting the tentacles
I carded some scoured merino and wrapped 8 half lengths of pipe cleaner, leaving an end uncovered on each. Then I made an octopus head shaped “stone” from the core wool and covered it in deep purple merino tops.
First body
I wet felted the tentacles, smoothing them out as much as possible. While the tentacles were still wet I curled up 3 of them and fixed them with light wire to help them “remember” the curves when they had dried – at which point I lost the curled up ones. (I blame The Borrowers.) As a result I had to make three more tentacles and, since they were to be curled anyway and I needed them quickly, I just made wet felted cords which were curled up.
New Curls
By the time these were dried the Borrowers had obviously decided that they didn’t want the original curled tentacles as they had reappeared. I tried various positions of body and tentacles to see how the necklace might look.
mock up of layout
That was when I decided that the octopus body should not be purple but green, looking a bit like jade, and that the tentacles needed to be purple rather than the muddy green I had pulled out to use. So I stripped off the purple tops from the body and replaced it with more carded scoured merino. Then I wet felted it and gave it a good coating of PVA glue, and I also PVA’d the tentacles.
Colour change
When they had dried I got out the metal nail file and the emery board. A good filing with these smoothed out all the ridges and bumps caused by the hairy surface under the glue. I gave them a couple of coats of Chinese Evergreen acrylic paint on the body, and of Mulberry Cream on the tentacles. These were “match pot” paints which I had acquired from a local DIY store. I find that decorating acrylic paint samples are very useful, since they have very good coverage and a fantastic range of colours. When I have a project like this, I visit and select from as many of the local(ish) stores as I can as they usually all carry a different range and therefore different colour choices.
When the paint had dried I decided that I would give the tentacles a coat of metallic purple paint (which I had acquired some time ago from a branch of The Range’s artists supplies). If it turned out the way I hoped it should look a bit like enamelling. I liked the result and, with the addition of a coat or two of clear nail varnish, it could be said to resemble enamel.
More Paint and Nail Varnish
I thought that the “jade” body stone might look good with a little purple “marbling” so added a few fine lines of a lilac coloured acrylic match paint, rubbed it a bit with my thumb and then varnished that too. Then I filed, painted and varnished the curled tentacles. Since I needed to have only two tentacles reaching up to each side of Iphelia’s neck, the rest would need to be curled around elsewhere. I thought that they could be grasping smaller pieces of “jade”, so I painted some wooden beads green and varnished those too. Having shaped the tentacles as I thought might be best, I gave everything another varnish.
When the varnish had dried I fitted the, now green, beads in the curled tentacles and stitched them in where necessary. One of them actually fitted over the tip of the tentacle and didn’t need stitching. I gave those tentacles a further final varnish to fix the beads firmly. It then occurred to me that to make the tentacles look more like jewellery I could make use of some of the jewellery findings which I had accumulated. I found some cord tips and, having added them to the ends of the tentacles without beads, painted them with an iridescent nail varnish since their “silver” colour had deteriorated to dull grey.
Varnished parts and Tentacles before brightening the cord tips
As I was about to assemble the octopus I realised that it hadn’t got any eyes and, although it is possible to sew through the painted and varnished surface, I decided that I didn’t want to risk poking a needle through in the wrong place. I needed to glue something down, but I’ve learned not to trust glue on stage. It always lets go just at the wrong time. Belt and braces are best!. I remembered then that I had acquired some glitter glue some time ago and having turned it out (eventually)I decided to just use blobs of it as the eyes. If they came off I doubted it would be noticed. I also decided that a “setting” was needed for the “cabochon” so I added a little braid which was painted and varnished.
Next I had to find a piece of the right green ribbon which I would permanently attach to one side of the necklace, and with a hook on the other end which could latch round the opposite side. Since the necklace would need to be removed quickly during the quick change which the actor would have, I would need to find a fastening that wasn’t fiddly. I had some furrier’s hooks and eyes, which are large and wrapped with yarn. I used a hook which I painted with the Chinese Evergreen acrylic and stitched that to the other end of the ribbon. And we were done.
Here is the finished piece. Hopefully in due course you will see it worn by the actor in costume.
Hello. My name is Capi Puszcz (pronounced Push,) and I am a new contributor to FFS. I am an indie yarn dyer, fiber artist, and shop owner in Macomb, Michigan. My father was a lifelong fiber artist, and I started my fiber adventure very early in life. We had a weaving studio in the late 1960’s, and a needlepoint shop soon thereafter. I worked at the needlepoint shop every day after school, and all day, every Saturday. To this day, I am amazed at the number of fiber crafts I am fluent in. Now, onto the topic at hand: color.
It was the late 60’s in Detroit; the Vietnam War was in full swing, and the Hippie Movement was alive on Plum Street. On Sunday’s we would often, take a ride, to see the local street artists. My parents weren’t “into the drug scene,” but my Dad was intrigued by the art inspired by those drugs. I was too young to understand, what was really going on, in those houses on Plum Street. But I sure loved, the bright Psychedelic colors, that surrounded me.
Fast forward to this very day: I still love bright colors. 💞 Anyone who sees my hand dyed yarns, comment on the beauty of the colors. My color choices are bright, but not brash; clear, but not muddy. They are colors that make us feel alive, and add joy to my life. I have tried to understand the color wheel, and have spent way to much time, and money on tying to learn it…my brain is simply not wired that way. (ADHD is all over our family’s DNA)
Most of these yarns are dyed by me. The others are dyed by Logan of LeonAlexander yarns.
I apologize in advance, to any trained artists in the community, for the audacity of my next statement. I don’t feel you have to be trained, to make nice color combinations. I think you can take a couple colors that speak to you, (or are in your bin of leftover yarns)and take to the Internet. I get my best yarn dyeing ideas on Pinterest by searching color [colour] combinations color [colour] palettes. Then scroll through the pretty colors. You can search further by adding other words; like pastels, brights, purples, or by color name like “aubergine.”
But my favorite method of choosing colors is called Stash Busting. My current, ongoing project, is crocheting hexagons. I call them my “Happy Hexi’s” as I get such a kick out of combining my color combinations. The pattern I am using is a free pattern on Ravelry: rubyhexagonblanket by Nova Seals. I’m using DK weight yarn on a US-H (4.5mm). When Ruth asked me to write on a topic, I decided to analyze the process I go through to choose colors.
This is the stash I chose from…and yes I have way more yarns than this!
With my hexagons I have found, alternating solids and multicolor yarns, to work quite well. 90% of the time I start with a multicolor yarn like this:
I chose this one.
My next color is a solid color present in the multicolored yarn. In this case the blue. (Yes, sometimes it’s the smallest bit possible to choose from.) Then from here I take it one step at a time, choosing a 2nd multicolor, that has elements of the first 2 colors. Then I choose another solid, followed by a multicolor, and finally a solid that works with it. Most of the time, my method leads to success.
Progression of yarn choices: showing how each one relates to the others.
I’m not going to lie, once in a while a hexagon leaves me scratching my head. But it’s easy to take care of … I just rip back and try again! Here’s how this one turned out:
A Happy Hexi for sure!
I hope this inspires you to try out this lovely pattern, and pick some colors that make you happy!


 1-2 Xmas present

 3-5 I think Dragon is a bit of a Ham!


 6 -10 Shots from Oakville in 2016 (There was snow!)