Browsed by
Tag: textured felt

Final Bark Color Mixing Experiment

Final Bark Color Mixing Experiment

I tried one last experiment with creating bark and color mixing. I showed you last week my attempt with color mixing with a drum carder. And there was another experiments here.  I had part of the mixed batt left over from last week so I decided to combine all of my techniques and see what happened.

First I split my batt in two layers. You can see the felted piece from last week on the right. I then added two layers of green wool over the surface of the bottom batt.

Then I cut up the felt piece from last week and placed it over the green wool. I wanted more green migrating through between the felt pieces.

Then I added the other layer of batt over top of the felt pieces. With everything layered up, I was ready to wet down.

I wet it down and then did a lot of rubbing. I worked carefully between the thick felt pieces in the center of the sandwich so that they would stay in place and there would be a nice indentation between. I also fulled the felt very hard to get lots of green migrating through the top surface.

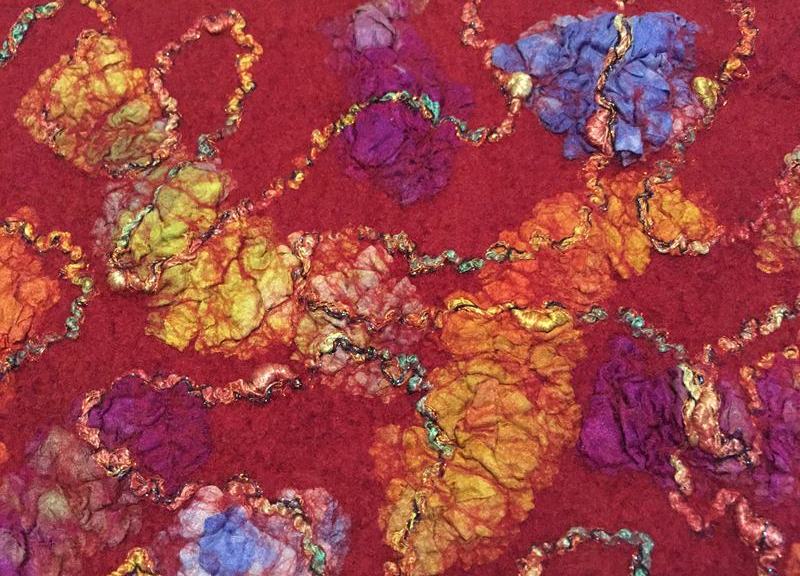
And here is the finished piece of bark. (Edgar is helping me take photos.) Finally, this is the look that I wanted when I started this experimentation. It has a wonderful texture and the color mixing is what I envisioned. So a combination of carded batt and layered colors with thick felt in between did the trick. Yay! I will have to decide if I am going to add any stitching or other embellishments to this piece or just leave it as is. What do you think?

Textured Vessel

Textured Vessel

I’ve mentioned recently that I don’t have the space to do any felting at home at the moment. Well, my last post about Textured Felt reminded me that I don’t need the time/space to do the wet felting part as long as I can do the layout and find the time for stitching. So, a couple of days ago I started to ‘build’ a textured felt vessel. I used all natural wools, animal fibres and embellishments. For the texture scraps between layers, I used some unravelled wool knitting. I don’t know if it’s 100% wool. I found the time to do the layout, stitching and unpicking, but that’s as far as I’ve got so far. I did two ‘regular’ thickness layers on each side and two ‘half layers’, basically 3 layers but split one into 2 for even shrinkage. I didn’t put texture between the two ‘half’ layers. This is the top with a hole cut and the resist taken out:

This is what it looks like when I separate the layers to make it more 3D:

This is how the bottom looks ‘flat’:

And separated/3D:

There is quite a thick ‘edge’, I thought putting the resist on top would show how much, but I’m not sure it’s that obvious:

I used a fine ‘layer’ of raw/unwashed uncombed Huacaya Alpaca beneath the top layer of locks and embellishment fibres. You can see how fluffy it is:

I put lots of locks around the edges:

Here are some Bluefaced Leicester locks:

I still haven’t found time or space to finish off my coiled pot, but since I was taking photos today, I thought I’d get a couple that show the texture. This is the bottom:

And the side:

Hopefully, by my next post, both of these will be finished.

Textured Felt

Textured Felt

I was updating my flickr page and had a look back over some old pieces when I found a photo of some textured felt I made a long time ago:

I think I made this piece in response to a World of Wool post asking for photos of pieces made from just their products. I used loads of different wools and fibres: Natural Merino tops, carded lambswool, English 56s, White Devon tops, washed Wensleydale, Washed BFL, washed Falkland, wool nepps, silk noil, silk hankie, silk carrier rods, natural bamboo tops, washed lambswool, Oatmeal BFL, grey and brown Merino, black jacob, grey Gotland, Grey Masham, Scoured grey/black lambswool. I made it using a felting technique of adding fabric and fibre scraps between layers of wool and sewing up the piece between sheer fabric and felting in a washing machine. One of the first pieces I made was this blue piece:

I used lots of fabrics and fibres on the piece including synthetic organza, silk fabric, silk noil, Bluefaced Leicester and Wensleydale locks, and dyed Icelandic wool and dyed carded lambswool. Here’s an angled close up which really shows the texture:

On this close up you can see the wool migration through some green synthetic organza:

The blue parts on this close up are dyed Icelandic wool, and the white parts are silk noil:

This is one of my favourite textured felt pieces, I had in mind a sunset over the sea:

I made a couple of bags with the technique, this is one of them:

I added a strap:

And this is another bag:

I can’t find any photos of it with a strap. I don’t do much self promotion, but what the heck, I like to eat now and again 😉 I just listed a quick guide on etsy for how to make the textured felt. It’s basically a slightly expanded version of the free tutorial on flickr, but in a handy PDF format. I thought I might make some more pieces using this technique so I’ll let you know how that goes!

I also finally joined Pinterest!

More Textured Nuno

More Textured Nuno

I enjoyed making the Nuno piece with lots of different fabrics and very fine layers of Merino, so I thought I’d make a much larger one. I almost completely forgot, but I took photos while I was making it. They’re really not good, but it shows how much the piece was fulled. This was the size of the piece when it was felted:

OLYMPUS DIGITAL CAMERAThis was how much it shrunk after I fulled it well on the bubblewrap:

OLYMPUS DIGITAL CAMERAAnd this is how much it shrank after fulling on my bead board:

OLYMPUS DIGITAL CAMERAThis is how the finished piece looked when it was dry:

OLYMPUS DIGITAL CAMERAI tried fabric pieces I’d used before, both which I knew felted well, and some which I knew didn’t attach well or stayed loose on the edges (a lot of synthetics tend to roll at the edges when torn). I also used pieces I hadn’t tried before. I’m not completely sure what some of them are after felting! This is a closer look at the left side, on an angle:

OLYMPUS DIGITAL CAMERAAnd the right side:

OLYMPUS DIGITAL CAMERAI think this was a piece from another charity shop dress, it was really softly rippled and pillowy:

OLYMPUS DIGITAL CAMERAThis is a scarf from a charity shop scarf I love using. You’ve seen it lots of times, it was goldeny pink open weave, some parts were doubled and some had starnds of golden fibre loose between the layers:

OLYMPUS DIGITAL CAMERAThis is one of the synthetics which rolls on the edges (I probaly should have put it in the middle). The outside edge is very loose, but the inside edge was firmly attached:

OLYMPUS DIGITAL CAMERALooking along the surface, you can see better how high some of the ruffles are:

OLYMPUS DIGITAL CAMERAThat photo also shows how much migration there was. It’s more apparent depending on the angle you look at it. This shows really clearly just how much there was:

OLYMPUS DIGITAL CAMERALooking slightly higher you can see more texture on the fabric:

OLYMPUS DIGITAL CAMERAOverall, I liked the piece, especially the texture, though I did think using just one colour of wool along with the migration dulled it quite a lot, and looking at it on an angle, it does look like it’s been under a dusty bed for a few years! Taking those things into consideration, I tried a piece using just white/natural coloured fabrics, and natural white Merino. I really loved how this turned out, this is from above on a slight angle:

OLYMPUS DIGITAL CAMERAAnd at a sharper angle:

OLYMPUS DIGITAL CAMERAThe textures are great and look even better in real life 🙂

Old Pieces and New Pieces

Old Pieces and New Pieces

About 7 years ago, I made this piece of nuno felt:

3466795176_8ec2f85e3b_oIt seemed like the perfect piece for making into a money purse, so that’s what I did:

4586142539_44ff9a91e4_oI made a section with a zip for coins and a section behind that for my Supermarket ‘loyalty cards’:

open-purse-newWhen I was writing a blog post not so long ago about liking to use nuno felt for coin purses because they’re hard wearing and don’t pill/bobble much, I thought I should photograph my purse one day to show how it has held up. So, I did! This sits in the bottom of my bag and has done for at least 6 years since I made it, and the only noticeable difference (to me, anyway) is the curve on the flap where it closes, and on the bottom from the weight of coins, so it doesn’t lie flat when opened anymore:

OLYMPUS DIGITAL CAMERAI forgot to take a photo of the front with it closed, but this is a photo of the back, not bad for 6 years old, is it?!

OLYMPUS DIGITAL CAMERAA couple of years ago I stitched together some felt offcuts, then put the piece through the washing machine. I’m sure I blogged about it, but I can’t find it to show the original piece, sorry. Anyway, the last time I had the sewing machine out, I made a pouch from the felt piece. I used a woven wristband cut in half for the closure:

OLYMPUS DIGITAL CAMERAThe only recent things I’ve managed to make are some more of those scruffy/tassley pieces I’ve shown before. I wanted a couple more samples in neutral/less ‘delicate’ colour schemes, so made a black and red piece:

OLYMPUS DIGITAL CAMERAAnd, a black and white piece:

OLYMPUS DIGITAL CAMERAAnd because I love supermacros, a close up of some visoce texture:

OLYMPUS DIGITAL CAMERAEdit: How to Make a coin purse with a zip tutorial: https://www.flickr.com/photos/zedster01/albums/72157626049445520

Textured Felt and Some Dyeing

Textured Felt and Some Dyeing

I finished up some textured felt this week. First the pieces I started last week to cut up. They are the wet ones at the bottom of the post. https://feltingandfiberstudio.com/2016/07/26/making-some-progress-and-free-give-away-reminder/

They turned out great. I am sorry for the quality of the pictures but the pictures are taken in full sunlight as that is all I had.

blue for cutting finnished blue close up

This one has so much depth. The yarn is quite sparkly. I am surprised It didn’t flash back more in the sun.

textured felt for cutting finnished. textured felt for cutting close.

textured felt for cutting angle.

I liked this so much I decided to make a scarf and matching hat.

The scarf is now drying.


scarf wet

The hat is just ready to cut open. I will show you it finished next time.

hat ready to cut open

Lastly I did some silk dying so I can make some scarves for the fall shows.

orange pink silk blanks

The green one on the left will probably get over dyed. It is two shades of green but they are to close. I will probably use some navy blue on part or it.

grean blue silk blanks

I can’t believe the summer is half over. I still have so much to do. How are you doing with your summer felting plans?


Make Textured Textile Art by Stitching Into Nuno Felt

Make Textured Textile Art by Stitching Into Nuno Felt

Today we have a guest post from Lyn

Last Sandcastle of Summer

The inspiration for ‘Last Sandcastle of Summer’ came from a recent day-trip to Sandbanks in Dorset.

Day trip to SandbanksWe’ve enjoyed weeks of glorious weather and I love wriggling my toes in the warm sand and watching the sun sparkle on the sea, but the weather’s broken now and I’m not looking forward to the cold of winter. When I got home I looked through my old photos and found some of my grand-daughter playing in the sand.

making sandcastlesI wanted to capture the last of the summer in a picture so I started to lay out merino fibres to make the background beach, sea and sky. I didn’t want to add details such as boats or other people so to add interest I placed three strips of fabric across the wool fibres.

The pieces of fabric were cut from loose-woven scarves that I’d found in charity shops. The blue/white scarf shown on the right has been my favourite for making skies and I only have a couple of inches left – I’m desperately trying to find another!

fabrics sand sea skyThis is the resulting piece of nuno felt, after drying, finished size approx 36cm square – I didn’t worry about the edges because I knew it would be trimmed and placed behind a white mount before framing.

nuno felted backgroundI made a paper template of the shape of the child then tacked it, with large hand stitches, in place on the nuno felt. I also pinned a piece of lightweight interfacing onto the back of the felt – it helps with stitching and with moving the felt around on the sewing machine table. With the feed-dogs down on the sewing machine and a darning foot fitted, I used black thread to make a quick outline of the child.

I removed the template then I cut scraps of organza into small rough triangles and attached them to the nuno felt using fine fusible web. The shadow was formed with dark grey organza and the skin areas were covered with a few pieces of very pale grey.  The hat and clothes have layers of organza – bright on the bottom and darker on the top – in autumnal colours to signal the end of summer.

Tip: unless you like cleaning the sole plate of your iron, use plenty of baking paper under and over the felt during ironing!  Also, the felt needs to cool down before moving it as the fusible web will be stronger after a rest.

Then it was back to the stitching.  It’s all very quick and ‘rough’ – except for the face because the profile needs to be sharp – and the eye was stitched by hand.

To add textural and colour interest, I gently abraded the top layer of organza, on the hat and dress, with the tip of a craft knife.
The lovely ‘quilty’ texture is achieved by the machine stitching on the nuno felt.

close up abraded organza
The finished picture has been mounted with white board and the size of felt that is on show within the mount is 31cm x 22cm.

If you have any stitching on felt pictures that you’d like to share, please leave a link in the comments – we’d love to see them!

Ingeo, Corriedale and Texture

Ingeo, Corriedale and Texture

I’m doing a craft fair next Sunday, 6th July at Victoria Baths, in Manchester, so I haven’t had chance to do any felting this week yet, so these two pieces are from a couple of weeks ago. This first one is dark brown Corriedale wool tops and Ingeo Fibre. Ingeo is a bit different to other fibres I use, it isn’t shiny as such, but it does have a sheen, and there’s also a soft almost ‘fluffy’ feel to it, without it actually looking fluffy. Lyn found this link for how it is made.

OLYMPUS DIGITAL CAMERAHere’s a closer view:

OLYMPUS DIGITAL CAMERAHere’s a Supermacro close up:

OLYMPUS DIGITAL CAMERAAnd here’s a supermacro of an area where the fibre were laid more thickly:

OLYMPUS DIGITAL CAMERAA while ago Marilyn sent me some fibres, one of them being some Domestic 56s wool tops, I tried them out on a texturey piece I made, mostly for the base, but also to add some texture between the base and top layer of 18.5 mic Merino. I liked the way they felted, similar to our English 56s.

OLYMPUS DIGITAL CAMERAI also used some Bluefaced Leicester Noil between the 2 layers. This is lower across the surface:

OLYMPUS DIGITAL CAMERASome of the embellishment fibres I used were soy staple fibre, viscose and flax

OLYMPUS DIGITAL CAMERAI also used milk and bamboo fibres.

OLYMPUS DIGITAL CAMERA

%d