Browsed by
Tag: needle felting

Finished Needle Felting

Finished Needle Felting

I finished the needle felted piece I showed in my last blog post, and with some nice, bright weather I managed to get a good photos of it too!

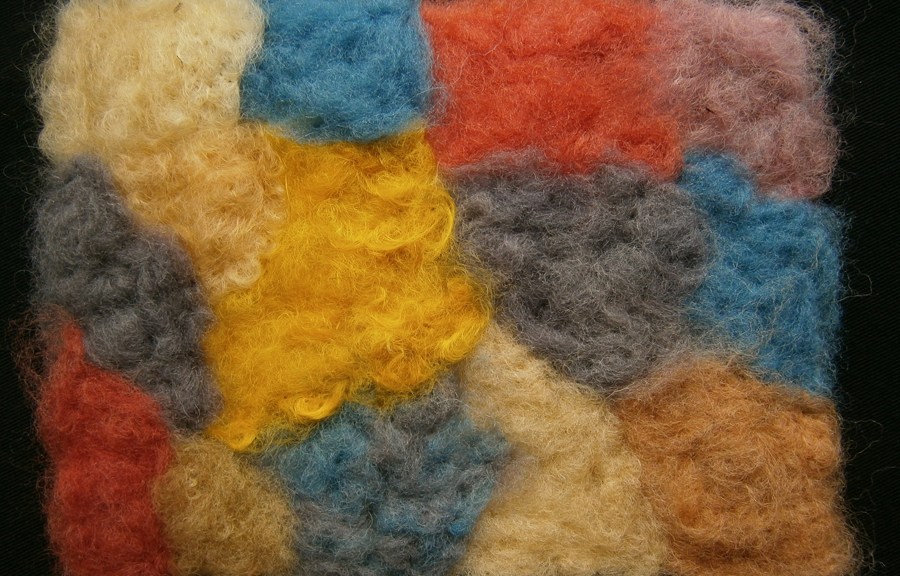
I also finished another piece that I made using the same wools from Cathy which I showed in a wet felted piece previously:

The natural dyed fibres look far less ‘harsh’ than the acid dyed ones, I think. This is the same Turmeric dyed locks I used on the wet felted piece:

And, I don’t know what this was dyed with, but I think it’s Alpaca:

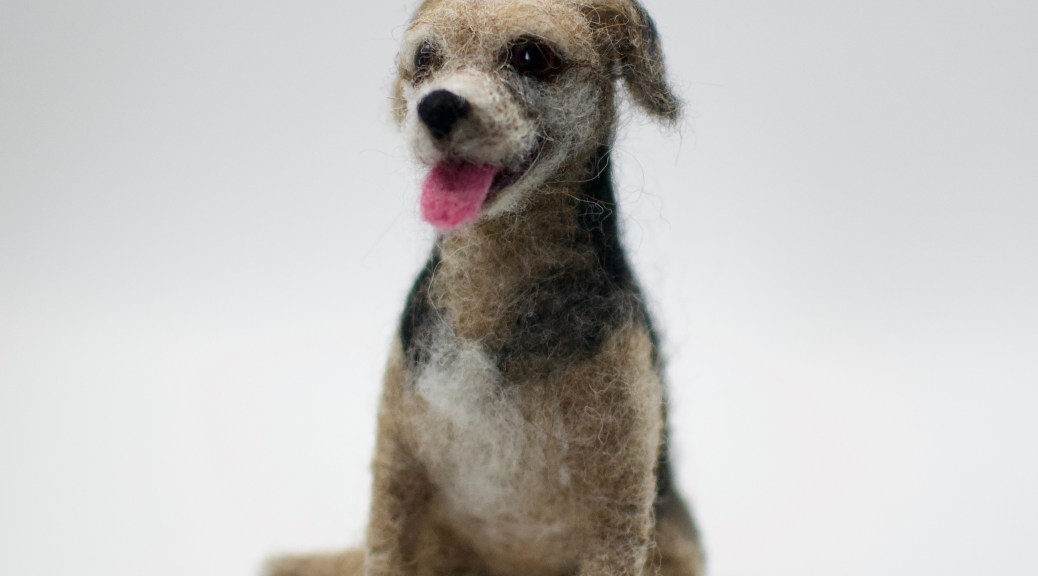
And one last needlefelted piece, I had forgotten all about this one! I was looking for a box to use and found one on top of a bookcase, it didn’t seem to have much in when I shook it, I was surprised when I opened it and saw this! I’m not sure if I’d considered it finished or just forgot all about it. I made it using scraps I’d saved, I think I got concerned about some of the threads which had got mixed up in the ‘wool for birds’ tub, after reading about how threads and long hair are responsible for pigeons losing their feet. It’s really soft and lightly needled:

I think I’ll be making felted soaps this week, we made one at the well being centre on Monday and I didn’t hate it! What are your plans for this week?

Some Needle Felting

Some Needle Felting

We’ve been needlefelting at the Well-Being Centre. We started last week when there were just a few of us. One of the members liked this painting of ducks that is on the wall:

This was how far she’d got at the start of this week after doing a little of work after taking it home last week:

I think I’ve mentioned it’s a basement room with strange lights and 2 tiny windows, so the light isn’t great. I started an abstract piece using some of the dyed locks we have:

Some of them are commercial dyed BFL from World of Wool. This is a green one:

And, I think this is some dyed locks Lyn donated to us when we were first starting out:

These weren’t done at the centre, but one of the members brought them in. She was a really good sport about us laughing at her first attempt. And we weren’t being mean, we know it’s just at a stage where it looks comical:

She started on a different one, and liked how that progressed so did a little bit more:

I’m looking forward to seeing them finished! She also brought in a nuno sample she made a few weeks ago, at the same time I made mine, this is the blended 18.5 mic Merino side:

This is the front:

And this is a close up of the texture:

I’ll have updates of the needle felting next time 🙂

Making Felted Sheep

Making Felted Sheep

Another flash back post. some needle felted sheep. I hope you like them.

With the start of show season gets closer I realise I only had a few sheep left. Time to make sheep parts.

sheep body 1 sheep head 1

I have to make bodies and heads. I roll them up and give them a few pokes. I use 2 needles held together with a hair elastic. It makes them comfortable to hold.

needles

There will be white sheep too

sheep head 2

Once they are rolled and poked they get put in to the legs of some nylons.

sheep parts ready fo the wash

These will go into the washer and dryer with a regular load of laundry.

I also make wet felted snakes to be cut for legs and a flat sheet of felt to cut ears out of.

sheep parts

I can’t find my bag of black spare parts.  may need to make more.

This is what the finished sheep will look like.

sheep small

They all get a safety pin on one side so you can wear them.

Chico the needle felted dog

Chico the needle felted dog

Hello, Leonor here. My guest post for today is going to be a simple “show and tell” as the weather here in London is too warm for complicated thoughts!

Some of you might be aware that I am a fibre artist by trade. Anything wool and I love it. I got into this business a little by accident, and making custom needle felted dogs was even more unexpected – basically, a friend asked me for a mini of his whippet, I took the challenge, and the rest is history!

I’ve now been playing with wool professionally for around 5 years, and I must confess there was one hurdle I was yet to conquer in my work – creating an open mouth. I’d tried once and it didn’t come out right, so I more or less gave up on it. That is, until I made Chico!

DSC_1102

At first I was going to make his tongue out of polymer clay (the idea of finishing it off with a nice layer of glossy varnish to mimic moisture was very attractive to me) but then I decided not to. I liked the idea of a 100% fibre sculpture better.

DSC_1106

I made the lower jaw separately, making sure the upper section was thin enough to accommodate both parts without looking weird. I added a layer of black around the edge to make it more realistic, and then a little white on the back for teeth. The tongue was made using two shades of purplish pink blended together. I made two mini tongues and chose the one that fit best.

DSC_1110

I received a few reference photos to make this little guy, my favourite was one where he was sitting with his leg to the side and smiling. I just had to make him this way.

DSC_1115

I love the detail of paw pads, the feet immediately look real. You can’t really tell from this picture, but Chico is er… anatomically correct. I like a realistic sculpture!

DSC_1114

Below is a picture of the original Chico. The mini version is off to a Spanish island as a surprise for the whole human family. I hope they like it!

unnamed

Have you ever created a needle felted animal? What wool did you use and how did you like your experience? Let me know in the comments section.
Questions? Happy to help, just leave a comment!

Jan’s 3rd Quarter 2017 Challenge Part 3

Jan’s 3rd Quarter 2017 Challenge Part 3

Now the final installment of Jan’s 3rd quarter challenge.

Part 3 finishing

I had been working on pieces of the waves while waiting for my mom at various doctor appointments. So I was able to try out the parasol to see if the concept would work. I was pleased but most of the crowd looked confused.

The demo display of felting included Miaka’s Cat Cave Coelacanth fish and the sheep head I had made at a workshop with Wendo (a local felter who felts very quickly) everyone seemed very interested in the little balls of wool top. I think it was the bright colours.

I continued refining the colour on the octopus and adding more sections of wave pieces at the weekly Monday social at the guild. I also showed off the progress at Show and tell during the guild meeting.

It was getting close to Christmas and I knew I would have 2 days to finish the polar bear I was also working on and come to a decision about the boats and fishermen. I did decide to add the fishing boats but let the octopus play with…Er, “rescuing” them. I made the 3 long skinny canoe like boats underneath there is a keel and you may be able to see the upturned prow. Other than shape and general colour I did not do as much detail with them. I was pleased overall with the final look.

So let’s review the original inspiration and what has happened to it!

Into the box to be wrapped as my nieces Christmas present. She is good at swimming and likes the water so I hoped she might enjoy the octopus.


I hope you have enjoyed reading about how I finally got the 3rd quarter challenge finished if just a bit late. But I hope it was worth the wait. I do have a polar bear that I could show you if you are not too overwhelmed with pictures! Maybe I should save that in case Ann ever asked me to write you a note again!
All for now, Jan.

I hope you all enjoyed Jan’s story. I will share her other posts later in the winter.

Pandagirl’s Year End Round Up 2017

Pandagirl’s Year End Round Up 2017

I’m always amazed at what I accomplished at the end of year. This year I took a few classes in order to expand my creativity in addition to experimenting on  my own. I also tried to use up more materials and finish some UFOs.

Here is a bedside case for odds and ends made with some merino inside and unknown fiber batt with silk embellishment.

Experimenting with different types of yarn to make a table runner.

Our First Quarter Challenge – Fauvism.

Weaving then felting.

A Valentine gift for granddaughter Lisa.


Teri Berry’s Snail hat class.


Finishing and hanging an eco print.                                                  Crochet around wire bowl.


Framing the felted weaving.

I did a lot of experimenting with crochet stitches.


Practicing for Ruth’s Free Motion Embroidery class.

Crochet hats for my granddaughter and her new premature brother Ken.

A dimensional potholder.

Learning more crochet stitches.

Making a crochet hook case from a crochet sample.

A bowl for the Second quarter Challenge – Celtic

Using yarn on a resist for a vase cover.

Adding dimension to the hummingbird/tiger lily picture.

Crocheting scrubbies.

Felt and crochet earrings.


Crochet beaded bowl with stiffener.

A Pumpkin for Ken.

The Third Quarter Challenge – Edo Period; felt and hand embroidery Sakura.

Ribbon embroidery and framing.


Playing with thickened dye for Ruth’s class on felt.


Finishing  a case from UFO pile and FME Butterfly


Maneki-Neko for Third Quarter Challenge Edo Period.

Framing the Rooster.

More stencil play with acrylic and thickened dye.

The Fourth Quarter Challenge — Suprematist

Penguin’s Poinsettia Holiday card.

A couple of scarves for my daughter in laws parents in Japan where it’s as cold as Chicago.


I want to let everyone know I am taking a leave of absence to focus on my health and family.  I will be around just not posting weekly.  We have a lot of talented artists that will be filling in starting with Tracey Thompson next week.

I want to thank everyone for helping out to give me this time.   If you or someone you know has something to share — it doesn’t have to be felt but anything fiber related including paper, please contact me or one of the other moderators on the forum and we’ll get you on the schedule.

I hope everyone has a Happy, Healthy and Prosperous New Year!  Happy Creating in 2018!

I’ve Been Framed

I’ve Been Framed

A few years ago I wet and needle felted a Rooster portrait.  Of course, its been sitting in my UFO pile.  I wrote about it here:

https://feltingandfiberstudio.com/2014/11/22/a-colorful-rooster/

I had a canvas frame I had used for something else and decided to use the rooster pic to cover it.

Then I tried it on several colored walls.

But I wasn’t really thrilled.  I felt something was missing. Then  I found a frame I thought would be perfect.

So, I removed all the staples, steamed out the bumps and mounted it in the frame.

Here’s a  closeup of the distressed frame which just happens to have a turquoise/teal color accent.

It’s found its home in the teal kitchen.

I think it all ties together nicely.  I feel like I’m looking out a farmhouse window at the rooster. What do you think?

Maneki-Neko for 2017 3rd Quarter Challenge Part 2

Maneki-Neko for 2017 3rd Quarter Challenge Part 2

I never dreamed this project would take me almost two weeks to complete.  But it is finished.

If you missed part one, you can read about it here:

https://feltingandfiberstudio.com/2017/09/25/pandagirls-maneki-neko-for-2017-3rd-quarter-challenge-part-1/

It would seem adding the details to finish would be easy.  Not!

I needle felted blue roving around the eyes.  The gems underneath are actually blue, but because they were put over black it wasn’t obvious what color they were.

Then I spent time looking for a gold bell, but decided on using a wool ball instead.  When I added the ribbon I made a slit on both sides of the arm to pull it thru.

The nose and mouth are also needle felted.  But at one point, the nose fell off and had to be reattached.

I curled over the raised paw and secured it in order to show the paw and nails.

The nails proved to be a real challenge and after ripping them out at least a half dozen times, trying needle felting, then using floss and finally rayon thread.

I tried needle felting the arm in front and the tail in back to show the dimension, but it was negligible partly because of it being black. So, I stitched around them which helped.

Another challenge was the writing on the coin.  I made a gold prefelt and copied the characters I had translated from an app for Good Health and confirmed with my daughter in law, Mari. I transferred the characters to a stabilizer.

I thought using the satin stitch on my Pfaff machine would work, but its not a straight satin stitch, but the stitches varied.  So I decided to use a triple stitch which was fine until I reached curves.  I ended up finishing by hand. I’m hoping I haven’t butchered the characters too much.  After finishing the coin, I slip stitched it to the kitty.

The final addition were the whiskers.  They are a little funky and I had to use a little GAC to give them a little stiffness.

Now its time to find her place facing East in hopes of bringing Good Heath to my household.

What challenges have you had lately?


Needle felted pictures for the 150th anniversary of Canada art show –Jan Scott

Needle felted pictures for the 150th anniversary of Canada art show –Jan Scott

Today we have a guest post by Jan Scott she is a great needle felter.

The concept of the show.

As you likely read in Ann’s earlier posts the Ottawa Valley weavers and spinners guild was given a proposal to have an art show of 150 pieces of a uniform 12inX12in size to celebrate Canada’s 150th anniversary. The originally the idea had been discussed at socials to decide the rules for the submissions.


The rules were quite simple:

Rule #1 – the artwork could be any medium of fiber arts, spinning, weaving, felting, knitting, were all ok. But the rest of the rules quickly developed as I started to propose ideas I would like to try to Carlene who was going to present the idea at the meeting. My first thought at hearing the format was AH!! Cascading waterfall in felt over 3 canvases!Rule #2 – all 12×12 pieces must not extend past the canvas.                                                         My second question was can we do this in 3 dimensions?

Rule # 3 – nothing should extend above the canvas more than 3 inches.

I’m glad I dint ask any more questions.

Art show Piece 1:


So now with the parameters decided and 3 canvases purchased I started to consider ideas. I had to find something that was quintessentially Canadian to me. I thought of all the places I liked best in Canada and settled on my parent’s cottage and the summers spent with my giant bullfrog friends. So I started to plan frog on lily pad as art work #1 and Lilly pads in flower as my second piece.


My work process seems to have developed as; first research images on the internet. (or looking thorough my photographs no wonder I have been taking pictures of everything through most of my life!). Then decide the general composition with a couple sketches. Do more researching for details of the composition. I created a folder of frog pictures that had elements I wanted to work from. Toes from this picture and the profile of the head of that one. Coloring from another shot. I selected the best bits from various photos and printed out a few reference photos to work from. With the frog covered I looked into lily pads and flowers, did you know they have huge lily pads that are used to photograph baby’s floating on them? I think they were in Thailand definitely not the ones from the cottage so I mostly ignored those.

My next problem as I started to make an armature for the bullfrog (a bit smaller than the life size ones I had played with) was how to make sure he/she was under the 3 inch height limit? Ahhhh. I turned the canvas over and looked at it again. Working from the back gave me almost an extra inch so Froggy could still be crouched to spring and fit in the height restriction!!!


I worked on the armature using mostly pipe cleaners and light gage wire to make the framework. I made an upper and lower skull/jaw, dorsal lines in the back and all appendages with articulating tows. It was somewhat frog like!


I had gone over to Ann’s to get help with carding Free Fleece from agriculture Canada’s experimental farm flock. I had washed the excessively dirty and vary spongy fleece but wanted a really cores carding to make core wool. That is the wool you use for structure but don’t want anyone to see. She put it through her picker which helped immensely and then we carded it on her really impressive electric drum carder. Much bigger than the home use ones we normally see. Ann’s help was greatly appreciated she saved me a lot of time!

So I started with stuffing rolled up balls of core wool (likely a redo Arcott blend) into the center of the frog frame armature. Until I had the body formed and started rapping the legs and the first foot. It was quickly apparent I had miss judged the tow length and had to give Froggy finger extensions in pipe cleaner! After quick osteology surgery to repair his bone structure I continued giving him muscles until I was happy with the overall shape. Next I needed Froggy like colours. I started looking through my stash of spinning and felting wool. Hummm, Green does not seem to be my favorite colour. I have Lots of blue though! I had won at one of the guild auctions a bag of lime yellow green that I had planned to use as a core wool on something but hadn’t got around to it. I did a run to some of the local supply places, bought some more fiber at the Chesterville spin in and begged a bit from Ann’s stash and a bit from Bernadette too.


The horrid yellow green was perfect for the under colour for the lily pads, but I didn’t have quite the green I wanted for the frog colours so it was time to think like a painter and blend my colours.


Maybe now is a good time to tell you a bit about myself. I am severely dyslexic you likely have figured that out by the spelling or lack of it. From Pre-school on I wanted to be a paleontologist but decided you had to be able to spell your profession so gave up on that idea in grade 6 when I realized I still couldn’t spell paleontologist or most of the dinosaurs’ names. My other interest was Art (I can spell that!). I loved technical illustration, I was really bad at it but was good at layout and design and kept being told I should be a fine artist not a commercial one. So I wound up with 3 years of commercial art and 3 years of fine art and art history. With Dyslexia and all the commercial art background I tended to approach my fine art projects at school with a slightly different perspective then the rest of the class. As an example we had a large scale painting assignment. I asked if I could use un-stretched un-gessoed canvas with acrylics applied in watercolor like washes and was allowed. So I arrived each class with my painting folded in my smallest portfolio and some painters tape to tape it to the studio wall. While my classmates tried to figure how to get there monumental pieces on and off busses.

It has become apparent to me over the years that the dyslexic brain does not take a straight line to get to the solutions to a problem. Of the 150 pieces created by members of the guild only 6 canvases were turned and worked from the back. Froggy, Lilly pads, muskox, polar bare, the forge, were mine. The only other one was the Hudson’s bay blanket woven on nails attached to the back of the canvas. So problem solving tends to result in a nonlinear solution not usually arrived at by the majority of the group. This can be a good thing or not. In this case I think it worked out very well.


So now you know why I looked at little balls of coloured wool and was excited about colour blending like my long unused acrylic paints. As well as thinking about layering colours like washes of acrylic used like water colours. My third important concept was grisaille painting technique where you paint you’re under painting in gray scale and then overlay the colour over it. This is used to give amazing depth of colour at the end. I thought about the under structure of the armature and core wool as my underpainting then layered over the colour and shading as the final layer. This make it much easier to get a Froggly look to my Frog.

I tried two technique to bend the colours. The first was very traditional using dog brushes from the dollar store as if they were little carders. This tended to give more uniformity to the blend but dint look quite rite. So method 2; I took little bits (a bit longer than the staple length) of the constituent colours and started to bend them by holding the tips and pulling them apart. Over and over, this produced a more stripy colour which looked much more natural. It took a long time to get the colours blended in this way but I think it was worth the extra work. This blending technique which I practiced on Froggy I think really worked most effectively on Muskox and Pole bare.

I had purchased from Noble fiber last November at the guild exhibition and sail a piece of pre-felt to be used for the backing of a picture. I had chosen a large piece of blues and greens in colours that reminded me of both the cottage and Monet water colours. Unfortunately I should have bot 2 pieces. So I allotted the one to the lily pad background and started colour blending to make the second for Froggy and his lily pads to sit on. I made the background large enough to rap around the frame and attach to itself thus making a form base to work from.

The lily pads were the next to make. I used a mix of both wet and dry felting to create them. I discovered that pipe cleaners don’t shrink at the same rate that wool dose and had to do a bit of patching to cover up the differential shrinkage. I laid in stylized veining and darker edges to the leaves. Then started to bend the pipe cleaners to the shape I wanted the leaves to be. I used thread to attach the leaves to the felt backing.

Next step Froggy must grip the edge of the leaf with his little articulating fingers and prepare for his grate leap to the lily pads in the next picture. So I got to play with bending and posing Froggy until I was satisfied. Than he too was sewn to the lily pads and felt below.


Canvas #2 the lily pads


I created the lily pads as I had the first 2 Frogy is sitting on. Pipe cleaner armature sandwiched by 2 layers of wool on either side. Using again wet and needle felting to get the structure I wanted. Over laying the final colours to give a representation of a lily pad.

For the flowers I made a core that was sort of lozenge shaped with a point at one end. The base of the core wool had 2 entwined pipe cleaners for the stem. I then created triangles with the tip firmly felted and the base left unbelted. I added white over the core wool for the center of the flower then the triangles for the white petals that surrounded the core. The outer layer was triangle of the limey green I had used with the lily pads. I needle felted each petal onto the core and stem until I finally rapped the base of the flower and stem itself.

I made 3 flowers and 3 leaves. I split the pre-felt base and rapped it over the back of the canvas frame attaching it securely. Next I played a bit with the leaf composition, no draping off the frame or flowers poking up too high. When I was finally happy I used button hole thread (since it’s nice and strong) to sew it all down.


I started working on the Froggy/lily pad combination idea in November just after the exhibition and sail and was pleased with parts by the February meeting. Originally Froggy was going to get a lily flower too but it make him too high so all the flowers went on the second canvas frame.

The Hummingbird and the Tiger Lily

The Hummingbird and the Tiger Lily

I know a lot of people are experiencing different seasons around the world.  Here in the U.S. summer has finally arrived.  One of the things I always look forward to is seeing the hummingbirds fluttering around my flowers.

While the hummingbirds haven’t been seen yet, I decided to make my own.  I started with making a base with Domestic 56 batts, then I added a thin layer of batts and silk hankies as a background felting it slightly and letting it dry.

I decided to make the bird and flower in three dimension.  I shaped the bird first by doing some needle felting and putting it in place then covering it with handmade prefelt and silk hankies. I did a little needle felting on the wings to get the detail of the wings.  The beak was made like a spike and attached before the final wet felting.

The Tiger Lily petals and stamens and stem were made from prefelt and again the stamens were added right before the final wet felting. I used little resists under the petals and needle felted the stamens to stay in place.

A little plastic wrap around the stamens  and beak to keep them from felting to the petals or background.

The felting was slow and I tried not to get it too hard. I wanted a soft look.

I added more needle felting for detail.

Here are several different angles to see the dimension.

Looking at it from above it doesn’t show the dimension.  I may have it framed in a shadow box.  What do you think?