Browsed by
Tag: first quarter challenge 2016

Better Late Than Never

Better Late Than Never

I’m tardy on completing the First Quarter Challenge using a resist in a different way.  I had a few ideas, but then Cathy (Luvswool) loaned me a resist she had used in a class a few years  ago.  I still procrastinated not having a clue what to do with it.

20160506_142401

I covered the resist using the first layer of Icelandic on all sides.  then I left it for a week while I traveled.  I was still unsure of what I wanted to do with it.  Then on Earth Day I was inspired to use some deep jewel tone merino fibers and made some batts.  I didn’t want really striped areas so they went back into the carder to blend them a little more.

20160422_124634 20160422_124608

I debated about using the fibers horizontally, but ended up using them vertically.  I suppose it wouldn’t have mattered either way.  I still wasn’t  sure about what shape it would take until I finished fulling it.

Here it is drying on my towel holder.

20160504_153250

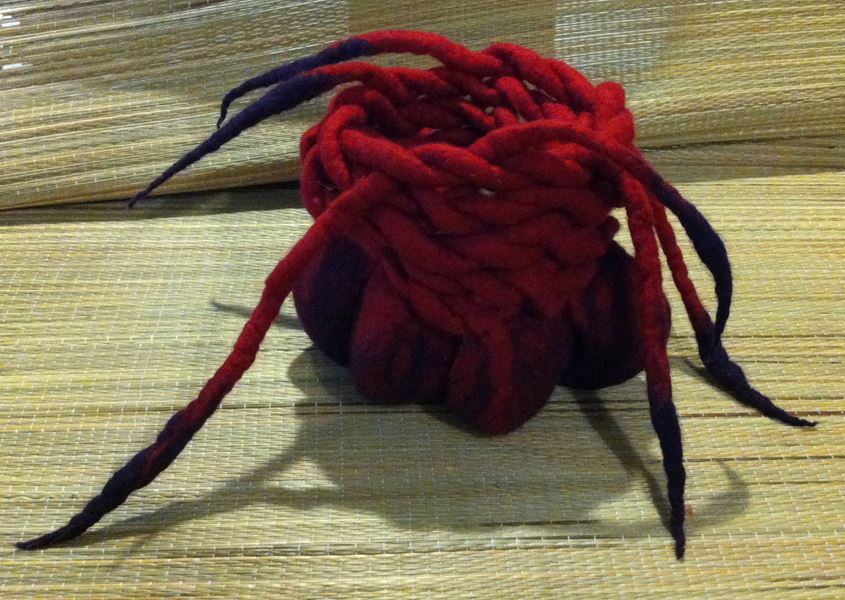
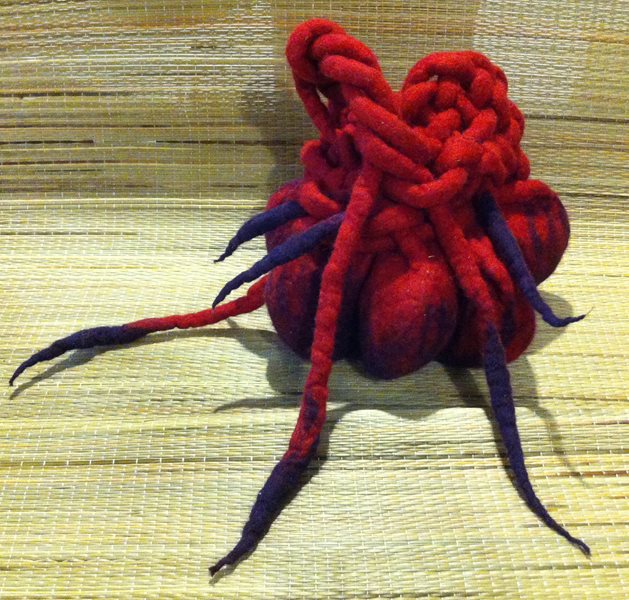
Views from each side. The Icelandic wool underneath really muted the bright tones, but I liked the way it turned out.

20160506_142241 20160506_142033 20160506_141920 20160506_141850

From the top.

20160506_142307

I don’t know what to call it, but it sits nicely by itself and will probably decorate the coffee table in my living room where the colors will be right at home.

I think I’ll try another shape after I finish the Second Quarter challenge.


First Quarter Challenge

First Quarter Challenge

They say great minds think alike. We all seem to have decided on a book resist. I started with 3 stacked circles. I had been going to cut 2 of them in half and attach them with duct tape but after reading Terries tutorial I grabbed a needle and thread and made a few stiches to hold it together.

The first thing I made was long snakes leaving the ends fluffy.

1 snakes

Then I made 6 fiber circles. I used about 2 grams of fiber in each of 3 layers for each circle.

2 circles

then I added them to the  stacked resist. I did remember what everyone said about having a hard time where the resists meet at the top and bottom and paid particular attention to that.

3 wrapping the stacks

next was the long snakes.

4 ready to felt

I put those on near the top of the circles.  The next part is not very interesting. rub, rub  rub,  roll, roll, roll. Then cut the hole in the top. I decided the inside wasn’t felted as much as I wanted so I left the resist in and went back to rolling.

5 cut open

after it was all dry I had planed to weave the long snakes around it in an artistic design. Unfortunately weaving really needs to have a odd number of so that didn’t work. I needed to find a solution.

I did these

solution 1 solution 3

or maybe turn it on its head?

solution 4

Last night I took it in to a guild meeting and challenged them to do something with it.

solution 5b solution 2solution 6

solution 7 solution 8

We had artistic twisting, plant hanger, a fancy bun cover, and a bag. We had a great time and lots of laughs, The conclusion was that had I made a great new party game.


First Quarter Challenge Finished?

First Quarter Challenge Finished?

I showed you the start of my first quarter challenge project a couple of weeks ago. Since then I have fixed a few areas that didn’t have enough fiber, fulled and shaped it. When I was covering the book resist, I found that the sharp corners and edges that are formed where the book resist is sewn together are hard to cover. I thought I paid special attention in those areas but there were definitely areas that weren’t covered and holes that developed. But it was easy to fix, I just added more fiber before fulling, needle felted it in place and then wet felted it further. There are still a few areas that are thin but since it isn’t functional, it doesn’t really matter.

I also shaped the crater areas for the “eyes”. I looked for something to fit in them that would hold the shape better but couldn’t find anything. I just used my fingers to shape the craters.

Q1 Challenge Balloons

I used 5 balloons and some plastic bags to fill each of the lobes. It’s really hard to take a good photo of this because it’s fairly large and strangely shaped as you can see. The spikes really make it even larger.

Q1 Challenge Bottom

Here’s the bottom of it. The center area was where I had to do a lot of repairs but you can’t even really see where the problem was now.

Q1 Challenge Piece

I didn’t really get a good photo of the entire thing but this is the best one.

Q1 Challenge Teeth

I am also considering adding some teeth all around the edge of the opening. What do you think? These are shark teeth that I picked up on the beach years ago. I would most likely either glue or sew them in place.

Q1 Challenge Hat

Or perhaps it’s a hat and I could wear it to the next Jubilee? (Sorry for the pitiful selfie.)

Have you done anything for the first quarter challenge? The challenge is to use a wet felted flat resist in a method that you haven’t tried before. I hope you’ll give it a try. It was fun!

First Quarter Challenge and Giveaway Winner

First Quarter Challenge and Giveaway Winner

I actually got an early start on this quarter’s challenge for a change! In case you missed it, here’s Ruth’s original post: http://feltingandfiberstudio.com/2016/01/02/first-quarter-challenge-2016/  I’ve used flat resists before, mostly for surface design, simple cases, and a few bags. I have made a few 3D items with flat resists: some bird pods, a few hats, and even a supposed seed pod which looked like the rib cage of a dead animal, but I think I’ve only tried a vessel once and it was a bit flimsy. So, I thought I’d try a vessel again. I decided on a flower shape, I can’t find the actual resist, but it was basically a flower shape:

OLYMPUS DIGITAL CAMERAI used some 27 mic coloured Merino batt I bought from wollknoll and used some silk hankies over the top. This is how it looked from above:

OLYMPUS DIGITAL CAMERAHow the underneath looks:

OLYMPUS DIGITAL CAMERAAnd a kind of side view:

OLYMPUS DIGITAL CAMERAThis is where the silk hankie was thicker:

OLYMPUS DIGITAL CAMERAAnd where it was fine:

OLYMPUS DIGITAL CAMERAAnd this is a close up of the batt texture:

OLYMPUS DIGITAL CAMERAIf I did it again, I would make the shape more curvy, where the petal shapes met, it was a sharp V shape and the vessel is too thin there, and in some places little holes. This is looking through the vessel opening at a thin patch:

OLYMPUS DIGITAL CAMERAWell, thanks everybody who entered the fibre giveaway, and thanks for the nice comments, I did read them all! The winner is: Jennifer Ralph! Congratulations, Jennifer. I will email you for your address to send the fibres. Please reply as soon as you can, if I don’t hear from you by Friday night, I’ll re-draw.