When teaching my vessels workshop a few weeks ago, I was showing the class pictures and talking about some more advanced vessels. They expressed an interest in all of them but especially in the book resist vessels. It got me thinking and now I am planning to give an intermediate vessel workshop later in the year, or maybe the new year, depending on scheduling.
At this point, my plan is to make 3 samples. That will help me write down the order and figure out how to teach it. I need to work out the materials list and timing, as well as how to teach it. Making them will also help me think of where things might go wrong.
I know there will have to be a prerequisite of having made at least one item, and preferably 2 or more items over a resist.
I plan on 3 different vessels. The first is a simple 6-sided circle pot.
The second one is more oval shaped vessel, I cut down the paper template from the circle so they will be about the same height when done.
And the last has an “odd” shape, again I used the half circle from the circle to draw the new shape to keep them about the same size.
As with most best laid plans, I discovered all I had for tape was narrow painters tape. So I will have to head to the store for some wide, strong tape that will hopefully stay stuck through the wet process of making a vessel. In the meantime, I think I will start writing the instruction so I can jot down additions as I go. I am not sure how long it will take to do all that. If I want to teach it in the fall through my guild, I will need to get the proposal in when the call for workshops goes out in the spring.
At the Waltham Textile group we have a biennial exhibition with a main theme, supported by any other smaller works we’ve produced during the two year lead up. Our current theme was launched in August and I was really happy to get a thumbs up when I suggested we have a nautical/coastal vibe…..if you know how much I love to create rockpool themed work you will know why I chose it! Within this theme we each get a metre width of wall space for a large hanging or several smaller ones and we’ve agreed a few specific group projects such as we all make a 3D fish, a 3D jelly fish, a decorated box and contribute to creating an Octopuses Garden.
Coming up with a title is always going to be tricky when it’s done by committee and, believe me, we debated many of them! Eventually we settled on “Making Waves” as its catchy, links to the ocean/shoreline but of course it can also be interpreted as rocking the boat or doing something subversive. Strange but no one in the group has mentioned this meaning so far, surely I can’t be the only one who’s planning on being subversive with (at least one of) the group challenges?
The general consensus is that the fish be attractive but my immediate thought was “angler fish“ due to its dramatic and sinister appearance. However a bit of Google research has opened up a whole new world of ugly fish, these are just a few that grabbed my interest. The red lipped batfish is probably the weirdest one of them all, I can’t help thinking it looks like someone’s added a face and four legs to a mushroom! That really is a face that only a mother could love! Collecting images of ugly fish is a whole new rabbit hole opening up so best to get back on track…..
It’s been a busy time recently with shows and workshops, plus playing catch up after being knocked off my feet for a couple of weeks with Covid. This has meant I haven’t made much progress but I have at least started one exhibition piece. If you visit the Felting and Fibre Community Photo page you may already have seen this as it’s made entirely from materials I had to hand and therefore fulfils the criteria set for the last challenge.
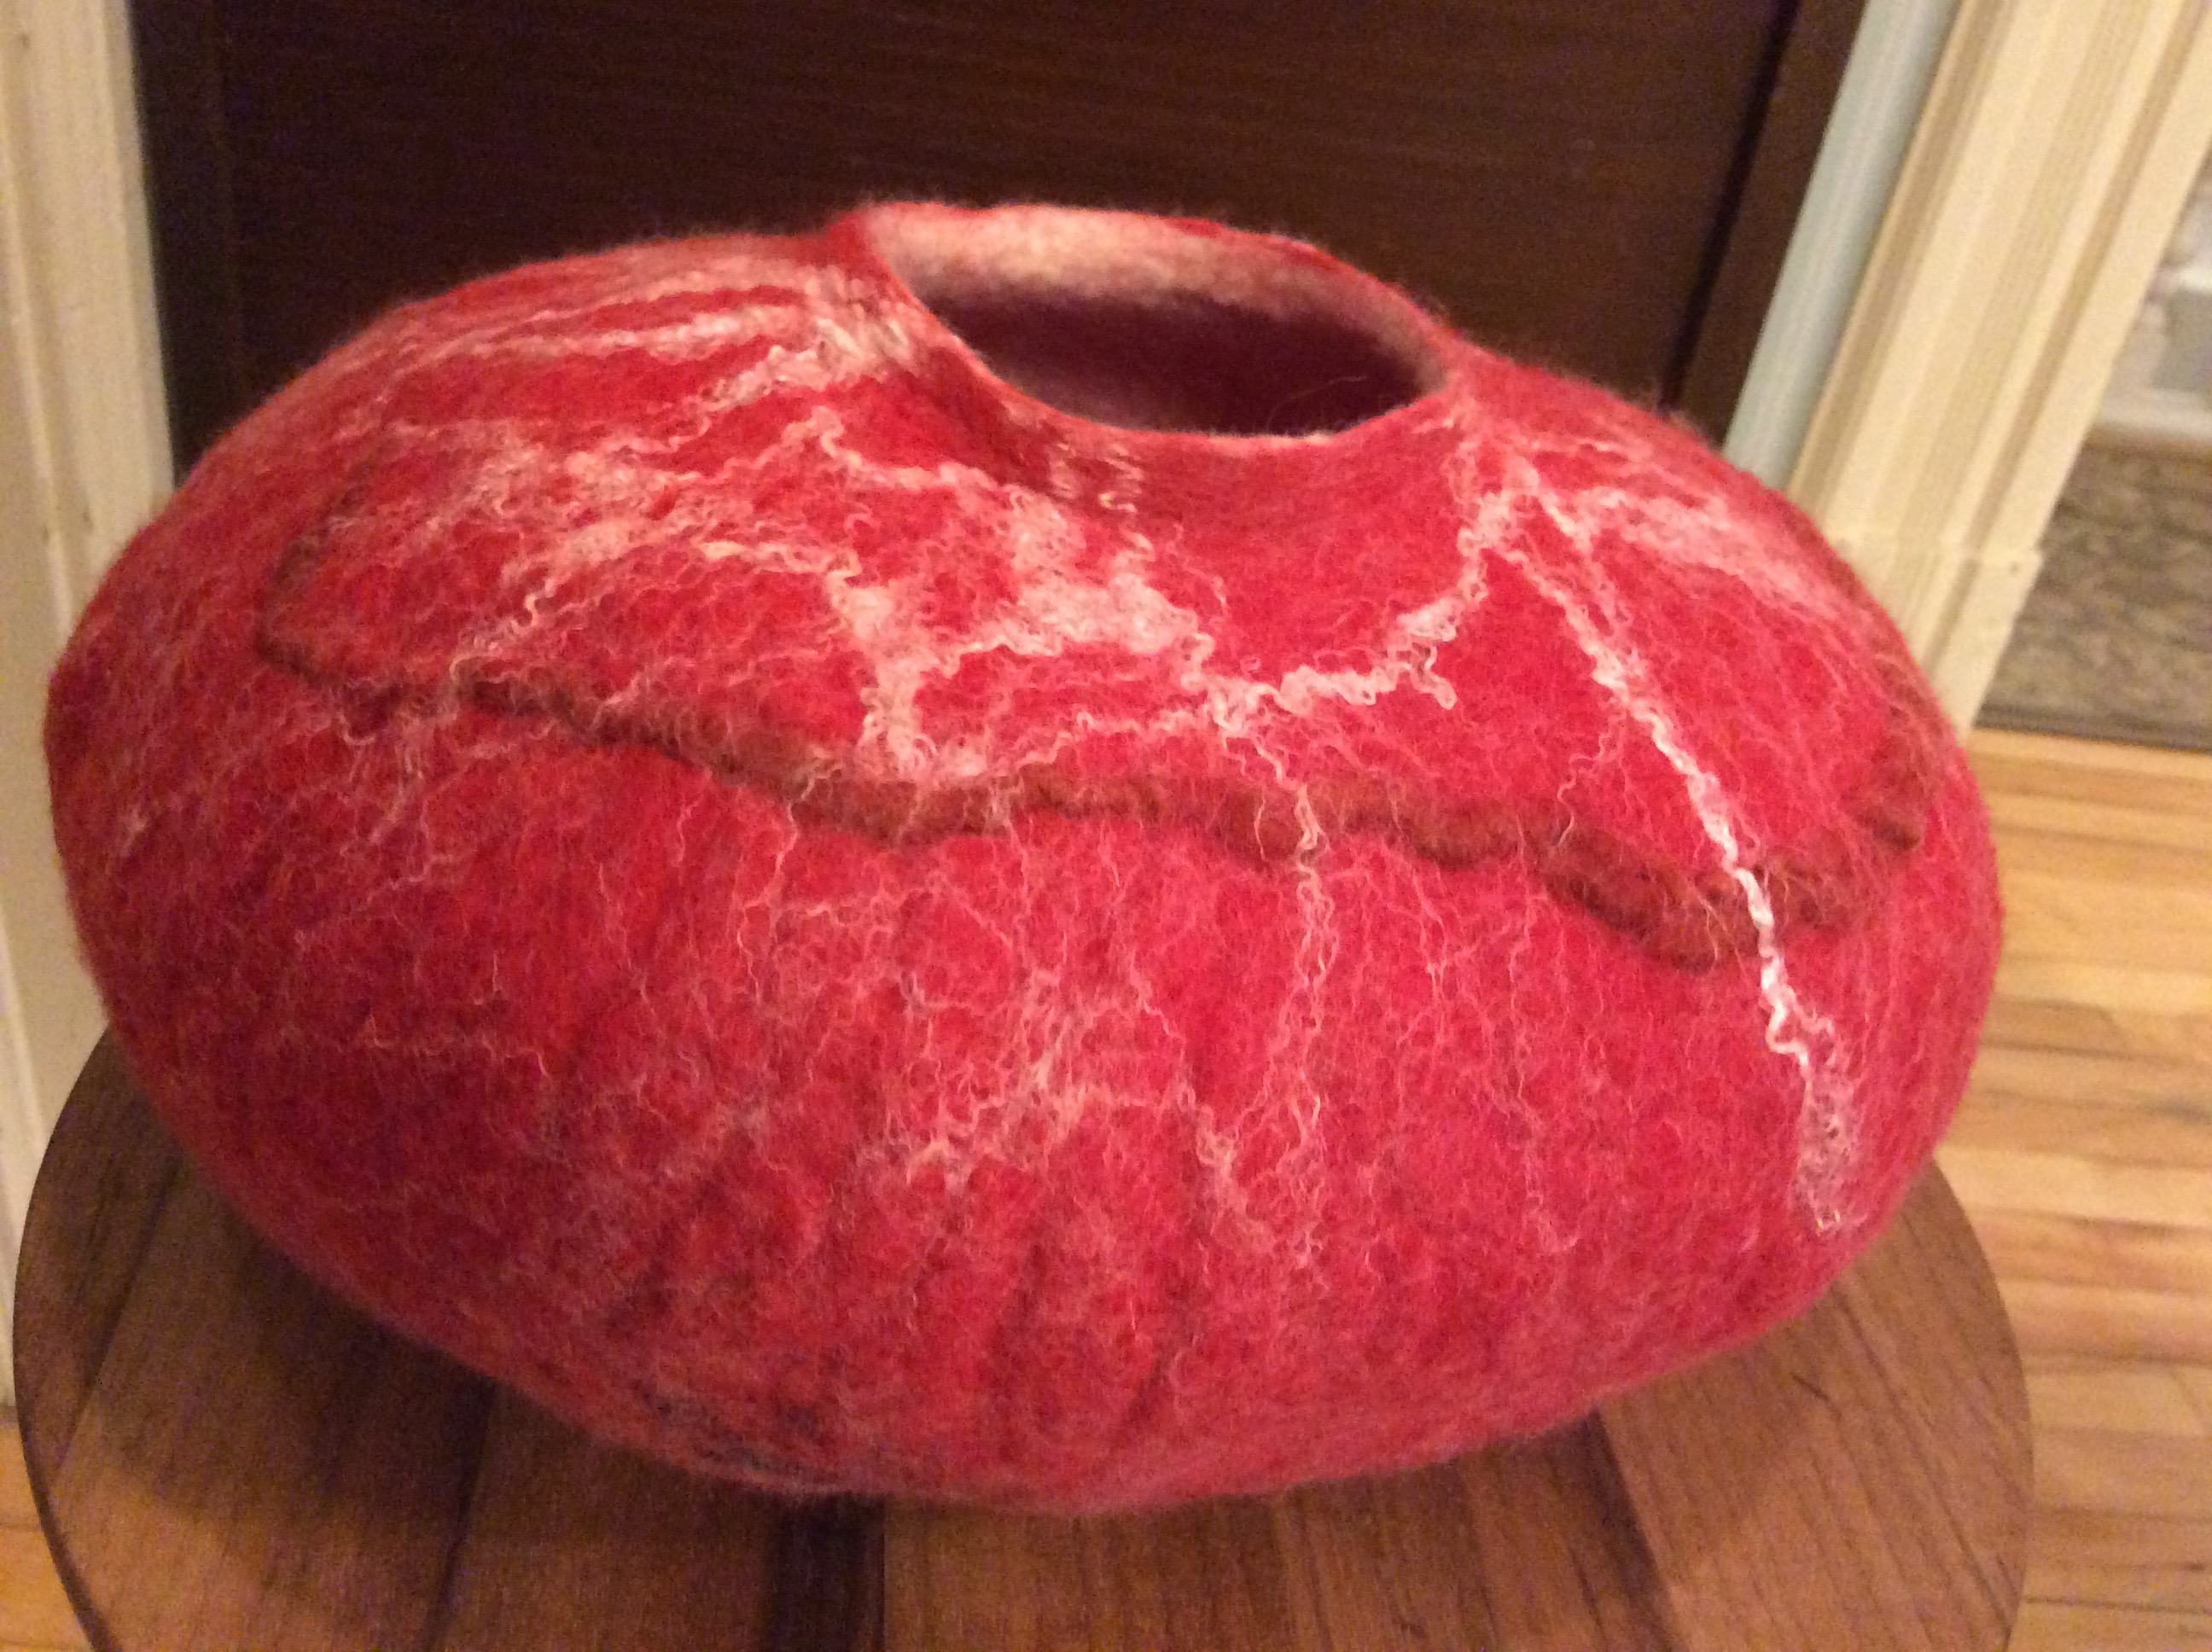
Making Waves vessel.
My aim was to create a wet felted vessel with a blue/green colour theme, an undulating surface and lots of texture. A student had recently commented on one of my necklaces saying it reminded her of rocks and coral and this passing remark inspired me to use the same technique and materials for my “Making Waves” vessel.
Detail of the felted necklace that inspired the vessel.
Using differential shrinkage is a great way to manipulate the surface of your felt. Thin areas have the potential to shrink much more than thick areas thereby creating hills and valleys in your work. These can be symmetrical, as in the yellow/grey bowl, or asymmetrical which was my aim for the necklace and this vessel.
The grey and mink fibre used is mostly World of Wool 23 micron Merino although, because I was using up left over short lengths from previous projects (remember the F&F challenge), I think there’s oddments of superfine in there too. The thicker areas are prefelt covered with hand dyed silk fabrics, printed viscose paper towels, sari yarn and wool yarns to create a variety of textures and after felting it measured 36cm x 17cm.
The eagle eyed might spot two pieces of lace which are on the layout but not the finished vessel, these didn’t look right so were pulled of. I’m now looking forward to some spare time next month to complete it with more hand embroidery, beading and shells.
It was 2 days later that I got back to my pot. After some preliminary rolling in the dryer, I rolled it by hand.
It shrank quite a lot. it is very tight around the resist. It is time to do some cutting. I cut in the spaces between the fins.
You can see how much the hole grows as you work the edge. The little blob on the left is the piece I cut out.
I didn’t want to pull the resist out through the hole. It is bulkier and less flexible than usual with the duct tape holding on the fins. I cut an X in the bottom of the outside pot. If I had thought about it I would have done it in the bottom of the inside pot so no one would ever have seen it.
This is how much it has shrunk so far.
Next was a vigorous rub down with a rubbing tool. This is one Jan found in the pet section of our Dollar store. It’s for washing your very dirty dog. I covered the pot with some plastic before rubbing. It is too grabby to use directly on the felt.
It shrank a little more but now it is al flat and smooth.
Before doing any more I needed to rinse out the soap. It always takes much longer to get all the soap out than I think it should.
I start with hot water and finish with cold. I also want to get more shrinkage during this prosses so I am quite aggressive in getting the water through felt to get the soap out.
This is how much more it shrank. You can see the black lines of where it was before rinsing.
I stuck the yellow inside the red one. It wasn’t too hard because the how where they are joined is not very small. What was harder was getting the ball in so I could blow it up. I wanted to use a ball because I didn’t think a balloon would be strong enough. I did get this one I but ended up taking it out and switching to a smaller 8-inch ball. the ball is a Linsom ball, they are nonslip, sort of sticky on the outside. They are great balls because they come with a removable plug. I took a vessel class with Sharon Costello where we used them. I suppose it helped the first layer of wool to stick. The layout on a ball is very difficult. It was a great class, a lot of fun and we learned a lot but not one I like to use.
and in the dark
I think it turned out fairly well. If I were to do it again I think I would make the inside pot bigger so it would open up the fins. I may, depending on how ambitious I am, wet it down, blow up a ball inside and them stuff plastic bags in to make the outer pot bigger. I may cut the fins off and then so some stretching so you can see more of the inside pot. I am still thinking. What would you do?
A couple of weeks ago I posted about the coiled vessels we were making at the well-being centre, and last week I posted about the textured felt vessel I’d started. I finished them both on Monday so can give an update. This is one of the sides of the coiled vessel:
You can see from the gap in the pencil roving where the edge of the circular resist was. There’s a similar gap on the other side:
Fulling the pot caused migration/fuzziness. It’s dulled the silk threads quite a bit, so I’ll probably shave it when it’s fully dry.
This isn’t the best photo, but I held the vessel up to a lightbulb:
The Textured felt vessel still isn’t dry. It’s so thick I think it’ll take a few more days yet. Here’s a photo of it with the balloon still in it:
I couldn’t get really good photos of it, it was too bright near the window and the back was in lots of shadow, but here it is without the balloon:
Here’s the bottom:
Here are a couple of photos of the side of it.
Fulling the vessel meant that some of the looser locks felted in more, there was also more fuzziness/migration like on the coiled vessel:
I put this vessel around the lightbulb too, I like how this one looks.
If it looks any different once it’s fully dry, I’ll post an update.
I’ve mentioned recently that I don’t have the space to do any felting at home at the moment. Well, my last post about Textured Felt reminded me that I don’t need the time/space to do the wet felting part as long as I can do the layout and find the time for stitching. So, a couple of days ago I started to ‘build’ a textured felt vessel. I used all natural wools, animal fibres and embellishments. For the texture scraps between layers, I used some unravelled wool knitting. I don’t know if it’s 100% wool. I found the time to do the layout, stitching and unpicking, but that’s as far as I’ve got so far. I did two ‘regular’ thickness layers on each side and two ‘half layers’, basically 3 layers but split one into 2 for even shrinkage. I didn’t put texture between the two ‘half’ layers. This is the top with a hole cut and the resist taken out:
This is what it looks like when I separate the layers to make it more 3D:
This is how the bottom looks ‘flat’:
And separated/3D:
There is quite a thick ‘edge’, I thought putting the resist on top would show how much, but I’m not sure it’s that obvious:
I used a fine ‘layer’ of raw/unwashed uncombed Huacaya Alpaca beneath the top layer of locks and embellishment fibres. You can see how fluffy it is:
I put lots of locks around the edges:
Here are some Bluefaced Leicester locks:
I still haven’t found time or space to finish off my coiled pot, but since I was taking photos today, I thought I’d get a couple that show the texture. This is the bottom:
And the side:
Hopefully, by my next post, both of these will be finished.
As promised here is the finished pot. It did work, as if there was any doubt. All the problems I had were to do with the size of the pot and me.
The first problem is that I cut the whole in the top much to big. I think it would have been better pot if it had curved in at the top. it is much to open making it more up and down. Part of that is the size of the piece. It is only about 2.5 inches tall. Also I should have to cut the holes sooner so I can work on the cut edges, or at the end so the edges would be cleaner.
Here are the silk cocoons I put in. I did not position these well so on is to high and one to low. Again the size of the pot limited my options. The cocoons did work well. They were crushed., but that didn’t really matter. After it was dry I cut open the cocoons and then steamed them to reshape them. It may have been better to do those sooner so m=perhaps the cut holes could have been made smoother. All in all not a great pot but it was a good piece to remind me of all thing I really already new but didn’t think about. I think I will make another one but bigger.
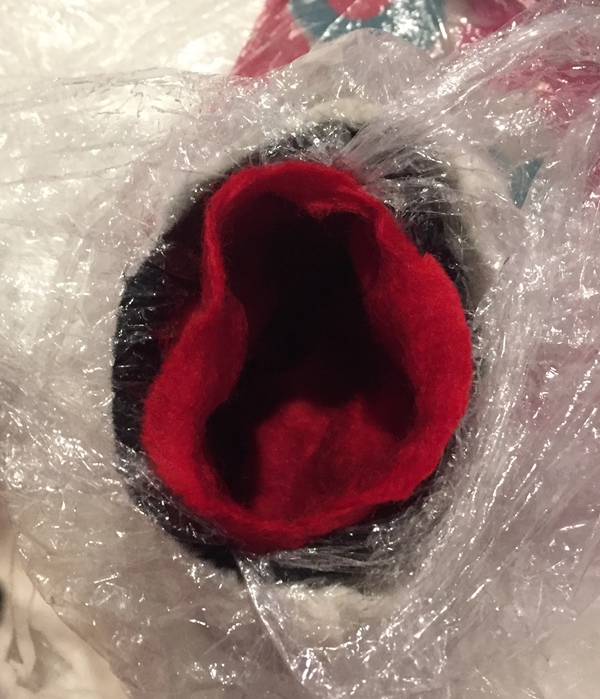
I only made a small one as I didn’t have a lot of time. I made the resist about 4 inches across.
I wanted to make a 3 layer pot. The first layer is red and not wanting to just do a regular pot I added two silk cocoons.
After both sides were covered in red wool I wrapped it in plastic wrap.
After that I wrapped it in black wool more plastic wrap and then white wool. I have no pictures of those as my battery died in the phone. I rubbed it a while and then popped it in my heatless dryer to tumble and went off to work. That was a few days ago and I finally got back to it a bit this morning. I cut open the first layer.
and then the black and red
I left he plastic wrap on the inner layers and blew up a balloon in side it. I wrapped it up in plastic like a Christmas pudding. and popped it back in to the dryer for more tumbling.
Now I have you all exited, I have to say it’s not done. My studio was freezing this morning so I went back to the house to stay warm. I do not like working in the cold with cold wet wool. I will have to finish it this week and show you next week. Enjoy the anticipation. LOL It’s supposed to be the best part, isn’t it? Were you inspired to give a pot in a pot a try after last weeks post? How did it go?
I’d planned to finish off a couple of projects yesterday – a bird pod, probably from last year, and a vessel I started at the well being centre on Monday – but thought that since I was getting all my felting stuff out, I’d do a ‘quick’ sampler piece with lots of different wools to take to the centre because a few members want to order some wools for felting at home. Well, it took a little bit longer than I’d planned, and I only used 15 different wools! This is it with the rows laid out:
I think this photo shows the colours a bit more accurately:
I used a few embellishments, but didn’t pile them on, like I usually do 🙂 I loosely twisted a silk hankie:
Added some teased apart silk noil:
A little bit of Bamboo staple fibre:
I took a quick photo after felting, before I hung it on the washing line to dry:
I can’t remeber if I ever showed this bird pod, but this is the one I’d planned to finish:
This is the vessel I started on Monday, still damp:
And the other side:
I really intended finishing them later on, but actually got around to felting those pieces of scrim with transfers on, so at least I’ll have those to show next time!.
I taught an enthusiastic group of ladies how to make felted vessels last Sunday. They were a great group and without Carleen’s reminders to take pictures I would have nothing to show you today.
This slideshow requires JavaScript.
Three ladies chose to make pots that were a different colour inside. and two made theirs a solid colour.
Then of course there was the wetting, rubbing and rolling and shaping
Blowing up a balloon inside helps get a nice shape. In the back ground you can see Carlene rolling on a car mat.
For some reason I did not get a picture of all the finished pieces. This is the only one I have of this white and gold pot. It was very elegant and I think it would make a great light cover. She said she was rewetting it and reshaping it. I hope she remembers to send me a picture of it when it’s done.
There was also some very determined rolling on the glass wash board.
I do have some finished pictures.
The blue one is Carlene’s. She wants to add to it. Here are 3 thoughts. The second and third pictures are the same yarn but different ends, one has more blue in it.
Her husband thinks the yarn covers up to much of the pot. I like the spiral but think maybe make the lines farther apart. What do you think? It may have been better to felt it right in. It would still be texture but flatter, more integral to the pot. Hey Carlene, maybe you just need to make another pot.
The first is a vessel. I haven’t made one in ages and thought it would be fun. I really like a cat motif that came up when looking at the time period I had picked.
I used grey Finnish wool. I had two balls bought at different times and they were slightly different colours and textures. I used the courser wool inside and the softer silkier wool on the outside.
For the vessel I just started with a big circle resist. then added some think wool for the cat shapes.
I used a different colour for the ears and then added some wisps of Fin to help secure it.
I have rubbed and rolled it and I am now in the middle of fulling it.
The second one is the same cat design but in a relief picture. I tried some Mauri wool I had. It feels like a medium wool. I came in small, sort of batts. I don’t know why it wasn’t either roving or a proper batt but I pulled it apart and layered bits until it seemed even. I decided to leave the edges rough so it looked more like a piece of broken pottery or mosaic.
I used some really thick rug yarn thrums that I was given years ago to make the cat. I then covered it in more mauri wool and made sure it was pressed down around the yarn. It is at the rolling stage.
That is as far as I got with both of them. You will have to wait until next time to see how they finish up.


