Browsed by
Tag: felt picture

A show and Picture Progress

A show and Picture Progress

I had a show on the weekend. It was quite good. We put a big push on advertising on Facebook and Instagram and it looks like it paid off. There were more customers this year. It’s nice that everyone’s efforts paid off.

This is what my booth looked like.

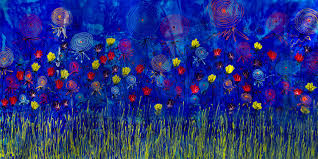
I sat in the back near the mirror and worked on my Moy MacKay class picture. You can see it on the left of the table.  People were very interested and it helped to start conversations.

On the second day, I changed the table around a little to see if the little bags would go better.  It might have been a little better. people look at them a lot but they are not selling. Maybe the price is a bit high. I need to get my webpage set up to sell or get my Etsy page up and working.

This is what it looked like at the beginning of the day.

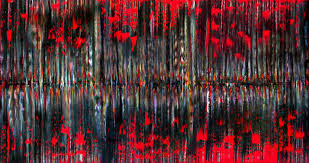
I added some more to the fences and some shadows for the ones on the left as the sun is on that side. added some purple to the left backfield to tone it down as it farther away.  The big thing I worked on mountains. The wool colours were running across, So they really didn’t look like trees. I added a thin layer of wool going the other way to make it look more like it is covered in trees. I used a greyer green so they will reseed more.


Now I need to add some shading to give the mountains some definition and mountainy shape. It’s coming along. At the moment I am working on the holiday card exchange. What are you working on?


A class with Moy MacKay

A class with Moy MacKay

Last week I had the opportunity to take a 2 day class with Moy MacKay. I went with a couple of friends and we had a great time.  We did the wet felting on day one. We had 2 pictures to choose from for the landscape.

I chose the one the left.

Moy demonstrated and explained to us how to work and what to do. We got to ask questions. She told us to take lots of pictures as we went because you see things in the picture that  you don’t see in just looking at it. Still I didn’t take enough.

First we laid out the background

Then we added the foreground and details. The house is prefelt and the flowers in the front are chopped up curls

We wet them down and gave them a 2 or 3 min rub and then rolled them for about 3 min one way and then the other for another few min and we were done. They are very lightly felted but that’s ok because they are pictures not hats.

That took the morning. After lunch we did another piece, a still life, flowers. We had a vase of red flowers and babies breath to use for inspiration. We were not to copy it but to use it to see how flowers look. You can see it in the group picture. Moy demonstrated again and explained again and then we only had about an hour to put the picture together and then a short time to get it felted before we had to be out of the room for another group.

We started with the table then the foliage and then the vase and then moves some leaves around. Then we added the flowers. The babies breath is nepps.

I quite like it at this stage. Not as much after it was felted.

On day 2 we started the embellishing. Moy talked about and demonstrated needle felting accents and refining the pictures. Also some machine embroidery and stitching.  we could try the machine stitching if we wanted but my picture wasn’t ready for that yet.   This is what they are like now. No where near done but works in progress.

This is after I straitened up the house and removed the mangled fence and added a new one.

This is where it is now.  I added windows and ivy to the house. I removed the cobwebs from the trees. I added some shading to the trees. I added in some stems for the flowers in front and another fence. I think the field behind the left fence needs to be darker because it’s farther away. It doesn’t show well in the picture but right now it is lighter and more yellow than the front field.  It needs a lot more work but I think I know what I want to do to it.

And the flowers. I forgot to take a picture of when it was wet felted but had no embellishments.  But here it is so far. I am not as keen on the flowers but they are alright. I may like them better after I work on them some more. The table needs straitening up and lots more texture. And notice the nepps have stuck. We had chopped up some green fibers as part of the foliage and I think the short fibers under them made them stick.

And lastly a picture of everyone’s works at the end of the second day. the flowers we used are beside Moy.

It was a great class. I think it’s given me confidence to try some more. Jan will be doing more posts for us and I hope she will do one about this class too. She will have taken at least a hundred more pictures than me and be able to show you her works in progress too.

Don’t forget to sign up for the holiday card exchange on the forum. Read all about it here: https://feltingandfiberstudio.com/2018/10/10/time-for-the-holiday-card-exchange-again/


A picture for exhibition

A picture for exhibition

Last week I missed doing my blog post because I had no power or internet. My area was hit by 6 tornados. We were not hit we had no damage.  Some areas near us were hit very hard, the large power substation near us was hit and some of the cell phone and internet towers too.

Before all that I did manage to work on my piece for the guild exhibition and sale. I  do not think I will get it done in time as it is due in a week.  The theme was a 100-mile inspiration. I decided to do a scene with the Parlement buildings. I am using 2 prefelt layers with a piece of cotton gauze in the middle for the background.

First I found a simple outline picture I could use for the outline of the building. I cut that out and tried it on the background.

I pinned it to another piece of prefelt and cut it out.

Then it was time to work ou the clouds.

After I took the picture and looked at it I realized I had made the clouds to symmetrical. Its funny how looking at a picture sometimes shows you more than just looking at it. I tacked all the pieces together with a few jabs of a felting needle

Next was adding fireworks as I am thinking it should be Canada Day.

Then I cropped the picture to see better how it will look.

I wet felted the piece and now I need to do some stitching around the building so it will show better.and my daughter said I should add beads around the fireworks like the sparkles you see with fireworks. I thought maybe some sparkly thread and a bead at the end of each firework.  What else would you add to this silhouette picture?


Some Needle Felting

Some Needle Felting

We’ve been needlefelting at the Well-Being Centre. We started last week when there were just a few of us. One of the members liked this painting of ducks that is on the wall:

This was how far she’d got at the start of this week after doing a little of work after taking it home last week:

I think I’ve mentioned it’s a basement room with strange lights and 2 tiny windows, so the light isn’t great. I started an abstract piece using some of the dyed locks we have:

Some of them are commercial dyed BFL from World of Wool. This is a green one:

And, I think this is some dyed locks Lyn donated to us when we were first starting out:

These weren’t done at the centre, but one of the members brought them in. She was a really good sport about us laughing at her first attempt. And we weren’t being mean, we know it’s just at a stage where it looks comical:

She started on a different one, and liked how that progressed so did a little bit more:

I’m looking forward to seeing them finished! She also brought in a nuno sample she made a few weeks ago, at the same time I made mine, this is the blended 18.5 mic Merino side:

This is the front:

And this is a close up of the texture:

I’ll have updates of the needle felting next time 🙂

Throwback Post: Felt Picture

Throwback Post: Felt Picture

Sorting through a pile of paper templates recently, I came across one I’d drawn for a felt landscape picture before I had a laptop to work from. And funnily enough, my sister has been thinking of getting this piece framed, so here’s a throwback post from August 2015, and if you have any suggestions for framing, which will protect it from moths, please let me know!

I had an idea over the week to do a piece of felt for my sister to say thanks for helping me at MakeFest. I saw a photo she took and thought that would make a great piece. I haven’t told her or asked her, so I probably shouldn’t post the photo without permission, but I made a simplified version on Photoshop as a guide:

field field picI don’t have a computer downstairs (or working printer) so I didn’t have a photo to work from, but I did draw a guide 🙂

OLYMPUS DIGITAL CAMERA

I marked out the bands on a template and did the first layer, I’m afraid some of the photos aren’t the best, it was dark and I had to use flash at times:

OLYMPUS DIGITAL CAMERAI then started on the second layer:

OLYMPUS DIGITAL CAMERAI thought it was looking alright until I got to the bright yellow patch near the bottom, it’s a field of bright yellow rapeseed flowers, and I really wanted to capture the almost bubbly look it had. I blended Nylon and silk throwsters and Bamboo, and it looked great, but made the rest look really flat:

OLYMPUS DIGITAL CAMERASo, then I had to go over all the areas with more texture. I blended shades, mixed in fibres, fluffed it all up and filled in the rows:

OLYMPUS DIGITAL CAMERAI realise now if I’d taken photos of the blends etc, I could have used this for the 3rd Quarter Challenge 🙂 My favourite part is the bottom, it was a hedge with lots of colour to it, mostly greens, but the new growth had shades of red. I used lots of different shades of nylon staple fibre for this.

OLYMPUS DIGITAL CAMERAI added the details on next: hedges, trees, telegraph poles:

OLYMPUS DIGITAL CAMERAFor the trees I used black viscose top, I pulled lengths off, fanned out the top, then gave it a twist to make the trunk and branches. Then I added fluffy wisps of blended wool.

OLYMPUS DIGITAL CAMERAWet down:

OLYMPUS DIGITAL CAMERAFelted and still wet:

OLYMPUS DIGITAL CAMERAA few bits of yarn I used for tracks didn’t work, so I removed them. Here it is dry:

OLYMPUS DIGITAL CAMERAThe back looks good too:

OLYMPUS DIGITAL CAMERAIt’s completely the wrong shades, the original photo is more ‘acidic’, but I liked how it turned out. I’m not sure it’s my sister’s thing though so it might be back to the drawing board there 🙂

A felt Picture

A felt Picture

While making little bags I also made a small picture. i suppose it would count for the first  quarter challenge.  happy-new-year-prepare-to-be-challenged/ i hope to do somthing a little more challenging before the quarter is over.  I like little pasture scenes. I started with a piece of black prefelt and then laid the blue sky and pasture. I thought I took more pictures but it seems I didn’t.

This what the back looks like. I wrapped the coloured fibers around the prefelt . I use black prefelt because it will intensify the colours. If I used white it would take the colours towards pastel.

This is the front side felted.  I made the contours of the meadow by using a multicoloured roving I had. I think it lets you give the meadow some texture and shape without painstakingly adding tiny bits of colour. I added some clouds to the sky and some flowers to the meadow with some soft silk and little white blobs of sheep as place markers for the next part.

I added the sheep using some embroidery floss and french knots.

Then added the heads and ears. I used a grey for the sheep that are farther away. I think it worked.

At this point it could have been done but I needed something else. Your eye goes to the middle and it is empty. I discussed it over on the Felting and Fiber Studio Forum and I decided some trees were needed. I only know how to do one kind of tree that looks half decent so ever greens were next. I did them in a medium green and then when back with fewer strands and added some darker stitches to give them more depth.

Here it is finished. I had to trim the top off so it would fit in the frame. I always seem to make to much sky anyway so that worked out well enough.

I looks quite nice in the frame. The frame seems to pop it out. I didn’t realise how many scratches it had until I took a picture. I will have to paint it. It is not a great picture, ther was so much reflection. this was the best compromise between the light reflecting or having a clear shot of me in the glass.

I need to learn to embroider more then far away evergreens and sheep. A little cabin or a nice oak tree would have been a nice  addition to the picture. I am thinking of buying Moy MacKays book. Do you have a favourite art felt  or how to hand stitch  pictures or art books?


First Quarter Fauvism Challenge

First Quarter Fauvism Challenge

I’m really late doing the first quarter Fauvism challenge, I thought I understood it, but every time I had an idea and started to work on it, it didn’t seem right. I finally decided on a picture to use last week, one of my favourite pictures of the lake at Sefton Park, Aigburth. I used it for a previous challenge, Marilyn’s Monet Challenge, and thought it’d be interesting to do a comparison. Then right at the last minute yesterday after looking at the other entries and googling ‘fauvism’ again, it didn’t seem right! But, looking at the other entries reminded me of my sister’s photo which I used to make a felt picture a couple of years ago. Here’e the post if you don’t remember: https://feltingandfiberstudio.com/2015/08/19/felt-picture/  and here’s the picture I made:

I took the original photo (without permission, hope she doesn’t mind!) and altered the colours in Photoshop:

I’d had in my head that Fauvism was really bright, but the more I looked, the more I saw muted colours, unsaturated shades. There’s one particular jade green that I started to see everywhere! I simplified the picture to get the colour bands:

And added some ‘accented edges’:

Then I blended the last one and first one together:

A lot of the Fauvist paintings had roughly blended brush strokes and patchy areas so I blended some colours for each band to try to get that effect:

I don’t know which photo shows it better:

Then I added embellishment fibres for mre effect, this is some Kapok on the pink, there’s a bit of silk on the blue, trilobal nylon on the orange, and nylon staple on the blue:

I don’t know why I did that second band blue, I can see it’s green on the photo, I clearly wrote ‘green’ on my template, and somehow chose blue! Maybe I tilted my laptop screen back too far (good excuse!) I did realise before felting and changed it:

The other embellishments and fibres I added are: some dark blue wool and light blue nylon for trees at the top; some green wool and red nylon for trees between the top orange row and blue one underneath it; green and yellow viscose staple on the green layer and some dark blue nylon for a hedge. The track lines are wool; I used viscose and nylon on the lower orangey band, and the blue/purple band at the bottom has dyed cotton nepps and nylon staple fibre added. This angle might show them a bit better:

I only got it felted early evening, so here it is pegged on the washing line to dry, I haven’t even had a look at it yet today!

I love the colours, but I put far more detail and work into the first one, so it looks dull and flat in comparison, so I think I will add some stitching to this to improve it 🙂

Felt Picture

Felt Picture

I had an idea over the week to do a piece of felt for my sister to say thanks for helping me at MakeFest. I saw a photo she took and thought that would make a great piece. I haven’t told her or asked her, so I probably shouldn’t post the photo without permission, but I made a simplified version on Photoshop as a guide:

field field picI don’t have a computer downstairs (or working printer) so I didn’t have a photo to work from, but I did draw a guide 🙂

OLYMPUS DIGITAL CAMERA

I marked out the bands on a template and did the first layer, I’m afraid some of the photos aren’t the best, it was dark and I had to use flash at times:

OLYMPUS DIGITAL CAMERAI then started on the second layer:

OLYMPUS DIGITAL CAMERAI thought it was looking alright until I got to the bright yellow patch near the bottom, it’s a field of bright yellow rapeseed flowers, and I really wanted to capture the almost bubbly look it had. I blended Nylon and silk throwsters and Bamboo, and it looked great, but made the rest look really flat:

OLYMPUS DIGITAL CAMERASo, then I had to go over all the areas with more texture. I blended shades, mixed in fibres, fluffed it all up and filled in the rows:

OLYMPUS DIGITAL CAMERAI realise now if I’d taken photos of the blends etc, I could have used this for the 3rd Quarter Challenge 🙂 My favourite part is the bottom, it was a hedge with lots of colour to it, mostly greens, but the new growth had shades of red. I used lots of different shades of nylon staple fibre for this.

OLYMPUS DIGITAL CAMERAI added the details on next: hedges, trees, telegraph poles:

OLYMPUS DIGITAL CAMERAFor the trees I used black viscose top, I pulled lengths off, fanned out the top, then gave it a twist to make the trunk and branches. Then I added fluffy wisps of blended wool.

OLYMPUS DIGITAL CAMERAWet down:

OLYMPUS DIGITAL CAMERAFelted and still wet:

OLYMPUS DIGITAL CAMERAA few bits of yarn I used for tracks didn’t work, so I removed them. Here it is dry:

OLYMPUS DIGITAL CAMERAThe back looks good too:

OLYMPUS DIGITAL CAMERAIt’s completely the wrong shades, the original photo is more ‘acidic’, but I liked how it turned out. I’m not sure it’s my sister’s thing though so it might be back to the drawing board there 🙂

Second Quarter Challenge Finally Done.

Second Quarter Challenge Finally Done.

That’s right I have it done and with days to spare. 12 whole days at that! Here are the details of the challenge if you missed them.  Challenge

I have know what I was going to do for ages I just hadn’t done it. I like Stephenson’s mirror pieces but I also liked the flower pieces so I decided to combine them.

stevenson 1  stevenson 2

I used a thin piece of black prefelt I had and doubled it up for the back ground. I then used my own handspun for the stems. I added silk throwers waste for the flowers and then more hand spun for the spirals. I wasn’t sure how everything would stick. There was not a lot of fuzzy about any of it. It worked out fine though.

I forgot to take a picture of it before felting but here it is finished. I like it a lot more than I thought I was going to.

stepnenson picture

I found this frame on my front porch ( have no idea why it was there) and laid it over the picture and I like it even more.

stepnenson picture frame

If you haven’t done a piece, go ahead and give it a try, you still have time.

Don’t for get to visit the Forum to see how others have interpreted the theme.  Challenge