Working on a new project, the design part
During my time stuck in bed last month, (literarily, not figuratively), I relented and agreed that my “Smart” phone was rather dim and it was probably time to upgrade to something that could at least text as well as make phone calls. I am still of the opinion that if you are holding a cell phone and you want to communicate with me, why text the dyslexic when you could just phone? Ann mentioned there was a Motorola for sale at Costco and maybe my hubby should investigate it. I was mostly out of it so didn’t get to have much impute but getting the same brand as what I have had should make the transition easier…… that thot went not quite as I expected.
When I was able to get out of the house and into the car (as a passenger), Glenn took me to the phone store and we got them to set up the new phone. He offered to transfer data and apps, but when he looked at my old phone, he laughed and said I only had about 10 contacts and no apps so he suggested it would be good practice to enter them myself. He also said there are many YouTube videos that would explain apps to me. (I still feel mostly in the dark but may get this figured out. in the meantime, I can sometimes make phone calls!)
My old phone was 3×5.5” and fit nicely in a handwoven pouch. The new one is much longer and has more buttons on the side, which I keep accidentally pushing when I pick it up! (Ok this learning curve keeps getting steeper, I am not a total Luddite really!!!) With a new phone, I will need a new case and glass cover. Since I had No luck at the phone store, I went online to find the accessories to protect the new phone.
1) New phone, Old Phone, and iPod  comparing size.
I found the phone covers online and accidentally started to notice small interesting purses (presumably to put your phone in?). A few of which I would be interested in trying to make in felt. (See I did have a felt topic hidden in all this phone upgrade chatting). I happily browsed through a shark and a whale, then found dinosaurs!!! There was a triceratops, a Tyrannosaurus or Allosaurus (hard to tell which) and finally a stegosaurus but without the tail spikes. none are anatomically accurate but all were very cute. They seem a bit small and all are made from fake leather and some have mettle studs for decoration.
Of the water life, I think I would do a manta ray with an opening at the mouth. It would be safer than trying to stick my hand in a shark’s mouth to retrieve a phone. My other option would be a blue whale since they have such a large mouth. They both eat krill so my fingers would be safe, which would make it easier to find the phone.
 2) Manta and blue whale
I have a couple of the metal hardware for coin peruses that are too small or the wrong shape for this use, but the concept may work.
 3) The 5 Kiss clasp clutch or purse hardware I already have.
Let me check online and see if I can find a couple of shapes that might work. And they are ordered, Arrival is expected in early July. Kiss clasps come in lots of shapes. You will notice that the metal arms have small holes along their length. These are to sew in the fabric (in our case Felt) that will make the opening of the bag.
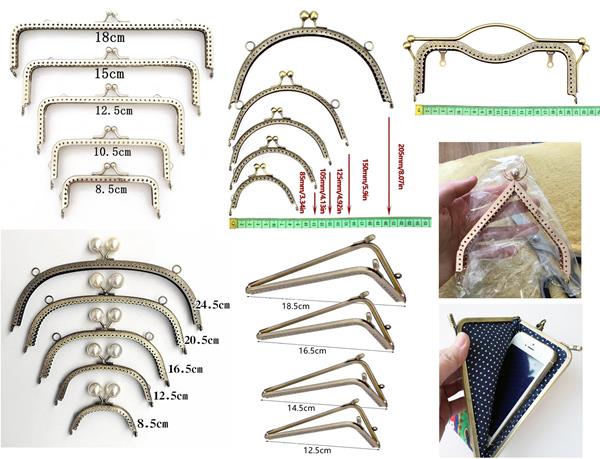 4) Some of the shapes and sizes of kiss clasps
They seem to be called kiss clasps and vary in size from one suited to a small coin purse to about 20.5cm. They come in various shapes, half circles, various arches (sort of flattened half circles), half squares and half rectangles and even L shapes (which I have 3 but won’t suit for this project).
I was also intrigued by the dinosaur bags (some are too small to fit a cell phone and maybe meant as a kid’s change purse so watch the sizes if you want to order one.)

 5-6) fake Leather Dinosaur bags; Stegosaurus, Triceratops, T-rex
Plotting and Planning
To create a phone-holding device, (purse), I have the option of working in either dry or wet felting or using some of each technique.
First thought: I am most comfortable with dry felting and could create a purse using needle felting techniques and a bit of sewing to add the cavity closures, but it would likely take even longer than working on the Mer’s. (I think I need something a bit quicker to finish).
Second thought: I could create a resist to wet felt over, making the main body and cavity for the phone holder. That would be quicker but adding appendages and spines might get tricky only using wet felting. I would still have to sew on the clasp or other closing method.
Stray thots that flit through while I am trying to concentrate on this wet Vs dry dilemma: If I try a manta phone-holder I will want to have it hang curved ageist my hip or side. This may suggest a wire armature in the wings or at least the leading edge of the wings. I will also need a mouth opening large enough to stick my hand in to find the phone. If I go with the stegasorous I will want it to stand up on its own solid firm legs. I would also want the neck and tail (with spikes) to be bendable so I can again curve it as it hangs beside me. I would also want to make a more anatomically correct dinosaur or Sea creature. (Not pink! ok, we don’t know for sure they weren’t pink but I am extremely hopeful pink was not a common body colour for dinosaurs)
I could insert a stiff single wire like I did to augment Mr Mer’s lower back problem (the firmness of the felting overpowering the wire gauge I had originally used. So I augmented it by inserting arthroscopically Harrington rods of 10ga aluminium with sharpened tips.) The con to that option is that when the distance to be strengthened is lengthened then the likelihood of getting a straight insertion is much more challenging. I wonder if I could baste on the wire, then needle felt over top to cover the inclusion?
If I am going to think about wet felting I will need a few pieces of resist (floor underlayment). I don’t think I have any resist hanging around the house but I can find some at our local hardware store! So I was off to the local home depo. Oh, it only comes in BIG roles I guess I can now make a few options or one very big purse!
 7) Flooring Underlayment comes in a large role, 2mm thick and 200sq feet.
The next thing to consider is the size and shape the resist should be to make the phone-holding opening. If I go with a manta, the actual resist can be much smaller than the wings and tail. I would also have to make an inset to the mouth to attach the kiss clasp too. My other option would be a zipper but it would put more strain on the mouth area so it would need to be very firmly felted. I could add a bit more strength if I used a bit of silk or gauze.
For a stegosaurus, I would need to add a belly between the legs. I think adding supplemental resists for the legs, which I could then backfill with firm felt should work. I want it to stand up if it was sitting on a flat surface. I would also have to add plates along either side of the spine and then spikes for the tail.
There are also the horrors of Math! Estimating the shrinkage then expanding to make the template…. Math…. Ick.
Well, I may have circumvented part of the horrors of math by finding this site! it may be helpful to other math challenged felters. Look about halfway down the page for “Wet Felting Wool Shrinkage Calculator” https://www.abcrafty.com/wool-shrinkage-calculator/
My next step will be to make a mock-up of the potential resist shape, but while I await the arrival of the clasps I have a couple of other things to work on. Bernadette had some locks that may work for Mrs. Mer’s hair and I guess that will also give me time to get a bit more work done in the garden. We had a break in the smoke and had a moment of sunshine this afternoon! (a wonderful change from the smoke and odd smells of the last few days so I wanted to share the sunshine with you.)
 8) shots from my front garden
Like this:
Like Loading...