Using up supplies: investigating a new fibre

Using up supplies: investigating a new fibre

I was looking around my studio wondering what to write about in this blog. I was remembered Ruth Lane’s recent comment in her blog here about using up supplies. I have a carded batt of merino / A grade mulberry silk from World of Wool that’s been kicking around for a while. I can’t remember if I bought it for something specific that didn’t get made or if I bought it on spec. I was interested to find out how it felted and what I might do with it so I decided to make a small test vessel.

I cut out a circular resist using a small mat as a template then started laying out the fibre outwards towards the edge. Apologies that these pictures are mostly white on light colours – I was thinking more about the making than the photography. I laid the second layer in a circular pattern before flipping it over to smooth the overlap onto side 2. After 2 layers on the second side, I flipped back and laid 2 more layers on side 1, followed by 2 more on side 2. 


After wetting it down I spent a lot of my time working the edge by pulling the voile over the edge so I wouldn’t get a ridge around the middle of the finished vessel. It felted quickly and I was soon able to start fulling – initially without removing the resist.

Once I’d cut out the resist I found, in my vast collection of miscellaneous wooden objects, that the handle of a wooden pestle (as in mortar & pestle) was the perfect size for getting inside the vessel and working it from the inside.

I spent a while fulling it as I wanted it to be smooth and very firm.

I packed the vessel with strips of recycled bubble wrap that I keep for this purpose – you can see it green inside.  Looking at this green bubble wrap made me wonder if I could make a vessel with a coloured interior but retaining the pale colour outside.  I thought maybe if I used silk rather than wool to add colour I’d get less colour transfer, so I thought I’d give it a go.

While pondering this, I decided to try using the same resist as the test vessel but to make 2 small bowls rather than one vessel: so, cutting it in two around the middle rather than making a hole at the top to remove the resist. I dipped into my big boxes full of second-hand silk scarves bought in charity shops and chose a plain turquoise and a patterned blue one.

Supplies for making two small wet felted bowls on a single resist: merino wool and mulberry silk carded batt with two second hand blue patterned silk scarves: one dark blue patterned, one plain turquoise
Carded merino / mulberry silk batt & two silk scarves ready for recycling


I put a circle of silk on the resist and decided to run a small line of coloured merino tops around the edge: partly as I was interested to see how it would look and partly as I thought I might not know where to cut when I was ready to remove the resist and separate the little bowls – I’ve made that mistake before!

I put a circle of the blue patterned silk on the second side. The merino and silk fibre layout was the same as the previous vessel. This time I also remembered to do the circular layer first followed by the radiating layer – I’ve learned that one before and obviously temporarily forgot for the previous vessel. It makes following the resist with the circular layers much easier and I prefer to try not to overlap that layer if possible – again it reduces potential ridges and produces a better join if you only overlap the radiating layer, in my opinion.  I’m sure some of you will disagree but that’s one of the many things I love about wet felting: with experience everyone works out the techniques and tools that work best for them.


I was interested that I could see quite a lot of the inner colour throughout. I quickly began to suspect this was more about the amount of dye bleeding from the turquoise silk as about seeing the silk through the wool. I was getting a lot of turquoise in the felting water.

Again, I fulled them thoroughly. During the fulling, I decided I liked the silk on the outside better than the inside so here they are, still wet.

And here are the 3 items. You can see how green the wool of the little bowls is compared with the vessel. I’m pleased with the bowls’ blue rims  – I like this effect – but the vessel is my favourite. In each of the test pieces the fibre has felted beautifully: it’s very firm and extremely light – it has an almost papery quality about it that I find really appealing.


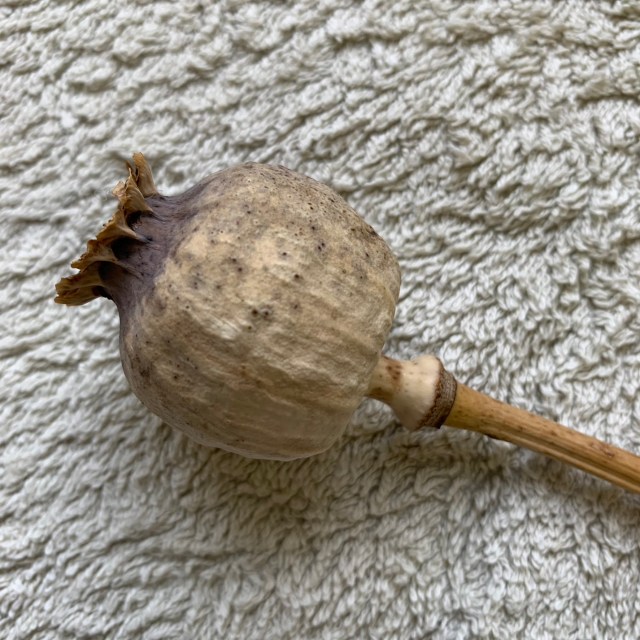
My imagination is now firing about what I could make next with this fibre. I have a dried poppy seed head sitting in a vase next to my desk. The felt reminded me of the texture and colour of the seed head. I’ve felted poppy seed heads before – one of my favourites. Another thing I have in the studio is some vintage cotton lace I was unable to resist when I saw it in a local second-hand shop.


I thought maybe that the lace would add a subtle surface texture so why not have a try? This time I made a small square sample using just 2 layers of the wool / silk mix batt with strips of lace in parallel lines.


Although it’s subtle, I really like the effect. As you can see in the close up shot, the batt has quite a bit of vegetable matter which in this case adds some interesting specks, enhancing the natural look. 

I was running out of time but decide to start the poppy seed head. The merino fibre length in the batt is very short which makes the layout quite slow but very precise.  In the first photo you can just see the strands of lace which I’ve laid out on top of 4 layers on the under side and are waiting for me to finish the final 2 layers on the top side before bringing them over. 

Circular resist partially covered in carded merino and silk batt
Work in progress: 3D wet felted sculpture with multiple resists laid out, wetted down and partially felted

The second photo shows how far I got yesterday before I had to stop. This is a multi-resist piece that will take a while to make. I’ll show it finished in my next blog.

I enjoyed letting the fibre lead my imagination in what I might do next.  I’ve done mostly production felting recently – making multiples of things for shops and sales – so it was great just to see where things led me and enjoy felt-making for the sheer fun of it.  I’m looking forward to getting back into the studio soon to finish the poppy seed head.

Tools for Wet Felting

Tools for Wet Felting

A few months ago, Mr TB treated himself a new toy, a rather expensive 3D printer….

The look on my face when I discovered what he had done probably wasn’t one of overjoyed enthusiasm. He had spent thousands of dollars on a toy he would probably only use a handful of times….

I suspect he was trying to appease my disappointment when he asked if there is anything I would like him to print for me but at the time I couldn’t think of anything remotely useful he could make.

A few weeks later I was fulling and shaping a felt pod with a tiny opening, the opening was so small I could barely get one finger inside, it dawned on me that a 3D printed tool with a ridged surface at the end would be a huge help.

I sketched out what I thought it should look like and described the dimensions to Mr TB who dutifully translated it in his CAD software and sent it to the 3D printer.

pencil sketch of a felt fulling tool

Ooops – fail! The tool detached from the print bed resulting in a scruffy bird’s nest of filament like this:

a scribbly mess of 3D printing filament from a print that went very wrong

In fact there were lots of fails…. this is just a fraction of the tools that didn’t quite print as they should have.

A colourful group of partially printed and broken felt fulling tools

Try as we might, we could not get this tool to print successfully.

We changed tack, and tried making another design. This new shape I mostly use for shaping the bottoms of bags, but it is also really useful for fulling large, flat pieces of felt (wall hangings, rugs…) and vessels.

a pair of scallopini shape felt fulling tools
Scallopini Tool

I also know at least one felt maker who uses a larger version for wetting out her large felt rugs. She wets out the wool, covers with plastic and uses the tool to “push” the soapy water from the centre to the edges so the water is even distributed.

a larger scallopini fulling tool

For my bags, I like to scrub the inside of the bag while it sits flat on the table, this tightens the felt on the base of the bag and creates a nice flat bottom so the bag doesn’t fall over when it is set down. Tipping the bag on it side while rubbing allows you to full all sides of the bag and give you straight sides too.

In this video I am using a slightly smaller tool because the bag is too small for the scallopini tool but the principle is the same. Just a few of minutes of rubbing shapes the bottom of the bag and 5-10 minutes of rubbing with soap and hot water gives a nice, firm felt, that is hardwearing enough for a bag.

I took my new scallopini tool to a felting retreat and discovered there is a lot of interest in 3D-printed felting tools, this surprised me as I know a lot of felt-makers are faithfully wedded to their favourite Tupperware lids and massage blocks but from chatting with them, most think the handles on their re-purposed tools aren’t all that comfortable.

Buoyed up by the overwhelmingly positive response at the retreat, Mr TB and I set about translating this wooden tool I commissioned from a wood turner several years ago.

a wooden version of the wand tool

This design also proved problematic for the printer, the first half would print well but almost invariably, the partially printed tool would get knocked by the printing nozzle and we would end up with a big squiggly bird’s nest again.

a failed 3D print of the wand tool

After multiple failed attempts, trying different heat and speed settings Mr TB had the genius idea to make the tool in 2 parts. We didn’t realise it at the time, but the interchangeable felting tool had just been born!

We have designed the tools so that all of the heads can be used with any of the handles.

This is the Wand tool in action, shaping a felted flower. These tools are good for getting into narrow spaces, such as inside horns or tubes, shaping and stiffening the feet and handles on vessels etc

I am working the base of each petal to stiffen it and make it stand upright.

2 sculptural felt flowers

Six months on from the initial, failed tool, the family of tools has grown to include 5 different heads and 3 options for the handles. I think it is safe to say I am using his 3D printer far more than Mr TB is! 🙂

The whole family of interchangeable felting tools together

In this last video I am using the medium ball tool and the scallopini to shape and full a child’s slipper. The video is sped up but it took me about 7 minutes to completely full and shape each slipper.

The moral of this story? Keep a lid on your irritation if your other half spends a large chunk of your savings on a new toy, redirect your energy into figuring out how you can turn their frivolous spending to your advantage… 🙂

These tools are available in my Etsy shop, if you cannot see them, please let me know where you live (they are currently only set up for shipping to a handful of countries).

I won’t get the chance to post again next week so will take this opportunity to wish you a very Happy Matariki (Maori / NZ New Year) for next Friday (July 14th) and a joyful year ahead.

a star filled night sky with the words, Celebrating Matariki, Maori New Year


3 New Chickadees for 3 new relatives

3 New Chickadees for 3 new relatives

Now a momentary pause from my last post and the horrors of math gone wrong.

Instead, I shifted gears back to a project I had started working on a couple of weeks ago but the deadline is now coming up quickly. As you may remember reading, as a commemorative of their parents, I had made each of my brothers-in-laws (there are 5 brothers in total), a chickadee.

6 sets of checkadee feet 1)Chickadee feet, birds in progress for the 5 brothers from 2021

We recently had exciting and unexpected news from one of the brothers. He had been contacted by new family members and was able to arrange a first meeting at the end of June.  I wanted to find a good way to have them feel welcome. When we lost both my in-laws, I made each of the five brothers a Chickadee. (There is a post about that somewhere in the blog.)  We all have fond memories of sitting on the back patio, or washing dishes in the kitchen sink and watching the birds, there were only a couple of bird feeders but so many birds!! The blue jays, cardinals, robins, finches, sparrows, other little ones (that I wasn’t too sure who they were) and the determined throng of chickadees. (There were also crows but I think I was the only one who liked them, plus an army of squirrels, oh and the occasional very cute rabbit.) I have inflicted photos of most of them on you already! Well, maybe just one more to inspire more felted birds.

Blue Jay stealing penuts2) Blue Jay steals Peanuts in Oakville

What we found out was that the brothers have gained a sister! (Ancestry has made a match!) And she has sons so we now have two new Nephews!!! (New to us, they are a bit older than brand new nephews usually are).  We knew that Brother #4 and family would be visiting in Ontario and could travel closer to the eastern end of the province so may be able to arrange a meeting. With a flurry of e-mails, all was arranged.

We were grateful to my brother and his wife for lending us their cottage.  This is the cottage from my childhood, where I honed my by-hand-hunting-skills with the local frogs (bull, leopard and occasionally tree frogs), snakes (black rat, Garter and grass snakes) and turtles (Snapping, painted and soft-shelled mud turtles). Unfortunately, I think my hunting days are behind me.) My brother focused on sneaking up and decapitating unsuspecting wildflowers (hunting) which were more appreciated by my Mom than my much more difficult to catch gifts. (Who could possibly say no to a tree frog? Ok, it was my Mom.)

We went up after work on Friday, it was a bit overcast but was forecast to be a hot weekend and it’s always cooler at the cottage than in the city. I packed up my box of chickadee supplies and was determined to finish all three before the new relatives arrived!

It is a fabulous spot looking out into the trees well above the level of the lake. It was a very inspiring spot to work. As you can see I took over the dining table and then spread to the coffee table. Felting is lighter to transport than spinning or weaving but it sure can take up a lot of space when it escapes from its confinement!

needle felting coving dining table in front of big windows at cottage 
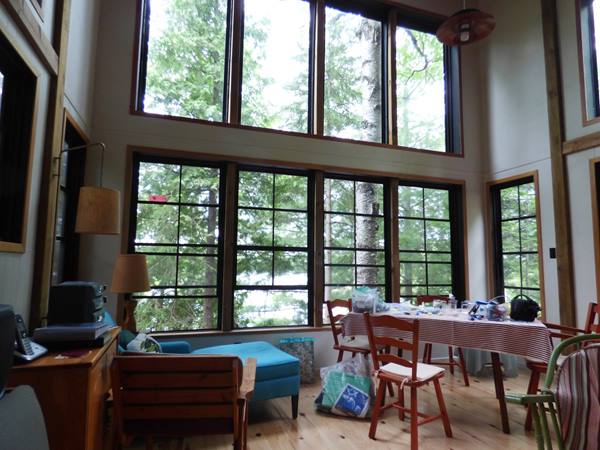
3)Wool expanding to fill the space provided (dining room table). Large windows showing trees and tiny glimpses of the lake, far below.

i left my hubby a bit of space to read as the rest of the table is covered with needle felting suplys4) I did leave my hubby a bit of space to read his book.

The Mer’s had come with us, as well as Miss Manta. The Mer’s tried out the teal chaise longue before checking out the window view. Once the Mer’s were happy, I got to work on finishing the Chickadees.

5)Mr and Mrs Mer, Necking on the chaise longue5) Necking on the chaise longue

Mrs and Mr Mer standing on there fins looking out window through trees to lake

I had gotten all three armatures wrapped in wool and to the point that they were ready to have their top coat added before leaving Ottawa.

This slideshow requires JavaScript.

7.1- 7.5) Adding tail colour and underwing detail

One of the beaks was not behaving as well as I would like. I noticed the wool on the top upper end of the beak was just a bit looser than when I had wrapped it and was looking a bit fuzzy.  This suggests I either did not use quite as thin a bit of fibre or I had not kept wrapping and rubbing the fibres long enough after running out of wool on the beak. Under the wool is floral tape which is embedded with wax but I found it was not quite as sticky as other times (it may be the section of the roll or its age? I don’t do a lot (or any) wrapping of flowers so I’m not sure of all the factors. It could be that I just didn’t pull that section quite as enthusiastically and did not activate the stickiness correctly.

If I have a bit that should be tight (tips of claws, beaks) and is not up to what I would like,  I can add a bit of conditioned wax.  Wax on its own can dry too brittle or not penetrate the wool, so something that makes it more pliable when dry is preferable. I did not have my wax mix from Sara (Sarafina fibre arts) so I resorted to a dip of wax from a blue candle that was conveniently sitting on the hutch. I first tried using the end of a felting needle to transfer the wax but found the wax cooled too quickly and did not penetrate the fibres, instead sitting above the felt. I cleaned off the unhelpful wax and finally just put the tip of the beak into the wax puddle, which worked.  I rubbed the wax as it cools and found it had penetrated into the wool nicely.  (I bet the little bird will not be looking for seeds in wax candles again!)

This slideshow requires JavaScript.

I don’t think I have shown you this, it’s another way to make a line on the surface of your felt.  I wanted a line on the back that was visible, but not as hard-edged as one that is created by tacking down at one end and then drafting out. (I did use that technique along the wings.) For this I started with a wisp of fibre blended to the colour of the line I wanted, laying it over the area the line would go.  I used a needle (I think it was a T-36 or T-38 ( a finer gage would not entrap as much fiber so it would just take more poking and could make a finer more wispy line.)

lay a whisp over the area to add a line and (poke/stab/impale) embedding the fiber in the general line-ish shape you want9) Step 1 lay a whisp over the area to add a line and (poke/stab/impale) embedding the fibre in the general line-ish shape you want.

Lift the fiber up (vertically) away from the felt10) Lift the fibre up (vertically) away from the felt.

If you were wanting a semi-hard edge colour change you could flop the fibre down on one side of the line and blend away, but I wanted to see a slightly indistinct line so I lifted both sides up and used my curved blade embroidery scissors, you can see on the table, to remove the excess fibre.

 11) the excess fiber from the whisp has been cut away leaving a line embedded in the surface of the felt 11) the excess fibre from the whisp has been cut away leaving a line embedded in the surface of the felt

You may already know this way to make lines and have used a similar technique when adding fur to a sculpture but without such enthusiastic trimming.  I figured I should mention it in case you had not yet investigated further and seen further possibilities.  The only drawback to this form of line making is that the wisp can obscure where you are laying the line if the “wisps” is not as wispy as a wisp of fibre should be! (Well, that is the start of a good tung twister I am sure one of you can expand on that thought!) I have been finding the curved blade embroidery scissors work very well on curved felt surfaces. This red handled pair I found for sale online out of China.

When I had the backs ready I created little wing shapes in 3 pairs. I added detail. I had made a special trip to get a brighter white fibre. When I tried it on the first wing, I found that it looked very odd compared to the other tones. So, I went back to the off-white/natural white which looked much better.

12) Once I was pleased with all the wings I added them to the little bird bodies.12) Once I was pleased with all the wings I added them to the little bird bodies.

13) Here all the wings are on and looking good.13) Here all the wings are on and looking good.

One last step to do, now where is the thread, giant bead needle and the little black beads go? Ah! Not to panic the thread and needle were in the bottom of the little toolbox and the beads are in the bottom of the box marked Chickadee!

14) Eldest Nephew of brother #4 joins the Mer’s admiring the lake (through the trees)14) Eldest Nephew of brother #4 joins the Mer’s admiring the lake (through the trees)

Saturday afternoon Brother #4 and his family arrived and were impressed with the cottage. (Thank you again to my brother and his family!)

15) I had just finished putting on the eyes and tucking each bird into his little box when the new members of the family arrived.

I am not sure we were quite what they were expecting. (I hope we didn’t disappoint them too much!) I think my new sister-in-law may have been a bit overwhelmed but they were all fabulous!

16) New Neffue #1, New Ant!, New Nefue #216) New Nephew #1, New Ant!, New Nefue #2

They did seem quite interested in the needle felted birds (as well as the Mer’s and Miss Manta (who seems to have dodged all the photos), so I sent both my new nephews off with a bag of felting needles carefully labelled with gauges for them to try. I am determined that there will be a next generation of felting, spinning or weaving but I had thought it might be my nieces on Glenn’s side or maybe a niece on my side. This is fabulous I may have two more nephews to confuse with fibre!! I wonder what their thots on spinning wheels are? Maybe next visit! (I don’t want to frighten them!!)

It was fascinating to suddenly notice similarities between the nephews and their new uncles. I think nature is winning out over nurture again but all in a very good way.

17) New Sister, New Nephew #2, New Youngest Uncle, New Nephew #117) New Sister, New Nephew #2, New Youngest Uncle, New Nephew #1

We had a wonderful visit on Saturday afternoon and evening, then they returned on Sunday morning for breakfast. It was sad to see everyone headed home, but I am hopeful we will get to see them again soon.  We lingered to do a final clean-up of the cottage. While we were sweeping, vacuuming and collecting laundry, we found the Mer’s were cavorting or maybe that was air swimming, it’s hard to tell.

18) the Mer’s having fun at the cottage.18) the Mer’s having fun at the cottage.

Once we had persuaded everyone into their project bag, we took a moment just to enjoy the quiet (ok there were sea-doos and the loons and some other birds and that daredevil squirrel…) for a moment, before heading back to Ottawa.

19) Hubby taking a moment to relax and read his book.19) Hubby taking a moment to relax and read his book.

The lighting was truly fantastic and the living room made a perfect chickadee finishing spot.

20) one last look before heading out and back to Ottawa.20) one last look before heading out and back to Ottawa.

As we got closer to town, we noticed that haze was back, and then that the smell had returned …. More forest fires still burning. I was hoping so much that all the rain would have dissuaded the hungry flames.

It was a memorable weekend, it’s not every day your hubby and his brothers get a new sister and two adult nephews! They definitely seem like part of the family, Art, Music, and I suspect a lot of reading! I hope they will get to meet the other brothers/Uncles soon. In the meantime maybe I can distract them with a bit of needle felting! Or maybe they would prefer wet felting? Or maybe both!! I have pointed them to the blog, and Sara and Marie’s YouTube felt-a-longs, I can’t wait to see what they make! Maybe some more Mer-People? The Mers should have relatives too!

PS Happy 4 of July to our southern nabours and family!

2023 THIRD QUARTER CHALLENGE

2023 THIRD QUARTER CHALLENGE

The members of this forum are scattered around the world and it would be fun to see a little about where we all live.

This challenge is to portray something that’s special about your home city/town/village – in whatever fibre medium you choose.

Unfortunately Annie and I couldn’t recall making anything that we can give as an example for this challenge! However, we did make this picture of a Finger Post, and had we been inhabitants of Lands End in Cornwall it would certainly fit the challenge!

There is also a ‘tree challenge’ running throughout this year.  It’s really simple – just find a tree that you like and depict it as it looks in this quarter – it can be realistic or representational.

Please share your make on The Felting and Fiber Forum / Studio Challenges and perhaps write a few words about it.

You can submit photos here: https://feltingandfiberstudio.com/community-photo-submissions/

Now the branch is finished too

Now the branch is finished too

So sliding in on a cloud of dust I have the branch finished just as the quarter runs out. I know we don’t have to get it done in a specific time but it is nice to get it done in the quarter the challenge is posted.

Last time I had all the flowers made. https://feltingandfiberstudio.com/2023/06/18/second-quarter-challenge-flowers-finished/

After looking at it and especially seeing it in a photo I decided the larger flowers at the bottom of the flowers should have yellow centres. So I added them. I used mostly french knots with 2 threads. The single french knots are smaller than the colonial knots. The Yellow stands out more in the photo than in real life.


hanging flowers made of felt and french knots .hanging flowers made of felt and french knots, close up

It still looked pretty sparse so I decided leaf buds would help. I looked them up online. It was best to look up flowering trees and look at the buds in the background. It didn’t seem to matter the kind of tree the leaf buds looked pretty much the same. I made all the leaf buds at the same time so I would get them about the same size. It didn’t take long and I only poked myself a few times. That’s the problem of working small.

first I had to make the green I wanted. I had Christmas green, lime green and a very yellow-green. I mixed them with a couple of dog brushes.

I made 2 at a time. Then cut them in half and finished shaping them while holding them. I poked myself working on the pad not in my hand and I know Jan will tell me she just gave me a tool so I wouldn’t do that. But I forgot until after I poked myself, naturally.

making a needle felt leaf pile of felted leaves

I fiddled around placing them. and felted them down…… without poking myself.

placing felted leaves on the branch

leaves felted down


I had originally thought I would add a bit of brown near the base of the buds but I didn’t like it and pulled them off.

adding brown to the base of the leaves.

I am quite pleased with the finished branch. Now I need to steam it a bit, to block it square. The dent on the left is really bugging me.

Making Silk Paper and Beginning a New Landscape

Making Silk Paper and Beginning a New Landscape

Having sold one of my larger pieces in the gallery, I had a request for a new large nuno felted landscape similar to The First Leaf. So if you are reading along and think that you are having deja vu, it is because this piece will be very similar, just a larger size. The new piece will be 19″ x 33″ and will use the same nuno background used in The First Leaf which is only 14″ x 18.5″. The first step was to make silk paper for the birch tree trunks. I had a little bit left in my stash but it was not big enough or long enough.

Silk paper birch trees laid out on netting and plastic with layers of white silk fiber and black accents.

Making silk paper is simple. You lay out silk fiber on to nylon netting, cover with another piece of nylon netting, wet down the silk and then paint on some type of acrylic medium. You are supposed to use fabric medium but I didn’t have any so I just used acrylic medium that I had. The photo above shows a portion of the layout of the white silk with black bits added on top. The nylon netting came in a roll so I could make a giant long piece of silk paper for my big birch tree.

Silk paper birch trees laid out on plastic with layers of white silk fiber and black accents and sandwiched between netting.

I made two lengths of silk paper. Here you can see one side laid out sandwiched between the nylon netting. The left side still needs black added. I actually think that the left side is not silk but perhaps viscose or other man made silk alternative. It didn’t feel exactly like silk but it was white and worked just as well as the real silk. I use up what I have before I buy more supplies, so other options of fiber will work for making paper.

Silk paper birch trees laid out on netting and plastic after being covered with acrylic medium.

Next you wet down the silk fiber sandwiched between the netting with soapy water. The soap helps to break the surface tension and allows the silk to accept the water more easily. You can spray it down or sponge it on, whichever works best for you. Once the silk is completely wet and there are no thicker, white spots left (air), then brush on acrylic medium mixed half and half with water. Flip the net and silk sandwich over and add acrylic medium to the other side too. Make sure the silk is thoroughly saturated with medium. Then peel off the top layer of netting and leave the silk paper to dry. You can hang it up to dry but take note that the water/acrylic medium will drip off and get on the floor if you hang it inside. I left mine flat to dry and it took a full day to dry.

Nuno felt background with birch tree silk paper trunks laid out.

I cut out my nuno felt background to size and played around with cutting the silk paper trees to different sizes to achieve some depth in the piece. These are the approximate layout that I came up with. Next on to stitching!


Yarn Bombing Our Hanging Pots

Yarn Bombing Our Hanging Pots

This post is going to be short and quick. It’s been a crazy couple weeks for us, and on top of that I am experiencing vertigo. Apparently a crystal in my inner ear, is floating around, where it’s not supposed to be. Eventually this crystal piece will move along, through the fluid in my middle ear, and out. Until then, I have to be careful of every movement of my head.

Today, I want to show you an idea, Brian came up with. We made a trip to Home Depot, the Friday before Mother’s Day, and my crystal incident. I wanted to get a nice potted plant for the inner courtyard at Mom’s Memory Care facility. I’ve never had good luck, at Home Depot in general, but this time we were pleasantly surprised. We found carts full of glorious colorful blooms, herb plants that were strong and healthy, and a couple varieties of heirloom tomatoes. Yay! Best of all, by the checkout, we saw a freestanding hanging plant stand, that would be perfect for hanging herbs off the ground and away from a curios canine. Brian created a perfect area for growing herbs, last year, when our puppy was very young. But, through the winter, Porter (at 75 lbs.) found my sage bushes, perfect for hiding lost tennis balls, and super comfy to lay on.

Double begonia flowers in bright orange and hot pink, herb plants, surrounding a bright white bucket.
Beautiful plants and herbs surrounding a very white bucket.

Home Depot displayed their plant stand, with plastic 2 gallon paint buckets, filled with gardening tools. I thought that idea was genius. Hanging pots are so expensive, and paint buckets are relatively cheap. My only problem, all that white overwhelmed everything. Brian came to the rescue with the suggestion “Why don’t you Yarn Bomb them.” That’s a great idea, Brian!”

white bucket, turned over, crochet covering it
This was my first attempt. Didn’t consider drainage holes leaking dirt all over my hand dyed yarn.

Man holding a decorated pot
I think they call this free form crochet! I started with super bulky yarn, a US-P size hook, and made up my own doily pattern.

We had to think a few minutes, about how to attach the crochet to the bucket. Suddenly I realized, “S” hooks would work, and we had some with our grid wall supplies. That worked for the first bucket, so I ordered more hooks from Amazon. They were on our porch the next afternoon. With my dizziness, I was only able to get 3 of the 4 finished.

This is how it looks so far.

We have some fun ideas in mind: like hanging a full recycled bottle of water from a hole in the rim of the buckets. That will tip the buckets, so the plants will grow as if they are pouring out. No matter what happens with this project, we’ve had a lot of fun, thinking outside the box. I hope you find some joy in your own crafting this week!

Capi

Update: Thank you everyone for your wellness wishes. Thankfully, the crystal issue is gone. I had been tested and diagnosed with low Vitamin D years ago: we live in Michigan, so that’s not surprising. I normally take extra Vitamin D every day, but recently a new doctor warned me I was taking too much! I lowered the dose…and had crystal issue within 4 months. (I’m not a doctor, so don’t trust the following information without consulting with your own physician.) There are thoughts by some in the medical field, that extra Vitamin D3 chemically binds with crystal chemical properties…and essentially moves them along. I’m not saying that happened for me, but coincidentally after returning to my original dose, it cleared up quickly. 🤔

Making Waves Update

Making Waves Update

In my last post I mentioned a few of the projects I was working on with the “Making Waves” theme, along with other members of the Waltham Windmill Textile Group. I’d begun work on a 50cm x 90cm felted wallhanging inspired by the markings on large stone slabs on the beach at Seahouses in Northumberland.

Having recently bought myself a drum carder I carded a variety of left over bits of fibre, mainly blues, greens, yellows and neutrals, to make my background and laid them out with off cuts of hand dyed silk fabric, scrim and large nepps. On the left is how it looked after felting and on the right is where it’s at right now. I’ve added synthetic sheers, machine wrapped cords, hand and free motion stitch and in some areas I’ve heavily machine stitched to push them back and encourage the adjacent areas to stand out. The original bottom left section wasn’t working with those silk circles so they were pulled off and replaced with some stiffened, rust dyed fabric circles, recycled from another piece of work. I’m calling it Going With The Flow because a) it’s inspired by a trip to the beach b) it has flowing lines and c) like most of my work its design wasn’t preplanned. It’s evolving as I work on it, adding bits in and taking bits off until it feels right. It’s got a way to go yet before I can call it done.

One of the other challenges within the Making Waves theme is to make a 3D fish and my immediate thought was to create what many would regard as an ugly fish but which I prefer to think of as a fish with shedloads of character……..one that would get noticed amongst a group of pretty fish!

Having typed  “ugly fish” into Google I lost many hours over the next few weeks looking at images and some incredible videos of life deep in the depths of the oceans. Each new search revealed yet another fascinating species of fish, some quite honestly didn’t look real while some, like the Tasseled Scorpionfish were strangely beautiful. One of the weirdest I discovered has to be the Red Lipped Batfish. If ever there was proof we descended from the oceans this red lipped, whiskered fish that “walks” on its specially adapted fins has to be it! 

Last month the Waltham group had a day making felted fish, some are finished, others are still work in progress.

Lucy made a wonderful wet felted Puffer Fish adding recycled plastics, including pipette tips, wine bottle netting and glass beads with recycling symbols underneath, to highlight the plight of our oceans.

Sue is very new to wet felting but she’s taken to it like a fish to water (couldn’t resist!) and has made “Angry Fish”. I think he looks more sulky than angry but he’s terrific!

Barbara’s felted fish is still work in progress but looking great, as is her sketch book and fabric fish purse!

Originally I had intended to wet felt my ugly fish but, after all those hours of studying them and getting excited about what I was going to make, for some reason when I took out my carded Corriedale fibres I found myself felting a cartoon version of an Angelfish…….I didn’t see that coming! Her name is TroutPout and she’s approximately 33cm x 36cm excluding her fins.

I’ve been enjoying teaching 3D Seed Pod workshops recently using wire wrapped with Tyvek fabric so decided to make my Anglerfish from wire rather than fibre. It was only when I’d got the 60cm x 33cm framework made that I sat back and realised I’d gone past the stage where I had meant to start adding my fabric! Time for plan B…..maybe I could use wire mesh to give it “body”?

I looked for some online but hesitated as I wasn’t sure how flexible or suitable the mesh would be. Having put the fish to one side, a few days later I joined the Lincolnshire Textile group and at my first meeting I was offered a piece of silver coloured Sinamay. Sinamay is one of the most popular hat-making foundations. It’s woven from the processed stalks of the abaca tree, a type of banana native to the Philippines. I couldn’t believe my luck……..being silver coloured this off cut looked like wire mesh but wasn’t and if I sprayed it lightly with water I could easily shape it to fit and stitch it with aluminium wire to my framework. So this is how far I’ve got. I’m going to add a few more wire spirals and do something more interesting with the eyes. He should have menacing teeth but I might not go that far!

Another feature of next years Making Waves exhibition will be an Octopus’s Garden so once the fish are done it’s straight on to making lots of coral and a few Octopus. I’m loving this theme and could quite happily continue with it way beyond our event next year…….it has to be the most interesting and enjoyable we’ve had so far!

What Do I Do With These Weird Colored Fabrics?

What Do I Do With These Weird Colored Fabrics?

Comments I’ve received in some of my previous blog posts have asked me to share some of the makings from my various fodder explorations. Sometimes it’s very hard to cut into any of those things we’ve spent so much time making. We need to save them as samples, right? They become too precious to us to even think about cutting them up!

I recently got a little push from that mentality.

One of the quilt guilds I belong to (Contemporary QuiltArt Association https://www.contemporaryquiltart.com/) needed to replenish their fiber art pieces for their fundraising stash. At the last in person meeting I attended, I picked up two yards of fabric that had been hand dyed by two past members and wasn’t selling at the fundraising events as raw yardage. We were asked to try to add surface design techniques to the fabrics to see if the pieces would sell better as yardage if they had another layer on them. The other option was to make some fiber art pieces using that fabric. I decided to try using up some of my own stash and collaging onto the hand dyed fabrics. I had picked an orange color and a grayish color. I decided to focus on the orange fabric first because I like orange! I wasn’t having much luck finding colors to match from my stash until I came across some of the printer ink pieces I had made in a Lorna Crane (https://lornacrane.com/) online class I took from Fiber Arts Take Two (https://www.fibreartstaketwo.com/). FATT has great YouTube interviews of a variety of artists from Australia and Europe. The fodder from Lorna’s class was in my PRECIOUS category.

These are the brushes I made after taking Lorna’s class (before they got ink all over them!)

Pretty primitive but very effective!

handmade paint brushes


And here is some of the fodder I made using those brushes and Epson printer ink. I didn’t have any ink for her class, the delivery of my order was a week or so away and I really wanted to get started on her process. I had purchased the wrong ink for my Epson printer and was going to send them off to the thrift store when I started wondering if I could use them. I did a bit of research and it looked like they might work. Each color was 65 ml. I just had to figure out how to get the ink out without spilling it all over the place before I could get it into a more accessible container.

I also used the brushes I made to paint the ink onto the paper and added some other mark making and acrylic paint layers.

fabrics and papers awaiting collage process

This is a mixture of inked paper and fabric pieces made into scrolls. Each of the scrolls is 3” wide x 35” long. I have quite a bit of leftover paper and fabrics plus these scrolls, so I think I have enough for my 5” x 7” series. (In the end I couldn’t cut the scrolls for use in the 5 x 7’s but DID cut them up for use in some 12” x 12” pieces).

finished scrolls

The printer ink made some unusual colors on the fabrics and papers.

But the background fabric is unusual as well. I tore pieces at 7” x 9” so I would have some play room for fussy cutting the finished size. I could get 6 pieces out of one 9” tear. (At this stage, I was thinking “OMG what am I going to do with the other 26” of this weird colored fabric??”)

Six 5x7 fabric pieces ready for collage

I’m still learning how to collage. It’s a combination of design principles and intuition and in my honest opinion not an easy feat. Especially when dealing with odd colors.

Here is a photo of them after working on them the first day.

fabric collages first try

Here is a photo of them after the second day. I was thinking about adding some blue to the mix, which is why you see my baggy of blues in the upper left. I found it difficult to try to add new colors in. They just weren’t working.

fabric collages 2nd try

I was grateful to have the white window tool to view them as I worked on them. They look really chaotic to me without a frame to contain them.

On the third day, faces started appearing. I’ve been focusing on portraits in my current work so maybe it’s to be expected that faces started appearing to me.

How silly is this guy!?

collage 4 with face

I think one could fiddle with these for days, but I needed to keep moving or I’d never get this blog posted!

The next step was trying to figure out how to adhere the pieces to the background fabric.

The collage pieces are a combination of paper and fabric. I didn’t want to stitch them down so I thought I would use either Matte Medium or Soft Gel Matte to glue them down as well as put a layer over the top of the whole piece. I bravely took one of my least favorite 5 x7’s and started with the Matte Medium. Ack! The white of the organza fabric blended into the orange fabric after gluing. Would it dry back to white or stay orange? Of course, I should have tested the Matte Medium before I possibly ruined one of my 5 x7’s but I was living large that day! I’ve also had some experience with the Matte Medium on cloth so I kind of knew how it would look. I took a deep breath and left the piece to dry overnight. I was pleasantly surprised when I looked at them the next day. There is a hint of white but mostly orange showing up. I went ahead and used the Matte Medium on the other 5.

Here is a before and after comparison.

BEFORE

collage before gluing


AFTER

collage after gluing

Next, I needed to decide if I wanted to do any stitching on them. I ended up running some straight machine stitches with black 30 wt Sulky thread in a couple of the areas.

I’m pretty happy with how they all turned out. The guild will mount each of them behind an 8” x 10” mat board. Hopefully each of them will find a new home and make the guild some money so we can continue to have all our wonderful speakers each month.

They are going to have to really like orange though!

Here are the finished pieces.

collage 6 done

collage 5 done

collage 4 done

collage 3 done

collage 2 done

collage 1 done

Now I need to figure out what to do with the gray fabric!

Happy Creating! Thanks for reading!

Tesi Vaara


Blacksmithing and working on the dino-purse…oops

Blacksmithing and working on the dino-purse…oops

This past weekend was Father’s Day and to celebrate we went off to the Glengarry Pioneer Museum to watch a blacksmithing event. This year the workshop was to create a replica antique door latch (Norfolk Latch). It was a 2 day workshop and fascinating to watch most of it. Blacksmiths and blacksmithing are very photogenic, with about 430 shots from Saturday and only 290 from Sunday (the battery died and the backup was in a similar state of uselessness. Don’t panic!!! I promise I will not show you all the photos but there were a few that you might enjoy.

the Norfolk Latch that was being recreated, a rolled collar on round stalk1 the Norfolk Latch that was being recreated, a rolled collar on round stalk (it will be part of the handle)

2 brushing scale off the tenon of the handle created a spark, tongs in front of a lit coal forge.2 brushing scale off the tenon of the handle created a spark, tongs in front of a lit coal forge.

There were 10 students, an instructor and an assistant. There were also blacksmiths who were not participating but were still watching and enjoying the demonstrations.

3 thick smoke hanging in the air from 10 coal forges starting up.3 thick smoke hanging in the air from 10 coal forges starting up.

This is not more smoke from the wildfires, this is 10 coal forges starting up under one side-less barn building.

After the weekend of photography, it was back to fun in the guild library. I added a new magazine, got the library open and ready to use, collected incoming books and got the outgoing ones ready to put into the circulation file. Since the library is now in hand I would get a chance to draw out a couple of options for the wet felting purse. (See I did get to felting!) I had wanted to try the Stegosaurus 3d bag which will be much trickier than the manta ray purse option.  Remember I like my felting dry, I can wet felt but making my own shape for a resist is not a common occurrence. Let’s see if I can work this through (With little math and minimal spelling!)

Option 1: this was a more cartoon proportion of a stegosaurus.

4 very simple shape with legs the same length front and back.4 very simple shape with legs the same length front and back.

Option 2: is still quite cartoonish but the back legs are closer to correct

5 still simplified but more anatomically correct than the previous Stegosaurs.5 still simplified but more anatomically correct than the previous Stegosaurs.

Next, the phone test;

6 laying the phone over the two drawings from #4 and 5 to make sure the phone will fit.6 laying the phone over the two drawings from #4 and 5 to make sure the phone will fit.

As much as I prefer the more realistic version, there is better space in the more cartoon one. Ok, so I should polish that one up a bit more.

7 expanding the scrap paper so I can add a better angle and length of tail and the tops of 2 plates.7 expanding the scrap paper so I can add a better angle and length of the tail and the tops of 2 plates.

Next, trim the sides so I can figure out the gussets for both the back and belly

8 taped strip of paper to figure out the belly gusset of the dinosaur.8 taped strip of paper to figure out the belly gusset of the dinosaur.

First attempt at the belly gusset;

9 estimating gusset for under tail, body, neck and head.9 estimating gusset for under tail, body, neck and head.

I checked the fit by using painter’s tape to set in the belly with the side

10 Belly gusset fits nicely with side.10 Belly gusset fits nicely with the side.

Once I liked the belly I started to work on the back gusset and taped that in to check the fit.

11 inside view with back and belly gussets in.11 inside view with back and belly gussets in.

12 adding width to the head and marked where a zipper would go if I choose to use one.12 adding width to the head and marked where a zipper would go if I choose to use one.

I wondered if I could attach the belly with the body between the legs and see if I could join the two parts

12 adding width to the head and marked where a zipper would go if I choose to use one.13 The belly is attached at the belly and behind the legs but not on the neck and tail.

The belly strip would only be half the width but I would have to raze the tail and head. But that might work. I will get a second opinion from Ann when she arrives. I had a quick message chat with Ann to review percentages and shrinkage for firm felting. We decided on 50%. So, I needed to scale up from the finished paper size.  I started by measuring the longest and tallest sections.

14 the longest line through the body and the height through the front leg.14 the longest line through the body and the height through the front leg.

I then took it further and graphed the general shape so it would be easier to scale up

15 1 inch graph added to the body.15 1-inch graph added to the body.

I tried to estimate the height and length but was having trouble scaling up the legs and still having space for the belly…. Ah. I started at the centre and between the legs and worked out from there.

16 i have most of the body estimated adding half to each side. The graph is making it easier to scale up.16 I have most of the body estimated adding half to each side. The graph is making it easier to scale up.

17 This is what I had graphed out by the time Ann arrived.17 This is what I had graphed out by the time Ann arrived. (there was a lot of measuring and adding while I was unsupervised.)

18 Ann lay the paper mock up on top of the resist18 Ann lay the paper mock-up on top of the resist

Ann (who is very experienced with wet felting resists) said she thot something looked a bit off. Other than the spikes I was sure I had carefully added the same amount all the way around. Oh…. You meant to add half of what I had, not half on all sides. Sorry, I think I am thinking in 3-D again.

So I now have a shoulder bag-sized dinosaur, not a phone and i-pod audiobook reader sized bag. Well, I could add wool and a couple of spindles at this size but I probably better go back and reconsider my math. I will probably just use the calculator I found last week and had meant to use and totally forgot! (I should never trust my own ability with numbers it is just as bad as my interpretation of spelling! It’s like interpretative dance only much more interpretative.)

So it’s back to the drawing board! Or, I could make it all out of dry… no be brave! I can always wear gloves and keep dry!! I will have to have a little pause and get back to working on 3 more chickadees which I may need for this coming weekend. I just need more hours in the day but for tonight it’s way past my bedtime and I will shortly either fall backwards off my stool or face-plant my keyboard.  I will keep you updated with the horrors of math or if I just decide I will make a bigger purse!

Have fun and keep felting!