Playing with Tyvek

Playing with Tyvek

My art group met at the first of June and we played with Tyvek. We were inspired by Karen L’s recent post here.  We cut up Tyvek envelopes, painted and heated them with a variety of heat tools including an iron and heat guns.

Paula had already made a few samples but we wanted to heat them a bit more than just the light heating that causes bubbling. The results are much more lace like.

Here’s another before and after. The results are really organic. So you just have to decide when you want to stop the melting process.

So everybody started painting Tyvek sheets.

Then we started melting them. These are Deb’s and she used the heat gun and then added some shimmery spray ink afterwards.

Here are a couple of Sally’s pieces. She stitched the leaves on the sewing machine before melting.

Here’s another one of Paula’s that turned out looking like a bunny.

Here are a couple that Louise made. The one on the right reminds me of forest floor.

And here’s one that I did. I added the darker blue paint on the high points after melting. I am looking forward to seeing how everyone uses their Tyvek experiments. I am planning on adding some acrylic mediums and paint and mounting them on a canvas.

Alpaca Antics

Alpaca Antics

When I began wet felting, merino was the only wool that I had had experience with, and I wanted to try new fibres.  I knew that there happened to be a working alpaca farm not far from were I live so I decided to pay it a visit after a phone call to check they take visitors.  I met a lovely lady called Dawn from Knavesmire Alpacas in Haxby, North Yorkshire UK who is passionate about her alpacas and I thought Dawn and her family would be a nice blog to share with you all.

Dawn has 38 alpacas, 8 Suris and 30 Huacaya alpacas, comprising 4 boys and 34 girls.  The British Alpaca Society (BAS) have 22 recognised shades from white, grey, browns, fawn and black.

DAWN - ALPACAS

Alpacas usually only have one cria (baby), if there are twins they rarely survive.  The gestation is approx. 11.5 months.  They self ovulate, so only come into season when being mated, so they can have cria anytime, so males and females are kept separate to ensure no winter babies.  Dawn has one hermaphrodite, which is really rare.

DAWN - CRIA IN A BLANKET

CRIA IN JACKET 2

CRIA IN JACKET

SMILEY ALPACA

They are fantastic mums and guards, keeping everyone safe from foxes.  Dawn has always loved them and started with five for her 50th birthday.

Now onto the fibre bit!

Dawn spins, wet and needle felts, both with 100% alpaca and also blending it with other fibres.  There are three cuts of fibre.  The first cut is from the saddle area, usually spun as it is ideal to wear next to the skin (less or hardly any guard hair which gives it the itch factor).  The second cut is the better fibre from the neck and top of the legs, sometimes suitable for spinning and ideal for needle felting.  The third cut is the short fibres from the bottom of the legs and the second trace of the shears, only really suitable for stuffing.

Huacaya is the teddy bear of the alpaca world, the Suri have the long silky dreadlocks.  There are only 10% of Suri alpaca compared with Huacaya, so it tends to be more expensive to buy (both animals and fibre).

Pics of fleece, yummy batts, hand dyed Suri locks and spun wool

FLEECE

DAWN - BATT ON DRUM CARDER

DAWN - BATTS

HAND DYED SURI

DAWN - WOOL

DAWN - NATURAL BATTS

Dawn made this shawl using baby alpaca locks on a fine merino and alpaca base.

DAWN - WET FELTED SHAWL

Needle felted family and wet and needle felted impressive hat!

THREE RABBITS

DAWN - NEEDLE FELTED HARE

DAWN - NEEDLE FELTED ANIMALS

DAWN - HAT

Animal heads, a rug and soaps – Love the rug Dawn!

DAWN - HEADS AND RUG

DAWN - FELTED SOAPS

Dawn also makes and sells these cute booties.

26219134_2053941798174777_4888089037691493673_nWHITE BOOTIES


I think it is safe to say Dawn is kept busy!

She uses olive oil soap to wet felt the fibre, and Ecover for washing it because it is gentle and does not contain Lanolin.  Huacaya are sheared every year, Suris once every two years.  She said the fleece does not need too much washing, however the alpacas do love their dirt baths and rolling around on the floor!  She says they are wonderful to keep, relatively easy and usually give birth easily too, and I know she loves them all!

My thanks to Dawn for agreeing to provide me with all the information and lovely photos.

If you would like to find out more or contact Dawn here are the links.

http://www.knavesmirealpaca.com/

https://en-gb.facebook.com/Knavesmirealpaca/

Last but not least, I thought I would pop in a picture of one of Dawn’s this year’s first arrivals, Gary the Pygmy goat, how cute is he?!

GARY THE GOAT

Playing Around

Playing Around

I’ve had a note on my kitchen white board for months which just says “unravelled knitting and plastic fibre.” I was stirring a pan of instant noodles one day and thought how much they looked like unravelled knitting and how much the frothy, boiling water reminded me of plastic fibre. I intended to make it in felt, but only got around to it yesterday. I picked Charolais wool, I thought this would make a spongy felt and help create the right effect. I think I would have been better off with something like Cheviot. This is the full piece:

Close up of the plastic fibre as frothy, boiling water:

Close up of unravelled knitting (which I think was mostly wool) as instant noodles:

While I had my White Wools tub out, I thought I’m make another couple of pieces to try combining different wools with fibres. This one was made with English 56s. It was a bit different to previous packs I’ve had, the fibres were much longer, almost like there was a high Devon content. I used some hand dyed Nylon Fibres. I love the colours you get with Nylon, especially the blues, which is why there are so many shades on this:

I don’t know if it’s obvious to you, but it definitely has a different look this Eng 56s, more ‘wavy’:

Here’s a close up of some green (the blue was impossible to capture)

For my last piece I used my new favourite wool, Rambouillet. And some fibres I have a ton of, crimped polyester lap-type things, (or as the shops call it ‘Hallowe’en cobwebs’!). I’ve tried this before with various results. It really attached well into the Rambouillet:

It looked to me like wet paper, the way it will form to whatever it dries on top of.

It kept a lot of its crimpy character while still forming a mat of fibres:

It was quite hard to get close ups, the green and orange are both fluorescent. Green:

Orange:

I don’t have any plans for them, I just needed a ‘play day’ 🙂

Making Some More Little Bags

Making Some More Little Bags

I haven’t had much time to felt and today I finally got some time to start some new little bags.

The last time I made little bags I forgot to add the spikes that end up as the closures so I made a bunch of spikes to be ready this time. Now to remember to make the rings for the bottom.

I make these bas self lining by putting fabric next to the resist. This creates a nuno felt lining and I don’t have to do it later. I licked this silk scarf a friend gave me for it’s nice bright colours and interesting dye pattern.

The other thing adding the nuno lining dies is add strength allowing me to make a thinner, less bulky bag. I set up 4 resists because if you are going to rub and roll some felt you might as well do make it worth while.

Here are the 4 bags ready to be put together. I try not to match the linings to the bag colour to much so it doesn’t disappear when I am done.  I may have to switch the 2 middle ones.

At this point I had to stop and switch the laundry and got distracted with other things so I haven’t made it past this point today. You will notice that I have forgotten the rings at this point but I have a chance to fix this when I get back to them. It is not to late …..yet. Next time I will hopefully have some progress to show you.

Ann


Up the North Fork

Up the North Fork

Here is the fifth in my series of nuno felted landscapes. It is called Up the North Fork after a portion of the Flathead River here in Montana.

Here is the layout and after wet down and felted slightly.

And here it is after felting. You’ll notice that the foreground has wool on top in browns and orange. I decided to remove that because I wanted it to look more like a river and I think the silk does that better than the wool.

I added fabric trees and fused those in place before machine stitching. This is before I decided to remove the foreground wool. The plan was to shave it off. I tried that but finally decided just to pull it off. Then I shaved the edges a bit at the edge of the “river”.

And here is the finished piece after much stitching of trees and a huge variety of green threads changed in and out of the sewing machine. The photo on the left shows the organic edges and the one on the right is cropped as if matted and framed.

I did talk to a framer about these 6 pieces and he thought I should keep the organic edges. His suggestion is to attach each piece to a matching background fabric, stitch the piece in place and then wrap the background fabric around foam core board. Then I could use a simple black frame and the background fabric will look like the matting. And you can still appreciate the organic edges. So I think I will try that and see how I like it. Only one more piece to finish and I’ll start choosing the background fabrics and get the pieces ready for framing.

The magic of blocking your hand knits

The magic of blocking your hand knits

Hello, Leonor here guest-writing for this week’s post.

After reading the title, if you’re not a knitter, you’re probably wondering what I’m talking about. What on earth is blocking and why am I writing about it?

Simply put, blocking refers to the act of stretching a knitted item with the aid of specialised wires and pins, with the intention of making it look a certain way. Think of all those airy, lacy shawls you’ve seen people wear – those have been carefully and mercilessly blocked into submission.

leonor1leonor2

Above is my latest project, the Banana Leaf Shawl. It looks nice-ish, but it lacks that finesse that one usually finds in store-bought shawls. The stitches look limp and you can see the differences in my gauge. Let’s make it right.

Firstly, soak the item in room-temperature water (add a nice wool wash if you want; I used Eucalan, a no-rinse Grapefruit-scented one). Let it sit for about 15 minutes and then carefully extract the excess water. Your knit needs to be damp but not dripping.

leonor3

Now comes the fiddly part. Using blocking wires, you’ll need to catch the edges of your project so it’ll keep the shape you want (in my case, everything’s a straight line, but it can be crescent-shaped, for example).
I decided to do this just before going to bed, thinking it wouldn’t take me long – how wrong I was. After one hour, I was losing the will to live. I’d need another hour to finish getting the wire through all the edges.

Next, you’ll need to pin the wires to a surface. There are special fancy mats you can buy for that, but I got some for home gyms that are a fraction of the price and do the job nicely.

leonor4

Because I have cats, I couldn’t risk them getting hurt on the blocking pins, so I had to move my blocks vertically for the night. I then used my desk chair to keep everything upright.

Once your finished object is dry, you can take the pins out and because fibre has memory (like the mohair and silk of this shawl), it’ll keep its shape… until you wash it again. Yes, blocking needs redoing every time a knit gets wet! Don’t you have a newfound respect for all the people who knit delicate lacy shawls?

leonor5

And here’s the finished product. I hope you can see how different my Banana Leaf now looks, comparing it to the first photo – from a slightly misshapen piece to one with sharp, well-defined edges. It’s grown quite a bit, too.

leonor6

leonor7

The stitches look so much better, too, neater. They’re suddenly really well defined. This shawl now looks like something one would see in a shop front, if I do say so myself.

leonor8

Even if you’re not a knitter, I hope you’ve marvelled, like I do every time, over the magic of blocking knitwear. If you fancy reading the technical bits about this particular project, head on over to my Ravelry page.

Have you ever done blocking? Can you think of any ways this technique could be used for other fibre endeavours? I’d love to read (and steal) your good ideas.

A Couple of Felting Videos

A Couple of Felting Videos

I’d planned to do a different blog post for today, but my workspace re-arranging has been really slow, so things didn’t pan out. But as I have nice clean windows and more space, while it was bright and sunny yesterday, I thought I’d take the opportunity to do a few practise videos. Videos are a bit out of my comfort zone! Of course, that didn’t turn out as expected either, the first one was too dark; on the second one I lost track of how many layers I’d done, and my neighbour called round and rang my really loud and annoying new doorbell!

Third time lucky? Not quite, the camera battery ran out before I’d finished 🙂 I think I got enough info from it though to make notes on things to change, for example, maybe when laying out the left hand side, I could spin the layout around so that my arm isn’t in front of the camera. I’d planned to add captions when I edit the ‘proper’ video, but maybe it’s self explanatory? Also, I’d originally planned to edit out all background music and noise – I live near a main road and it is really noisy, but when I took off all audio, it was a bit weird. Have a look and tell me what you think.

I finished the layout while the camera was recharging. I added some fibres, all hand dyed, mostly viscose, soy and nylon staple, with some silk throwster’s waste. I didn’t charge it long enough though, because it ran out just before the end again! There was only the rinsing left to do though. I think a video of the wet felting process needs a few captions even though it is pretty self explanatory too. It’s probably about as interesting as watching paint dry, but if you want a look and offer any opinions, please do!

Here’s a photo of the finished felt:

I might have got carried away with the fibres, but there were so many nice colours!

You can’t have too many can you?

Last one:

What have you done outside your comfort zone, lately?

Felted Cat Cave, A Quick How To

Felted Cat Cave, A Quick How To

Another old post from me. This is one of the most visited posts we have, so thought everyone might like to see it again.

I have been wanted to make a cat cave for sometime now. I decided it needed to be bright. I picked some Blue Faced Leicester  wool so it would be strong and dyed it chartreuse. Then I picked some purple and magenta for the spikes.

Spikes and Wool

I wanted an oval cat cave. I used my oval hat form to get the shape and gradually sized it up.

Drawing the Resist

I laid out 4 layers of wool for strength and even shrinkage. I put the first side aside and after laying out the second side I poked holes to put the spikes through.

Spikes in the Wool

After wetting it all down I wrapped each spike in plastic wrap so it would not get felted down flat.

Spikes all Wrapped Up

I covered it with a sheer curtain and rubbed both sides for a while and rolled it for a while and then wrapped it up and put it in the dryer twice, changing the position of the felt each time.  It was starting to shrink so I cut out the resist and switched to rolling it in a stick blind. I find the stick blinds to be very aggressive and shrinks felt quickly.  I did do some throwing too. Finally I rinsed the cave out in a bucket of alternately hot and cold water being quite aggressive with it. I then had to stretch the top so it would be domed up. I steamed it to heat it up and make it easier to stretch. Mostly I used a wooden spoon to push in a sliding motion to get the shape. Here it is on top of the resist so you can see how much it shrank.

Finished Cave on top of the Resist

Here it is in use, it didn’t take long for one of my cats, Wu, to take up residence.


Cat in Cave

As a foot note Wu ( queen of all things) is no longer with us. This is one of my favourite pictures of her. She really like the cave and we buried her in it, here on the farm.

Sunset at the Lake

Sunset at the Lake

Here’s another one of the nuno felt pieces I made in April.

This one was originally supposed to go this way with the silk at the top being the sky.

But then I decided to turn it into a sunset and this orientation worked better for that. So the silk became the lake.

I added some tree shapes in hand dyed cheese cloth.

Then ironed those down with fusible. The fusible keeps them in place when free motion machine stitching and prevents the foot from catching on the loose pieces and moving them around.

I then added machine stitching to the trees, made shadows on to the lake and created the sunset. I also added a few lines to the water to make it look a bit more lake like. I used a variety of thread colors especially in the sunset.

Here is the result and better than I expected. About halfway through the sunset, I thought it was going to look terrible but I pushed on through and it worked. I wish the sun wasn’t so near the center of the piece but I do think it looks better when it is cropped and I can change the cropping if I really want to cut a little bit more off the right edge. I have two more of these to go and then I need to get them all framed. The set of 6 will be shown in an exhibition in September.


Spinning at Can Games

Spinning at Can Games


JAN’S BLOG POST; CAN GAMES Spontaneous Demoing 2018

For a number of years I have followed my husband to the local board gaming convention on the May long weekend (Can Games). In exchange for my support of his hobby, I get gardening help from him. I have been attending Can Games for quite a number of years always accompanied by my portable spinning wheel.

   Jan 2Friday spinning upstairs beside the Curling club kitchen. The Road bug spinning wheel fits in the trundle box for travel.


I have been there long enough that I am greeted by Gamers I recognized by face if not by name.

jan 03 jan 04

Glen plays various board games (many involving trains and vary complicated rules systems) and I sit with my wheel and spin, sometimes I use my hand carders. There are a lot of guys gaming, most of whom are interested in the way the wheel works. I hear lots of stories about wives and mothers who knit too. While the much younger kids just seem really interested in the turning wheel. I think it was last year that a very fussy baby noticed my wheel spinning and became mesmerized (and quiet).

The last couple years I have asked if they should add a live action RPG game of “Spin the golden fleece” or “Turn straw into gold” (well actually linen but it’s almost as good!). This weekend was the first time one of the volunteers who run the convention has mentioned that I should present a game description for play testing at next year’s convention.

He suggested I should have levels of difficulty to learn and earn experience (starting out with a skill and perfecting it). Then give them a greater challenge to learn and perfect. Maybe starting out with a regular fleece and moving up to a golden one? Maybe a silk and merino blend and then have a choice of alpaca or cotton for the really advanced spinners and to earn extra bonus points?

Character requirements would be high dexterity, excellent patience and a sense of humour.

I would suggest the chopstick Turkish spindles may be ideal for this purpose since you can increase the weight and rotational momentum by adding bulldog clips to the arms of the spindle and they are really cheap to make.

I could offer a second “Live action RPG game” for advanced level players who would turn straw into gold, which could cover bast fibres, if there was interest.


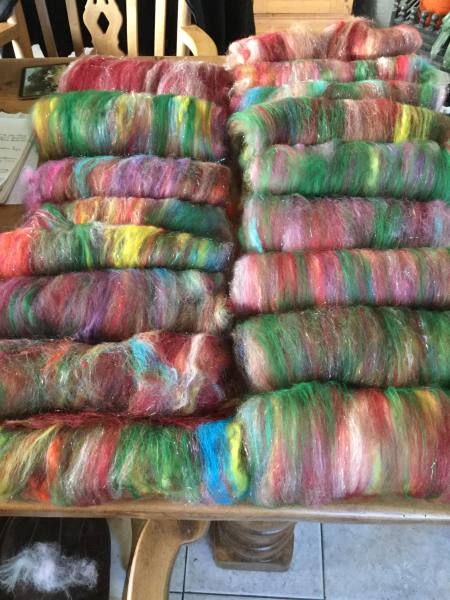
As you may remember, I did quite a bit of needle felting last year. I purchased a good quantity of super wash merino wool (mill ends from Black Lamb). The colours were amazing and enticed me into the purchase. Although I did successfully needle felt with it, I did find it was a lot more work than non-super wash wool. So I need to find a use for all this fabulously pretty fibre. Hum, I bet Mom would like a scarf for next winter. I bet I could make some very interesting slightly slubby yarn that would weave up nicely. I have a couple of table looms to choose from and could use that as a demo project for the next demo at the beginning of June. It will be nice to weave with my own handwoven again.

jan 05   Part of the super wash Merino acquisition.

I selected the blue and one of the greens tones in a slightly variegated top. I split the top into thinner strips and then intermittently spun one or the other colours then both together. It was fun to spin and I enjoyed the blending of colours.

jan 06  jan 07

jan-08-e1526940294613.jpg

I used the road bug travel wheel again. When I had the bobbin full I wound it off onto the blacksmith made plying tool. Glenn made it so I would stop using his paperback books to wind onto. It has 2 parallel arms that have a slight slope so I can slide the singles onto my wrist and then ply from the double ended ball that is now wrapped around my wrist. This tool also works for drop spindles and means I can put it down and go do something else (very handy).

jan 09 jan 10    Put the end of the singles yarn through one of the end rings and put your thumb over the tail as you start to wind on. (Alternating sections of diagonals similar to a Nostipine work well)

jan-11.jpg  Working at a distance helps to even out the tension consistency.

  jan-12.jpg  Wind off the bobbin onto the plying tool. You can put it down and go look at something then finish winding. When you get to the end, remove the beginning and the end from the rings and tie them together.

jan 13   I use my Left hand to slide through the double ended ball, gripping the beginning and end with the fingers,

jan 14   jan 15 Now slide the ball off the implement and onto your wrist.

jan 16After the bobbin of plied yarn was full (ok I played yarn chicken to get it all to fit back on the plying bobbin and won) l I used the cheap easy to make niddy noddy to wind into skeins. (PVC Pipe from Home Depot)

jan 17

Even with all the spinning I did while at Can Games I still had time to play a couple games (Chariots and A playtesting new game which hopefully will be available in August on Kick starter), some shopping a few board games, a couple for one of my friends, and a game of stacking miniature chairs) and watching some of the games that were running.

  jan 18  jan 19   The Chariot Race

jan 20jan-21.jpgjan-22.jpg

Lego mecs, Dice and Helms deep

jan 23jan-24.jpgjan 25

Pirates, chair game, sheep participate in Scottish fort battle.

I was not the only fiber arts person there this year. There was a lady knitting beside a miniature games with pirates being attacked by small green monsters.

The gaming convention is now over for another year and I hope next year I will be joined by more spinners, weaver’s, felters or knitters who would like to have fun on part of the long weekend. Maybe you will join me in an RPG to spin the Golden Fleece? We will make Turkish spindles out of chopsticks and elastics!