2019 Early Christmas Mice

2019 Early Christmas Mice

I have Wire and wool, now what should I make for Xmas this year?

1-2

Mice!!  Don’t mice just scream Christmas to you too? In their tiny little mice-y voices of course.

I had been in Dollerama again ( I am beginning to think this may not be as good a plan as I first intended) looking for floral wire and floral tape for an unrelated felting expedition. I will tell you about that if anything interesting happens. While there, I discovered this is not the time of year for floral wire but if I would like the short pieces of, again un-gauged, wire I could buy up to 3 packages of them. The pieces are just over 5 inches long or just under 13cm. They are a little more flexy than I had hoped for from looking at the package.


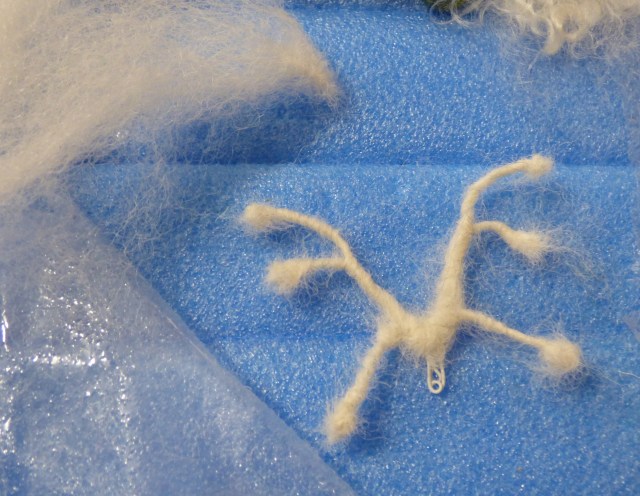
I started to make an armature frame for the first mouse. Since the wire was much shorter than I normally work with (I do have to stop putting things in “safe places” so I can find them later!)  I made samples of different numbers of wire to figure out what stiffness might work. I found mouse one to be a bit too flexible. I loosely braided the back leg wires together then because I had short wires to work form I  entwined the 3 strands I used for the tail and the wires used for the spine through the leg wires. To add more stability I increased the twist on the legs after I had integrated the tail and spine.


This slideshow requires JavaScript.

3-6


To further stabilize the join between the spine/tail and hip /legs I laid in the comb waste from the extra long Shetland. (the same one from the post on demoing at the wool growers co-op and then again for washing fleece – this has been an amazing fleece.  It just keeps on being usefull). The comb wasted worked very well for all the core wool and actually made a very nice outer layer to the body.

77

To wrap the legs I attached one end of the fiber to the body core then wound the fiber keeping it flat against the wire down to the foot loop. I secured the fiber by working through the foot loop end then needled carefully up along the wired legs. I did the same for the tail then started to add a short neck and back of the head.

810910 8-10

Next was adding the head and ears. Then back to shape and firm up the general mouse shape.

11-1.jpg121311-13


Mouse 2; I augmented the wire for legs and added wire for the ears. Yes much better. Still a bit thin on the butt.  Needs more sculpting.  Actually mouse one is a bit tall and lightly butted too. Hmm, better fix that later.


Ok on to starting mouse three, same armature layout as mouse 2 but better buttage.


Glenn noticed my start of a mouse army of invasion and wondered if I could make one an angel mouse for his mom for Christmas? That sounds like a good idea.  She has a very extensive Christmas angel collection!


To make an angel mouse I will need wings.  Since I would like this to be a mouse dressing up as an angel I need detachable wings and I should really have a halo too. Hmm, wings come in lots of shapes, bats, birds, butterflies. I think the bats would not be as accepted as angelic so that’s leaving birds or butterflies or some sort of hybrid.


I looked for wing pictures on the internet. I feel inspired.  Lets make an armature in white wire.


1415-1.jpg 14-15

First cover the armature structure with some of the combed long white Shetland. Starting from the bass and using the end loops to make sure the wire stays covered.

16-1.jpg 16

I added curls from a baggie (labeled wool curls – very helpful) and then  a bit of angora with a gentle crimp to give a bit more lustre. I worked mainly from the visible side of the wings but also added a few wool curls carefully to the underside to make sure the support structure was not visible.

Note I have left the very bottom centre part not covered by felt. This is to allow the belt to be added and the wings tied to the mouse. I added the wire for the halo.

17 17

Glenn had originally suggested a gown for the angel. I have a love of lace and have as good collection of different types including a damaged circle of tatted lace just about the right size for a mouse


18-19

Interesting but not quite what I was wanting. Maybe she needs a pearl necklace?

20 20


Closer but still not quite what I was envisioning. Maybe drop the robe and add some flowers?
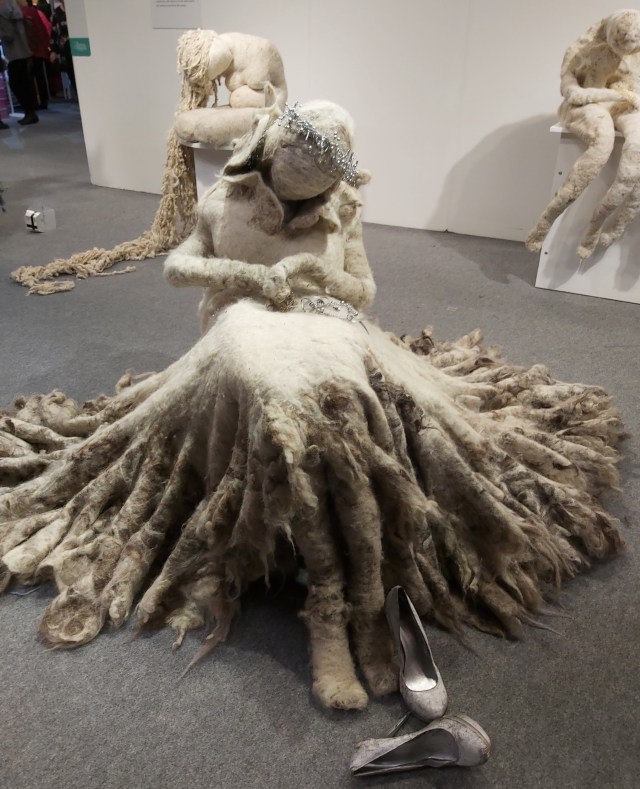
This slideshow requires JavaScript.

21-24

Yes much better. Now how to present her? She will not fit in a shadow box frame. Doesn’t Ikea still have a bell jar? Let me think about that for a bit. There is still time before she has to be delivered to Glenn’s Mom.


A few days pass


It snows

25 25

Most of it melts.


Its time to go visit! We picked the weekend before Xmas, packed up presents to give and presents I was working on and off we went. On Saturday afternoon we declared early Christmas and gave Glenn’s Mom her present. (Glenn’s Dad’s present was saved for Xmas proper.)


This slideshow requires JavaScript.

26-34


I am sure mouse will be very happy with the rest of the angel collection. These are a few from the living room.  There are more in the dining room too.


35363735-37

So my Christmas mouse angel has a new home and seems to have found a spot on the coffee table. Glenn’s Mom will have her great granddaughter over on Christmas day.  I wonder if she will like the little mouse too?


The Canada give away winners and my colourscape

The Canada give away winners and my colourscape

First, on this Christmas Eve, I get to announce our Canadian giveaway winners. The numbers were generated by a random number generator.  Congratulations to:

This is very generous! I would like to try spinning art yarns and this would be fun to use.

Susan Ozembloski says:

I live on Vancouver Island on the west coast of Canada. I would love to win to make some felted soaps and vessels. Thanks for this generous giveaway.

Susan

Would love to be surprised with a bundle of fiber. Each fiber tells the weaver what it should become. I’m ready to imagine!

We will contact you for your addresses and mail your wool packages after Christmas.

The other thing I did this week was finishing my 4rth quarter challenge, colourscape. https://feltingandfiberstudio.com/2019/10/01/fourth-quarter-challenge-2019-colourscapes/

It took a lot more thinking than I thought. After making a nice Autumn coloured background I traced some leaves onto some dissolvable webbing. First I thought I would free-motion to embroider the leaves but I need more practice. I very slowly did two leaves and switched to hand stitching.  This is not such a big deal for me as I quite enjoy hand stitching. I am not good at just sitting in front of the TV. If I knit I would be all set but I don’t.

pictures with webbing

Once it’s all done just a quick rinse under the tap and all the webbing is gone. The colour is not true. for some reason when I took the paper off the phone lightened the wool and turned my couch from the forest green it is above, to the blue below. I tried to change it in the photo program but nothing helped.

I may zig-zag around it to make it square and then trim off the excess but I am not sure. I may just square it with some matboard. Then it can be changed if I want to.

The other question is should I add the main line up the middle of the leaves? And the several main ones on the maple leaves or leave it as it is? When the webbing was in place I thought I should but now the webbing is gone I don’t think it needs it. The stitching is more subtle now and I like it. What do you think?

And I am editing this in because I forgot to say Happy Holidays to Everyone.

Another Colorscape

Another Colorscape

Before I show you my new colorscape, I am excited to announce our three UK prize winners! The winners were drawn by a random number generator. The prize winner are:

AdventuresInFelt says:

Thank you for this lovely giveaway! I would be happy with any of the bundles as I have been doing a lot of wet felting lately. I see a scarf in there somewhere! Or a hat! or handwarmers! 🙂
Arlene

Leonor says:

Lovely giveaway! I’d love to get prize 3, but any would be great – I’d use it to play with 2D needle felting, something I’ve been toying with but haven’t properly started yet 🙂

Best of lucks to everyone!

yarnbelle says:

Rae Bell

I will contact you for a snail mail address by email. Lyn of Rosiepink will be mailing your prize and it will be mailed after Christmas. Congratulations to our winners!

I decided to try another colorscape and went with one of my assignments for color studies in my stitch class. This one is blue-green, yellow, red-orange and violet. I used some short fiber merino that Paula gave me, thanks Paula! I didn’t worry about the edges because I was planning on cropping and trimming the piece at completion.

I then added a layer of Mistyfuse to fuse the top layers of sheer fabric down to the felt. I realize that I could have nunofelted these in place but I wanted a less textured surface.

I then layered some hand dyed silk organza over the top and fiddled around with the small pieces until I like the result. Then I fused it in place with an iron on a cool setting. This isn’t a very good photo but the best I could get.

Then I free motion machine stitched over the silk organza, cropped the edges and cut the organic edges off. You can click on the photo to enlarge it to see the stitching a little better.

For all felt purists out there, I took a photo of the back that is just felt and stitching without being covered up. Perhaps I can make it a reversible piece!


Knitting & Stitching Show 2019

Knitting & Stitching Show 2019

One of the highlights of my calendar in November is always the Knitting & Stitching Show at Harrogate. I’ve never thought that the title does this show any justice as it’s so much more than knitting and stitching!

The event, held over several halls in the Harrogate Convention Centre, features a wide range of exhibitions, most of which have the artist in attendance so you get to meet and chat to them about their work. There are also a number of artists in action (literally), workshops, lectures, demonstrations and a huge variety of craft retailers as well as artists selling their handcrafted items.

I’m guessing there will be a lot of our readers who didn’t attend this event due to location so I thought I would show what to me were some of the highlights.

Marian Jazmik “Beyond the Surface”

Marian Jazmik is a mixed media textile artist who uses a wide variety of materials, often heat distressed, to create stunning highly textural pieces of art. I was particularly drawn to her work by the wonderful neutral colour pallet. Depending on which piece you are looking at, close inspection might reveal sisal, plastic straws, packaging, cotton buds, scrim, beads and free motion stitching. She often uses heat treated Dipryl, a spun-bond fabric similar to Lutradur.

Marian Jazmik “Beyond the Surface”

Catherine Kaufman aka the “Woolly Queen” is a Feltmaker working with locally sourced fleece which she needle felts to create life size sculptures celebrating the female form. It was the scale, and again the colour scheme, that made this exhibit stand out for me. Also hearing how the figures are worked on at home on her kitchen table! Catherine begins by making a wire armature which she then covers with fleece. I felt the most powerful figure was Rapunzel and, learning that the hair for this figure was Catherines first attempt at spinning, I’ve been inspired to have a go myself!

Rapunzel by Catherine Kaufman
Catherine Kaufman

Daisy Collingridge explores the potential of the human body and celebrates its physicality through her textile sculptures. The human form is so unbelievably varied, despite us all being built from the same components. Daisy has a strong fascination with human endeavour and the extremes the human form can take, dictated through genetics and choice.  These soft sculptures came from a desire to push the traditional craft of quilting to the extreme. The technique used is no longer recognisable as quilting in the traditional sense but the fundamental idea of sandwiching fabric is the same.

Daisy Collingridge

The figurative work has a grotesque element and body image and body transformation are obvious narratives through which to view her work. Each piece is a “body suit” and as part of the installation viewers can watch a film of the figures in action.

The Artists in Action area is always an interesting space with Textile artists and Feltmakers creating their work and demonstrating to the public. It was nice to meet Lizzie Houghton and watch how she creates her beautiful hats.

Artists in Action – Lizzie Houghton

Angie Hughes, one of my favourite Textile Artists, was also there demonstrating surrounded by samples of her beautiful work.

Artists in Action – Angie Huges
Vivienne Morpeth

In a different part of the hall I came across Vivienne Morpeth, a fellow Lincolnshire Feltmaker who specialises in fabulous Nuno felted garments.

Vivienne Morpeth – Nuno detail

CQ London, a subgroup of The Quilters’ Guild of the British Isles, have been meeting since 2017 in Camden Town, London. It is an eclectic group, whose members possess a wide range of skills and interests. This was their debut exhibition and it consisted of two themes, London and Notan, a Japanese design technique featuring positive and negative shapes in a harmonious balance of light and dark. The following two quilts were standout pieces for me. The Southbank building was instantly recognisable and very dramatic in its simplicity. The fabric was painted with acrylics before bonding and stitching.

Southbank 14 by Sabi Westoby

City Textures by Connie Gilham was another favourite. Depicting St Paul’s, Roman walls and the Thames it was created using painted and dyed silks, cottons and sheers, again a very striking image.

City Textures by Connie Gilham

On a smaller scale, but equally beautiful, were these exhibits in the Embroiderers Guild area. Out on Tiles won the Beryl Dean Award for best hand stitching.

“Out on the tiles with a crumb of comfort” by Patricia Blinco

Alyssa Robinson won the Val Campbell-Harding prize for best machine stitching.

Alyssa Robinson

This piece by Jane Dexter titles Wood Grains was also one of my favourites.

“Wood Grains” by Jane Dexter

This is just a tiny snapshot of the show, there was so much more and I came away with my head full of inspiration and my bag full of goodies! If you live in the UK and haven’t been it’s well worth a visit if you get the chance.

Time for the fabulous fibre giveaway Canada.

Time for the fabulous fibre giveaway Canada.

We here at The Felting and Fiber Studio would like to wish everyone a happy holiday season. In celebration, we will be hosting several giveaways for your woolly pleasure! To make this a little easier and less expensive on postage, we are doing more than one give away by country. Please make sure and sign up for the correct one depending on where you live.

Ruth’s friend Paula is the one to thank for all the woolly goodness. She has decided to give away her wool supply as she is no longer doing any felting. She has moved on to other art forms.

So I have piles of mainly wool, mainly merino. Some of it is marked as to what it is and some isn’t. Some have been in plastic bags for a while and maybe a bit matted down. But that shouldn’t bother any of you since if you win, it’s free!

Heres the box of wool Ruth sent to me.  We will have three separate giveaways, a US giveaway, aUK giveaway and a Canada giveaway. Please only comment and sign up for the give away if you are in the corresponding country. If your name is drawn and you aren’t in the appropriate country, another name will be drawn.

This give away is for Canada. If you would like to win a padded envelope full of wool and a few other embellishments, please comment below. Tell us what you want to create from the wool. Feel free to spread the word through social media. We will announce three winners in a post next week. The USA and UK drawings are now over.

Please only enter the giveaway if you live in Canada

Giveaway Guidelines:

  1. Leave a comment on the comment form below. Your comment must be left on today’s post to be eligible to win.
  2. Be sure that your comment has your name on it so there won’t be any misunderstandings of who won.
  3. Make sure that there is an email address associated with your comment. If I can not contact you, it isn’t possible for the prize to be sent to you and another number will be drawn.
  4. Leave your comment before 4:00 pm mountain standard time on Monday, December 23 13, 2019. The winners will be announced in my post on Tuesday, December 24th.
  5. In your comment, tell us what you would like to create from the wool
  6. Only residents of Canada are eligible for this drawing.
2020 Online Class Schedule

2020 Online Class Schedule

Teri and I have come up with our online class schedule for 2020. If you are interested in signing up for any of these classes, please fill out our contact us form and include the name of the class in which you are interested. We will contact you when registration opens. All classes are held online so you can be located anywhere in the world and still take the class. You don’t have to be present at any certain time and there is opportunity to show your work, interact with other students and ask as many questions as you have.

Felted Bags with Teri Berry will be held beginning February 13, 2020. Registration will open on January 30, 2020. Take a look at more details about the class here.

Felted Concertina Hats with Teri Berry will be held July 16, 2020. Registration will open on July 2, 2020. Here is more information about the hat class.

The four modules of Embellishing Felt with Surface Design – A Mixed Media Approach with Ruth Lane will be held for two sessions in 2020. These modules do not need to be taken in any order, they are all stand alone classes. Click on the links below for more information.

February 21, 2020 (Registration opens on February 17, 2020)

May 29, 2020 (Registration opens on May 15, 2020)

Nuno Felting with Paper Fabric Lamination

Experimental Screen Printing on Felt

Printing, Stenciling, and Playing with Thickened Dye on Felt

Free Motion Machine Stitching on Felt

Our online Wet Felting for Beginners Course is always available. You can sign up anytime here. 


Wonderful Woolly Holidays – UK Wool Giveaway!

Wonderful Woolly Holidays – UK Wool Giveaway!

It’s time for our second giveaway in our Wonderful Woolly Holiday Giveaway series. This one will be for our readers in the UK. But before I show you the three prizes available, I will announce the winners from our US giveaway last week. The winners were picked with a random number generator. The three winners are #5, #18 and #32:

Karen Gordon How lovely! Thank you for this opportunity! I have been working with wet felted floral landscapes and gardens, but am also working on a Maine seascape series. That said, blues and greens and earthy colors would be great, but there’s always room for bright reds, pinks and yellows! Anything would be just lovely! Thank you again and best wishes for the holiday season!
Jess M I would make a felted vessel or bowl. Greens and yellows. Thank you for making this giveaway happen! Happy holidays!
Shoshana Avramovitz Wow what a beautiful thing:)
I am a glass and encaustic wax artist and recently acquired some felting supplies from a very ill artist friend who has since passed. I think of her often on this new amazing journey in wool fiber. I’m just loving it, the colors and feel of the wool makes me happy:)
Thanks for doing this hugs 🤗


Congratulations! I will contact you by email to get your snail mail addresses.

My friend Paula is the one to thank for all the woolly goodness. She has decided to give away her wool supply as she is no longer doing any felting. She has moved on to other art forms.

The three photos below show you the prizes for the UK giveaway. Some of it is marked as to what it is and some isn’t. Most of it is merino wool. Some has been in plastic bags for a while and may be a bit matted down. But that shouldn’t bother any of you since if you win, it’s free!

Here is prize number 1 with all kinds of woolly goodness.

And prize number 2!

And last but not least, prize number 3.

The first giveaway is for readers in the UK.

If you live in the UK and would like to win one of these lovely packages of wool, please comment below. Let us know which prize you prefer (and we’ll try match the winners with their favorite one) or you can say ‘any prize would be wonderful!’ Also, in your comment, let us know what you’d like to create with your new wool. Feel free to spread the word through social media. I will announce the winners in my post next week.- You will not receive the prize until after the holidays. The Canada drawing will be soon, so keep an eye out for that post.

Thanks so much to Lyn and Annie of Rosiepink for distributing the prizes!

Please only enter the giveaway if you live in the UK. 

Giveaway Guidelines:

  1. Leave a comment on the comment form below. Your comment must be left on today’s post to be eligible to win.
  2. Be sure that your comment has your name on it so there won’t be any misunderstandings of who won.
  3. Make sure that there is an email address associated with your comment. If I can not contact you, it isn’t possible for the prize to be sent to you.
  4. Leave your comment before 4:00 pm mountain standard time on Thursday, December 19, 2019. The winners will be announced in my post on Sunday, December 22nd.
  5. In your comment, tell us what you would like to create from the wool and what prize you prefer.
  6. Only residents of the UK are eligible for this drawing.
Zed Needs Your Help!

Zed Needs Your Help!

If you have been reading this blog for any length of time, you will remember Zed’s posts. She does some wonderful experimental felt making and is always trying out new fiber, embellishments and other fun stuff and letting us know what happens. Zed has not posted here since June because she has been having a very difficult situation in life. She has been on disability benefits ESA and PIP due to conditions called Myalgic Encephalomyelitis (ME) and Basilar Artery Migraine. Last year, Zed was offered the chance to try self-employment for a year under a government scheme. Although it wasn’t a ‘runaway success’, with the safety net of Working Tax Credits to make up the difference in income to the same amount as ESA, she decided to try and make a go of ‘Felt by Zed’. Zed didn’t realize that she wouldn’t be entitled to the other low-income benefits she’d previously claimed which help with rent and council tax, so she used her savings and money from her mom’s will to cover these. Unfortunately, the savings ran out at the same time a PIP re-assessment resulted in a benefits cut of 33%, so soon income was less than expenses.

Zed’s debts have spiralled and due to bad advice, and other unfortunate experiences with the system, Zed is now being threatened with eviction. Zed is unable to work a normal job due to ME and is finding it difficult to even afford food. By raising $1,000.00, Zed will be able to pay past debts and start fresh. Zed may be entitled to Universal Credit but won’t be able to get an appointment until after the holidays. It takes 5 weeks for the applications to be approved.

We here at The Felting and Fiber Studio feel it is important to help our own. We have started a GoFundMe campaign for Zed and have contributed $200 to start out the campaign. Here is the link if you would be so kind as to donate a few dollars or pounds.

https://www.gofundme.com/f/zwgeb-zed-needs-your-help?utm_source=customer&utm_medium=copy_link&utm_campaign=p_cf+share-flow-1

If all our readers could afford a few dollars, we could reach this goal very quickly. Or if you don’t feel comfortable giving through GoFundMe, would you consider buying one of Zed’s e-books? https://feltingandfiberstudio.com/shop/felt-by-zed/

Your generosity will allow Zed to pay back any debts owed and afford the basics over the holiday season. We appreciate any amount that you are able or willing to give. Thank you!

The Felting and Fiber Studio Team


Flax Study Group Part 3

Flax Study Group Part 3

Flax Study Group Part 3

(sorry this is a Long Post if you make it through to the end there are videos! make sure to check out the one on flax dressing its really horrible looking stuff but works exceedingly well)

After a break for the guild Sale and Exhibition we resumed the Flax project on Saturday, November 16th at 10am. It included a potluck lunch.

A quick review of what went before:

– April 4, 2019 Waiting for the soil to thaw and dry

– May 5th  Prepare the ground and plant the seeds; germination expected in 10-14 days.

– May 13th Sprouts are seen

– June 08 2019 – Weeding party

– June 28 2019 – The first flowers have appeared

– July 7 2019 flax flowering is slowing down,  seed pods developing

– July 9th added extra support ropes to keep flax from collapsing during impending torrential rain storm

– July 13 flax survived storm – wind and heavy rain

– July 18 Seed pods are showing signs of turning yellow

– July 27, 2019 at 10 am First Harvesting  (1/4 of the crop has been left to be harvested in 2 parts later)

– July 29 Bernadette tries rippling, not yet ready.

– August 10 2019 Rippling and Winnowing the flax then beginning of the retting

– August 15 the remaining crop is ready to harvest for the seed

– August 17 2019 continuing threshing and winnowing. Retted flax laid out to dry

Which brings us up to November 16th at 10am. We converged at Cathy Louise’s Coverall barn where the flax was waiting for us.

11 kiddie pool of first harvest, retted flax

We kept the flax in the three sections of harvesting. The first harvest in the kiddy pool, second harvest on one end of the metal troughs (it’s the darker colour) and the last harvested, saved for the seed, which is the lighter colour and at the other end of the trough.

22 the later harvests darker, below, harvested before the lighter on the top of the picture

Starting with the largest amount, we began the breaking. (Let the Violence begin!). The Brake breaks up the outer fiber to start to access the long linen fibers within. We eventually figured out this was a very important step. Cole who has processed many local bass fibers (dog strangling vine particularly) had the most experience with the equipment. He had built his own brake, we had the loan of an antique and Gord had found a good rugged one for sale.


This slideshow requires JavaScript.

3-6 Using the Brake

After the fiber had been cruelly beaten by the brake its fate turned dire as it was firmly thwacked by a skutching sword. The best one seemed to be the Lilac branch that had been split and slightly shaped. It was a bit more flexible than the kitchen implements Cathy Louise had tried or the wooden swords similar to my Viking sword beater. Cole had brought a massive timber and a board with a hand-protecting hole cut in it. Both worked more ergonomically than the boards we had started with.

7-8 Skutching Knife made from Lilac

9-11 Skutching tool  formerly a kitchen impliment

This slideshow requires JavaScript.

12 -16 our various skuching boards, note the handy safety hand hole to keep your finger safe.

The next step was the Hackles. This is the sharp part!! By this point, you really do need to have your tetanus shots up to date.

1717 setting out the hackles

We set up a coarse, medium and fine set. We had been lent both old and newer Hackles, all were very sharp and really should be used with gloves. I found them highly photogenic.

1818 i got a few really cool shots of these viscous implements of plant torture

We ran the flax through the teeth to separate the line (the long really good fiber) from the tow (the shorter pieces that are not as sought after but still will spin and weave up nicely)

192019-20 drawing the flax through to hackles removes more of the shorter fibers and leaves the high quality line linen. you can see the tow stuck in the hackles and on the table.

We worked from the course to the medium to the fine. Producing small amounts of line flax.

21222324 21-24 Hackles and a growing pile of Tow

As you can see there was a lot of tow for as little bit of flax. We suspect that we will get a better yield with greater attention to breaking and possibly slightly longer retting. This is our first time and we suspect the growing season was not prime for flax so we hope for a better harvest next year. The Line flax we got from the process was very nice; most of it seemed quite fine from the first batch.

2526

25-26 inspecting the flax and checking out the cows

While we were torturing plant life on one end of the coverall our neighbours were having an extended lunch or maybe it was second or third lunch. Like cats, cows seem to feel that there butt ends are one of their best features. I had trouble getting a shot that wasn’t mostly butt shots. (I had promised the study group not to take them but not all the cows would cooperate.)  Thinking of lunch it was time for ours so off we went back to the house to enjoy it and get a bit warmer.

Lunch break Pot Luck:


This slideshow requires JavaScript.

27 – 35 Lunch

After lunch, Cathy Louise showed us her CPW (Canadian Production Wheel) she has an amazing spot to sit and spin in her loft.

Then it was back to work

36 – 40  thump thump thwak thump thwak thwak

At the end of the day we had 2 bags of floor findings from the Brakes and the same amount from the Skutching and possibly a bit more from the hackle leavings. We kept them separate to work on as part of the final days processing.

This was the amount of line linen we produced.

41424344 41-44 our days work, a little bit of good line linen and lots of tow

Final day of flax processing

45 45 the coverall barn that we were sharing with the cows and some annoyed birds

Saturday November 23 at 9:30 am, one week later and we were back at the coverall.

46-47  Alison had brought her course drum carder to try on the flax

4848   First batt off the drum carder looked promising.

49-50     Bernadette arrived with the dew-retted flax she had done. It was a darker colour. She also had big English combs in her bag to try out with the flax.

51 -53 4 pitch English combs by Alvin Ramer

Unfortunately the combs were not as successful as we had hoped ( it shredded both the long and shorter fibers) so we continued with the drum carder.

54 -55   Here is the difference in colour between the two types of retting (field and trough)

56-57  We finished possessing the last of the flax and put most of the tow through the drum carder once before we cleaned up for lunch.

5858 Cole made a quick bit of rope out of some of the coarsest waste. He used the strange wooden tool on the table to make the rope.

Lunch Break Pot Luck!


59-62 Lunch!

After lunch, we measured and divided the flax seeds. We kept part for next year’s planting from the late harvested plants. We each got a portion to either plant at home or make flax dressing from. (This is used instead of water when spinning the flax or to size a warp for weaving. Bernadette made some it was truly an interesting viscosity but worked extremely well for spinning.


6565  We then weighed and divided the line flax.

66-67 the line is ready to be divided

We looked at the difference between the two methods of retting and tried to determine if the second and third sections harvested were much coarser than the first.

6868  We kept aside samples for comparison later.

Then it was back to the coverall for a quick peek at the cows and to give the tow a second pass through the drum carder.

69

This slideshow requires JavaScript.

-73 We divided up the tow, did a final clean up and headed for home.

74

75 75  (Glenn took this just to prove I was actually there since I wasn’t in any of the pictures!)

I took  a number of videos while we were processing the flax and Bernadette’s experimentation with flax dressing. If you would like to see all the videos please consider joining the OVWSG Flax Project Private Group on face book https://www.facebook.com/groups/642029912915854/?fref=nf

Cole using the Brake:

Cole Skutching

The Hackles

Drum carder with the Tow


this is the culmination of this part of the Flax study group.   Bernadette has boiled 2 tbs of the flax seed to make a flax dressing which is used to size warps that are being difficult and to add in spinning flax.

11-25-19 flax dressing – Bernadette with wool and flax spinning using Flax dressing.


I hope you have enjoyed the Flax study group as much as i did participating (well i did more photography and not as much hands on but it was still a blast and i hope to be able to participate in next years study group).  if this appeals to you too you mite want to join next years study group or maybe start your own.

PS it takes a lot longer to upload a video than it dose a picture so its much later than i expected it to be and i think i best head off to bed now.

A lovely card and some progress.

A lovely card and some progress.

First, the lovely card I received from Jackie, aka The Batty Felter on the forum.  It is a lovely card and she must have done it up quickly to get it here from New Zealand so soon.

And a lovely note explaining what the flowers were. They are so lucky to have such a magnificent tree in bloom at Christmas time.

I feel bad I took so long with mine. and I was in such a hurry to get it into the mail I don’t think I even signed it. So Sorry for the Jackie. I will show you the card after Jackie receives it. They told me it would be there before Christmas.

And now my 4th quarter challenge. I lost the thread I have no idea where it went. It was in my purse. I emptied it out and all I found was the receipt. So I went looking for new thread. I found one that is almost the same and it will do.  I have never heard of this brand.

I put the darning foot on the machine and had a go with a spare piece of felt but I think I need more practice before ding that on anything but a practice piece. I decided to do it with regular sewing, going slow. I did 2 leaves. If they were all simple, it would be fine. There are too many curves.  I only did 2 leaves and stopped. The bottom thread was solid orange. It looks nice against the green back.

I think I will just do it by hand, much less frustrating. I may be cursing doing such a big piece by the time I am done. But maybe not. I like hand stitching.