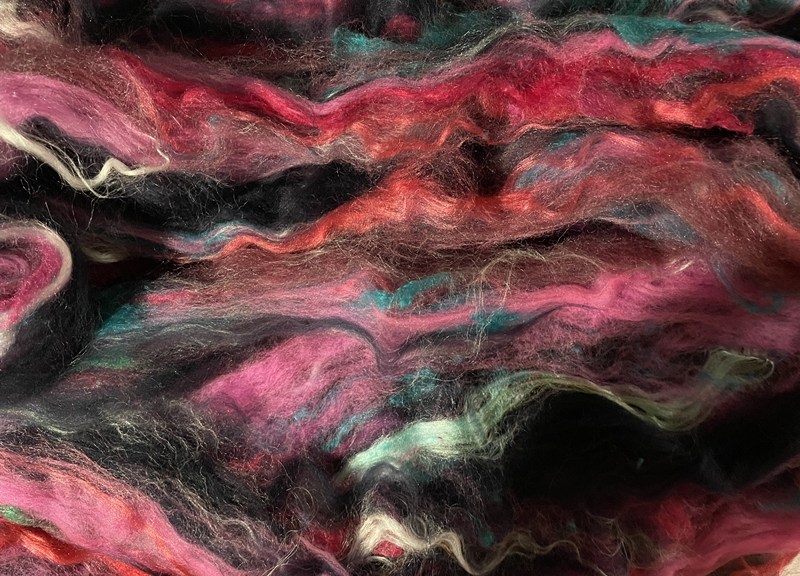
More work on the ocean sunset. I got a few orange locks from Bernadette. I believe they are mohair, but she can correct me in the comments if I am wrong. They were nice and shiny so they went with the silk well
The next thing to do was to wet felt it. I popped it into a large freezer bag and added a little water. I have never done this method before. Well, a little is relative, right? After getting it all wet I drained out the water so it wasn’t swimming. Then I pressed it and it was still floating so I squished more water out and drained it.
The silk kept moving, no matter how gentle I was, so it ended up a bit stringy and not all in the right place. I still like it but it needs some fiddling.
I got out a fine felting needle and started lifting and moving the silk and flattening the horizon. Horizons are not wavy except in high seas.
This is how far it is now.
I was thinking of a boat silhouette but I may go with a whale tail this time. maybe a bird floating nearby. I am not sure. It also needs some colours reflected in the water. I may add bits of silk or maybe some of the coloured sparkle powder. I may not wait for them. I am wondering if I should spray the picture with something if I use the powder. Maybe a spritz of hair spray? Has anyone done anything similar?
More waiting now. I did do another small fast project I will tell you about next time to give you a break and build suspense.
This is my favorite work, because here the archaic motifs are the base but the colours and curves make this work to be a modern piece. It’s wet felting technique, first the design and than the 3 layers of wool. (rolling)
Back in June last year, at the end of my 2nd post on this felt painting, having remixed the fibres for my palette and removed the fibres I had already needled into the far background of the picture, I redid that bit of work and left you with this picture of where I had got to then:
Starting work
I am pleased to say that I have made considerable progress since then and here I’ll take you along for the ride!
On my next visit to the Hideaway Workshop – my friend’s place where I tend to do most of my work on my pictures – I set to to blend fibres for the palette for the main part of the picture.
Blending Fibres for Palette
I worked on the picture for about 4 – 5 hours once a month, until I was able to take this photo of the results on 26th February 2022.
This was still work in progress and I carried on and in May I was able to take further pictures of details – Red Devon cattle in one of the far off fields; sheep moving on the hill in the middle distance; the beginnings of trees and shrubs in the near distance; and the river in the foot of the valley with woods behind.
Red Devon cattle in one of the far off fields
sheep moving on the hill in the middle distance
the beginnings of trees and shrubs in the near distance
the river in the foot of the valley with woods behind
By then I had done pretty much all I was going to do for the landscape until the final details just at the end, and I needed to get on with the horse.
Now, I was toying with a new idea about how to do this. For some time I have been considering experimenting with the type of scenery often seen in simple stage sets like our typical panto village scene with shops and other buildings. Almost all of which were flat with one side showing a village shop and the other some other building for a different scene. These would be set about the stage facing square on to the audience so that they could see only the side applicable to the current scene, with further buildings painted on the backdrop. Cast members would appear from behind these and various other scenery flats like rocks, or bushes. I don’t have any suitable photos that would illustrate this, but I do have a couple of photos of children’s toy paper theatres which also demonstrate what I mean.
Toy Paper Theatres
I thought I might be able to do something along these lines for the horse in my picture. By affixing a fairly stiff piece of felt in the shape of the horse to the picture but leaving it’s head and the top of the body unattached and slightly proud. I was hoping that this would give even more depth to the whole.
Knowing that if I was to needle felt a “flat-ish” horse to the required size, I would actually have to start off with a slightly bigger image – as the more it was needled, the more it would shrink and become out of scale. So using my copier I enlarged the image of the horse by 10% and then made a tracing of the image. As I did with the actual landscape picture, I then stitched the outlines of the horse through the tracing onto a piece of thick white felt. This was a piece of the felt that I used for the background of the landscape, but folded into three. I needled it and then wet felted it so that it was a solid piece of felt which would if necessary stand up on its own.
starting to stitch over the tracing
ready to colour in
I blended some fibres to make the palette I would use, having decided that the picture I had taken would be a guide to shape only and I’d have a slightly different coloured horse in my picture.
Horse palette
I had by this time removed all the guide stitches from the landscape picture, except the lower part of the Golden Mean lines to guide me where to place the horse when completed.
Here is the horse, substantially finished, about to be cut out of his background.
And here he is having been cut out.
I have left the top part of the body with the original depth of the backing felt and have shaved down the backs of the legs, the belly and nose so that they will be more part of the picture as opposed to appearing to stand proud of it. I have also added coloured fibres to the sides and the rear edges for the whole horse so that no white background will be visible when the horse is attached to the landscape. The final shape of the legs and neck will be refined at that stage, and more grass added around the muzzle and hooves. I have left the tail and the forelock un-needled to emulate a slight breeze blowing some hairs around. I have also attached some linen threads to the back which I will use to secure the body to the picture. If I don’t do this it is possible that the horse might fall off the picture if he’s only attached by his hooves and his muzzle.
back view
And this is where I have come to a (“shuddering”) halt.
I was hoping that this would be the last post in this series; that I would have finished my picture of the horse on the Devon hillside. However the recent very hot (to us) weather we have been experiencing here in the UK has meant that I’ve had to stop work. So I was getting very behind. In addition, I seem to have acquired an RSI (repetitive strain injury) to the shoulder of my dominant right arm – to be exact “rotator cuff related shoulder pain”. Although I don’t think it was as a result solely of needle felting, I suspect that the action of frequently stabbing fibres for several hours at a time may have contributed to it. It certainly hasn’t helped it. Whatever, it has resulted in my having to put aside my needle felting for the moment. I will post again as soon as I can get back to work and finish this, which has fast become a labour of love. In the meantime this where I have got to.
Now hopefully, you’re not sick of them yet, another ocean picture. I plan on adding a sunset. The sky’s progress looks very similar to the progress of the other ones. I could probably just pick one and use the same picture over and over. This one is a bit darker as I am thinking it’s starting to get late with the sun going down.
For the ocean this time I wanted darker water and not so much sparkle so I peeled the top layer with the sparkle off and used the darker inside and back.
I have a nice pinky batt I think I can use to add the sunset to the sky and water. I think I am going to do it as the sun already being below the horizon but I am not sure. But I was back to a baking day so it will have to wait.
Now I’ve pulled the batt out to take a picture for you I am not liking it as much its got a lot of black and some blue in it. I think I need to look at what else I have.
That didn’t work well at all. What else do I have, Who knows, It’s all in boxes all stacked at the back of the storage area. so I must make do. I pulled a bit of corral pink and 2 shades of red silk ( probably but shiny anyway) out of the above batt and spread it out to be the sky.
I laid it on top and left a little spot for some orange sun.
Now as I said my stash is all in boxes and most of that is at the back. I did reach a small box or multicoloured silks in small bags. I found the right one I pulled a blob( technical fibre term) of dark purple from it. I don’t need much.
I pulled some fine bits ( another specialized fibre term)out and laid them across the top of the sunset sky.
Now I just need the shiny orange curl I have begged from Bernadette Monday night for the sun and that part should be done…….Except it’s not needled down and so it’s not really stuck. I look at it and it’s so wispy I think that if I try to needle it, it will end up pulling and being a mess.
I think I am going to have to wet felt it. I am planning to dig out some wet felting supplies. I think I can reach enough things for a small piece and some plastic wrap from the kitchen will work fine. That’s tomorrow’s job. Now if this ends here you will know I was unsuccessful at finding my supplies and taking them to the guild social to work on. Or possibly making tourtiere pie filling and waiting for and dealing with the livestock viewer took too long and I just ran out the door to do some spinning with friends. Hopefully, you won’t have to wait until my next post to find out how it goes.
A few years ago, while searching for an online textile workshop, I happened upon one that made me curious. I was familiar with the tutor’s name, Ruth Lane, as her book “The Complete Photo Guide to Felting” was and continues to be one of my ‘go-to’ reference books. Among its many attributes are two that I hold important, good writing and clarity.
At the time, Ruth was offering, among her courses, one titled Nuno Felting with Paper Fabric Lamination. This four week course is available under the heading Embellishing Felt With Surface Design Techniques – A Mixed Media Approach.
I was absolutely delighted when Ruth asked me to write some posts for the Felting and Fiber Studio blog and when I finally decided to design and produce the online Spiral Workshop I was thrilled when it was accepted as one of the courses on the FFS workshop platform. I feel so comfortable with the whole ethos of small class sizes and encouraging participants to engage with others if they so desire.
The Spiral workshop came about as a result of a challenge put to me by a fellow felter. Once I had refined my technique I set about filming each step of the process. I wanted clarity as, to a large extent, the videos needed to replace my physical presence in the learning space – that said as with all courses offered by FFS, tutors are available to answer questions for the duration of the course.
Once the full course was recorded, I set about editing the material. This did not involve a lot of deletions. Instead the videos were broken into smaller steps which would make particular elements of the process easier to locate for participants. Each video has an accompanying PDF which again is broken into steps to match the videos. These are available for participants to keep and the videos are available for the duration of the course (and a few extra weeks).
This will be the third run of the course which will start on 26th August. Registration for it opens today (12th August) and numbers will be limited to make the experience more intimate.
Here are some photos of students’ work. They are all so gorgeous and so different. I have included some of the reviews at the end of the video.
If you are interested in finding out a bit more, feel free to check out the following link:
I’m learning to print onto felt so I thought I’d show you some work in progress. I’m following Lindsey Tyson’s course ‘Transfer Printing onto Felt and other Fabrics’ so I’m focusing here on what I’ve made rather than how. Lindsey’s been printing on felt for some years and has developed her own techniques. She’s now moving away from felt-making and printing to focus on painting so has produced a comprehensive course to share her expertise. I first saw her work a few years ago and have been really intrigued ever since to know how she produces such lovely images on felt.
I do quite a lot of sales and exhibitions in my local area. I’ve long thought I’d like to develop some smaller decorative items I can make relatively quickly and so sell at a lower price than some of my other work (because it’s more time-consuming). I thought printing might provide an opportunity to do this.
I hummed and hawed for some time before signing up as it involves quite a big investment – not only in the course itself but also in equipment, software, space (for the equipment) and time. I’ve just had a milestone birthday and as my mother wanted to give me a milestone gift, I decided that this was it. I do love learning new skills and developing ideas so I was pretty sure I’d love the course. Thank you Mum!
My first venture was to source some free online images (this is covered in the course) and, along with a little oyster shell sketch I drew, prepare them for printing and print some samples onto scraps of felt.
Small test pieces
I was pretty pleased with the results. However, some of the prints had a rather plastic feel and very visible edge.
Poor quality printBetter quality print
Lindsey was very helpful with her suggestions on how to improve – including highlighting that I’d overlooked one of the steps when using the paper I’d chosen, doh! That is now largely resolved though I’m still wrestling with myself about whether I should buy a new printer as I have an inkjet and apparently laser prints work better.
I made a little tea light holder cover using some commercial prefelt. I’ve never used bought prefelt before (I’ve always made my own) and although it produced a very lovely fine felt, I also managed to create a line in the cover where the sheet of prefelt joined that I wasn’t happy with.
line where prefelt joinedSame line with light behindPrinted back of tea light holderAvocet (with some unwanted fluff!)First tea light holder attempt – using commercial prefelt and one of my own felted bird images
I now know (from the course) that there’s a way round this but I’ve decided for the time being to stick with making my own felt from scratch rather than introducing new variables.
The course covers, in a lot of detail, how to design and manipulate images. It includes tutorials on using free software as well as paid-for software like Photoshop. I decided to buy Photoshop Elements ( a basic form of Photoshop with a one-off purchase rather than a monthly subscription). I have to admit I have not taken to it like a duck to water! Some of that is doubtless me (remember that milestone birthday!) but I’ve seen lots of reviews that agree that it’s not very intuitive and so not particularly easy to learn to use. Fate intervened with (as far as I know) my first dose of Covid-19 during which I confined myself entirely to staying at home for 5 days (as per our current guidance) and until I tested negative. After the first couple of days I started to feel better so decided this was my time to make Photoshop Elements work for me. In spite of sometimes getting very frustrated, I actually quite enjoyed the learning and have to be impressed with the things I can now do with it (however slowly) let alone all the things it can do that I can’t yet. There are some really good free YouTube tutorials too, which helped, and I have certainly put in the hours. Many, many hours.
Back to the felt-making. I made two more little tea light covers – one from 2 fine layers and one from 4 fine layers of 21 micron natural (undyed) merino. I wanted to see how they’d look with a lit tealight inside. Surprisingly they were both OK.
By then I’d thought of using my own felted bird images which I expertly (!) extracted from their backgrounds. I like the redshank and curlew as they both have feet. Often my felt pictures have birds (like the avocet) whose feet are in water or behind pebbles – both because that’s how I saw the wild birds they’re based on and because I find felting bird feet quite hard!
2 layers 21 mic merino4 layers 21 mic merinoBack of the 2 layer one; tealight litRedshank and Curlew on 21 mic merino
I then tried out 18.5 mic undyed merino and decided this was what I’d use as it has a lovely smooth surface, light colour and a fine translucent appearance. Perfect both for printing and for tea lights.
I started to dig into my vast collection of charity-shop-bought silk scarves and added silk strips to the lower part of the designs. This was partly because lit tea lights’ metal cases cast a shadow at the base of the cover (see the lit one above), partly because it adds to the decoration and partly because it can ‘ground’ the images – i.e. give those birds’ feet something to walk on. Oh, it also eases my conscience about quite how many second-hand silk scarves I own.
Redshank with recycled grey silk scarf strip
And so here are some more of the results. I’ve printed a design on the front and the back (apart from the one with a flock of birds – that goes all the way round). They also look nice as plant holders, ‘thought they’re not quite the right proportions for most plant pots so I have to add some small pebbles to the bottom of the glass container if I want to show them as plant holders.
Some of them are free images I’ve found on the internet; some are from my own large felted pictures and one (the honesty seed pods) is from photos I’ve taken of the seed pods and worked on in Photoshop Elements to create a composite picture.
And here are the first 6 I put in the gallery shop at Creek Creative in Faversham (it’s a gallery, café, shop and studios where I rent my studio), just over a week ago. Inside each there are comprehensive warnings about lit tea lights, some felt care instructions and the name of the image.
First shop display at Creek Creative
The redshank on the left sold within a few days – I don’t know about the others yet.
I’ve also made some cards – initially to use up all the little test prints….
Square cards made using test samples
…..and then some I made specifically to become cards
Long cards
And finally a couple of bigger purpose-made plant pots with metal pots inside, using 21 mic merino in green and white.
Side 1 – ladybirdsSide 2 – Butterfly and flowerSide 1 butterfliesPlant pot holders
Next steps? I’m looking forward to a couple of in-person sales / exhibitions I have coming up so I can gauge people’s reactions. I will keep building a stock of tealight holders, plant pots and cards and developing new images so I have plenty of both stock and variety. I will keep extending my knowledge and skills in both printing on felt and using Photoshop. And I will definitely keep working through Lindsey’s excellent course and drawing on her extensive and generous one-to-one and group support to help me on my way.
Here’s a link to a promotional video for Lindsey’s course, in case you want to check it out.
This is a wet felted rug with archaic motif from Turkmenistan. It was a long process, about 1 weeks work. First I started on bubble wrap with design (wet pencil roving), then I filled with coloured wool and then on the top I put it 3 layers of wool. With rolling technique I finished the rug.
I showed you a historical felt pattern sample recently where I used a water soluble stabilizer to create the pattern. Obviously, in ancient times, this product would not have been available. So I needed to try a more traditional method.
I decided to try a different design based on wings. The pattern was printed twice and put one over top of the other in a mirrored pattern. The paper design was covered with plastic so I could lay wet wool down on top of the pattern. This is the method that Ildi uses, thanks again Ildi!
Next, wool yarn was wet down and applied over the pattern. Pre yarn would work better, but this is what I have in my stash.
The colors chosen were two shades of blue, one leaning towards blue green and the other leaning towards the violet side of blue. The fiber was wet down and laid in place. Layout definitely takes time with this method.
Then another layer of the dark blue was laid out on top of the wet wool pattern. I didn’t need to add any water to this wool as there was plenty already available. Next on to felting. The piece was kept in between plastic for the entire felting process but then with fulling, the piece was rolled against itself. Big mistake as this caused the yarn to fragment and pull free in some areas. Sigh.
Here’s the piece after felting and the black was not a clean line. Again, this is partly from using a twisted yarn instead of a pre yarn but also due to the fulling method.
I shaved the black but it is still not as clear as I would like. The design also had very sharp points where I cut the yarn and the ends didn’t felt in as well.
This is the sharpness that I would prefer. These two pieces were made quite a while ago. I made all the felt, then cut out the shapes and appliqued (hand stitched) them down. I then couched a green yarn around the shapes. This is a traditional ram’s horn design that is seen frequently in the Central Asian areas.
Lots of people asked to see my recent landscapes once they had been framed. I get my work professionally framed with a narrow, black wooden frame. If you’re in Whitefish, MT and need some framing done, I highly recommend my framer, FoR Fine Art. They also have a wonderful art gallery in Whitefish and Bigfork, MT and Tucson, AZ.
Here are the two biggest pieces after framing. They are approximately 20″ x 30-32″.
Here’s a couple more that I completed over the winter.
And the last one with it’s new frame. I have been working on getting new gallery representation and contacted a couple of places. I heard back from Northwest Handmade in Sandpoint, ID. I took 16 pieces over to them and will be taking them some snow dyed silk scarves when we go back by there in July. Yay, happy dance.
I decided to make a few more 5″ x 7″ pieces to take with me but didn’t get a chance to show them here. These are included in the 16 pieces that went to Sandpoint. If you happen to be in the area, please stop by and visit Northwest Handmade!
The five framed pieces shown at the top of the post weren’t ready when I went to Sandpoint. I picked them up from the framers and the next day, I heard back from 4 Ravens Gallery in Missoula, MT. They were interested in carrying my work too! Wow! Those five landscapes will be on display towards the end of June. Again, if you happen to be in Missoula, MT, please stop by and visit 4 Ravens Gallery.
It is great to have two galleries carrying my artwork but now I have to get busy and make some new pieces to replace any that sell. (I’m being hopeful and thinking positively.)
As I told you in my last post about our trip to New York City, I visited the Met Museum’s Watson library. I am doing research on ancient felt making patterns in and around Central Asia.
This is one of the books that I found in the library and it had loads of illustrations with different patterns. But, the book was written in Russian. I went ahead and scanned the illustrations and hoped that I would be able to get it translated when I got home. It took me a few days to realize that I knew someone who speaks Russian, Galina! She is a member of The Felting and Fiber Studio Forum and will be teaching another Fantasy Fish online class soon. Galina kindly translated for me and also told me a little bit about the book. The book is about the Nogais, a Turkic ethnic group, who now live in the North Caucasus region. This is “next door” to Central Asia and since these were nomadic people, I think I will include their patterns in my research. The book was written by Fatima Kanokova and her doctoral thesis had a theme of “Decorative Art of the Nogais.” Thanks so much Galina for your help!
I took one of the floral patterns from the book and enlarged it. I then painted it on paper in the colors I was going to use. The colors were limited to what size and color of prefelt I had available. I used a very lightweight commercial prefelt and decided I was going to need at least two layers and then a backing piece of prefelt. I did try and do a little dry felting of the two pieces of prefelt so they would stick together during cutting. This wasn’t very successful. I would highly recommend using a thicker piece of prefelt to begin with and the cutting process would have worked better. Next, I needed to decide how I would transfer the design.
I was thinking of using the freezer paper method like Lyn used with her pigeon/rubber ducky piece but then suddenly remembered that I had some Sulky Sticky Fabri-Solvy that I had bought for free motion machine embroidery. I did not like using it with the sewing machine or hand sewing because it gummed the needle up so much. But I hoped it would work with the prefelt.
The Sulky Sticky Fabri-Solvy has a paper backing on a sticky, water soluble fabric type stabilizer. So I traced the design and cut it out with a craft knife. I cut very carefully, so that I could use both portions of the design for the negative and positive shapes.
Here it is after cutting and you can see the negative and positive shapes that resulted.
Next was to peel the paper backing off and position the pieces on the various colors of prefelt.
Here is the prefelt with the cut shapes of Sticky Fabri-Solvy stuck in place. Now on to cutting them out. I tried cutting them with the craft knife but the two layers of prefelt kept shifting around. So I used a small, sharp scissors to cut out the shapes. Again, I was very careful so that I could use both the positive and negative shapes in the two different colors.
Here are the shapes after cutting. If you look closely, you can see the cutting wasn’t perfect. Again, this would have been easier with one piece of thicker prefelt.
Now to put the pieces together in an inlaid fashion. I used a piece of white prefelt behind the red background. If I had been thinking about it, I should have used a piece of red prefelt. Then you wouldn’t be able to see any movement of the cut shapes if it occurred during felting. But I didn’t have any white prefelt for the brown background piece. I decided to cut the edges of the brown piece and add a red background.
Here’s the brown piece after cutting and adding the red background. I didn’t inlay the brown into the red background, I just laid it on top.
On to felting everything. I covered both sides with a nylon curtain and wet the pieces down. Hopefully, you can see that the Sticky Fabri-Solvy mainly stuck on to the nylon curtain and then peeled off. I washed the remainder of the stickiness out of the nylon curtain and preceded with felting as I normally do. The little bits that were still stuck on the red prefelt dissolved. I’m sure the whole thing would have dissolved without pulling it off with the nylon curtain. But sometimes this type of water soluble fabric leaves a stiff residue and I didn’t want that to happen. So I was happy with it all peeling off easily. I had tried to peel if off before I wet it down but it would have damaged the prefelt. Also, I found that with the stabilizer in place, the pieces fit together easily and held their shape better than the other pieces that didn’t have any stabilizer. It didn’t really matter with the end result anyways.
And here you can see the two pieces after felting. The one on the right had a bit of ruffling edges since the prefelt in the center was thicker than the outer edge. But that didn’t matter because I was planning on trimming the pieces after felting.
Here are the two pieces after trimming. This method worked great and now I have a useful purpose for the roll of Sulky Sticky Fabri-Solvy that I have.