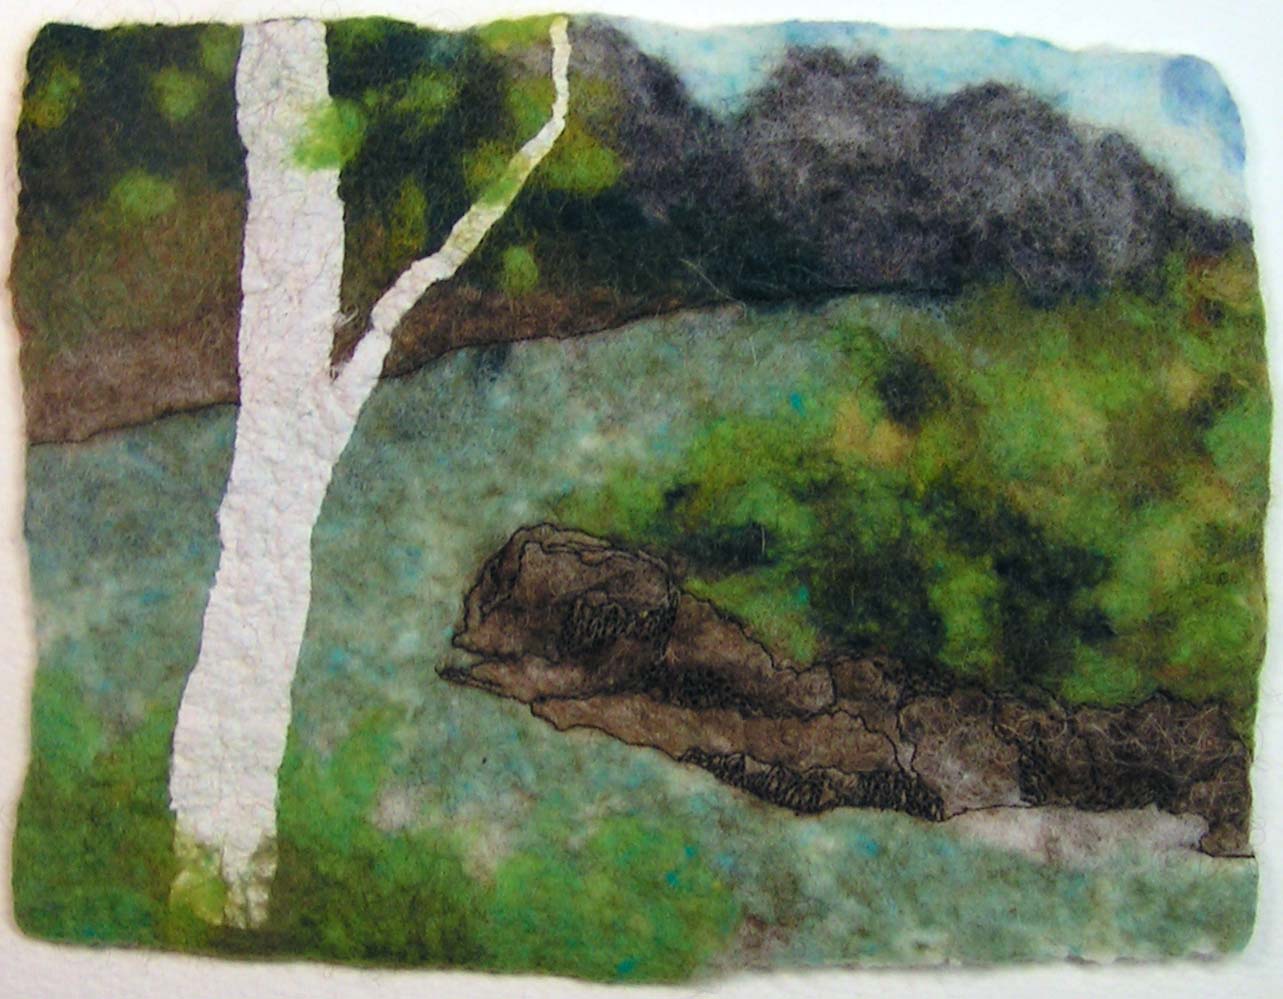
I added free motion machine stitching to the distant shore. Whenever I start FME on a landscape, I always think that the first few areas where I have stitched look like it’s too much. But I keep going and usually, once more stitching is added, the initial lines don’t feel excessive.
The next step was to stitch the rocks across from the tree. I considered adding some stitching into the foliage above the rocks but decided to leave it as is.
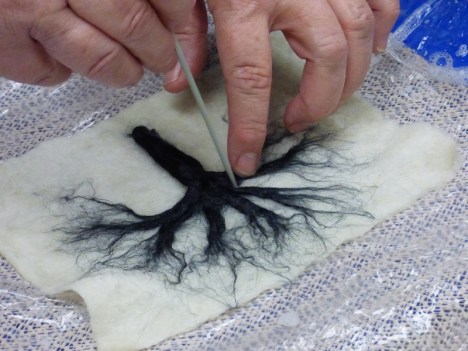
Then on to stitching the tree. I added the dark bits to the trunk and stitching through the felted paper was a breeze, no problems at all either by machine or by hand. The dark branches were added next and then decision time on how to add a few more leaves. I considered needle felting some smaller leaves on the dark branches but then decided I would hand stitch the leaves.
I then hand stitched leaves on to the dark branches using hand dyed lace weight wool thread and detached chain stitch. I added a few bits of grass at the bottom of the trunk as well.
The miracle is that I found a backing fabric, stitched the felt to that and then wrapped/laced the piece around matte board so it’s ready to frame. Since the piece is small (matte size 8″ x 10″), it went quickly and now I have two pieces ready to take to the framers. This piece counts for the year long tree challenge for spring. I have to think about the summer one as it wouldn’t really look different than spring, a few more leaves perhaps?
The winter birch piece is also ready for framing. I used a darker gray hand dyed fabric for the winter birch as it felt “colder” that way. Now on to the next landscape as the gallery wants me to replace the one that sold last month. (Doing a little happy dance!)
This is the piece that sold called Remembrance. Yay!
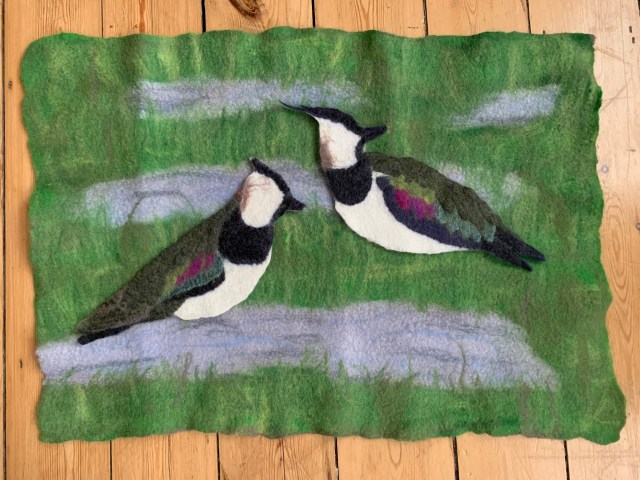
I’ve recently made a new felt picture of lapwings so I thought I’d show you how I went about it.
As you’ll know, if you’ve read my other blogs here, I live on the East Kent coast in the UK and am particularly fond of the local birds. I’ve seen some beautiful flocks of lapwings including at a small nature reserve just along the coast at Oare. I’ve not attempted lapwings before though they are really beautiful birds, so I thought I should have a go.
I’ve only seen lapwings in quite large flocks – I’ve never seen one on its own – so I thought I should have at least 2 birds in the picture. I did a quick sketch to help me decide on the size and stance of the birds
I started with the background. The birds at Oare were on the wet, grassy edges of a lake, very near the sea. Here’s the background laid out & ready to start felting.
I spent a while thinking about how to represent the lapwings’ lovely iridescent feathers and decided on lots of prefelt.
I had some blended greenish wool that was perfect for the main feathers though I had no idea where it came from or what it was. As I made some prefelt I tested out the shrinkage – mostly just to be sure it would felt rather than getting a specific shrinkage.
Then I set about prefelt for all the other lovely colours. The dark green sections are scraps of recycled silk from my favourite source: a charity shop scarf. The others are mixtures of different merino wool colours. I was particularly pleased with the dark section on the right which was a bottom layer of blue and top layer of charcoal grey. It was just the effect I was hoping for. With hindsight I should have used silk for the light green & pink / purple too as that would have given me more shine.
Here’s the prefelt cut up & arranged in a bird shape.
And here are the 2 birds once fully felted but still wet
And here I am deciding how to position the birds on their background.
I needle felted the birds into the background then added eyes, other face details, legs (using recycled tapestry wool) & head plumes. If you look closely you can see I also fiddled a little with the background: needling in extra strands of grass to soften the edges of the water.
The lapwings went straight into an exhibition with 4 other big pictures plus some smaller pieces at my local gallery: the wonderful Horsebridge Community Arts Centre in Whitstable. Here’s my display (not a great photo, sorry).
And I’ll finish with a quick shot of a beautiful painting I bought at that exhibition.I’ve been looking for something to hang over my bed for ages and I thought this was perfect.
Painted by my friend, the artist Josephine Harvatt. The title “When you wake up it’s a new morning”is particularly apt for over the bed. I love it. If you want to see more of Josephine’s beautiful work, here’s an Instagram link.
Teri wrote a post a while back about making mushrooms. She inspired me to give it a try. I already had a small circle resist (7 inch diameter) and just needed to add the stem. I cut a rectangular piece of floor underlayment (6.5 inches x 2.5 inches) to add to the circle.
Here it is after I duct taped it together. Now ready for wool. I wanted the process to be fairly quick so I chose some colors from my selection of short fiber merino which felts very quickly.
I decided to ad a few pieces of pre-yarn in brown to the base. I should have put these on the outside layer but I covered with more yellow before wetting down.
Here you can see both sides of the mushroom resist covered with four layers of wool and wet down. Then on to rubbing and making sure the edges were taken care of so I wouldn’t end up with a ridge around the resist.
Here’s the mushroom before I removed the resist.
Once it was partially felted, had a good skin and starting to shrink, I removed the resist. Then on to working the cut edges and begin more aggressive felting, fulling and shaping.
And here’s the finished mushroom on a plastic base with a rod in the center to hold the mushroom erect. I didn’t quite get the bottom even enough for it to stand on it’s own. This was a fun, quick project and I plan on making a few more with a bit more surface design next time. Thanks for the inspiration Teri!
Our local art group made some Joomchi a couple of months ago and since that time, I have been thinking about adding paper to the surface of felt. I realize that there is a well known online course about how to do this, but I have not taken the class and these are my experiments on adding paper to felt. If you haven’t heard of Joomchi before, it is made from layers of mulberry paper that are wet down and agitated. Essentially, wet felting layers of mulberry paper together. If you search online for it, you will find YouTube instructional videos and some beautiful artwork made with the technique.
I have a variety of mulberry papers in my stash that I used. I cut a 2 inch square from the different papers and laid these out on a couple layers of short fiber merino batt. I figured that the pinks and reds would probably run from leftover dye in the paper but that didn’t concern me. I just wanted to see how the paper would felt in.
I covered the wool and paper with a synthetic sheer curtain on both sides and wet down with cold water. This seemed like nuno felting to me, so I followed my routine for nuno felting. I treated the piece gently, used cold water until the fulling process and rubbed over the surface of the paper pieces to encourage the wool to migrate through the paper. I fulled mainly by rolling but did do more aggressive fulling in hot water once the paper was holding in place.
Here is the result. All the paper types felted in very well. You can see that the red paper shared it’s dye with a couple of the white pieces of mulberry paper.
The close ups show that the paper does crinkle a bit but it is adhered well to the wool. I like the use of inclusions in the paper and the surface is interesting.
The fibers in the top pink paper almost look like a silk but I don’t think they are. It’s probably that the fibers take the dye differently than the paper pulp.
As you can see on the red piece, the “tinsel” or whatever the gold strands are, migrated almost completely out of the paper. If you pull on the gold strands, you can pull them right out.
Now on to the Joomchi. Most of my mulberry paper is red and pink. I used about 5 layers of paper, wetting down each layer as it was placed on a corrugated rubber surface. I then used a piece of pvc pipe and rolled over the papers. I kept turning the paper at right angles and also flipping over to the other side. Once the papers began holding together, I crumpled them in my hands, then gently pulled them back out flat and continued to crumple them. I thought the texture that developed due to the fibers of the paper beginning to break down was very organic and beautiful. The process also causes shrinkage of the papers, another similarity to felting.
Here’s the piece that I made with our art group. I borrowed other paper colors so I didn’t have to use pink/red again. You can see a bit of my red at the bottom left corner.
It was fun experimenting and I’m happy with my samples. Now to consider how I can use this in my work. Have you done any experiments lately? We’d love to see or hear about them, you can upload a photo here.
After our move to The Exchange, as mentioned in my first post there followed several years’ worth of productions in which I was not called upon for costume assistance although I regularly helped my artist friend who designed and painted the Panto scenery, and assisted with makeup. I once got the chance to make a giant beanstalk for our “Boy and Some Beans” Panto, after which I quite often was given the “head gardener” position whenever the scenery needed “vegetation” in addition to the painted sort.
In the mean time, and for several years running, SNADS were asked to put on some form of Haunting for the Halloween weekend at the local ruined mediaeval Wardour Castle.
Wardour Castle
Each year we wrote a short play, the various scenes of which took place in different spaces within and around the castle and it’s stone grotto, and 2 or 3 performances would take place each night over the nearest weekend to Halloween. This was great fun, even if decidedly cold and/or damp on occasion, and we actually got paid for doing it! It enabled me to expand my special effects makeup, which I had learned about at a theatrical summer school. It was there that I learned of the amazing things you can do with gelatine and porridge oats!
I always liked to be a witch or a ’orrible ’ag as this gave me greater scope for doing ’orrible makeup and practicing my witch’s cackle!
Porridge anyone?
Me and a Friend (that’s me on the right)
I was tasked with making a prop for our 2010 Panto Arabian Nights. The Sultan had a tame rat, which I was asked to produce as a hand puppet so that it could open and shut it’s mouth and wave it’s paws in a menacing way, and it was to have eyes that would light up red. This of course I made in felt (wet and needle) and my husband provided the tiny red lights for the eyes from his model railway stock. To make it more believable I needled a false hand onto the back of the rat and the section of arm extending from that hand covered the actor’s own arm as it disappeared inside his sleeve. From the auditorium it was not really clear that the hand holding the rat was not the actor’s own, except that it was not the quite same colour as his real hand – which should have been made up but wasn’t.
The Sultan’s pet rat
For the same Panto I was asked to make up the Genie. Here he is with a camel. (I didn’t have anything to do with either costume though.)
Camel and Genie
I was actually the front legs of this camel in our 2017 panto Ali Baba – great fun but tiring because my head was in his front hump and my arms were up his neck, holding up the head with one hand and using the other to poke out his tongue! This is the least tiring two person panto animal we have, at least for the back legs actor, because s/he is able to stand up with his/her head inside the second hump (it’s a dromedary).
In June 2013 the Society obtained permission to perform Terry Pratchett’s Monstrous Regiment. This is the one which is (loosely) based on the story of “Sweet Polly Oliver”, as she is called in the old folk song. She joined the British Army, dressed as a man, to try to find her brother, who she had looked after as a boy. (The “Monstrous Regiment” of the title comes from a pamphlet written by John Knox in the 16th Century – a “gentleman” who I think would have felt quite at home in today’s Afghanistan in regard to his attitude to women.) In addition to the Company’s enlisted “men” – all women pretending to be men – the Company boasted a (female) vampire and a mountain troll (also female, but it is difficult to tell the gender in the case of trolls).
I was cast as the troll – Carborundum by name. Mountain trolls are actually living rocks and I thought that I could do something with the costume for that. I had, a few years earlier, needle felted some bas relief gargoyles/water spouts using mixed bats of Jacob fleece, which actually looked like stone – as long as you didn’t get close enough to see that it was hairy, I should have borrowed my husband’s razor!
Corner Gargoyle/Water Spout – The original of this water spout is attached to the corner of a church tower in Hinton St Mary, the village just up the road from where I live.
So I thought I could use felt, but what to attach it to so that it looked like rock and not clothing? Well, a couple of years previously my Guild (Weavers Spinners & Dyers) held a special exhibition as part of the Dorset Arts and Crafts Association annual show, which was entitled Dorset Coast and Country – or something like that. We had a whole room to ourselves and we filled it with exhibits depicting the county. The Dorset coast is actually part of the Jurassic Coast – a World Heritage Site – and runs from Orcombe Point in Exmouth, Devon, extending east for 95 miles to Old Harry Rock, near Swanage in Dorset. Therefore we had to include some exhibits around this. I made a giant ammonite in needle felt and it was formed on a base of foam pipe insulation.
Ammonite
So I knew that if I could find some grey foam I could make the troll’s costume out of that with felted embellishments. Now I wonder where I got the foam from – silly question, as a needle felter I had been collecting foam in various sizes and thicknesses for ages. Anyway, I put together a rocky costume, complete with some “moss” and embroidered lichen. I made up my face to be more flat planes than chubby me and this is the result.
Carborundum
Front row: Troll, female vampire trooper, Back row, officer and sergeant “baddies”
Terry Pratchett himself actually came to our Saturday night performance and obviously enjoyed it – he gave us a standing ovation.
Carborundum chatting to Terry Pratchett
I got to wear the costume at the Haunting of Wardour Castle that year and actually managed to frighten some of the punters when a chunk of the grotto turned round and glared at them!
Watch out for Act 2 Scene 2 sometime soon, when I might actually get as far as telling you about the Wicked Queen in the title image.
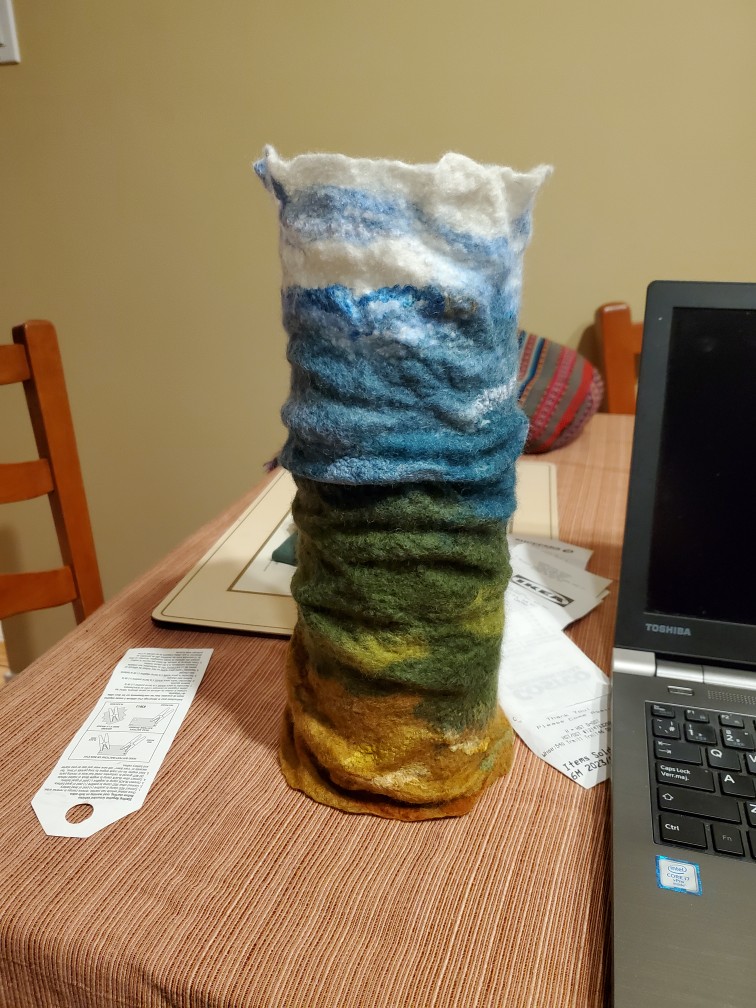
Four Ravens Gallery in Missoula, MT (USA) is holding a garden themed exhibition in May. I have several pieces that will be included in the show. I decided to make another felted vase cover to fit a glass vase that is 4″ diameter and 6″ tall.
I wanted a mixture of greens but didn’t want to take the time to card a batt. So I laid out different colors of green wool for each layer. Here’s the first layer, so that’s the inside of the vase cover.
Then I added a second layer which is much more neutralized green.
The third layer was a mix of greens that I had hand carded and was left over from another project.
Then comes the fun layer. I added a variety of green wool, yellow silk noil, red mixed wool in tufts and burnt orange locks. There are also a couple of pieces of bright green cheesecloth under there somewhere. Then the felting and fulling process (no photos) happened.
And here’s the vase. The photos show it from different angles. In the center photo, you can just see a small piece of the bright green cheesecloth. It’s a bright and cheery piece and reminds me of spring in the garden. If you’re in the Missoula area, you should check out the gallery as there are some wonderful artists represented there.
I picked a piece or felt I had and added the sky and snow backgrounds. I used 3 shades of natural white wool for the snow so that it wasn’t so flat. I used Merino, Corriedale and something strong and shiny. the shiny wool may have been BFL or even Mohair.
Then I started working on the tree. I worked on a separate surface so as not to disturb the background too much as it is only lightly needle felted. I decided to work in two layers for the tree so this is the darker back layer. I started by just fluffing it up and then using a knitting needle to move fibres around to get a better tree shape. then gave it a dry felting ( just flattening and wiggling it a bit so the fibres stick together) to move it onto the background.
I picked a redder brown for the second layer. I forgot to take a picture of it when it was separate. I must have been in the felting zone. I put the tree slightly off-center. I tried it in the middle and I didn’t like it.
Here’s a close-up so you can see the 2 layers
I poked the tree all over to tack it in place and started fiddling with the roots, so it won’t fall over in the wind.
and some more snow
And that was as far as I am right now. I will probably fiddle with it more before wet felting it and then fiddling more, of course. I am thinking of adding a shadow but not sure how to tackle it. I am not sure where the sun is. I may have to go out to the field and look at shadows.
Have you started your tree challenge or maybe you’re going with making something useful or both?
We would all like to see photos of challenge pieces and if you are unable to upload photos directly onto The Felting and Fiber Forum ‘studio challenges’ thread, then please use the link below.
I’ve recently finished a felted picture – mostly wet felted but with needle felted elements. ‘How long did it take to make that?’ I’m often asked when people see my work. I find it difficult to answer precisely. ‘Quite a long time’ isn’t very helpful so I usually say something like ‘About four days’. I don’t really know if that’s true. It’s my best guess. As the felt-makers among you will know, most people have no idea how much work can go into making felt, so as I was making my latest picture I thought I’d try to document the stages and see how long it all takes. That’s what I’m going to show you here, plus take you on a little visit to the town where I work.
I’ve already decided to make a picture of a turnstone feeding at the water’s edge so I set about making prefelt sheets for the pebbles. I live on the North Kent coast and love watching the local water birds: how they look, move and interact with their environment. It’s mostly pebble beach on the stretch of coast nearest to my home so pebbles are a good place to start.
First a piece of natural grey merino prefelt. Then a piece of mixed browns
It takes a surprisingly long time to cut all the pebble shapes
Here’s the grey cut up and an offcut of nuno prefelt which I’m gong to add into the mix.
And finally a sort of orange / yellow piece.
I use prefelts as they give the pebbles more definition than if I just add blobs of wool. I’d guess all of the above is about a day’s work.
Now I can start the layout. This is going to be quite a big picture so will take up pretty all the space on my standing work desk. Here’s the first layer – natural white merino.
The second layer starts off with pewter for the water. While I’m working on the water section I add some dark blue low lights.
After I complete the second layer with more natural white merino, I lay out different coloured wool on top of the pewter and dark blue. I’ve previously carded pewter wool with a variety of light blues and greens using large hand carders. I haven’t even thought about adding that time to my calculations. I use this for the top layer of the water, mostly covering the dark blue which I want to add depth without being too prominent.
Here you can see that I’ve also added all the cut up pebble shapes to the bottom of the picture, plus some scraps of silk cut from old scarves, leaving a white section where I will add the wave.
For the wave I’ve chosen mohair because it has a slight shine and I hope it will be wiggly when felted. Along with the mohair I add lots of silk hankies and wool locks: I’m trying to get lots of texture into this section.
There’s also a piece of sort of knitted yarn that I picked up in a charity shop a while age. It’s meant to be knitted into a scarf (according to the label) but I lay a line of it under the wave, hoping it will look like the foam from a previous wave. I also pop some offcuts into the wave for more texture. I finish by adding a few locks to the water to look like small cresting waves and I’m at the end of day 2.
A couple of days later I start the wetting down. Because it’s large, I decide to work in three sections, starting with the pebbles. I like to use voile netting over and under the wool – which you can see in this photo.
I spend a couple of hours prefelting the picture, working both sides. Here’s the back. I can see the pebble outlines pushing through the white so can be confident the layers are starting to felt together. At this point I decide to take a break and go for a wander outside.
I work in a small rented studio in the historic town of Faversham, about 8 miles from where I live, in Whitstable. The studio is in a former industrial building (originally a late-Victorian brewery bottling plant) which is now a lovely not-for-profit gallery, café and shop called Creek Creative Studios. It also includes 32 small studios filled with a good variety of busy individuals including painters, jewellers, potters and glass workers on the ground and lower ground floors; writers, illustrators, stringed instrument specialists, web designers and other small businesses on the upper floor.
Faversham is a gorgeous medieval market town so wandering about at lunchtime (and of course checking out the charity shops) is one of my favourite pastimes. It’s a lovely sunny day so I thought I’d share a few photos with you.
Top left is the historic market place with its stilted guildhall. Top right is the Shepherd Neame shop: there’s a long history of brewing here and Shepherd Neame is Britain’s oldest brewery. Some days it does mean the town is rather ‘aromatic’. Second right is the lovely Yarn Dispensary. Originally an apothecary, the building dates back to 1240 and has a beautiful, separately listed wooden apothecary interior. It also sells a delicious selection of yarns. Bottom left is an old pub; next is the old water pump in the marketplace and a couple of the other buildings that surround the market place. There’s still a market here 3 days a week plus regular monthly ‘best of Faversham’ and antiques markets at the weekends.
Back at the studio I spend the rest of the day rubbing and rolling the felt until it’s fairly firm. Because it’s a picture and going behind glass it won’t endure much wear and tear but I still like to ensure it’s properly fulled. End of day 3.
I leave the background to dry and return to it about 6 days later, as I start to think about the turnstone or turnstones. Working from my own photos, I roughly sketch a couple of birds and cut them out so I can see how they might look.
Although I like the 2 birds they are a bit small (the waves round here aren’t that big) so I decide to go for one pecking bird but bigger than the sketched one. First step is to make some prefelt for the feathers.
Here it is as I’m starting to wet it down (left) and as a light prefelt (right – apologies for the poor quality of the second photo)
I cut up the feather prefelt and lay out a general bird shape. At this stage I am leaving the head large and a bit vague. I’ve learned that it’s better to make it too big and cut it to size later rather than trying to get the exact size and shape and risk having to add more wool or felt.
Here’s the bird felted and with a lightly trimmed head. Sorry it’s not a great photo as it’s electric light and I’m casting a shadow but I hope you can see it well enough to get the overall idea.
From layout decisions to the felted bird has taken most of day 4.
The next stage is to needle felt the bird into the background and needle in the eye and legs as well as refining the beak. For the legs I used some of the orange-ish prefelt I made for pebbles, adding strands of wool on top.
Using a broken needle I pick at the wave to raise some of the texture from the silk hankies and wool locks. I’m not sure whether it’s visible in this photo but it does make a difference in the actual picture.
I didn’t take progress shots of the needle felting but I’d say it took a good half day. It’s difficult to know when to stop fiddling around with it and declare it finished.
So, here is the final picture before framing.
And a shot in its frame.
Frame size is 63 x 86 cm (approximately 25 x 34 inches)
I used an adhesive hook tape – like the hook side of Velcro – which I stick to the mount board. The hooks hold the felt in place without impacting the fabric.
So, it looks like my 4 day estimate was a bit low. Next time someone asks how long it took me to make this picture I could say ‘About 4 ½ days, oh, plus the carding, the nuno prefelt and the framing….’ . Maybe I’ll just settle for ‘About 5 days’.
Do you try to work out how long you spend making things or just go with the flow?
One of this year’s challenges is divided into the 4 seasons. A tree in each of the four seasons. Now I like evergreens so I could have cheated and made the same identical evergreen 4 times but thought that was a bit too easy. I had seen online someone say they had been shown how to do a tree by Andrea Hunter, Creating Felt Picturesblackwells.co.uk/bookshop/product/ It’s a great little book. What I saw was just a picture of the finished layout. I thought I can figure that out. That was months ago. On Monday I finally gave it a try.
Monday was a Holiday here, so I gathered up my supplies and headed into the guild to meet Jan. We were going to do our felting machine comparison so she could blog about it and I wanted to try making the tree.
I brought a new rolling mat I had just picked up because it had a nice little lip to help me keep things dry. I was not going to need a lot of water. I used some prefelt for the background and some black merino for the tree.
I decided to do the first one quickly and without any fiddling around. I just held the trunk portion firmly and fluffed out the rest. Part of what I wondered was: would the rolling cause movement that would make some thicker branches?
I think it would have been better if I had taken out the two blobs in the branches but I was quite pleased and if I would going to lay some green over it to make a summer tree it would have been fine.
Finished, wet
Finished dry
Next, I tried wetting the prefelt and the black wool to see if it would spread out any better but it was so terrible I just pulled it off and tossed it before I even started. It would make a good start for a flower.
I squeezed most of the water out of the prefelt and got some new black. I also grabbed a knitting needle to manipulate the wool. the wool picked up moisture from the wet prefelt and that made it easier to have the wool stay where I wanted it.
This is much better I fiddled around with making bigger branches and trying to make it look less like a small child drew it. I was quite happy with it and decided to add a little mixed brown wool for some texture and Jan suggested adding a thin haze of green to give it a spring haze look like just before the trees get their leaves.
I am quite happy with how it turned out. I like the way the thicker trunk area kept some of its 3dness( I am sure that’s not a real word) You know, they stick up a bit. The trunk needs work but I think this will work well for the challenge. Now I need to go shopping for some brown wool or I need to get on with some dying. I have almost nothing in the way of brown wool.
Finished, wet
Tree finished, dry
Oh, and since Jan is always posting pictures of me I thought I would share one of her in her octopus hat at the Chesterville Spin-In a few weeks ago.
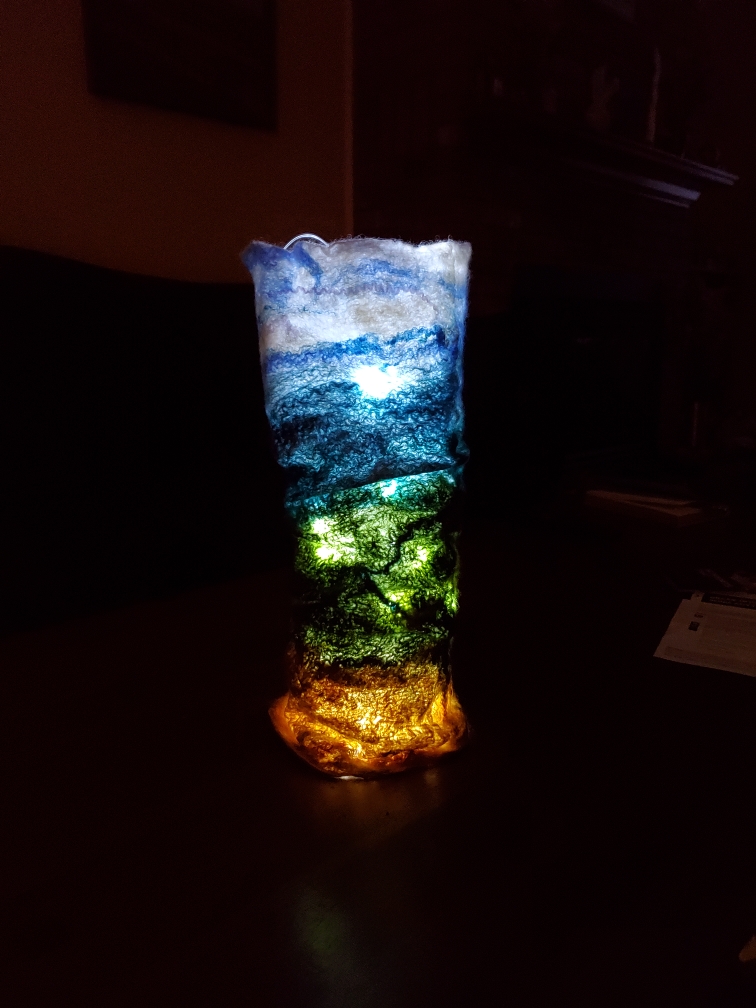
This last Sunday I taught the felted lantern cover workshop that should have happened in December but was delayed. I was teaching at the guild I belong to, Ottawa Valley Weravers’ and Spinners’ Guild.
It was a half day class. the biggest challenge with the lantern covers is laying out the wool thin enough to let the light through but with enough wool to hang together. They don’t need to be strong because the lantern will give them structure. For this class, I provided a glass vase so everyone would be working to the same resist size. You can use a large pop bottle with the top cut off but I would add some weight to it to make it more stable.
I had 5 ladies for this class. I showed them two examples of covers I made.
Everyone wanted the longer one so they could add wrinkles
I only just realized we ended up with just 2 colour palettes. the largest part of this class is taken up with layout and decoration. We discussed how you can add things to the inside of the cover that won’t show when it’s not lit up but will show as silhouettes blocking more light. A couple of people decided to give that a try.
It is hard to see on the last one but she is adding white and blue silk hanky pieces to the wool. they disappear as soon as they get wet. They will show up again later. You can see them a little in the pictures below. I think everyone had a great afternoon.
Two of my students sent me pictures of their covers dry and lit.
Christine
Janet
I hope the others will send me pictures as well. One was very thin and delicate and I think it will look amazing lit up. If they send them I will add them here.
I did have someone ask why I like to make covers rather than making them with a bottom. There are 4 reasons, first making a nice flat bottom that will allow the vase to stand properly can be tricky. A cover that is self-supporting needs to be felted much more or be thicker to be stiff enough. Having an internal structure gives you something to put the lights in and attach the controller to. And lastly, the container inside allows you to add water if you would like to use it for flowers.


 Wardour Castle
 Porridge anyone?
 Me and a Friend (that’s me on the right)
 The Sultan’s pet rat
 Camel and Genie
 Corner Gargoyle/Water Spout – The original of this water spout is attached to the corner of a church tower in Hinton St Mary, the village just up the road from where I live.
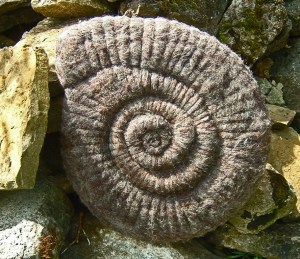 Ammonite
 Carborundum
 Front row: Troll, female vampire trooper, Back row, officer and sergeant “baddies”
 Carborundum chatting to Terry Pratchett