Browsed by
Category: Weaving

Combining Weaving and Felting by Fiber Artist Cathy Wycliff

Combining Weaving and Felting by Fiber Artist Cathy Wycliff

For many years I have been a lover of textiles, but I never wanted to knit or weave. Too fiddly….knit, purl, knit, purl. Or weave to a pattern but first figure out the sett, the epi. No, not me.

And then last year, I saw Meta vd Knijff’s small homespun weavings on felt on Flickr. Meta also uses natural dyes and paints and takes cool photographs as well. Meta is an artist in the Netherlands who I discovered on Flickr. So, back to the weavings on felt. I thought, hmmmm, if I could do that with weavings, then maybe I would like to weave. Then I discovered Saori weaving quite by accident, somewhere on the world wide web and subsequently took instruction.

I discovered that weaving doesn’t have to have patterns, that weaving can be creative and free, and what’s more–I could combine it with felt.

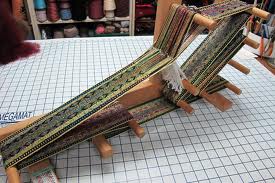
Over the period of a week or two, I made a bunch of small sample weaves, no plan in mind whatsoever. Then I grabbed some pre-felt I had in my stash, some homemade and some commercial. I fooled around placing the small weavings on pre-felt.

IMG_1527sm

IMG_1526sm

IMG_1532sm

IMG_1537sm

Most of the weaving samples are cotton and/or wool, and all are woven on black thin cotton warp. There may be the odd novelty yarn thrown in there, since when I was weaving samples, I was not thinking about combining them with felt. I chose 3 samples to felt with: the largest is multi-colored, all cotton warp with all cotton weft. I chose a large bright turquoise commercial pre-felt batts called “Maori” from Opulent Fibers, which I recall being Corriedale. I used small pieces of the same prefect batt to cover parts of the all-cotton weaving.

The second largest piece was a weaving I made with mostly wool and some cotton weft. I used as pre-felt a piece I had cobbled together with my naturally dyed wool, half madder and half logwood. I did not use any wool wisps to cover parts of this weaving.

The last and smallest piece was a small sample weaving I made using partial wool, cotton and nylon weft on cotton warp. I placed the weave onto cider merino ( handmade by me) pre-felt–again no wool wisps to cover.

I felted all of them in the usual way but not rolling as long as normal because I had used pre-felt as the base. Besides, I was impatient to see how they turned out! All of them successfully felted, although I did use a bit of needle-felting to secure some areas, mostly with the largest all-cotton weaving. I think that will make a nice wall-hanging for someone who likes a lot of brightness in their decor. Unsure about the medium-sized one, perhaps a small wall-hanging or pillow-cover? And the third piece I have fashioned into a cuff with vintage buttons. The inside is soft as merino should be!

IMG_1546sm IMG_1557sm

IMG_1558sm

Any weavers out there? You really don’t need a floor loom if you would like to get started weaving. You can even use a table loom, a pin-loom, or just hammer some nails into an old wooden photo frame, and you’ll be ready to weave and felt!


Thanks Cathy for yet another fiber technique to try!

Weaving a Rug from Raw Fleece

Weaving a Rug from Raw Fleece

Our guest artist/author is Zara Tuulikki Rooke.  We’ve recently seen the beautiful fleece rugs she’s felted and shown us on the forum with her daughters.  But she has taken it a step further and has built a loom and woven a rug from fleece.

Some of you may remember a post I wrote here in April about shearing sheep.

Shearing Sheep in Sweden

Now I thought I would show you what I did with some of that thick winter fleece. For this project, I used fleece from my own sheep, which are all cross-breeds (Gotland and other old Swedish breeds). One is white, while the others are light to dark grey.

Photo 1

I wanted to try weaving with raw fleece. I do own a loom, but it is not set up with warp. Now, I have a basic understanding of weaving, but warping a loom requires more than that. So I started thinking about how to construct something simpler to weave on, and ended up building an oversized weaving frame. The frame itself measures about 1.5 x 2.5 meters (4.9 x 8.2 feet). I happened to have a wooden curtain rod that reached across and could be used as a heddle rod, and I used forked branches to make holders for the heddle rod.

Photo 2
I made a number of equally sized string heddles by tying pieces of sting around two nails, hammered at an appropriate distance from each other into a piece of wood. I wrapped a heddle around every second warp thread and over the heddle rod. The warp threads have a natural opening (shed) due to the thickness of the plank that I used in the top end of the frame. The heddles pull up the lower level of warp threads to create the opposite shed. I was actually surprised at how well this simple construction worked.

Photo 3
I started weaving with yarn, to get a more secure beginning before I started feeding-in the raw fleece. The fleeces had all been skirted, but not washed, and I picked away some pieces of hay and straw as I went along. All I did was grab some fleece and twist it as I fed it into the shed, alternating between fleeces of different colours and pushing each row down with a shed rod.

Photo 4
After a while, I realized that it did help to tease the locks apart a bit before I started twisting the wool. I also twisted the ends around the first and last warp thread in each row. Amongst the equipment I got with my ordinary loom, was a rather ancient looking metal contraption used to keep the tension across the weave (see photos below). I have no idea what this thing is called in English, but it worked really well.

Photo 5
I finished off the weave with yarn again and tied off the warp treads in knots. Then came the washing and rinsing. We simply poured hot water with soap over the rug and walked around on it for quite a while. The kids were ever so helpful at this stage, and I figured that a little felting would help the wool stick together. I gave it a good rinse with the garden hose and also let it soak in an old bathtub for 24 hours, changing water a couple of times until it looked clean.

Photo 6It took over a week to dry, but then it is made from the best parts of three and a half fleeces, pushed together into a rug measuring 100 cm x 120 cm (3.3 x  3.9 feet). That amount of wool can hold a lot of water. I still have to sew in the ends of the warp threads, but other than that, it is ready to be used on the floor of our living room this winter.
Photo 7Thank you Tuulikki for sharing this complicated and wonderful process with us.  Bravo for a job well done!

Felting, Weaving and Teaching

Felting, Weaving and Teaching

I had a fairly productive week I made 4 cup cozies.  They need their buttons and elastic loops but I should get that done this week. I need to sort out if they are narrow enough to go through the handle on a coffee mug. If they don’t fit I will make them for travel mugs without handles.

cup cozies

Here are some close up pictures. The top two have throwsters silk waste. The bottom left is a silk scarf and the right is cotton cheesecloth.

cozies close up

I also got the inklette loom warped to make a strap.

incle loom

The weaving is not great but it is getting better as I go.

ingle weaving

Lastly I had t very nice ladies to may studio to learn to make nuno felt scarves. As usual I was busy with the students and forgot to take pictures until the end.

nuno finished scarves nuno scarves close up


My Felt in the Guild Exhibition

My Felt in the Guild Exhibition

My  guild exhibition opened on Wednesday. we had a vernissage  Thursday evening.

guild show

I can now show you the hat I have been working on for ages. First I had to make a prototype, modeled her by my son. It was how to make, attach and manage the horns that I needed to work out.

prototype 1 web prototype 2 web

Very Monty Python to me.

The finished hat looks like this

hat on display

I will do a post about making it in the near future.

I also have some pictures in the exhibition.

pictures hanging


picture hanging

I think they look great hanging. You can get an idea of how big the Cityscape is in the hat picture, it is in the back ground .

Here are some of the other things in the exhibition.

colapsable weave lace shawl

Collapsible weave scarf and a lace shawl hand spun and knit.

shawl shawl close up

Hand woven shawl and close up of the pattern.

hand dyed, spun and knit handspun and knitting

Hand dyed, hand spun and hand knit. hand spun and hand knit art yarns.

pillows from hands woven fabric mettal weaving

Pillows from handwoven fabric. Hand woven metal wall hanging.


More distaff day

More distaff day

Last time I showed you what I did at distaff day.  http://feltingandfiberstudio.com/2014/06/03/distaff-day/ I thought I would show you some of the other classes that were going on.

needlfelting class Needle felting class

sock knitting Sock knitting class

weaving a bag over a card. Weaving a little bag over a peace of card

inkle weaving Inkle weaving with wire added  for manipulating

kumihimo Kumihimo, Japanese  braiding. here they are using marudai to do the braiding but you can do it with a piece of cardboard with slits cut into the edge.

beret on a card loom Weaving a beret on a card with holes punched in it.

rug hooking with roving rug hooking with roving finished          Rug hooking with roving. This is done with a hook  similar to a crochet hook and thin roving. I had only ever seen it done with woven wool strips.

This rug hooking really interests me. It looks like a great project to carry with you when you travel. Have you seen a new to you  fiber craft you want to learn?


Carp Fair Demo

Carp Fair Demo

This is the last Demo until spring. the carp Fair was celebrating its 150th anniversary this year. It was a beautiful weekend cool in the morning and hot by mid afternoon.  There were more people their than ever before. We demoed an extra hour. It was alot of fun chatting with everyone that came by

Here is my display, I was making sheep again.

my display

Here is hand spinning on her tiny wheel. I think it’s called a road bug. It’s designed so you can spin sitting in the passenger seat in a van. jan spinning

This is Julie, She was working on an inkle loom and a 4 harness table loom and

Julie inkle weavinngJulie weaving

This is Bernadette, she is showing me how to use combs. They are English combs I think.

Burnadet combing

And last but not least is Linda who is making a tail spun yarn.Linda tail spinning. Linda tail spinning on the bobbin.

We where not the only ones sharing our passions.

our neighbour blacksmith trimming shingles chainsaw carver moving display moving display 2There was more to this display but I couldn’t get a good shot with the sun in my lens. All in all I think everyone had a great time.

I Did Some Weaving

I Did Some Weaving

This week end I did something I claim not to like, weaving.  What I really mean is I don’t like what most people think of as weaving, on a table or floor loom. I don’t like getting the warp ready and putting it on the loom and tying it all up and then sitting and weaving. I like finger weaving and I like what I was doing one Sunday, Inkle weaving.

inkle loomThis is a table inkle loom. I was using a floor version but I forgot to take a picture and couldn’t find one with the weaving on it.

I took the beginner class for the second time. I took it the first time a few years ago. Its not like most weaving where you only see the cross threads or you see the treads going in both directions. This is warp faced weaving. It means you see the threaded that are held on the loom not the threads you are putting back and forth. it also only makes narrow pieces. You use it to make straps and belts and trim.

book mark sampleThis is the beginning. you can see at the bottom where I started isn’t as nice as it is a little farther along. In the beginner class we make a scissor pouch.

twisting the fringethis is twisting the fringe the a really cool tool that makes it supper fast and easy.

twisted fringeYou can see the little snip scissors inside the pouch.

scissor pouch finishedThis is the finished pouch . You wear it around  you neck and when. you need to cut some thread you slide the snips out and there you go.

What I like about his kind of weaving is its so fast to warp the loom and the weaving goes really fast. When I finish my felt boots I may make some decorative trim for them.