I haven’t done much this week but I did decide to do some stitching on one of the circles I made earlier for the jewelry challenge. Seeing Antje’s post reminded me I had made a few stitching blanks. this one is just over 2.5 inches/7cm. I don’t think mine is quite as artistic but it was fun to do with the bright threads.
Next, I thought I would like to do something a little more 3D. I have a box of stretched silk hankies and bits of silk hankies left over from other felting.
I stretched out some circles from bits to make the flower bases.
And a bigger blog of pieces for leaves.
I added some wool.
And then some more silk hanky bits.
I rubbed them all and then I decided to roll them up and pop them in the dryer while I made a few small landscape blanks for stitching. I cut out some prefelt and added the sky and grass. They went into the dryer too and then it was time to feed the bottle lambs and head of to work.
Next week is our school break so I am hoping to get some felting time in.
Now that my partner has finally received her card I can tell you about it.
First I made a background using some prefelt and added some northern lights. I then wet felted it all together. they are not felted hard because it is small and is an art piece.
Next, I added the trees along the far hill and a nice big evergreen and a barn using prefelt again.
I added some snow to the tree and added some definition to the barn. I also added the fence wire using perspective so I could add the posts along the right line.
Then came the fence posts and some shading for the snow-covered ground.
and finally I added the sheep( I bet you are not surprised that I added sheep) and trimmed the northern lights so I could turn it into a card. I always do my card as a postcard so they can easily be framed if someone wants to. I just print off a postcard back from the internet and iron it onto the back with a fusible web. I was in a hurry to get it in the mail at that point and didn’t get a picture.
I made a second one at the same time. I like to have 2 to choose from when sending a card. This one I kept. I will frame it. I haven’t decided if I will keep the northern lights projecting over the mat board or trim them off as I did in the one I sent.
I wish I had a better picture for you but I have put it someplace safe and now I can’t find it. I am sure I will come across it when I am looking for something else.
In September I started a two-year part -time basketry course at City Lit, which is an adult education institute in London. Although it’s only one day a week in college, there’s at least another day’s worth of homework, so it’s quite intense. But I am enjoying it immensely.
Plaited paper vessel
In the first half of the term we focused on plaiting, mainly with strips of watercolour paper. In the second half of the term we moved on to willow, which was much harder on the hands! You can read more about either of these subjects on my blog if you’re interested.
Stiff paper or card is ideal for plaiting, as you can get nice sharp edges and the structure retains its shape. But I like messing about with different materials, so I wondered what would happen if I plaited strips of prefelt and then felted them afterwards. How would shrinkage affect the overall shape and pattern?
If you don’t know how to make a bias weave plaited basket, there are some good instructions here. I don’t usually twine around the base as shown here – I just use pegs! – but otherwise the method is the same.
I used commercial prefelt for this experiment, in two colours. The white prefelt was merino wool, while the grey prefelt was Gotland. Gotland has a sturdier finish than the merino, but in my experience they have slightly different shrinkage rates, so that was another thing to throw into the mix! 🙂
I cut six strips of each colour and then wove them together to make a squarish 6 x 6 base. I pinned them together as I went along, and when all 12 strips were in place I then stitched horizontally and vertically. I did a couple of back stitches at the beginning and end to secure the threads but left the ends long so I could use them to continue stitching up the sides.
Prefelt strips woven and pinned togetherPrefelt strips stitched together
(Apologies for the quality of some of these photos, but they were taken in artificial light, as the days are so short at this time of year!)
Once the base was stitched, I started weaving the sides by overlapping the central two strips on each side and then continuing to weave under and over the adjacent strips. I pinned and stitched as I went along.
Weaving and stitching the sides
This is what the piece looked like after I had woven the sides and cut off the excess felt.
Normally with plaited baskets you have to make a border by tucking the ends in or stitching a band around the edge. The advantage of felt, of course, is that it is self-sealing as the fibres mesh together, so I planned to finish just by trimming the edge after felting.
Once the weaving was complete, the felting could begin. I wetted the piece down, rubbed with soap, and started gently rubbing it all over, turning it inside out to make sure that both sides were felted.
I had to keep opening it up and turning it around during the rubbing phase to make sure the sides didn’t stick together (I could have used a plastic resist but didn’t bother, as I never rubbed for too long in one position).
The prefelt strips felted together fairly quickly, but despite the care I took when rubbing, holes started to appear at some of the intersections. So when the piece was partially felted I did some more stitching to ensure that there were no holes. I’m afraid I didn’t take any photos of this as it was quite dark by this stage!
This is what the piece looked like after felting and fulling.
I was tempted to leave the felted ends on, as they gave quite an organic feel, but in the end I trimmed them off, and rolled the piece some more to seal the cuts.
I also initially thought I might leave the stitching in, as I liked the marks and texture it added. But when I took out the stitching on one side for comparison, I felt that it distracted from the subtlety of the pattern, so I ended up taking it all out!
The inside and the outside have different patterns due to the weaving, but during felting some of the fibres have migrated through, so you can get an idea of what colour is on the other side.
Scaled up and turned upside down, I also thought this could make a good flowerpot hat – I can see Audrey Hepburn wearing something like this, can’t you? 🙂
So it is possible to plait with felt, though it is rather fiddly and time consuming. The forms are softer and more rounded, and you get a subtle idea of the pattern on the other side.
Thank you for reading, and I wish you all a very happy and creative 2020!
I’m continuing on with some experimentation on how three-dimensional shape in felt is influenced by different factors. This time, I am using a resist with a layer of prefelt which is cut in a certain manner and then added to a thin layer of laid wool over the same resist. The differential shrinkage of the two layers creates the shape. I learned of this technique from several discussions on the forum that we had about creating sea shell shapes. One of our members suggested that we look at this blog: www.parallelfunk.de/ She has a series of photos of the steps that I will go through below. Scroll down on her blog to find the relevant blog posts.
I decided to try a seed pod type of shape instead of a shell. The first step is to make a fairly thick prefelt. I decided to use a green batt that I had made some time ago.
The batt was actually really thick so I pulled it apart into two layers. I ended up using only one layer so I have enough to try a different shape. I used a small circle of floor under layment for the resist.
I covered the resist with pulled apart batt in a radial fashion. I wanted the embellishments to run the correct way on the finished pod. You will see how this works when I cut the prefelt off the resist. I wet down the wool, flipped it over to the other side and folded the ends in. Then I covered the other side with wool in the same way. I used two layers of wool on both sides of the resist.
Here is the covered resist ready to felt. I felted in my usual fashion by rubbing with soapy hands. I generally don’t cover the felt with anything except when I wet down I use a sheer nylon curtain just to hold everything in place. We do get quite a few questions of how to avoid a ridge at the edge of the resist. I avoid this by not rolling. I also carefully rub the felt so it pulls the felt inward against the edge of the resist and doesn’t felt against itself. Wool has a tendency to spread out when wet down. This causes the edges not to be pulled tight against the resist. I counteract that with rubbing in towards the center of the circle and making sure that the ridge never forms at all.
Here’s the prefelt after I finished rubbing. It is just barely starting to shrink on the resist and it is holding together well. Now it’s time to cut it open. Depending on what shape you want to create is how you decide how to cut the prefelt.
I cut the circle in half on both sides of the resist. You can see that the silk embellishments will be following the shape of the “pie pieces” when I get them all cut.
I then cut one side into six “pie pieces”. I just eyeballed it since I wanted to end up with an organic form, I wasn’t worried about exact symmetry. Then I flipped the prefelt over and pulled out the edges of the flaps so I could see where to cut on the back side. The photo on the right shows the pieces completely cut with a few flapped open.
The inside of the prefelt needed to be roughed up so that there were lots of loose fibers. So I used a felt brush that I had to roughen it up. I did also try using a fingernail brush which worked just as well.
I then covered the same resist that I used for the green prefelt with black wool. I used only one layer and it was pretty thing. Just thick enough so I wouldn’t end up with holes.
The next step was to reapply the prefelt over top of the resist that was covered with the thin layer of black wool. Then to wet down and begin gently felting.
I used cold, soapy water and worked slowly and gently. I rubbed a lot along the edges of the prefelt and along the edge of the resist where the black wool needed to attach to the green edge. I gently placed my hands over the entire piece and made a rocking motion back and forth with increasing pressure downwards on to the ridged rubber mat. I continued to alternate rubbing and gentle downward rocking. I gradually increased the pressure and rubbing friction until the entire piece was holding together and the green prefelt was adhering to the black wool.
The piece was beginning to shrink and you can see that there was an almost floral shape emerging instead of just a circle.
I picked which side I wanted to be the open top end of the pod and cut a very small hole in the black felt. I removed the resist and began fulling and shaping. I have a problem taking photos during fulling as I am using both hands and get absorbed in the process. I did most of the fulling by pulling the pod from open end to closed bottom end and then rolling it over the ridged mat. I added hot water and rolled it in between my hands as well. I did a bit of holding my finger inside and rubbing the green felt lengthwise but not much. The shape actually nearly created itself. Hopefully, when I try the next one, I will get more fulling photos.
The pod can actually be at least two different shapes. This is more rounded and looks more like a bell pepper or perhaps a sea urchin.
I actually like it stretched out more like a seed pod as shown in the photos above. So I dried it in this shape. I fulled the felt hard and it holds its form easily. The reason this works so well is that the thicker prefelt doesn’t shrink in the same way as the thin layer of black wool. Therefore you get the curved pieces of the green creating the organic pod shape.
I am going to try another one cutting the outside prefelt into a different shape and I will show you that soon.
I finally pieced a picture for my second quarter challenge piece. If you remember is it seascape this quarter. this is the picture I chose.
I found it on the internet, where you find everything. It should be ok as I aske for free to use pictures.
I started with a piece of prefelt a little bigger than a piece of paper, with the idea it would shrink to an to be the size of a piece of paper. And for a change I have a piece the right size. It is a mazing what some planning can do for you. You would think I would learn.
Next I layered some more prefelt to make the basic shapes in the picture. the mottled piece at the front was dyed by a friend.
That is v
That looks very boring and flat so now it has to be brought to life. I added some silk hanky scraps to the water to give it some depth and movement.
Then I added the surf using throwsters waste.
And lastly I added some foliage and flowers
Now it is all ready for wetting down, I plan to add the wooden path to the beach later. I am not sure I have the right colour for the wool. what colour is that anyway?
Last week in Ruth’s post Batik Post she had a scribble tree. I have always liked them so Ruth suggested I make some. Ok them what to make. then I remembered these felt pieces I made a long time ago, I think, because I do not remember making them or what they were for.
They seem to be white felt with black silk hanky on them that were make to the prefelt stage, then cut out and put on some black prefelt(maybe) and felted again. I had no idea what to do with these but then thought why not just treat them like pieces of tile and just make a picture on them like painters do.
First I needed some tree green yarn so bot out my carders. It is some sort of curly fiber maybe Blue Faced Lester as that is what I have most of and the curls are small.
I made some rolags to spin. It is full of lumps and nepps so it will be a textured yarn.
I spun up a single, then plied it and made it into a center pull ball ready to use.
I used the yarn to needle felt a scribble tree onto one of the bigger pieces.
I decided it needed a star so used some embroidery thread to add one. I would like to add some hanging Christmas balls but there really isn’t room for them. The piece is only about 4 inches square.
I decided to try it on one of the smaller pieces too about 2×3 inches. The picture on the right is the back. I love how all the little stabs of fiber stick out.
So thats been my weeks worth of daily doses of fiber.
As It is so close to new year I am going to Wish you all a Fibrey New Year full of creativity. I am planning to do more hangable art work, work out an online workshop and an intermediate vessel class for my guild. But also to learn how to use my new camera to make and document my work. See you next Year(8 whole days form now).
It’s holiday time again and we ran a holiday card exchange with members from the Felting and Fiber Studio Forum again this year. People signed up a little over a month ago. I ran the names through a random name generator gave everyone their partners name and by now all the card should be mailed. I got Ruth this year. I usually just do one card but I hedged my bets and made 2 this year.
Here is how I made it. I started with 2 layers of white prefelt. I added the sky and then the snow.
Then I used some darkish green prefelt to cut out triangles for the background trees. And some light gray to add some shading so the snow wasn’t flat.
Then I added the foreground trees using some blue faced Lester curls fluffed out. The one on the left is the one that ended up as Ruth’s.
And some silk for the clouds.
This is what they looked like felted but still wet. They are very lightly felted. I had planned on felting them more but I liked them as they were and didn’t want to distort them.
Then I added more curls to fill out the trees and to make them stand out from the background. I tried to make them all a little darker on the right side. Then some snow. The snow did 2 things: first, it added some nice high lights but it also made the branches look like the go side to side and not up and down. I added the locks up and down and it was noticeable.
I decided the silk was too shiny for clouds and covered them in a very thin layer of the light gray wool.
I liked the picture but it was lacking something so I added some French knot sheep. They were tricky to do because the felt was not firm at all. The thread didn’t want to stay where I wanted it but pull over or sink in. If I had been thinking I would have put some stabilizer behind it.
I needed to make it into a card. I chose to do a postcard. I made one up to the right size on my computer following the basic template. I used iron-on facing to glue the card to the back of the felt.
I trimmed it and popped it in an envelope and sent it on its way to Montana. I crossed my fingers it would get there in time. We were having rotating postal strikes in here in Canada. Fortunately, the postal gods were smiling on it and it did make it there in about 2 weeks. I still need to add some sheep or something to the other picture. I do not know what I will do with it. I may just frame it.
Last week I missed doing my blog post because I had no power or internet. My area was hit by 6 tornados. We were not hit we had no damage. Some areas near us were hit very hard, the large power substation near us was hit and some of the cell phone and internet towers too.
Before all that I did manage to work on my piece for the guild exhibition and sale. I do not think I will get it done in time as it is due in a week. The theme was a 100-mile inspiration. I decided to do a scene with the Parlement buildings. I am using 2 prefelt layers with a piece of cotton gauze in the middle for the background.
First I found a simple outline picture I could use for the outline of the building. I cut that out and tried it on the background.
I pinned it to another piece of prefelt and cut it out.
Then it was time to work ou the clouds.
After I took the picture and looked at it I realized I had made the clouds to symmetrical. Its funny how looking at a picture sometimes shows you more than just looking at it. I tacked all the pieces together with a few jabs of a felting needle
Next was adding fireworks as I am thinking it should be Canada Day.
Then I cropped the picture to see better how it will look.
I wet felted the piece and now I need to do some stitching around the building so it will show better.and my daughter said I should add beads around the fireworks like the sparkles you see with fireworks. I thought maybe some sparkly thread and a bead at the end of each firework. What else would you add to this silhouette picture?
I have been to busy lately to do any felting. The other problem is my felting table gets turned into gift wrapping central.
I Got a lovely card from my exchange partner in our card exchange. I got a few extra goodies with my card too. My partner Rhoda Lamb (how’s that for an appropriate name) has a nice little etsy store. https://www.etsy.com/ca/shop/TheFibreBin?ref=search_shop_redirect
This year seems to have flown by. I have been teaching and making some art pieces for the guild art show celebrating Canadas 150th birthday. I even sold a piece, the sheep.
I had fun reshaping some hats. I plan to make some more that are similar.
Next year I would like to work more on artwork. Time to dig into the inspiration file. I have accumulated lots of frames I think will work well for felt. I will need to remember to make the pieces the size to fit and not make some felt and then try to find a frame that will work. The first thing to do will be to have a really good tidy up. With today being boxing day you wild think I might be inspired.
I am hoping for a slower and more creative new year and I wish you the same.
I sent a card to my partner for the Christmas card on the forum. holiday-exchange-2017 She has it now so I can tell you all about making it.
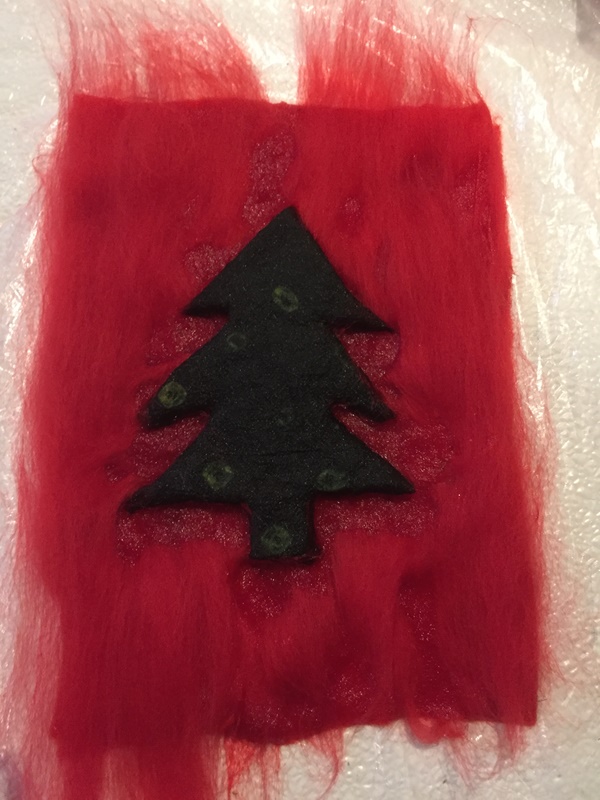
First I went through my old felt bin to find a thickish piece of felt and cut out a tree shape. It’s a blueish green even if it doesn’t look like it.
I then cut out some red prefelt I had for the background. I did 2 layers for each of these. I did the extra on so if this didn’t turn out I could go with plan B.
Then I roughly cut out a tree shape form a silk scarf I got at the second hand store. I then layers the pieces and wet it all and trimmed the silk a little.
Even with 2 layers the prefelt is not very thick so I added red merino to cover the extra silk and make it thicker and more sturdy. I cut the wool to give it a nice straight edge to put up against the tree and give a nice clean line.
After that was done I flipped it over and wrapped the excess around to the back. I wanted to make sure the tree would stick to the finished felt so I did some poking with my felting needles.
This after the fulling. I blocked them to square them up. The blue colour of the tree came through the silk more than I wanted so I gave it a shave to bring the green back.
I went through my stash looking for some fuzzy gold yarn to use as tinsel but instead found this yarn with beads that I think looks like lights. I sewed it on and then added some shiny pony beads as Christmas balls and a star.
I thought it looked ok but lacking something. So I added some 3D sheep. I think they improve it and make it look finished.
I printed off a post card template from the internet and using fusible web ironed it to the back of the felt. I forgot to take a picture of that but I am sure you all know what the back of a postcard looks like. I like it and my exchange partner seemed to be very happy with it. No I just wait for Canada Post to decide to get mine to me. I am hopeful it will arrive before Christmas.