Browsed by
Category: Made From Felt

Felt and Textured Paper Collages

Felt and Textured Paper Collages

I usually don’t show a lot of my class homework here for my Level 3 Art and Design class that I am taking. But we did some really interesting textural collages in our last class that I thought might be appreciated.

This slideshow requires JavaScript.

I am still in the process of completing a bunch more collages but these are the ones I am satisfied with at the moment. I have also started a series of collages made from scraps of leftover printed felt. For my online classes (you can still sign up for those for the second quarter, click on online classes in the menu, then embellishing felt…), I have loads of scraps of felt that has been screen printed, stamped, stenciled etc. I wanted to put those to good use and also to practice my composition skills with collage. I also like to keep my free motion machine stitching skills in use so each collage will include some machine stitching and possibly hand stitching as well.

Here’s the first one. The background piece is one my friend Paula made with an old wool blanket and eco printing. I then added the two printed pieces. The one in the center is actually the back of the printing process. I liked it better than the front. I haven’t decided how I am going to use these yet. So of course it is an odd size and I’m not sure how I will frame or display them yet. Just decided to make them and then see.

Here’s one in the planning stage. I plan on stitching the piece of silk with an aspen leaf pattern as in my sketch on the left. Now that I am looking at the photo, I might change out the background piece of fabric as it needs a bit more contrast from the silk piece on the left. I will have to look to see what else I have, perhaps a mix of green and orange? I have loads of printed and dyed fabric and felt so I could keep these up for a while. You can take that as a warning or a threat 🙂

Finished Book Cover

Finished Book Cover

I finished my book cover.

This is the piece I cut off the end for the one of the inside sleeves. When I used a piece of prefelt for the middle I hadn’t thought of it showing when I cut it. I think next time I would make a separate piece.

Here it is open with the book in it. Don’t look to closely at the stitching. The edge should be zig zaged but my machine will not longer zig zag.

and a close up of the pencil holder

Next time this will go on the outside maybe with a flap over it. It doesn’t allow the book cover to close flat.

This part I thought was quite good. I only sewed the flap down top and bottom so the book cover can slide right through. It makes it easy to insert the book and it means if the next book is a little bigger it will still fit.

and all closed up

The rope could be a little longer but it will work. Over all I like it but I know what I would do differently now. Have you made something for the first time lately?

More From Jan Scott

More From Jan Scott

Canvas 3: arctic Fiber Gold, Qiviut!! Now that is Canadian

Now I was on to canvas 3. I had been looking and thinking of quintessential Canadian topics, I considered moose and had selected a couple reference photos that I may do at some other time but just wasn’t quite what I wanted. Then I started thinking about the arctic. Muskox!!

My brother Dave is a Geologist, he has worked up north most of his career. He told me of being on a mapping traverse and stopping to sit on a bolder. He had been innocently enjoying his lunch when he heard a Whiffling sound behind him. So he turned to see what it was. It was a muskox squinting at him. He seemed to be trying to figure out what Dave was, likely hoping for a sexy new female muskox and not an interfering male one. He got a little closer and seemed to realized it was only a geologist having lunch, did a snort, looked indignant, turned and left. INSPERATION!! I will do a muskox. (But without Dave and the rock).
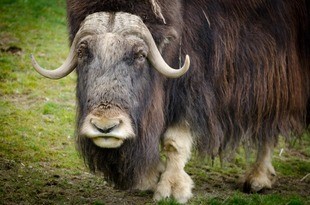
I kept to the same work process as before, Research first; off to the internet to look at lots of muskoxen, eastern arctic, western arctic and Greenland. I looked for various pictures with details I wanted. Coloring, body shape, horns, feet, nose, eyes. I spent hours having fun surfing Google images. I made of folder of the ones I thought most helpful.

When I had a good selection of reference photos in my file, I grabbed a scrap of paper (which now I can’t find to show you) and did a quick composition sketch to fit the 12×12 square format. I wanted the muskox to be emerging from the background. So I would need the head and shoulders forward and land for the muskox to stand on. Ok I will need a background to work this from. I am not fond of getting wet if I don’t have to so needle felting is my preferred method of working. I made a gray brown back ground so I can add foliage and muskox to it. I used a felting tool I purchased at the fiber festival Twist. It is perfect for background work! You can get it here https://halcyonyarn.com/felting/68862190/10-needle-felting-tool-_-aluminum

For the background I used some of the leftover fin-wool form Miaka’s great fish cat cave https://feltingandfiberstudio.com/2016/02/25/the-great-fish-creation/ and some Shetland in a gray brown. I measured out the felt so that I had enough to rap around the stretcher bars of the canvas and secure it to the frame.

Next was to build up the core of the muskox and base. I had used an armature in the frog but here I was only working with part of a muskox, so the front legs and one back one have an armature, as well as the neck, head and horns. It was very handy to be able to tilt his head up so I could work on his chin!!!


I continued using Rideau Arcott for my core wool. It was free, unfortunately it was also dropping veggie matter all over the floor. But it made a good solid base for the muskox and the promontory he is standing on. I added the armatures in as I built up the structure. The flexy neck was really odd in this under layer form.

Next I went to the living room and started searching for the colours I would need, I used alpaca for some of the black and reddish brown as well as merino Shetland and assorted bits I wasn’t sure what they were anymore. The pull it apart over and over again blending technique really worked well here. I used the photos to try to get a realistic colour. I started adding the colour layer from the Hooves and nose first and working up the body. I blended only a bit at a time and re-blended to create more so there is uniformity in that I am using the same base colours but the exact percentages are changing as I mix each batch. I was not blending to the point of a uniform colour so the individual colours still showed as I used them which lets the eye blend them. I also considered the light source as above and slightly behind the muskox. So you have was lightening of the colours from both sun damage and visual lighting conditions to consider as I worked up the fur.

To create the fur effect I used a combination of securing the fibers at one end and the fold over technique to get the shaggy fur look. I used a single needle and a tiny bit of black blended alpaca for mouth and eye details. It was amazing how little fiber could create so much detail.

Mounting: With the canvas removed it was easy to use double sided Carpet tape to position the piece and then sew it around the stretcher bars. I again used the indentation of the stretcher bars to give myself more height for the piece. I carefully adjusted the foot and attached it to the promontory then adjusted the head down and made final adjustment to the horns. This is the show and tell presentation at the guild. Sorry that Froggy is giving you a cheeky butt view.


A Zed Inspired Book Cover

A Zed Inspired Book Cover

I bought myself a new sketch pad that is in a book form rather then a flip pad. I decided I wanted to cover it in the way that Zed had last shown us here project-updates-2/

I am lazy and wanted to get to the decorating so I started with a piece of white prefelt. I didn’t take a picture of it but you can see it in the picture of attaching the cord farther down. This is the overall piece just wet down.

Here is a closer look at the flowers and the little resist I put in for a pocket. I want to be able to put a pencil eraser nd pencil sharpener in the cover. I used some of my handspun for the stems.

The area with the pocket will be cut off and sewn in to make the sleeve on one side of the book cover.

I flipped it over and started to layout the purple for the inside when I realised I hadn’t added the cord yet.

I made a hole and stuck it in.

Then I decorated the inside of the flap. I am not sure how this will work out but we will see.

Now all I have to do is find time to do the felting and sewing. Not sure where half the summer has gone already. How much felting have you done this summer?

Project Updates

Project Updates

I showed a piece of green plaid-inspired felt a few weeks ago. I made it to use for a notebook cover with front flap and incorporated cord/tie. I finished that a couple of days ago. This is how it looks on the book with the cord wrapped around:

This is what it looks like on the inside without the book in:

I promised photos of the finished purses, and surprisingly, I have them! This is the bluey/purpley ones, and I also made a small simple case with a green plaid offcut:

And here are the finished pink purses:

I liked the green felt with Bluefaced Leicester locks so much I made a blue one:

I used more embelleishments on this one though: silk carrier rods, silk paper, viscose paper, cotton gauze, unravelled novelty yarns.

The shiny white patch at the top is viscose paper, the blue rectangle in the bottom right is silk paper:

A BFL lock:

I feel like I could sleep for a month now, and if I never have to do blanket stitch again this year, I won’t mind!

Latest Nuno and Bookcover

Latest Nuno and Bookcover

I made the last of my nuno strip pieces into panels for a bag. It was this yellow piece:

I used various types of fabric–cotton, viscose, silk, suspected silk, so got various textures:

I liked these two strips next to each other, they showed the very different way felting/shrinkage affected them:

I used some of the spare offcuts from the orange piece to make up the panels:

I made the Green felt which I piled with BFL locks into a notebook/diary cover. The pictures look a bit weird because I had a small patch of desk out of the sunlight when I was taking photos, but it must have been shadier at one end so, to me, they look upside down!

Here’s the other side:

This is the inside without the book:

And this is the outside without the book:

I’ve finally got the buttons and buttonholes on nearly all the purses from a few weeks ago, so hopefully, I’ll have those to show next time 🙂

Out of the box Part 3

Out of the box Part 3

This is the 3rd and final set of pictures from this exhibit. http://mvtm.ca/?exhibition=colour-unboxed   the first is here:  https://feltingandfiberstudio.com/2017/01/18/colour-unboxed-by-out-of-the-box/ and the second here: https://feltingandfiberstudio.com/2017/01/26/out-of-the-box-part-2/ Again I apologise for some of the odd angles as it was very crowded with people enjoying the exhibit. In the last picture you may find it hard to see but the is a very long weaving draped across  the ceiling.

This slideshow requires JavaScript.


Making some progress and free give away reminder

Making some progress and free give away reminder

I want to remind everyone you only have a few days left to enter the free draw for a spot in Terri’s Concertina Hat Class. The last day to enter is July 28. Just follow the link. https://feltingandfiberstudio.com/2016/07/16/online-felted-concertina-hat-class-with-teri-berry-in-august/

I finished my triangle scarf this week.

The wool side

finished orange and purple shawl wool side finished orange and purple shawl wool side close

The silk side

finished orange and purple shawl silk side finished orange and purple shawl silk side close

There wasn’t that much shrinkage as it is very cobwebby on the wool side.

I finished the prefelt for the building on a Picture I am working on.

prefelt for picture.

I cut some circles to make little earbud pouches.  Sorry I can’t right now remember who had this great idea to use scrap piece for felt for this. I want to keep my square credit card reader in one.

circles for pouches

I made 2 pieces specially to cut up.

felt for cutting1 felt for cutting1 close angle felt for cutting 2 felt for cutting 2 close angle

I love the way the silk throwsters waist seems to hover on the felt even though it is well attached. The blue one isn’t firm enough so I will rewet it and full it some more.

I also started 2 more. I laid the wool out first. The first one I used on large piece of silk  on top . I added the roving so you could see the colour. I wanted something a little more “masculine”.

peice for cutting dry

The other one I want more texture from the silk so I had to wet the back ground so the silk would stay where and how I put it. I then added some synthetic yarn and put tiny amounts of wool to bridge it and hold it down.  I really like how it looks so I think I will make a scarf in the same design. It is very dark in the picture because it is wet.

peice for cutting 2 wet peice for cutting 2 close angle wet

So that’s been my week in felt.  I hope you have been able to play with some fibers too. Don’t forget to enter the draw for a free hat class.

Handmade purses

Handmade purses

I think I’m just out of date with everything I’ve made! No one uses cameras now because phones have them, so no use for camera cases. Same thing with diaries, who needs a diary or notebook when phones have organisers and memo apps etc. And I think I’m the last person to still use actual money, and even debit cards, but that means you get to see the purses I made last week 🙂 This is the blue flowery nuno one (obviously!). Front:

OLYMPUS DIGITAL CAMERAThis is it opened:

OLYMPUS DIGITAL CAMERAAnd this is the back:

OLYMPUS DIGITAL CAMERAI don’t think I blogged about the felt piece I made these next two purses from, though I do remember sharing it on the forum. I wove lots of different strips of fabrics for an interesting nuno piece with lots of texture and contrast. You can see the piece here. This is the first purse:

OLYMPUS DIGITAL CAMERAThe back:

OLYMPUS DIGITAL CAMERAAnd the second one is very similar:

OLYMPUS DIGITAL CAMERAThe felt was just the right size to cut the purses out and allow me to use both top and bottom  natural edges. This is the back:

OLYMPUS DIGITAL CAMERAAnd the last one is one of my favourites, made from a sunflower scarf nuno felted onto Merino. This is the front:

OLYMPUS DIGITAL CAMERAThe dazzling inside:

OLYMPUS DIGITAL CAMERAAnd the texturey back:

OLYMPUS DIGITAL CAMERANext week I’ll probably show you all the greetings cards I didn’t sell 🙂