Browsed by
Category: Made From Felt

I’ve got rainbows on my mind

I’ve got rainbows on my mind

First of all, happy Thanksgiving to everyone reading this in the US! I hope you had a nice celebration.

Today I’m sharing some rainbow-y fibre I created, plus a “throwback” item that I hope you’ll like.

Being an indie dyer means I get to play with dyes fairly regularly, but it had been some time since I adventured into the world of saturated rainbows. I think it was the grey London Autumn that got me inspired, I just needed to get a colour fix. Off to the dye pot I went.

IMG_3780

One of the things I’ve been a little obsessed with lately is how yarns look when they’re in skein format – I love it when colours look cohesive and have a certain progression to them when displayed, so I went for a red “bottom” that would change as the eyes look up. Hopefully you’ll see that this was done consciously.

I knit this into a hat (complete with a pompom) that I think looks very cheery. It’s going to be a Christmas present so I hope the recipient likes it.

IMG_3887

I hope you’re not fed up with bright colours yet…

DSC_1358

Although not technically a rainbow, this wool top came out super bright and happy (to my eyes at least). If you’ve ever dyed wool top or roving you’ll know it can be an adventure to control where the colours go. This is superwash wool (it doesn’t felt) so it wasn’t as difficult to get “right” as non-superwash fibres, but I’m still perfecting my methods. Suggestions are welcome!

This being the Felting and Fiber Studio, there should be some felting, so here is a little Piglet I made a couple of years ago and gifted to a friend. I really loved creating this little guy and think he came out really well. I got to see the sculpture again a few days ago at a friend’s house.

IMG_3863

Have you done any hand dyeing or needle felting lately? Share your experiences with me in the comment sections.

Pieces For Greetings Cards

Pieces For Greetings Cards

It seems like we’ve not had any well-being centre felting sessions for ages. We meet up on a Monday so we lose days when we have a bank holiday; the reception had a bit of a weekend make-over too so was closed one Monday after and August being popular for gigs and festivals has meant less attendance and cancellations too. So, I was feeling a bit impatient to be creative this week. I could have made something with the strips I pieced together last week, but I wanted something a bit more ‘instant’! I need to make some more greetings cards, so thought making pieces for those would be a good way to be productive. This is the first one:

I stuck to Blues and Greens because it’s so messy and fibres/threads get everywhere. This is the 2nd one:

These next two are two halves of one piece I made. I thought it made sense to make a longer one and cut in half. I also made these more green:

I like the blue offcut with cotton nepps on this piece, it was left over from the piece I turned into a notebook cover not too long ago:

They all look very similar when they’re all togther. So, for something a bit different, here’s a piece of nuno I made earlier this year. I used a piece from a silk scarf I got at a charity shop. I think I planned to make a coin purse out of it:

Close Up:

Do you have any ‘quick + easy’ projects for when you want to feel productive and accomplish something?

Painting with wool

Painting with wool

For today’s blog post, I am sharing with you a workshop I went to, where Dani Ives was teaching how to paint with wool. If you haven’t heard of Dani’s work, I highly recommend you check out her website.

Dani+Ives_Luna+Portrait
Portrait of Luna, copyright Dani Ives (taken with permission from the author)

Before we get started, what exactly is “painting with wool?” It is a 2D needle felting process whereby you pick a theme, copy the design onto flat wool sheets or another type of fabric, and then proceed to “paint” it with different colour wools using felting needles.
This term was coined by Dani Ives when she realised she was essentially using wool the same way painters use paint to represent an object.

IMG_3267
My “classmates” before we started

I was asked to bring an image to reproduce. My main goal with this workshop was to learn how to do 2D pet portraits, so I decided to be ambitious and chose a photo of my cat Marshmallow.

Marshmallow png
I’m being ambitious but not overly so – her eyes are closed

After transferring the image onto the felt fabric with an ordinary pen, it was time to pick the appropriate colours to use. I confess this is the part I have the most trouble with, because you have to think of the colour not only “as is” but also have a little sense of how it will look after it’s been blended with the others around it.

IMG_3268

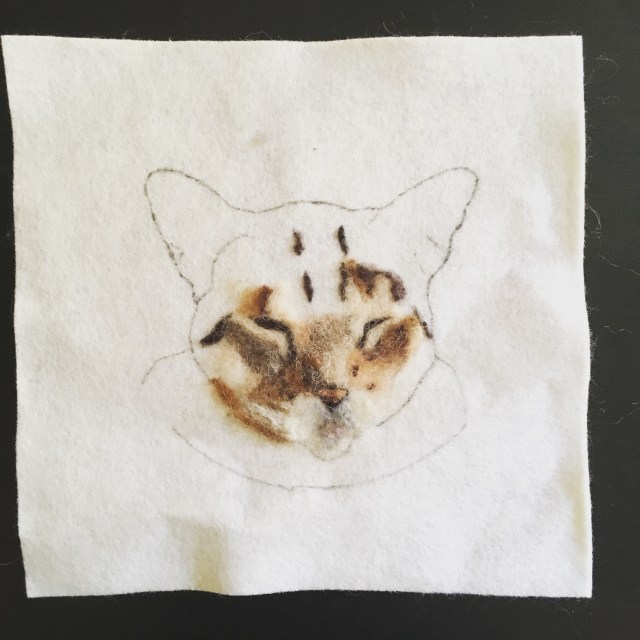
We then proceeded to apply the wool onto the surface and needle felting it in place. You need to keep the reference photo at hand and look at it often, as it’s very easy to get carried away and start using artistic licence – you don’t want to do that when you’re going for a faithful reproduction!

IMG_3273
There’s more hours put into this than I want to admit

This is a slow, laborious process. Obviously you will get quicker as you become better but I sure took long to reach the above phase.

IMG_3315

This is my current progress. It’s slowly coming together. I can’t wait to see this finished.

Finally, I had to share my fangirl moment, a picture of me with Dani Ives herself!

IMG_3270

Have you ever done any 2D needle felting? Let me know how it went for you in the comments section. Thanks for reading!

Cases And a Cover

Cases And a Cover

I got a couple of cases made this week. I thought I’d made a mistake and forgotten to add the cord at the right stage for this first one, then remembered I wasn’t making a bag after all! I added a piece of braiding/trim and a split ring. This is the felt side:

And the back/fabric side:

I did change my mind about what I was going to do with the piece of felt I used on this next one. If you saw my last post, I’d planned to make a small shoulder bag. But as I was cutting it out, I thought it was too narrow to work that way, so also made this into a case:

I changed my mind about the fabric to use aswell, I wanted something a bit more sturdier, so chose what I think is upholstery fabric:

A while ago, I made a piece of nuno with lots of shrinkage and rippling. I kept looking at it and thinking it’d made a cool book cover, so that’s what I did. This is how it looked after sewing up, but without a book in, outside:

Inside:

I wanted to keep all the edges as they were, and only had to trim off one small part. I haven’t decided which side I like best, so here’s one side:

And the other:

I might go over the stitching again, I want it to be secure, but don’t want to zig-zag stitch it as I like how the edges look.

Planning Sewing Projects

Planning Sewing Projects

I’m sure I’ve said it before, but planning a project – doesn’t seem to matter what kind – always takes at least twice as long as you imagine! I’ve been trying to match felt with backing fabric, zips and cords for small zipped bags or shoulder bags. Sometimes it seems straightforward. I cut a piece of felt in half and found a piece of fabric to match. I thought this piece would make a nice bag, so matched some cord too:

I used the same fabric for the other half of the felt piece. I think I’ll add a zip to this, but don’t have one to match yet:

The fabric seems perfect for both pieces of the felt. But when I was moving things around, I placed the pieces next to each other differently and suddenly they didn’t seem to match!

Luckily I’ve got these photos to refer back to, though the pieces won’t actually be next to each other on the finished bag. I thought I’d found the perfect combo of backing fabric, felt, zip and cord for the next bag project:

I’m not quite so sure when I put the zip and cord on the back of the felt, but let me know what you think?

These two pieces don’t seem to match, but put together, I quite like them:

I had some fabric with purple in it, the piece wasn’t right, but putting it close to the felt made me think I might need something more purple:

When I was looking through my fabric pieces, I found some upholstery samples I got a while ago:

These ones either look like ink stains, or birds on a branch, it changes each time I look!

I’m not sure I have the exact fabrics I need yet, which can only mean a trip to the fabric shop is well needed 🙂

Finished Bookcovers, Unfinished Purses

Finished Bookcovers, Unfinished Purses

I actually finished a couple of notebook covers this week. The first one is the landscape piece I showed cut out ready for sewing. This is the front:

And this is the back:

I think every time I use ‘scene’ type pieces for book covers, I tell myself to make the top and bottom ‘sections’ bigger next time, because I always have to compromise over what gets cut off. I always forget! But, then I can use those nice pieces for something else, like part of a collage book cover! I tried to make this next one nice and bright, you might remember me choosing some of the pieces back in February:

And I did make a start on it in March, and then put it away for a while. I realised last week that I was going to be hot, sweaty and miserable no matter what, so I may as well just try to be a bit productive and get my sewing machine out and finish the cover:

Other side:

This is the inside, with some hand dyed cotton fabric as lining:

Front and back opened out:

I bet a hat made like this would look great! I still haven’t manged to get any further on some purses I cut out, but I did get a photo of them:

Chico the needle felted dog

Chico the needle felted dog

Hello, Leonor here. My guest post for today is going to be a simple “show and tell” as the weather here in London is too warm for complicated thoughts!

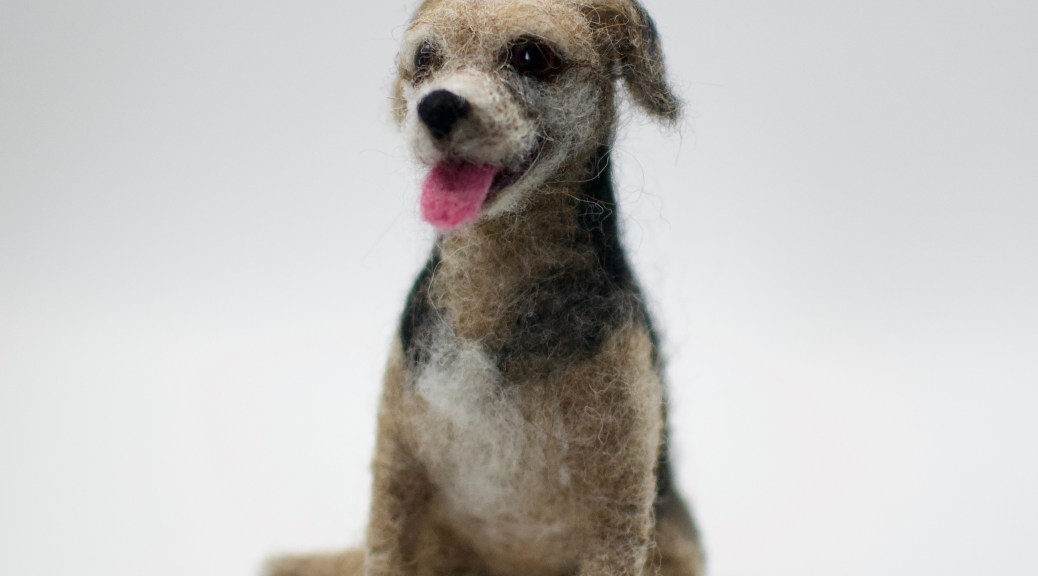
Some of you might be aware that I am a fibre artist by trade. Anything wool and I love it. I got into this business a little by accident, and making custom needle felted dogs was even more unexpected – basically, a friend asked me for a mini of his whippet, I took the challenge, and the rest is history!

I’ve now been playing with wool professionally for around 5 years, and I must confess there was one hurdle I was yet to conquer in my work – creating an open mouth. I’d tried once and it didn’t come out right, so I more or less gave up on it. That is, until I made Chico!

DSC_1102

At first I was going to make his tongue out of polymer clay (the idea of finishing it off with a nice layer of glossy varnish to mimic moisture was very attractive to me) but then I decided not to. I liked the idea of a 100% fibre sculpture better.

DSC_1106

I made the lower jaw separately, making sure the upper section was thin enough to accommodate both parts without looking weird. I added a layer of black around the edge to make it more realistic, and then a little white on the back for teeth. The tongue was made using two shades of purplish pink blended together. I made two mini tongues and chose the one that fit best.

DSC_1110

I received a few reference photos to make this little guy, my favourite was one where he was sitting with his leg to the side and smiling. I just had to make him this way.

DSC_1115

I love the detail of paw pads, the feet immediately look real. You can’t really tell from this picture, but Chico is er… anatomically correct. I like a realistic sculpture!

DSC_1114

Below is a picture of the original Chico. The mini version is off to a Spanish island as a surprise for the whole human family. I hope they like it!

unnamed

Have you ever created a needle felted animal? What wool did you use and how did you like your experience? Let me know in the comments section.
Questions? Happy to help, just leave a comment!

Trying To Be Productive

Trying To Be Productive

I’ve got a craft fair in a couple of weeks, so I’ve been trying to make some new things to take with me. I can never predict what might be popular or sell, so I’ve given up trying to 2nd guess, it just leads to a lot of stock piling up and a lot of disappointment. Instead I decided to concentrate on things I enjoy … with the exception of felted soaps, I’m going to give in and make some, they’re guaranteed to generate interest! Sounds like a plan, ay? Except we’ve been having the most ridiculous heatwave here, so I’ve managed to do very little, unless you count sweating and eating ice cream as being productive 🙂 I did manage to make one new piece of felt though, a ‘seascape’:

And I even managed to turn it into an A5 book cover. This is the front:

And the back:

I had a look through my already made felt pieces and found one from a challenge which I thought would make a nice cover, so I cut that out:

I’ve got both ends sewn so far, so I’ll show it all sewn up next time. I also got as far as choosing some pieces to cut up for piecing together, probably also for book covers, though maybe bags since I bought a load of zips with that intention. I just hate sewing zips!

Any tips for secure closures which doesn’t involve zips or magnets? I’m leaning towards lobster clasps and D rings at the moment. I like delrin clips but making the felt straps is so time consuming.

Book cover

Book cover

I made a sketch book cover for my daughter for her birthday.

Here is the layout I started with. It is 4 times the length of the book. the background is wet in this picture.

And a close up of the base for the flowers. The stems are some hand spun thick and thin wool yarn. The flowers are some super bright trilobal nylon. to this I added some yarn. I forgot to take a picture of that. I just spiraled it around.  The background is wet while I am adding the decorations. The nylon in particular stays put better when the background is wet.

I was not careful to keep the flowers just so. I wanted some distortion, it is more interesting. Next I made the strap for the back of the book. I like this better than two folded over flaps. It means you can put a wider or thicker  book in more easily. I uses some really pretty dragonfly fabric I picked up at a destash sale at my guild for the strap.

For a closure I sewed on a ring and looped the tail through it.

and lastly a shot of the whole thing.

I hope she likes it. She is quite a good sketcher.

Felt and Textured Paper Collages

Felt and Textured Paper Collages

I usually don’t show a lot of my class homework here for my Level 3 Art and Design class that I am taking. But we did some really interesting textural collages in our last class that I thought might be appreciated.

This slideshow requires JavaScript.

I am still in the process of completing a bunch more collages but these are the ones I am satisfied with at the moment. I have also started a series of collages made from scraps of leftover printed felt. For my online classes (you can still sign up for those for the second quarter, click on online classes in the menu, then embellishing felt…), I have loads of scraps of felt that has been screen printed, stamped, stenciled etc. I wanted to put those to good use and also to practice my composition skills with collage. I also like to keep my free motion machine stitching skills in use so each collage will include some machine stitching and possibly hand stitching as well.

Here’s the first one. The background piece is one my friend Paula made with an old wool blanket and eco printing. I then added the two printed pieces. The one in the center is actually the back of the printing process. I liked it better than the front. I haven’t decided how I am going to use these yet. So of course it is an odd size and I’m not sure how I will frame or display them yet. Just decided to make them and then see.

Here’s one in the planning stage. I plan on stitching the piece of silk with an aspen leaf pattern as in my sketch on the left. Now that I am looking at the photo, I might change out the background piece of fabric as it needs a bit more contrast from the silk piece on the left. I will have to look to see what else I have, perhaps a mix of green and orange? I have loads of printed and dyed fabric and felt so I could keep these up for a while. You can take that as a warning or a threat 🙂