Browsed by
Category: felt art

The Bull

The Bull

We have three public houses in Sturminster Newton (at one time there were 11 in our small market town!) and The Bull Tavern is one of the oldest. The building consists mainly of a 3 roomed 17th Century cottage with an attic room, built of old timber infilled with wattle and daub. Some additions were made in the 18th Century. Records show that the cottage was definitely an alehouse by the late 1700s. Apparently there was a slaughter house at the rear and a Pound where straying animals were kept until collected – upon payment of a fee of 1 shilling (which must have been a fortune when you consider that a married man’s weekly wages at the Town’s Workhouse were all of 9 shillings and a single man’s only 6). Part of the C18th additions was a stable block (which eventually became a skittle alley and later part of the restaurant of the pub). It is rumoured that the horses stabled there were used to help get carriages and carts up the adjoining steep hill leading to Sturminster Common and the small community of Broad Oak.

The building, known to Thomas Hardy (one of our famous inhabitants) as The Old Bull Inn,  is shown on the earliest known map of the area dated 1783, as being part of the Pitt-Rivers Estate.  You can learn more about the Pitt-Rivers family here: https://www.dorsetlife.co.uk/2012/04/sturminster-newton-and-the-pitt-rivers-family

About 18 months ago, after our then favourite landlords moved from the White Horse Inn in Hinton St Mary, the pub was closed for refurbishment. Hinton is a village about 1.25 miles away, where the Pitt-Rivers manor house is situated.  We used to walk there 3 times a week – our exercise with benefits – but since the benefits had disappeared we decided to patronise The Bull – for our exercise of course.  The only trouble with that was that it’s uphill on the way home whereas it was down hill from the White Horse.

During that time we had come to enjoy the chats with Marianne and Lance, the Bull’s managers.  Lance being the very good chef, and Marianne “Front of House”.  Early in January 2021, they announced that on Christmas Day they had got engaged.

One of my felt paintings – commissioned by a mutual friend –  had been given to the White Horse landlords as a wedding present a few years ago, and Graham, my husband, suggested that I do something similar as a wedding present for Lance and Marianne.

Felt picture of sepia tint image of old public house
My interpretation of an early image of The White Horse, Hinton St Mary

Although The Bull itself is a very interesting building, I wondered if I should do a picture of an actual bull for them. No date had been set for the wedding at that time, but I thought I should at least start collecting reference pictures, both of the pub itself, including some of their Pub sign and of some animals. I thought about breeds that might have been around in the 16th Century – White Park Cattle and black Gloucesters; and also looked at Herefords since that was the breed on the Pub sign.

image of Bull Tavern sign with hereford bull above image of the public house
The Bull Tavern and it’s sign
image of black bull with winners rosettes and image of large white bull
Gloucester and Park White Bulls
image of hereford bull head, image of bull grazing, image of bull in field
3 Hereford Bulls. I eventually picked the one at top left.

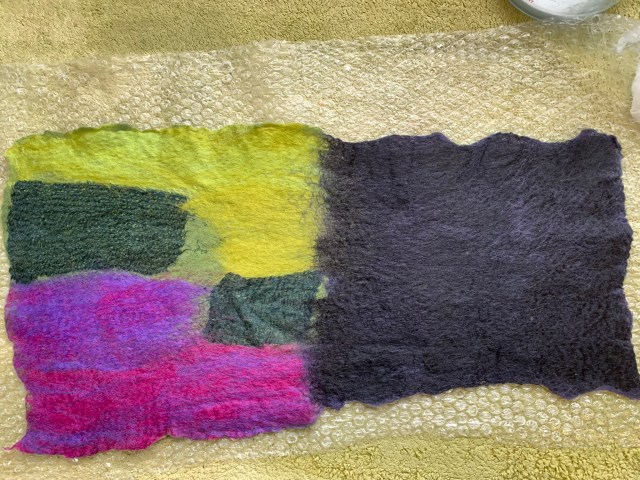
In the end I decided on a Hereford bull. After a lot of thought and manipulation of pictures, and also starting on a background field for the bull to stand in, I still could not come up with a layout that I was happy with. One idea was to surround the image of the bull with cameo pictures of nearby local landmarks – the water mill and the mediaeval bridge – with perhaps an image of the pub itself as well.

Then, just after Christmas 2022, Marianne said that they had set the date for the wedding – 10th June 2023.  Now I had to get my ideas together and get on with it.  The picture would need to be simplified if I was going to get it done and framed in time.

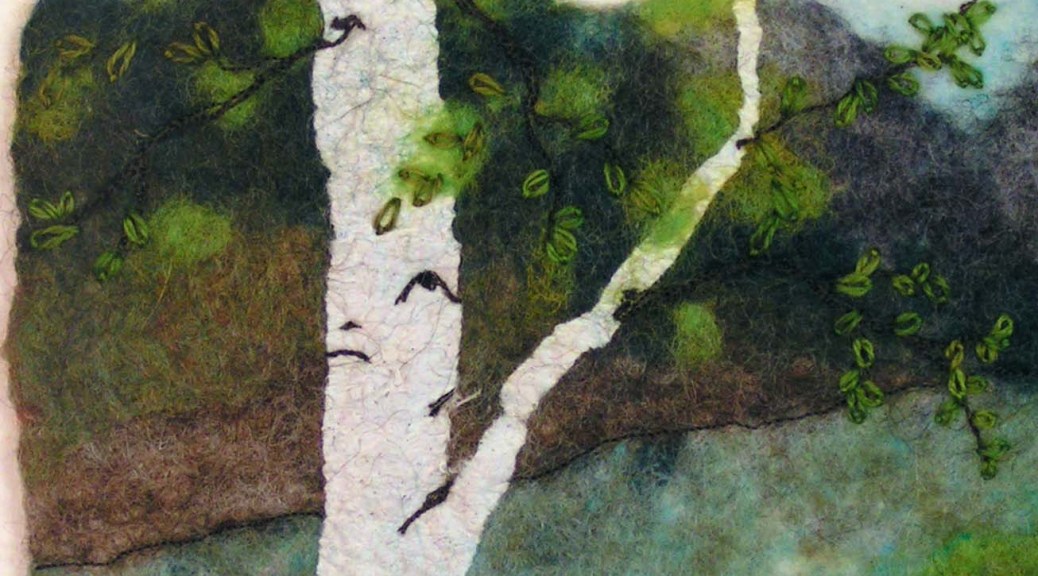
It was about then that my picture of the horse on the hillside in Devon was finished and it occurred to me that I could use a similar method of producing a figure with more depth.

image of felted horse on background of trees and stream
Detail from my Glorious Devon picture showing the horse added to the finished landscape.

  I finally decided upon a cameo type picture of the bull’s head and shoulders and I would use the background which I had made back at the beginning of this saga.  I would paint (with wool) the shoulders and neck and outline of the head on to a piece of flat wet felted core fibres.  With a separate face and ears, and a further separate set of horns and the nose on another piece.  I would cut all of the pieces from the backing when these were substantially finished.  I would fix the torso and neck onto the original background and layer on the face and ears, horns and nose, then I would do the final titivating and framing.  I made a start and here are the initial progress pictures:

This slideshow requires JavaScript.

As I said earlier, it was intended that this picture would be a wedding present for Lance and Marianne, but at the beginning of April this year, they told us that, because of various unforeseen difficulties arising out of successive pandemic lockdowns (which included them catching Covid between lockdowns so having to shut the pub again)  they had decided to give up the tenancy of the pub.  They had obtained a job, with accommodation, managing a Touring Caravan Park in Cornwall.  Marianne was leaving almost immediately and Lance would stay on for a couple of weeks, with his last trading day on the 19th April.  So the picture was going to have to be a leaving present.

That caused a bit of a panic at home as you can imagine, so I had to get my head down and finish it NOW!  These were the final steps;

This slideshow requires JavaScript.

I managed to finish the picture and, with Graham’s help, I mounted it in a deep box frame in time to hand it over to Lance on the 19th, when we went in for a final lunchtime meal.

So here’s the completed and framed picture – my entry for the 2023 Third Quarter Challenge – Something Special About Our Town.

image of felted bull head and torso on a field and sky landscape in wooden box frame
Finished and framed.
Calling Down from the Branches

Calling Down from the Branches

This is the final installment of my large nuno felted autumn landscape, it is finally finished and I have even stretched it over stretcher bars so it is ready to go the framer next week. It is my entry for the 4th Quarter Challenge  of the year long tree challenge. I’m way ahead this time. Yay!

In my last post, I was trying to determine how to handle the ground and prevent the background trees from “floating”. I decided to try leaf litter on the ground. I used the same fabric and paper that I used for the leaves on the branches. You can see on the left hand photo the first attempt. I had some leaves that were already cut out but these were much too big. It made the ground move forward since the leaves were the same size as the foreground tree leaves. Not the look I wanted. So I cut the leaves into tiny pieces and scattered them about. I didn’t want to bore you with all of the time I took arranging the leaves. You can see the progression from left to right. I had taken over 10 photos of this progression but thought I would show the first, middle and last photos. Perhaps you can tell a difference that way! Once I had the leaves where I wanted them, I glued them down with an archival gel medium. I don’t usually use glue but these pieces were so small, I thought that was the best option.

Next up was to determine the color of the “matte”. This is the fabric that I stitch the nuno felt down on to hold it in place for framing. I decided to go with the darker grey fabric. Then I stitched along the edges of the nuno felt to hold it to the background fabric. Normally, I would then lace the fabric over matte board or foam core but this piece is big and I decided to use stretcher bars instead. The stretcher bar frame is 23″ x 34″. I wrapped the fabric around the stretcher bars and stapled it in place. The hardest part of that process is getting the nuno felt landscape in the right position since you staple from the back side.

Nuno Felted Landscape with Autumn Birch Trees and leaf litter on the ground.

Here’s the piece on the stretcher bars ready to be framed. I will use my usual slim black frame. Did anyone notice anything else that was changed at the very end? Calling Down from the Branches is now ready to go to the framers and then off to the gallery.

Adding leaves to my summer tree.

Adding leaves to my summer tree.

The next step to do for my summer tree is to get it some leaves. I decided I wanted some texture so thought I would use some silk fabric to make some needle felted nuno felt.

I found some of my boxes of fabric and had a rummage for some green I found mostly silk and some stuff labelled nylon which is a very good imitation of silk.

The green and brown was my first thought but best to try them all.

I pulled out my sampling tree. The one that looks like a peg having a bad hair day. 😉

I then thought maybe I could put the dark fabric down and then add some other fibre on top. the dark fabric is the nylon. It’s a very loose weave so it pulls threads when you poke it.

I tried adding some loose threads but they just looked messy. I think they would make great vines in a swampy picture

I decided it was a waste of fabric to put the dark green down first It would be too hard to leave some showing properly and it would prevent any of the branches from showing.

On to the real tree, I did fiddled with the branches in the middle and it does look better naked. Not that much of it will show but still, it was good practice.

I tried adding it all as one piece but I couldn’t scrunch it properly. So I pulled it off.

I added the silk in small amounts

and all done, I left a few holes for the sky and a few branches peek through. I left the edged raggy to add to the texture.


And here’s the finished overall look. I like the overall look. I am going to have to fiddle with the roots. Combined with the slant of the land, they are making the tree look like it’s leaning over. I think a little poking in on one side and poking out on the other should fix it. I am going to have a look for the wool I used for the grass portion of the background to maybe put a little over the roots. I will have to do some googling for pictures of roots.

Next, I think I will add some rocks around the roots and maybe a few around the field in the thin spots. Then maybe some tufts of grass with stitching.  I may fiddle with the cloud too. I am still thinking.

Large Autumn Landscape – Adding Leaves

Large Autumn Landscape – Adding Leaves

I have been continuing to make progress with my large autumn landscape.

Autumn colored nuno felted background with silk paper birch trees, stitched branches and set up with thread, scissors, cut out silk leaves and reference photo.

I began by looking for silk fabric in the correct colors. I found a yellow orange and a yellow green. But I needed a lighter mid yellow. I didn’t have that in silk fabric but I remembered some rice paper that I had painted yellow and coated with matte medium. I could use that for leaves too. To prevent the silk leaves from fraying as much, I ironed a light weight fusible to the back side of the fabric. Then I cut out a variety of leaf shapes. The secret to making leaves look more natural is just cut them out freely by hand. The shapes will be all different and the sizes won’t be exactly the same but that is what you want. I found a photo online to give me an idea on how the leaves should look and used that for inspiration.

Autumn colored nuno felted background with silk paper birch trees, stitched branches and silk fabric leaves partially stitched in place.

When I was stitching the leaves down, I wanted some movement and the feeling of the leaves about to fall. Therefore, I only stitched them down with one or two straight stitches. This allowed the fabric leaf to come out from the background and be more three dimensional.

Autumn colored nuno felted background with silk paper birch trees, stitched branches and stitching more silk fabric leaves.

Cutting and stitching individual leaves takes a bit of time but I liked the result.

Autumn colored nuno felted background with silk paper birch trees, stitched branches and silk fabric leaves.

Here’s the piece after adding leaves. I may add a few more in a couple of places but I am evaluating now to see what else the piece might need. I haven’t cut off the bottom edge but I will be doing that shortly. I could add fallen leaves at the base of the background trees. Or I could add a bit of grass here and there. Or I could leave it alone. What’s your vote?

My idea for a name for this one is “Calling Down from the Branches”.

Guest Artist – Diane Coe

Guest Artist – Diane Coe

This is a guest post from Diane Coe, one of our readers, who recently submitted a photo for our 3rd Quarter Challenge. Thanks for sharing Diane!

My name is Diane Coe and I live in Featherston, New Zealand. I started being creative at a young age. Drawing, painting, and learning to knit from my Granny. I used to make tiny felt mice and exhibit them at a local annual art show as a young teen. Later on in life, in the 80s, I discovered Leadlight and produced for markets and made windows for houses. Then I progressed to Mosaics which I enjoyed for a while. I discovered a local felting group in 2014, and have been hooked ever since. Mainly I use wet felting with some needlefelt.
Sign of The Last Call of the Ruru
I was inspired to create Te Karanga Whakamutunga Ote Ruru (The Last Call of the Ruru (Morepork) from Maori Folklore, in which the Ruru is regarded as a guardian. With much of our planet being endangered, I wanted to portray the Ruru guarding the NZ Bush as a last call, as time is running out unless there is a change and more protection.

I wet felted the background and then needle felted, adding wool roving and balls of wool recycling from Op shops. The Kiwi is a scrap of possum fur. I spread out all my colours and fibres and picked up pieces to needlefelt as I went along, choosing what would work best for what I wanted to portray in each piece of the picture.

Close up of the felted picture of the Ruru

This close up photo shows more details of the intricate work.

There is hidden in the picture a Powelliphanta (native NZ giant snail). The piece took months to complete and is framed in native Totora farm posts.

Wool painting by Diane Coe, The Last Call of the Ruru

This is the photo that I submitted of the piece for the Third Quarter Challenge. You can click on the photo to enlarge it.

Here I am in my studio, creating another landscape.

Friend of Diane Coe holding portrait of dog created by Diane Coe with dog sitting opposite.

I have created other pictures like the portrait of my friends dog.

Diane Coe with felted attire with hat.

I have also entered recently a national competition in NZ called WoolOn, in which you can enter anything wool. It will be on the Catwalk and judged later in August 2003. Felting is a beautiful artform and a wonderful natural product. There is always so much to learn and create with.


Thanks so much Diane for telling us about your felting journey. 

If you would like to submit a photo for one of our challenges, you can do so here. If you are interested in telling us more about yourself and your fiber art, we would love for you to write a guest post. Just fill out the Contact Us form to let us know of your interest. 

Now the branch is finished too

Now the branch is finished too

So sliding in on a cloud of dust I have the branch finished just as the quarter runs out. I know we don’t have to get it done in a specific time but it is nice to get it done in the quarter the challenge is posted.

Last time I had all the flowers made. https://feltingandfiberstudio.com/2023/06/18/second-quarter-challenge-flowers-finished/

After looking at it and especially seeing it in a photo I decided the larger flowers at the bottom of the flowers should have yellow centres. So I added them. I used mostly french knots with 2 threads. The single french knots are smaller than the colonial knots. The Yellow stands out more in the photo than in real life.


hanging flowers made of felt and french knots .hanging flowers made of felt and french knots, close up

It still looked pretty sparse so I decided leaf buds would help. I looked them up online. It was best to look up flowering trees and look at the buds in the background. It didn’t seem to matter the kind of tree the leaf buds looked pretty much the same. I made all the leaf buds at the same time so I would get them about the same size. It didn’t take long and I only poked myself a few times. That’s the problem of working small.

first I had to make the green I wanted. I had Christmas green, lime green and a very yellow-green. I mixed them with a couple of dog brushes.

I made 2 at a time. Then cut them in half and finished shaping them while holding them. I poked myself working on the pad not in my hand and I know Jan will tell me she just gave me a tool so I wouldn’t do that. But I forgot until after I poked myself, naturally.

making a needle felt leaf pile of felted leaves

I fiddled around placing them. and felted them down…… without poking myself.

placing felted leaves on the branch

leaves felted down


I had originally thought I would add a bit of brown near the base of the buds but I didn’t like it and pulled them off.

adding brown to the base of the leaves.

I am quite pleased with the finished branch. Now I need to steam it a bit, to block it square. The dent on the left is really bugging me.

Still working on flowers and lambs.

Still working on flowers and lambs.

I have started adding flowers to my branch. It is slow going as I am still fighting my cold but it is started, so that’s something.

I started adding the purple backgrounds for the flowers. I took a picture partway along.  I remembered to take pictures before finishing so everyone should clap…… or something. LOL

a felted tree branch with purple flowers

Taking the picture made me look at it more and wow, dead straight


A felted tree branch with more purple flowers

So I went back and poked them into a more organic shape.


a felted tree branch with purple flowers and orange stems.

Next was the stems and that’s as far as I got. I am not sure about the blank space bottom right. I can’t decide if I like it or not.

And just for fun, sheep and lambs. theses are bad sheep who escaped in the rain and decided to eat the grass between the two houses on the farm. They are not very good at being sneaky. This was a little earlier in the spring. They are out in the pasture during the day now.

Sheep grazing on grass.

And some cute Lambs


Black sheep and her twill white lambs. Black lamb looking through the fence

Stitching on Spring Birch Landscape

Stitching on Spring Birch Landscape

My spring birch landscape has been stitched and applied to a backing board so it’s ready to frame. I showed you the first stages of the landscape in this post if you missed it.

Felt landscape of spring birch with free motion machine stitching added.

I added free motion machine stitching to the distant shore. Whenever I start FME on a landscape, I always think that the first few areas where I have stitched look like it’s too much. But I keep going and usually, once more stitching is added, the initial lines don’t feel excessive.

Felt landscape of spring birch with free motion machine stitching added to rocks in foreground.

The next step was to stitch the rocks across from the tree. I considered adding some stitching into the foliage above the rocks but decided to leave it as is.

Felt landscape of spring birch with free motion machine stitching added to tree trunk and branches.

Then on to stitching the tree. I added the dark bits to the trunk and stitching through the felted paper was a breeze, no problems at all either by machine or by hand. The dark branches were added next and then decision time on how to add a few more leaves. I considered needle felting some smaller leaves on the dark branches but then decided I would hand stitch the leaves.

I then hand stitched leaves on to the dark branches using hand dyed lace weight wool thread and detached chain stitch. I added a few bits of grass at the bottom of the trunk as well.

Felt landscape of spring birch stitched to background fabric and wrapped/laced around board ready to frame.

The miracle is that I found a backing fabric, stitched the felt to that and then wrapped/laced the piece around matte board so it’s ready to frame. Since the piece is small (matte size 8″ x 10″), it went quickly and now I have two pieces ready to take to the framers. This piece counts for the year long tree challenge for spring. I have to think about the summer one as it wouldn’t really look different than spring, a few more leaves perhaps?

Nuno felt landscape of winter birch stitched to "matte" fabric and wrapped/laced around board.

The winter birch piece is also ready for framing. I used a darker gray hand dyed fabric for the winter birch as it felt “colder” that way. Now on to the next landscape as the gallery wants me to replace the one that sold last month. (Doing a little happy dance!)

This is the piece that sold called Remembrance. Yay!

More Experimentation with Felting and Paper

More Experimentation with Felting and Paper

I have continued with my experimentations with mulberry paper and felting. My first post is here if you missed it.

Mulberry paper with embossed leaf laid out over green wool ready to felt.

I have had this mulberry paper with leaves embossed on it for quite a while. I loved the paper but never used it for anything. It is fairly thick and the embossed portions are really thick. The question was whether it would felt easily to the surface. I tore out a single leaf and placed it over a small torn piece of green, short fiber merino batt.

Mulberry paper with embossed leaf laid out over green wool wet down on felting surface.

The wool and paper were then wet down (sorry for the blurry photo) and I felted as I had on my previous paper samples, treating the paper as if it was fabric as in nuno felting. I wondered whether I would lose the embossed lines of the leaf, whether the paper thickness was too heavy to felt in easily and if it would felt differently than the thinner papers I had tried previously.

Mulberry paper with embossed leaf felted to green wool as a sample.

Here’s the end result. You can still see the leaf. It felted very easily and doesn’t seem much different than the thinner papers. I think if I had done a lot of wringing of the felt it would have distorted the leaf but I was careful to avoid fulling in that manner.

Hmmm… how can I use this leaf paper in a design? What would happen if I added ink or dye to the paper before felting? What if I dry brushed paint over the surface of the paper after felting? What else could I do to the surface to enhance the feel of leafiness? How would hand or machine stitching look on the surface? Will it be easy to stitch through? Any other experimental ideas for me? Obviously, more samples to follow.

Wool laid out for landscape with birch tree, river and distant trees and mountains. Birch tree from mulberry paper on the surface of layout.

Next on to experimenting with paper in my landscapes. This is the layout of wool and a paper birch tree. (This also works for my spring tree for our year long tree challenge.) The piece is pretty small and ended up about 7″ x 9″ after felting.

Wool wet down for landscape with birch tree, river and distant trees and mountains. Birch tree from mulberry paper on the surface of wool.

Here’s the piece after wetting down and curbing the edges a bit before felting. Again, I treated this gently to allow the paper to felt in.

Wet felted landscape with birch tree, river and distant trees and mountains. Birch tree from mulberry paper felted to the surface.

Here’s the piece after felting. I plan to add some free motion machine stitching to add more interest in the tree and more branches as well. I will probably add a few more leaves to the tree as well and perhaps a bit of detail to the rest of the landscape. The tree worked well and the paper really stands out to make the tree the focal point of the landscape. I definitely need to do more experiments with landscapes and paper. How else could I use the paper besides tree trunks? How would scraps of green paper felt in to make foliage? What would a variety of colors of paper layered over each other and then felted look like?

I love asking ‘what if’ and trying out these ideas, which lead to new ideas and further experimentation. I haven’t even begun to scrape the surface with how paper and felt can be used together. I would love to hear your ideas for experimentation so please leave a comment with your “what if’s”.


Lapwings Felt Picture

Lapwings Felt Picture

I’ve recently made a new felt picture of lapwings so I thought I’d show you how I went about it.

As you’ll know, if you’ve read my other blogs here, I live on the East Kent coast in the UK and am particularly fond of the local birds. I’ve seen some beautiful flocks of lapwings including at a small nature reserve just along the coast at Oare. I’ve not attempted lapwings before though they are really beautiful birds, so I thought I should have a go.

I’ve only seen lapwings in quite large flocks – I’ve never seen one on its own – so I thought I should have at least 2 birds in the picture. I did a quick sketch to help me decide on the size and stance of the birds

I started with the background. The birds at Oare were on the wet, grassy edges of a lake, very near the sea. Here’s the background laid out & ready to start felting.

I spent a while thinking about how to represent the lapwings’ lovely iridescent feathers and decided on lots of prefelt.

I had some blended greenish wool that was perfect for the main feathers though I had no idea where it came from or what it was. As I made some prefelt I tested out the shrinkage – mostly just to be sure it would felt rather than getting a specific shrinkage.

Then I set about prefelt for all the other lovely colours. The dark green sections are scraps of recycled silk from my favourite source: a charity shop scarf. The others are mixtures of different merino wool colours. I was particularly pleased with the dark section on the right which was a bottom layer of blue and top layer of charcoal grey. It was just the effect I was hoping for. With hindsight I should have used silk for the light green & pink / purple too as that would have given me more shine.

Here’s the prefelt cut up & arranged in a bird shape.

And here are the 2 birds once fully felted but still wet

And here I am deciding how to position the birds on their background.

I needle felted the birds into the background then added eyes, other face details, legs (using recycled tapestry wool) & head plumes. If you look closely you can see I also fiddled a little with the background: needling in extra strands of grass to soften the edges of the water.

The lapwings went straight into an exhibition with 4 other big pictures plus some smaller pieces at my local gallery: the wonderful Horsebridge Community Arts Centre in Whitstable. Here’s my display (not a great photo, sorry).

And I’ll finish with a quick shot of a beautiful painting I bought at that exhibition.  I’ve been looking for something to hang over my bed for ages and I thought this was perfect.

Painted by my friend, the artist Josephine Harvatt. The title “When you wake up it’s a new morning”  is particularly apt for over the bed. I love it. If you want to see more of Josephine’s beautiful work, here’s an Instagram link.

https://instagram.com/josephineharvatt?igshid=NTc4MTIwNjQ2YQ==