Browsed by
Category: 3D

A Pictish shepherd for my little blue sheep

A Pictish shepherd for my little blue sheep

Alright, I have put aside the strange creature Glenn can’t identify to provide my last little sheep with a proper supervisor. (we are presently cat-less so it must be a shepherd)

1 1  I am sure all my felting friends will immediately recognize what I am making! <Grin> (the merino I have will not work for the topcoat so I have to hope to find something more appropriate in my stash or wait until the Co-op is excepting shoppers again!)


So change of gears and on to the shepherd. I looked at the height of the sheep then went for the 20 gauge floral wire I found when I started to clean my desk. ( I probably should finish cleaning it and see what else I’ve lost there). I double wound the wire leaving loops for hands, feet and head. I used the very spongy Rideau Arcott again for the first layer of the understructure. I then remeasured him against the sheep….. drat, he seems taller than I had anticipated. That will make for a very diminutive breed of sheep.


22  My shepherd somehow grew too much, starting shepherd #2.


Many years ago, long before any thoughts of felting flitted into my brain, I had purchased antique floral wire from the local Salvation Army thrift store (aka the Sally Ann). It was quite stiff and covered in fine cotton yarn. One piece had migrated from the bookshelf in the living room where it had come to reside on the desk in the office by the computer. I was considering making a dragon with it but hadn’t come to a final idea. It was just about the right length for the head, torso and legs for a shorter shepherd. I used the 20 gauge doubled for the arms.

3 3  Two different wires to create the armature.


I am again using the foam (like a pool noodle) kneeling pad and a combination of the 36 triangle and the unspecified “3 sizes” needles from Amazon. You can also see the 3 needle holder with the blue handle I got from one of the amazon resellers. It is not quite as sturdy as I had hoped but works if you keep your fingers holding the darker blue part. If they slide foreword the front cap/guard comes off. I did take it apart and with a bit of a struggle, I got it back together. It seems to have a few design weaknesses but does work. I think it will be more useful with picture felting or larger 3D projects.


44 Three needle holder from amazon reseller.

As I started adding wool to the second shorter shepherd I found I was breaking needles. Particularly just superior to the patella above the coccixs and the inferior aspect of the bracial plexis. (ok anatomy sticks in the brain even when felting) I am wanting a very firm understructure. Then plan to overlay in pasty pale northern skin tones then add the Pictish woad blue. I will have to take a quick peek and see if I can find the roman description of their Pictish opponents. I have no idea where I put my university history notes so I will do a bit of a search and see if I can find an English translation of the Roman text I remember.

From Tacitus’s Agricola – “the inhabitants of Caledonia,  their red-gold hair and massive limbs proclaim  German origin”. I am embarrassed to admit fell asleep while re-reading the Agricola. That was not the passage I was thinking of so maybe it was a quote from Bede I was thinking of that was a bit more descriptive?

I found that Pict derived from a Roman word meaning to paint.  So I am still unsure if it was blue overall or patterns of blue. I found some illustrations I remember seeing before but are much later from the 1500’s. (I will have to figure out how to show that without being too educational.)

5-15 illustrations c1585, by John White. Woad stained Pict warriors (with careful smudge added to keep from shocking the kids)

I will continue to look at some of the Pictish patterns and make a final decision later. I spotted an unfinished standing stone that had blacksmithing tools at the bottom of it.  I wish I remembered my university history class more clearly. Oh, maybe there is a reason university seems a little foggy is because it was over 30 years ago! EEK!

I got distracted when I started to work on him. I was listening to an audiobook by Kalayna Price.  It was the second one of her books I’ve listened to.  This one was called Grave Dance. As you can see, I made reasonable progress while listening to it.


This slideshow requires JavaScript.

6-9 Progress while listening to book 2 in the Alex Craft series

I am particularly pleased with the patella, glutes and gastrocs. The thorax is progressing but needs more work. I’m thinking washboard abs may be added. Still have more work to do. Yes, I noticed the hands and forearms are missing too. But for now, it’s past time to stop and make dinner (and I have to buy the next book in the series before I get back to felting). I will try harder to stop and take pictures.

I have been working on the feet fussing with the arch and malleoli. I have the right one close to what I want but the left still needs work.  I used the embroidery snips to remove a bit of the hairiness from the felt and the ankle suddenly looked better.

10-16 progress on the right foot

I am having fun with him and am still debating how anatomically correct I should make him. If I make him check or plaid pants (trues/Breeks) or a grate cloak or maybe a tunic no one will know what is under his clothes! (if you don’t peek). Have fun and keep your hands in lots of warm soapy water felting!! (not dishes)


1717 Humm, maybe a bit more lateral glute on the right side?

3D wet felting experiments (part two)

3D wet felting experiments (part two)

In my last blog spot I showed how I made a sprouting seed pod as part of a group of 3D wet felted objects I’m calling ‘Lifecycles’ that I am submitting to an open exhibition.  You can see that blog here if you missed it or want a reminder https://feltingandfiberstudio.com/2020/01/13/3d-wet-felting-experiments-part-one/.

The second piece is a fallen tree branch with fungus and lichen. My ideas is that as one thing dies (the branch) it gives life to others (fungi etc). This will tie in with the sprouting seed pod (a new tree) and maybe I’ll add a couple of other things too, yet to be decided.

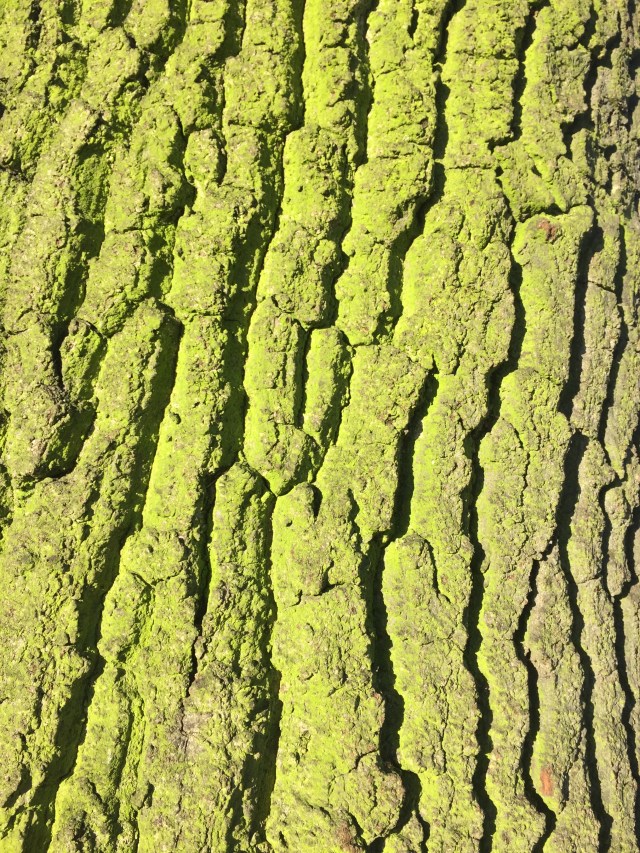
Wondering where to start with the texture I take myself off to the local park to look at different types of bark.

I am particularly taken with these very ridged examples and wonder how I’d go about creating that texture in wet felt.  I happen to have some off-cuts from the seed pod on my work table – a piece of fabric, probably linen, I found in a charity shop and felted –  so I decide to see what it looks like if I lay those under some new felt.  Keen to do things properly (and not waste time) I make a sample.

I am still experimenting with using wool batts from different breeds of sheep (rather than merino tops) so put together natural brown and grey Shetland and Finnish wools plus a little dyed green Perendale including a couple of bits of prefelt. You can just see the ridges when felted but I want more so try cutting into the surface. I really like that effect.

Sample of recycled scarf felted to become lichen

I try out some pieces of a (charity shop) hand dyed silk scarf for lichen and like those too so decide to get on with making the log.

I make a sheet of nuno felt using the recycled fabric which I cut into uneven strips.

Using a large rectangular resist I lay out 3 layers of wool on each side, wet it down, and add the felted linen strips on one side in what I hope is a bark-ish pattern. 

I cover these with two more layers of mixed brown and grey wool then add the surface decoration including prefelted discs for fungus and some marbles under the largest green section.

Surface of side one laid out

I would normally lay out the whole thing before starting to felt but there is a lot going on by now that I don’t want to disturb by flipping it over so I start working the first side to try to get it stable before finishing the second side layout.

On the second side I add yarn, locks, nepps, slubs, silk noil, nuno prefelt, pieces from a striped charity shop silk scarf….I am really starting to enjoy this. It’s a good job there isn’t a kitchen sink nearby as I might throw that in too. I’m thinking that as the log will be lying down, this will be the under side so it doesn’t matter if I don’t like everything. I could even cut bits out.

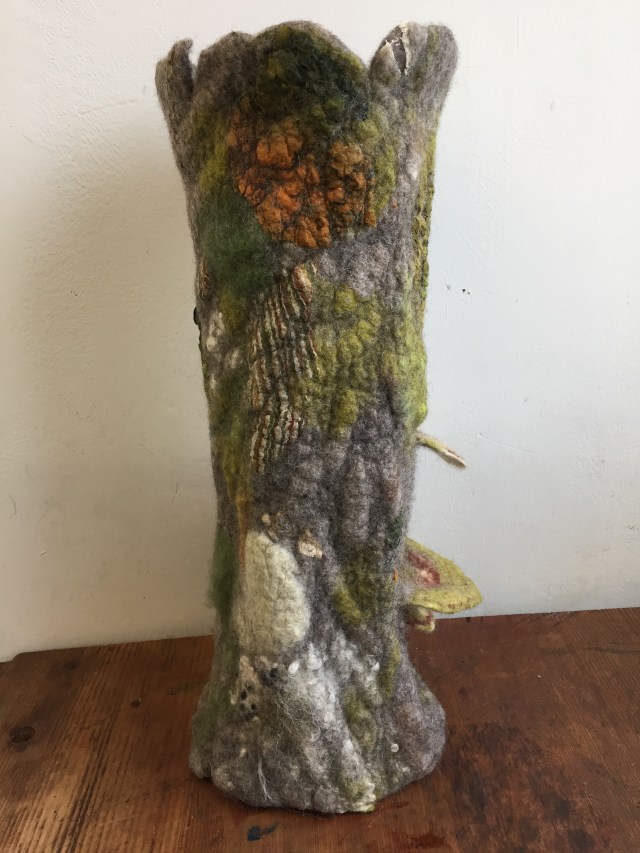
It takes quite a long time to rub and full this woolly smorgasbord, working hard into all the grooves. As I finish working it I decide it looks better standing up and so the log becomes a tree stump. 

Final tree stump from the front

In the end I decide not to cut into the surface as there is plenty of texture and I also leave the marbles in as I like the green knobbly bits (visible in top picture). 

What next? I’ve been mulling over how the pieces will be displayed together and decide to make a flat piece of ‘woodland floor’ felt for them to stand on.  I start with a piece of mixed leafy-coloured prefelt.

I cut the prefelt into rough leaf shapes and lay them on some layers of brown wool.  I can’t resist adding a little bit of 3D so felt some thick green rope to look like new shoots emerging from the ground. 

Finally I make an autumn leaf to highlight the annual cycle of a tree’s dying and renewal. 

Here’s the final piece.  Have I captured the idea of life cycles?

Final “Lifecycles” piece

And yes, Lifecycles has now been accepted into the exhibition so will be on display at Beach Creative in Herne Bay from 20 March to 2 April as part of the 3 gallery exhibition ‘Map’. If you’re in the Whitstable, Faversham, Herne Bay area do pop along to the Fishslab, Creek Creative and/or Beach Creative Galleries and check out how other people have responded to the Map challenge (dates vary slightly). I know some of my friends have fabulous work in the exhibitions so I think they will be hugely varied and interesting shows

2020 Jewelry Challenge

2020 Jewelry Challenge

Hello Fellow felters.  Today I want to tell you about how the first challenge of 2020 is going.

Do you remember Ann’s resist? (https://feltingandfiberstudio.com/2020/02/10/a-zen-sculpture-and-some-cuteness/) The one my enfeebled brain kept telling me had to fold together somehow into a book resist? The one that was not a book resist and had me stumped? Ok, I had a serious blind spot in figuring that one out! So I now have one that stumped her!

I am sure you remember we are making Jewelry!  (And you are getting to know me, with my strange sense of humour and odd ideas so it might not be quite what you would expect of modern Jewelry) Enough hints! On with the embellishing item!!!

Step 1: Inspiration.

It can come from anywhere. So it did. And I will show you that at the end. I have the shape and am now working on the ideas for the mounting.

Step 2: On to Armature!

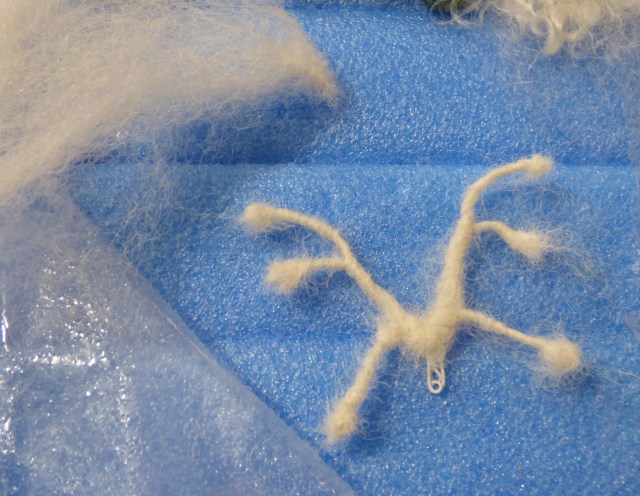
That 20 gauge black floral wire I picked up at Walmart has been handy. It was 18 inches long when I started with 2 pieces bending them double creating a loop at one end and a bifurcation at the other. Do you have any idea what I am up to yet? I have a few shots so you can see the size of the piece. I did trim a bit off. So part one to the bend is 3 and 1/8 inch, part 2 to the next bend is ½ an inch, part 3 to the beginning of the loop at the other end is ¼ inch and the loop is about ¼ inch. (clear as mud!)


1-6

Yesterday, which was Monday as I am typing this, was the first day I have ventured out of the house in over 2 weeks. I was hoping February would make up for January’s unhealthy-ness but alas I was gifted this impressive “Cold” that is likely a flue but not the one out of china so its all OK! Anyways yesterday was Monday so if I can crawl out of bed and get to the car I will be in at the Guild studio working on the library. After a few try’s I  got myself, the external drive with the library databases on it, a basket of fibre and a box with a few more felting supplies off to the guild. When I get to the guild studio I usually post on face book I’m there so anyone who wants to come use the library can join me. I also let them know what the temperature is so they can bring sweaters or tank tops depending on the conditions. (It was 26c and felt wonderful). Unfortunately, it looked like someone had had a party in the lobby and smashed a bottle, a lot of the contents and some of the broken bottle leaked under our door into the studio.  I got some of the loose glass picked up but the rest was well stuck in the spill. Oh, no. there will be a clean-up crew in today to fix that. So on to more important stuff. (My life is never boring, there is no time to have boring! Even lying in bed for 2 weeks watching the 11am 1pm and 2:30pm crows was not boring! Although it would be nice to have more crows.)

7 7

I spent about 3 hours chasing down books that hadn’t been checked in and updating the data base. I usually am not that slow, but I have been under the weather lately so I have an excuse. Since I did not want to start another library job, I was still moving slowly, I switched to felting.


Step 3: add Wool!!

I wrapped the wire in white wool and the loop end in a bit of off white. I added 2 eyes in a bit of greenish dryer lint looking wool. It was as dry as dryer lint and I would have gotten my mask on if I had been working with much more of it. (I do not need wool lung on top of the wheezing I already have from that flue)

8  8 At this point Ann is stumped!

910  9-10

I was sure the bifurcated butt would give it away but I seem to have them flummoxed still!

111211-12

Add more body to the body. The fibre I am using is from a small bag of locks from “Adele’s locks of love”. (https://www.facebook.com/pages/category/Shopping—Retail/Adeles-Locks-of-Love-196725851258486/ ) 11oz of Wenslydale cross lamb. I took a hairbrush to a few locks to open them up a bit then needle felted then into the body working head to tail. I had the needle at an angle getting close to parallel to the body and tacking the fibre in a bit at a time.

Then I started to add important appendages, that is when Ann caught on to what I was making but was skeptical that it was jewelry!

13 13

I switched back to the Dollarama un-sized wire for the front edges of the wings. You can see sheep from the hospital coming along in the background, (the 3 white fluffy bits are the sheep ears, yes I have an extra ear for that sheep)

I slid the wires through the “shoulders” close to the surface then added a bit more of the fluffed locks to secure them. Using the mini round nose pliers I added a little loop at the end of each wing tip. This allows an attachment point to help solidify the front edge of the wing. I affixed the other end to the body.

14 14

I worked the front two wings with the second set bent out of the way. Felt is very accommodating when you have an armature.

15 15

Here she/he is propped up on the needles. That did not last long since he/she was off around the room to visit with Bernadette and others at the social.

16171819

16-19

By this point, 6pm, I was wiped and their pizza order had arrived (with creamy garlic dipping sauce) so I made a hasty retreat to the pizza place across from the guild and brought a much less deadly pizza home for dinner, Double mushroom with pineapples!

So now, I have the first part of my jewelry done and it’s on to legs and embellishing, then making the base!

Here is the inspiration from 1900ad., River Edge in spring, dress with dragonfly. Now I will need a bit of art deco inspiration for a collar since I do not think I want to make the whole dress at the moment. Maybe after a few more legs and some embellishment a pin may suffice let’s see where this takes me next.

2021

20-21 Dress 1900.

222322-23 I added some glass beads to the wings.

2424  I then added legs and built up the body.

Hmmmm, now what will i attach my dragonfly to? Should i make him a tiny felt Mosquitoe?

Studio Space -“Final” Layout

Studio Space -“Final” Layout

On my last post, I showed you my new studio space. I had just moved in and my beloved fibre was still very much scattered around, and I felt a little at a loss as to where I should place my furniture.

It’s been 3 months, so how have things progressed?

IMG_5106

The quick answer is, very much as I’d expect – there’s still work to be done! For good reason, however: I’ve been busy working on a new collection and have been concentrating my energy on that instead of changing things around.

IMG_5107

I did manage to add a little touch of whimsy to this corner. A few of my for-dyeing fibres are tucked in those cubicles, and I managed a way to show off a few o my hand spun art yarns, as well as some commercial ones I have plans for very soon.

Holes in the walls are a no-no, so I’m buying some MDF, placing it behind the shelves and  drilling that instead to keep my vertical storage organised. Having it propped against the walls as is isn’t agreeing with me.

IMG_5108

My little reading corner, currently filled with work stuff. When I’m sewing I feel I never have enough space to place my finished items.
I managed to add a little artwork to the walls, to liven the place up. My ceiling is very high and the bare walls looked a little sad. Wish me luck when it’s time to remove them…

IMG_5109

Placing the sewing table in front of my window was both smart and silly. I get plenty of light (my initial reasoning) but when it’s windy I can feel the draft from the window ventilation slots. For now, it stays where it is, but I might change it later.

Have I told you I named the sewing machine Marge?

IMG_5110

My former dining table can be completely stretched now, which is lovely. It might look chaotic but every item is in use for my current project! Ok, most items are.
Spot the Christmas wreath in the background… it’s needle felted.

IMG_5111

I made this wreath for my husband, who had to spend the holidays by himself in Scotland. I wanted him to enjoy a little seasonal joy and made this in a couple of hours. What do you think?

That’s my tour of the studio space. I’m still going to add more artwork to the walls, and might change the big table’s orientation. Other than that, I’m very happy with my work area and have found my energy is higher here, especially now that the days are growing longer. I’m looking forward to working in my corner during Summer.

Forgotten photo and a small sheep to keep me company

Forgotten photo and a small sheep to keep me company

I apologize I have been recovering from the post dental surgery and the third antibiotic this month. I have a bog written but am still trying to find the best photos for it and am not yet satisfied. But while I was working on that I realized I have a shot that I had promised Ann I would show you.  Unfortunately, my memory still feels a bit like Swiss cheese so i forgot all about it and I cannot remember which of the Canadian winners Ann Said this was. She did seem very happy and I promised I would post the happy winner! (I think Ann wished she could have entered the draw too! what a lot of fluffy inspiration!!)

1There were some very interesting fibers in the bag and I hope we will see what they become at some point!

I also wanted to mention I have been dragging around a small basket with a partly constructed sheep.  I started it when I went to the walk in clinic the day I got sick and continued it at the dentist then attempted to keep working at it in emergency but by that point I really was too sick to safely use sharp pointy implements. The poor little partly built sheep stat beside me while I was stuck mostly in bed too.

2The Christmas mice with a few of the under structure samples of sheep.  The unfinished white sheep kept me company through all the doctors appointments!

What I am quite amazed about the portability of the small sheep project. It was also grate to be able to start and stop working on it. I have dragged looms and wheels to lots of places but even my drop spindles are not as easy to pick up, put down and pick up again.

I am finding I am developing a preference for batts when making small sheep. I have found that the bats are felting quicker than the roving and top I have also been using. I have been experimenting with full and partial armatures with the sheep. I will give you an update when I have the outer coats on the sheep.

I hope if you too have an emergency fiber-arts bag (yes I still have one hanging on the hall door in case Glenn decided he needs another trip to the hospital) I think I will switch out the drop spindle for a small foam pad, a few needle and some wool. A bit of dry felting can keep me busy for hours!


Felt Pod with Differential Shrinkage Has a Mind of It’s Own

Felt Pod with Differential Shrinkage Has a Mind of It’s Own

I am continuing on in the differential shrinkage experimentation mode and wanted to try a different shape with a resist and try again on the machine lace inclusion.

I stitched the stamen in a radiating pattern and doubled the length since my last ones were too short. I also am using a lighter inside wool color so that the black thread will show up better.

First, I decided on my resist shape and then covered it with four layers of batt on each side. The photo on the right shows the piece after a bit of felting. I really didn’t do that much felting but I should have paid a bit more attention. It was too felted and really already past the pre-felt stage. I haven’t used these short fiber merino batts that much and boy do they felt fast! But since I wasn’t paying enough attention, I just kept going.

I then cut the “pre-felt” into 5 pieces and started on the inner layer.

I used the same resist again and put the machine lace stamen in place over the resist. I covered that with a thin layer of merino wool in a yellow (with a green tinge). Then at the last moment, I decided to add a stem. So I whipped up a stem with brown and burnt orange and added that to the inner layer.

Now to add the “pre-felt” back over the inner layer and ready to felt. I took quite a bit of time trying to get the green to adhere to the yellow but it just wasn’t to be. I did add a bit more green wool to the top of the “petals” so that they would adhere better to the stem.

It seemed like it had started to adhere slightly to the yellow so I thought if I took the resist out and worked from the inside, that it might get those yellow fibers to adhere to the back side of the green.  But that really didn’t work. There were a few places where it adhered slightly but I needed to have roughed up the inside of the green felt and that might have worked. But really, I should have done less felting of the green so that it was still pre-felt.

So it didn’t turn out as planned. It looks more like a flower than a seed pod. The yellow layer is separate from the green and therefore, I didn’t get any differential shrinkage. The new stamen worked better than the last experiment and didn’t adhere to the felt even though I never covered them with plastic. But it is an experiment so I will just go with the result.

I decided the stem needed more dimension so I needle felted some grooves and notches to give it a more natural feel.

I’m not sure how many times I need to learn that sometimes wool/felt has a mind of it’s own. Also, that I can’t rush the process or not pay attention. That’s usually when I set myself up for disappointment. But I accept that it’s just another learning opportunity and an experiment. And perhaps, next time, I will remember to not rush the process.


Halloween for Christmas 2019

Halloween for Christmas 2019

As you may remember, my Halloween Ghost Girl was lonely and I created Werewolf boy to keep her company. I was thinking of my niece and nephew while I was creating them, which may be why they seem to be wearing Kamiks,  a northern boot.  Def- Mukluks or Kamik (Inuktitut: ᑲᒥᒃ [kaˈmik]) (singular: ᑲᒪᒃ kamak, plural: ᑲᒦᑦ kamiit) are a soft boot, traditionally made of reindeer (caribou) skin or sealskin, and worn by Arctic aboriginal people, including the Inuit, Iñupiat, and Yupik.).  Since I had the kids in mind as I made them, I hoped that my sister in law would enjoy them.  I was sure they would have a good home there.


1              1 Kamik


I had a problem on how to present them.  In this case, lucky for me, I have dyslexia and was unable to do any of the normal jobs my friends had, (since no one is dumb enough to hire me as a secretary or receptionist, although the guild kept electing me as librarian).  Instead, I wound up being a picture framer as my first career. Lots of archival work, French matting,  shadow and plexi boxes. So I know how to present a 2 or 3 dimensional piece.

But a plexi box is not always the solution. Sometimes it’s good to think outside of the box even if you are thinking of a box.

Solution 1 Michael’s Art store carries shadow boxes and plexi display boxes, that would be perfect! So I’m off to Michaels.  No, they don’t carry that size of plexy display box anymore, would I  like the one for basket balls or there is this lovely one that holds base ball cards that lights up?  They did have an “open”  Shadow box (ok, it is just a deep plain molding without glass that hangs on the wall. Only barely deep enough for the figures, and a bit high. …..but that would work for those trees I want to try later, …….. and its on sale …… ok, I cave. On to Ikea which for me is in the same mall.


Ikea has a large table top miniature green house that might work and it would keep plants or Halloween figures safe from cats. But it’s a bit too large a foot print for just the two figures. But it would be a good back up plan.  It’s still sitting in the back of the car.

2 2 Ikea; Width: 17 ¾ ” (45 cm) Depth:  8 ¾ ” (22 cm) Height: 13 ¾ ” (35 cm)


Over at Walmart I spotted a tall, glass and black metal pillar candle lantern.  The base might be a bit squishy but it’s worth a try. Oh look, no price but it has a bar code. No, scanner is broken at the self-scanning spot…. again…. (Mutter) it’s a bit pricier than I had hoped but it’s worth a try. I got it home and realized the width was not adequate for both figures.  However, the lantern concept was excellent! Just what I sort of envisioned for presentation.


33 Walmart; 5″ x 7″ x 19

Back to Ikea for their big white lantern (much cheaper in price than Walmart’s), return the lantern to Walmart and drive over to pick up Glenn from work. Just in time to Drive to Oakville for the weekend. (That was the trip that the last post about the Mouse Angel happened on)


44 Ikea; 17 1/4″ (44 cm)


Along with Xmas presents and necessary visiting stuff, I had packed Ghost Girl and Werewolf boy, more of the Shetland fleece from last summer (Dark and light sections), the Bee combs and an assortment of needles still stuck in my garden kneeling pad I use as a work surface. I did not pack a ruler. I wanted to do a bit of finishing touches on both figures before they ended up in the candle lantern and off to their new home.


I wanted to add a bit more firmness to the Kamik like boots and give Ghost Girl her Mitts (she did not hold her Ghost Balloons quite as well but I bet her fingers are warmer now!)

565-6 Mitts to keep her hands warm

7 7 Boots to keep her toes warm


My plan was to use the foam pad to anchor the figures in  then cut the foam to fit the inside of the lantern. (that’s where the missing ruler might have helped) but due to my skills with non-math solutions to measuring I had a piece of yarn and pins to solve this dilemma. Dyscalculia is not all bad really! The foam cut easily and with a tiny bit of trimming fit into the bottom of the lantern.

88 Ikea Solution in Oakville (there are more angels in the background!)

9109- 11 foam base and using the sting to measure and the pins to mark

11

Time to drive back to Ottawa and continue work on the base


On Dec 23rd the Guild had a Potluck and Social for those still in town and needing a fibre related escape. I continued with the base. I started with laying out wisps as when wet felting. Then started to use the needles to create adhesion. I layered in a darker path and then added a bit of undulation to the landscape.  I kept to the same colour scheme easily by using the same fleece. This time I deliberately felted into the foam as I worked around the edges to keep the blue from being visible.

  12- 14 Covering the base with felt


Yes! that is sort of what I was wanting. I wish the lantern had been just a bit bigger.

Wrapping – I failed utterly at wrapping since I didn’t want to put the lantern on its side and possibly have unwanted movement occur. So basically unwrapped presentation I will just have to focus next year’s attention all on the wrapping and not on the content to make up! (Maybe a spectacularly wrapped but empty box? Dante the cat would like that.  Maybe I will try that for him next year!)

15-17 the delivery My Niece with the ghosts on stings. i will have to make her bigger ghosts!!

(These pictures were off Glenn’s camera.  Sorry, they’re a very grainy.)

1818

1919 The bell jar I used with the Angel Mouse was also from Ikea. It was called a  BEGÅVNING Glass dome with base, 10 ” (26 cm) high.


Having the felt figures under glass decreases the need to dust and keeps cats from trying to play with the mouse!  Framing felted pictures is a bit more problematic not for the dust protection which can be excellent. The problem can be the same as photos against glass. If the owner used an excessive amount of glass cleaner, the liquid can wick in behind the glass and affect the photo making it stick to the glass or wetting the felt. The use of a mat or a spacer gives a space between the Glass and the art which will reduce the effects of wicking wetness (the best idea is spray the cloth to light dampness and then wipe the glass so no liquid runs behind the glass) but we can chat about framing some other day.   For now I have glass-less shadow box, an extra BEGÅVNING and a SOCKER Greenhouse to fill……another weasel dragon or maybe a small hippogriff? That’s what I love about felt you can make anything!!!

2019 Early Christmas Mice

2019 Early Christmas Mice

I have Wire and wool, now what should I make for Xmas this year?

1-2

Mice!!  Don’t mice just scream Christmas to you too? In their tiny little mice-y voices of course.

I had been in Dollerama again ( I am beginning to think this may not be as good a plan as I first intended) looking for floral wire and floral tape for an unrelated felting expedition. I will tell you about that if anything interesting happens. While there, I discovered this is not the time of year for floral wire but if I would like the short pieces of, again un-gauged, wire I could buy up to 3 packages of them. The pieces are just over 5 inches long or just under 13cm. They are a little more flexy than I had hoped for from looking at the package.


I started to make an armature frame for the first mouse. Since the wire was much shorter than I normally work with (I do have to stop putting things in “safe places” so I can find them later!)  I made samples of different numbers of wire to figure out what stiffness might work. I found mouse one to be a bit too flexible. I loosely braided the back leg wires together then because I had short wires to work form I  entwined the 3 strands I used for the tail and the wires used for the spine through the leg wires. To add more stability I increased the twist on the legs after I had integrated the tail and spine.


This slideshow requires JavaScript.

3-6


To further stabilize the join between the spine/tail and hip /legs I laid in the comb waste from the extra long Shetland. (the same one from the post on demoing at the wool growers co-op and then again for washing fleece – this has been an amazing fleece.  It just keeps on being usefull). The comb wasted worked very well for all the core wool and actually made a very nice outer layer to the body.

77

To wrap the legs I attached one end of the fiber to the body core then wound the fiber keeping it flat against the wire down to the foot loop. I secured the fiber by working through the foot loop end then needled carefully up along the wired legs. I did the same for the tail then started to add a short neck and back of the head.

810910 8-10

Next was adding the head and ears. Then back to shape and firm up the general mouse shape.

11-1.jpg121311-13


Mouse 2; I augmented the wire for legs and added wire for the ears. Yes much better. Still a bit thin on the butt.  Needs more sculpting.  Actually mouse one is a bit tall and lightly butted too. Hmm, better fix that later.


Ok on to starting mouse three, same armature layout as mouse 2 but better buttage.


Glenn noticed my start of a mouse army of invasion and wondered if I could make one an angel mouse for his mom for Christmas? That sounds like a good idea.  She has a very extensive Christmas angel collection!


To make an angel mouse I will need wings.  Since I would like this to be a mouse dressing up as an angel I need detachable wings and I should really have a halo too. Hmm, wings come in lots of shapes, bats, birds, butterflies. I think the bats would not be as accepted as angelic so that’s leaving birds or butterflies or some sort of hybrid.


I looked for wing pictures on the internet. I feel inspired.  Lets make an armature in white wire.


1415-1.jpg 14-15

First cover the armature structure with some of the combed long white Shetland. Starting from the bass and using the end loops to make sure the wire stays covered.

16-1.jpg 16

I added curls from a baggie (labeled wool curls – very helpful) and then  a bit of angora with a gentle crimp to give a bit more lustre. I worked mainly from the visible side of the wings but also added a few wool curls carefully to the underside to make sure the support structure was not visible.

Note I have left the very bottom centre part not covered by felt. This is to allow the belt to be added and the wings tied to the mouse. I added the wire for the halo.

17 17

Glenn had originally suggested a gown for the angel. I have a love of lace and have as good collection of different types including a damaged circle of tatted lace just about the right size for a mouse


18-19

Interesting but not quite what I was wanting. Maybe she needs a pearl necklace?

20 20


Closer but still not quite what I was envisioning. Maybe drop the robe and add some flowers?

This slideshow requires JavaScript.

21-24

Yes much better. Now how to present her? She will not fit in a shadow box frame. Doesn’t Ikea still have a bell jar? Let me think about that for a bit. There is still time before she has to be delivered to Glenn’s Mom.


A few days pass


It snows

25 25

Most of it melts.


Its time to go visit! We picked the weekend before Xmas, packed up presents to give and presents I was working on and off we went. On Saturday afternoon we declared early Christmas and gave Glenn’s Mom her present. (Glenn’s Dad’s present was saved for Xmas proper.)


This slideshow requires JavaScript.

26-34


I am sure mouse will be very happy with the rest of the angel collection. These are a few from the living room.  There are more in the dining room too.


35363735-37

So my Christmas mouse angel has a new home and seems to have found a spot on the coffee table. Glenn’s Mom will have her great granddaughter over on Christmas day.  I wonder if she will like the little mouse too?


Werewolf Boy

Werewolf Boy

1Ghost Girl looks lonely 1

Werewolf Boy:

Last post I showed you the OVWSG sale and exp. between photos I was demoing needle felting.  I brought the ghost girl and had already decided she looked very lonely even with her ghosts on strings. After a bit of consideration I decided on giving her a friend, Werewolf boy.

23Workshop sign up table and the beginnings of a friend  2-3

As you saw before, I made the armature from the same Dollarstore floral wire (no gauge noted on packaging). Learning from experience I doubled up the wire for the legs and arms but the head loop is single. The tail is actually one-piece cut in half and then folded which gave four offset twisted pieces. I made the farther end two strands and the nearer end four strand. I had left a tuft to start the tail and anchor the wire as I was building the body shape.

For this one I wanted to have the appearance of mitts, boots, a hood and muzzle mask, jacket, tail and maybe another basket. Like the ghost girl I wanted the hood to be removable. I still do not have a base. I had wanted to take another wander down the street to the used-to-be-there forest, the crows do not look pleased, but there has been a lot of mud created by the heavy equipment moving tree pieces around into piles. I may be able to get to the scrap pile now that the ground will be starting to freeze. If not I may try to find a piece of firewood and split it. In the meantime, they can enjoy the softness of my working foam (garden kneeling pad from Dollarama $2.50 Canadian.  They should be back in the stores by February).

I made the frame and then decided the shoulders were a bit too wide so adjusted them and started with the boots followed by chest, arms, neck/head and then legs. I am not sure why that felt like the right order. I used wast wool from combing again for the body and primarily locks or teased locks for the costume pieces. The wool is from a dark section of the giant Shetland fleece from earlier this summer.

For the hood and mask I started with the mask, getting the upper jaw then adding the lower jaw. Adding a strap and then worked on the hood. I joined the jaw with the strap and the hood then added the ears. I found the ruff a bit thin and wanted to add as few more curls to augment it. The seam ripper was sitting close by so instead of trimming the locks with the scissors I tried the seam ripper.  Although my seam ripper is sharp it produced a less straight cut then the scissors would have. It also has the advantage of being able to get into spots my larger scissors could not reach.  It may be a useful tool to add to my felting tool box.

Another odd tool was the foam hair rollers which I had picked up in three sizes, again at Dollarama. (No I don’t work there or own stocks in the company but maybe I should look into that?) It made working on the curve of the assembled hood and small basket quite easy.

456

Felting Tools (What you put them in your hair? how odd.) 4-6

78

Werewolf Boy needs a basket for trick-or-treating 7-8

I again got distracted as I was working so there are few pictures (that makes up for the last post!) to make up for such a horrible pho-paw, I had werewolf boy participate in a couple photo shoots so you can see him.

This slideshow requires JavaScript.

Werewolf Boy dose Photos Shoot 9-13

1415Ghost Girl meats Werewolf Boy and its time to Trick-or-Treat 14-15

These small figures were fun to create and then dress in their costumes. Now I have to find them a better base but that may be best left for a later day.

A Felting Adventure

A Felting Adventure

This is a guest post by Lindsay Wilkinson. You can find her here: Lindsay Wilkinson Artwork (Facebook and Instagram). I am also excited to say that Lindsay will be joining us as a regular contributor and I am looking forward to seeing more of her work.


Last week I set off on a felting adventure I’d been looking forward to for a long time. I was travelling from the UK to the Netherlands to do a 2-day wet felted seed pods workshop with Gladys Paulus, an internationally acclaimed felt artist whose work I’ve long admired.

I’m one of those people who cannot go on a walk without coming back with pockets stuffed full of found natural objects like shells, pebbles and seed pods and they have often inspired my felt work so here was the opportunity to learn from an expert.

The first challenge began before I even left home: how to fit everything on that long list of course materials into a suitcase that I could take on a plane? The answer? – ditch most of the clothes.

The venue (Atelier Fiberfusing) was a large warehouse-type building in a beautiful setting which had acres of working space – it was a real luxury for me to work on an enormous bench as my studio work area is pretty small.


After brief introductions (my nine fellow participants were all experienced felters from 5 European countries, the USA and Australia) we quickly set about making our first experimental piece using pre-felt we’d pre-made then stitching and felting to create very textured pieces.


Mine looked decidedly like a brain and I love it!

Our second experimental piece investigated differential shrinkage – using the fact that thick felt shrinks less than thin felt – to create shaped structures. I’ve exploited these properties before, for example in making 3D shells, but was still amazed at how much shaping we achieved in our pieces.

Finally we set about our main piece. I decided to work from this small eucalyptus seed pod I’d picked up somewhere on my travels.


We worked on these for the rest of day one and the whole of day two. There was plenty of expert one-to-one advice and support throughout the process and we also got to share in others’ learning as we were encouraged to gather around each other’s benches at key moments.

Here’s my eucalyptus-inspired seed pod. It’s not perfect but I am really pleased with it and learned so much through the process of design, making and experimentation. I particularly like the very textured surface (created by adding silky mohair locks and a small amount of kid mohair) and was thrilled to learn how to create the shaping of the body and how to attach a stem.

We finished by putting all our work together and everyone seemed impressed with how much work and variety we’d produced in 2 days. (Most of these are in the top picture)

Take-home lessons? Lots! I was particularly struck by how different our pieces were even when starting with the same template. There are so many ways you can work with and manipulate the felt and I realize a resist is more of a starting point than a defining feature. I also really enjoyed learning from others, particularly Gladys but also the other participants. Apart from a one-day beginners felting workshop about 8 years ago, I’m a self-taught felt maker but will certainly look out for other group learning opportunities.

I’m now buzzing with new ideas and can’t wait to start using some of the new skills and techniques.

Here’s a bonus photo of the scenery near Atelier Fiberfusing on Sunday morning.