In my last post, Work in Progress, I wrote about the A4 challenge I was working on with my local group at Waltham. I was well underway with my planning but, as often happens once I start on a piece, part of my plan changed. I decided not to use the felted backgrounds I’d originally made and instead I created the forest floor using painted and heat distressed Lutradur hand stitched to a cotton background. I used 70gsm Lutradur from Spunart and painted it with tones of green, yellow and grey Inktense. By applying the heat tool you can make wonderful lace effects which are very effective when they are layered.
Once all the elements were ready to be assembled, i.e. the pebbles, greenery and leaves, I positioned the roots in order to decide where everything else would fit. The easiest option for assembling would have been to use glue but, as Waltham is predominantly a “stitch” group, I went with the more time consuming method and hand stitched it all in place. The final stage was to attach it to a canvas to make it more robust for transporting and hanging.
Roots
I’m really pleased with the finished piece, which I’ve called Roots, and looking forward to showing it at The Big Textile Show at the end of this month.
I was hoping to show you Jacky and Caroles finished A4’s but unfortunately life’s got in the way for both of them! Neither ladies have managed to do anymore to their work as yet so instead here are some images from a recent workshop I attended with Textile Artist Jan Dowson.
Jan’s Workshop Sample
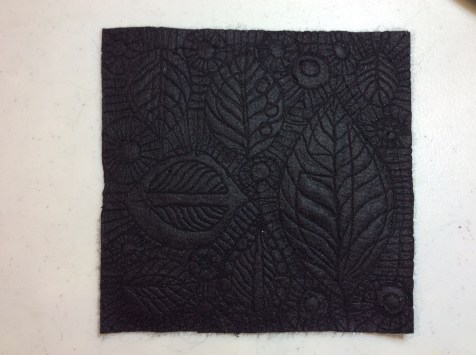
Jan was teaching a technique made popular by Susan Lenz. Susan layers polyester velvet onto polyester felt, free motion stitches with 100% cotton thread and then hits it with the heat gun……what’s not to like!! This was right up my street but rather than using square shapes as Susan does I used a leaf theme for my overall design. I’m now waiting for my order of polyester felt to arrive so I can make a larger piece…..
Adding free motion stitch to my leaf design.The stitching is easier to see from the backReady for turning up the heat!The finished piece.
This may seem like a rather philosophical title for a textile blog but please bear with me, I wanted to share a new direction and body of work with you.
These thoughts and ideas have been slowly percolating through the recesses of my mind for about 20 years, since a fairly heated debate with a psychology teacher on whether humans are the only animals who possess cognitive abilities (perception, attention, memory, motor skills, language/communication and visual/spatial processing). She quite vehemently argued that only humans possess all of these skills, I was a veterinary nurse at the time and forcefully argued the opposite, taking it further and arguing that animals also feel emotions too.
This debate was recalled during a trip to India in January 2018 and a visit to a Jain temple. The Jains have an intriguing philosophy and what struck me most about the monks was the extreme lengths they go to in order to preserve and protect all life, they believe every animal is sentient and as such, must not be harmed by their actions (either directly or indirectly). Their vows of non-violence make them the ultimate pacifists, a stance which I thoroughly admire but have to admit, have no hope of ever attaining. They are strict vegetarians and do not eat after sunset for fear of accidentally eating an insect on their food, and the monks pluck out all their head hair rather than shaving it so as not to harm any lice that might be residing there.
While sentience is essentially another word for consciousness and it is relatively easy to argue that most animals, even the smallest, are “conscious” on at least some level, even if it is just awareness of food sources and potential mates. The idea that all creatures are sentient rekindled my thoughts about the cognitive processes and expression of emotions in animals.
Paramecia – are they conscious?
I knew I wanted to explore this idea from a creative perspective but was unsure where to start. Researching colour theory revealed a wealth of information about our emotional responses to different colours and this led me to play a game of “abstract word-association”; starting with a one or two words that described an emotion I worked on small squares of water colour paper, trying to express that emotion with just colour and mark making, these are some of the results:
These little sketches were surprisingly cathartic to make, if you or someone you know is going through a challenging time and finding it difficult to talk about how they are feeling, asking them to illustrate, in an abstract way, a series of emotions (both positive and negative) from a list of words may be helpful.
Taking Gladys Paulus’ mask workshop earlier this year has given this topic, and my approach to it, a whole new lease of life, no longer confined to 2D work I have been having a ball making various animal sculptures, each expressing their own emotion. As each new personality takes shape on my work bench I am finding myself creating whole backstories for them.
I am thrilled to introduce you to 2 new, very special friends:
“Laughing Lionel”
While the king of the beasts has a fearsome reputation, Lionel is really a very gentle, affable soul who likes nothing more than a good chortle at the ridiculous things humans do.
“Indignant Margo”
She isn’t quite finished, but will be a wall-mounted sculpture like Lionel when she is.
Margo is an old soul in a young body, she takes offence at almost everything and wears a permanent look of indignation on her face. She believes her purple spots are a sign that she is descended from aristocracy and therefore everyone is beneath her; if anyone is going to look down their nose at you, it should be the tallest of the beasts!
These two sculptures (and hopefully one or two more if can finish them in time) will be on display at the Art Box exhibition, at Denbies Wine Estate, Dorking RH5 6AA, UK, between September 23rd and 29th. If you are in the area please pop in and say hello, it is a beautiful place to visit and entry to the exhibition (with artworks in a range of media from 8 independent artists) is free.
Which animal and emotion would you like to see paired together?
Do you think I am anthropomorphising (applying human characteristics) the animal kingdom, or do you agree, animals do feel and express emotions, and perhaps some humans are too ignorant to understand when the animals around us try to communicate these emotions?
I completed my course of Level 3 Studies in Art & Design at the Gail Harker Center for Creative Arts in March. Our class had an exhibit and I wanted to show you a portion of the exhibit. These photos included my work as well as work of my classmates with their permission. Hopefully, all of the photos are in the right orientation, sorry to my classmates if I made any errors.
Here we are after receiving our diplomas. From left to right, Ellen, Ruth, JP, Tesi and Gail.
Here is the new center in downtown La Conner, Washington. Our class had the first exhibit in this space.
This slideshow requires JavaScript.
Here is the set up of the entire space. We were just finishing up hanging all the artwork and getting everything cleaned up.
These are shots of one of the walls in the back where we had a variety of work hung and includes work from Ellen, Tesi and myself. It was a really interesting process in figuring out what worked together and how to hang pieces as a group.
The flower arrangements were done by Carla, Ellen’s sister. You can see in the first set of photos the arrangements that were scattered throughout the room.
And if you’d like, you can watch this video of my work as it hung in the show. There is no commentary and shows most of the same artwork that you have already seen in the slideshow. But it does give an all around view of the carved books. The last part of the video shows that back wall where there is a mix of work by Ellen, Tesi and me.
I hope you enjoyed a look into our exhibit. It was two and half years of hard work but I thoroughly enjoyed the class. I have no connection to Gail Harker other than having taken her classes but I would highly recommend any of her courses. They are well worth the investment and I have seen my artwork improve immensely since taking her courses. So if you’re anywhere close to Washington state in the US, check out her link at the top of this post for classes beginning soon.
I’m continuing on with some experimentation on how three-dimensional shape in felt is influenced by different factors. This time, I am using a resist with a layer of prefelt which is cut in a certain manner and then added to a thin layer of laid wool over the same resist. The differential shrinkage of the two layers creates the shape. I learned of this technique from several discussions on the forum that we had about creating sea shell shapes. One of our members suggested that we look at this blog: www.parallelfunk.de/ She has a series of photos of the steps that I will go through below. Scroll down on her blog to find the relevant blog posts.
I decided to try a seed pod type of shape instead of a shell. The first step is to make a fairly thick prefelt. I decided to use a green batt that I had made some time ago.
The batt was actually really thick so I pulled it apart into two layers. I ended up using only one layer so I have enough to try a different shape. I used a small circle of floor under layment for the resist.
I covered the resist with pulled apart batt in a radial fashion. I wanted the embellishments to run the correct way on the finished pod. You will see how this works when I cut the prefelt off the resist. I wet down the wool, flipped it over to the other side and folded the ends in. Then I covered the other side with wool in the same way. I used two layers of wool on both sides of the resist.
Here is the covered resist ready to felt. I felted in my usual fashion by rubbing with soapy hands. I generally don’t cover the felt with anything except when I wet down I use a sheer nylon curtain just to hold everything in place. We do get quite a few questions of how to avoid a ridge at the edge of the resist. I avoid this by not rolling. I also carefully rub the felt so it pulls the felt inward against the edge of the resist and doesn’t felt against itself. Wool has a tendency to spread out when wet down. This causes the edges not to be pulled tight against the resist. I counteract that with rubbing in towards the center of the circle and making sure that the ridge never forms at all.
Here’s the prefelt after I finished rubbing. It is just barely starting to shrink on the resist and it is holding together well. Now it’s time to cut it open. Depending on what shape you want to create is how you decide how to cut the prefelt.
I cut the circle in half on both sides of the resist. You can see that the silk embellishments will be following the shape of the “pie pieces” when I get them all cut.
I then cut one side into six “pie pieces”. I just eyeballed it since I wanted to end up with an organic form, I wasn’t worried about exact symmetry. Then I flipped the prefelt over and pulled out the edges of the flaps so I could see where to cut on the back side. The photo on the right shows the pieces completely cut with a few flapped open.
The inside of the prefelt needed to be roughed up so that there were lots of loose fibers. So I used a felt brush that I had to roughen it up. I did also try using a fingernail brush which worked just as well.
I then covered the same resist that I used for the green prefelt with black wool. I used only one layer and it was pretty thing. Just thick enough so I wouldn’t end up with holes.
The next step was to reapply the prefelt over top of the resist that was covered with the thin layer of black wool. Then to wet down and begin gently felting.
I used cold, soapy water and worked slowly and gently. I rubbed a lot along the edges of the prefelt and along the edge of the resist where the black wool needed to attach to the green edge. I gently placed my hands over the entire piece and made a rocking motion back and forth with increasing pressure downwards on to the ridged rubber mat. I continued to alternate rubbing and gentle downward rocking. I gradually increased the pressure and rubbing friction until the entire piece was holding together and the green prefelt was adhering to the black wool.
The piece was beginning to shrink and you can see that there was an almost floral shape emerging instead of just a circle.
I picked which side I wanted to be the open top end of the pod and cut a very small hole in the black felt. I removed the resist and began fulling and shaping. I have a problem taking photos during fulling as I am using both hands and get absorbed in the process. I did most of the fulling by pulling the pod from open end to closed bottom end and then rolling it over the ridged mat. I added hot water and rolled it in between my hands as well. I did a bit of holding my finger inside and rubbing the green felt lengthwise but not much. The shape actually nearly created itself. Hopefully, when I try the next one, I will get more fulling photos.
The pod can actually be at least two different shapes. This is more rounded and looks more like a bell pepper or perhaps a sea urchin.
I actually like it stretched out more like a seed pod as shown in the photos above. So I dried it in this shape. I fulled the felt hard and it holds its form easily. The reason this works so well is that the thicker prefelt doesn’t shrink in the same way as the thin layer of black wool. Therefore you get the curved pieces of the green creating the organic pod shape.
I am going to try another one cutting the outside prefelt into a different shape and I will show you that soon.
I have already shown two felt shapes I created with fiber layout and differential shrinkage. The last one is what I’m calling a “bonnet” shape.
I started again with the same circle template and Blue Face Leicester wool. The center is laid out radially but a smaller circumference was used. Then a circle of wool was added at the ends of the radial wool. Then another layer of radial wool was laid out. I used two layers of wool laid out in this manner. This one reminds me of making a ruffled scarf except it’s a circle.
Here is the wool after it is wet down. This one was felted in the same manner as the “bowl” that I showed you last week. I forgot to take the photos of the felting and fulling process. But I always worked along the length of the fibers to shrink the felt in the direction that the fiber was laid out.
Here is the “bonnet” after it’s finished. The photo on the right shows how I used a rubber band to hold the edge in place while it was drying.
And here are all three pieces. These are made with the same type and amount of wool, felted and fulled in the same way but because of the directional fiber layout and differential shrinkage, different shapes were achieved. I can see how these techniques would be very effective when you are creating felt where you want shrinkage to occur differently and you don’t want even shrinkage.
I’m not sure why I never really thought about this before but it makes perfect sense. I hope it helps some of you when you are trying to create a specific shape with felt.
Last week I showed you how I made a cone shape from a flat circle of felt. I also made a shape that is similar to a bowl without using a resist. The shape is created from the fiber layout and directional shrinkage.
I started with a circle template so that my layout would be the same size as the cone shape I made last week. The center of the fiber layout was done radially. So the fiber was pointing from the center outward. Then on the outside of the radially laid fiber, I laid a ring of fiber. I again did two layers of fiber both done in the same way. The fiber is Blue Face Leicester.
I wet down the wool with cold, soapy water and then began rubbing. I rubbed in the direction of the wool fiber. So the center was like rubbing along the hours of the clock. The photo in the middle shows rubbing at one o’clock. I worked my way around the circle rubbing in this manner. Then I rubbed around the outside edge rubbing along the circumference of the circle. This one did not form the shape as easily as the cone did.
I found a glass vase that was the right size sphere to work on. I was careful with my rubbing since the vase was glass. You can see in the photo on the left that the edges are pleated to conform around the vase. I had to rub and rub and rub to get those pleats to flatten out and to shrink the outside edge. In the right photo, the direction of my left hand is the direction in which I rubbed. I also put the felt wrapped vase on the side and rubbed against the ridged rubber mat. Once the felt was shrinking, I added hot water and continued in the same manner. Next time, I would make the outside ring of fiber a bit wider. I think that would have helped in getting the correct shape.
And here’s the finished bowl. I dried it on the glass vase to keep the shape. It is fulled very hard and holds its shape easily.
Next week I will show you the “bonnet” shape I created. Do you use fiber layout to create a specific shrinkage/shape? I would love to hear what you have done. Join us on our free forum and post about it.
Several years ago, I saw a chart on a felt makers blog about using directional fiber layout to create a shape from flat felt. I can’t remember where I saw the information so thanks to the person who got me started investigating this idea.
When you first learn to felt, you are instructed to layout out your fiber in opposite directions to get even shrinkage. Shrinkage of wool occurs most in the direction of the fiber length. I think that we have a tendency to keep laying out this way because we want things to be even. But what if you took the principles of wool shrinkage and used that to your advantage when creating a more three-dimensional piece? I have used fiber layout to create dimension from flat felt.
I used Blue Face Leicester and used a round template to lay the wool out over. I laid out the fiber in a spiral direction.
I started with a small spiral and kept laying out the wool in a clockwise direction. I did two layers of wool and even though I don’t think it made any difference, I laid the second spiral counterclockwise.
I wet out the wool with soapy, cold water and then rubbed gently in the direction of the fiber. I kept rubbing on both sides of the circle moving always in a circular direction. You can see in the right photo that the felt is starting to rise up in the center of the circle.
You can see the cone really starting to form now. I hadn’t starting fulling at this point, I had just been rubbing with my hands. I do use a ridged rubber mat at all times under my felt projects. I never roll felt anymore. I just rub and felt by hand. I have not used any hot water at this point either.
I then started fulling by adding hot water to the felt and then rolling it against itself as you see in the left photo. I also used a wooden top of a meat tenderizer tool. I just used it to rub the felt over itself on the ridged rubber mat. All of the felting and fulling was always in the direction that the fiber was laid out to emphasize shrinkage in that direction. The photo on the right shows the finished cone shape.
This is the same cone that I have shaped differently. The photo on the left shows the cone with vertical folds which gives it a flower shape. The photo on the right shows the cone with concentric ring shapes folded in a concertina manner. This reminded me of a small hat but I didn’t use a resist to create the three-dimensional shape. All I used was the direction of wool layout and shaping through specific shrinkage along the length of the wool fiber.
Next time, I will show a different fiber layout that creates more of a rounded bowl shape.
A year ago a friend who also owns a small fibre business asked me to dye her some Autumn-inspired rainbow yarn for her to knit with for her own client. I was happy to oblige, and very pleased with the end results. This is the picture of the leg warmers she made. Her name is The Crimson Rabbit on Ravelry and here is her profile.
Now, repeating a colourway when you have no written data on how you accomplished it the first time can be a bit tricky, but not impossible. If you’re used to the same dyes you sort of develop an eye to recognise them, and this is more or less what happened in this instance.
You can see the yarn starts out a very light yellow and progresses to a slightly more orange-toned one. I mixed some dyes up, eyeballing the colours and dipping a corner of kitchen roll tissue in the liquid to determine when I was happy with the mixture. I did the same for each colour. I was lucky I recognised the yellow-brown dye at the end or I’d be in a lot of trouble to reproduce that particular one.
This is what the skeins look after they’d been steam-set and dry. I think it looks quite similar from the original one, don’t you? Winding these two skeins back to functioning yarn took me (I kid you not) around two hours. I had divided and tied up each section previously by weight, and boy it’s a lot more work to put it all back together…
Now, since I know my post is a little late (sorry about that) and a bit on the thin side, allow me to share a couple of images of the park near me when the cold arrived. Our friends over in North America will no doubt think this type of cold is cute, but I sure felt it in my bones…
Finally, another exciting commission: a raven! I was asked to make this and it had to specifically be a raven, not a crow. Not sure exactly how to tell the difference between the two, I did some internet research and, a few documentaries and image searches later, I think I’m a bona fide corvid geek now…
What exciting stuff have you been up to in the fibre world? Share away, I’d love to hear it.
It is almost a year to the day that I gave up my day job of setting up clinical trials of new drugs for hospital patients to pursue my dream of making felt full-time.
A post on FB this week, prompted me to reflect on why I made that choice. One year in to my new adventure and the start of a new year, this seems like a good place to pause and take stock.
The post on FB asked us to choose the 3 main reasons why we chose to use our creative talents to go self-employed because lets face it, most of us don’t do it for the financial rewards, if economic security is top of your agenda, going self-employed in the creative arts is likely to be low on your list of employment choices.
This is the list of values to choose from but you are welcome to add your own, they came from Shannah Kennedy’s book: Simplify, Structure, Succeed.
Which 3 did you choose?
Mine were:
Freedom and Health: being self-employed means I can go for a 2 hour run or a long walk in the middle of the day if I want to, being able to down tools and go outside when the sun is shining has made me far more physically active and the psychological benefits of spending more time outside, in our beautiful British countryside, means I am far less stressed. This also relates to biophilia (see below) which is also supported by working with wool.
I also love that I don’t have to get up a silly o’clock in the morning to sit in traffic jams with thousands of other equally miserable people trying to get to the office before 9 am. There’s a lot to be said for home-working!
Order/stability : I found working in the corporate world could be incredibly stressful, every 2-3 years we would have a new VP, none of them could ever accept that the systems installed by their predecessor worked just fine and so felt they needed to restructure the entire company in an effort to leave their mark, like dogs peeing on a lamppost. We were constantly working in a state of flux, trying to navigate new processes but never being allowed to do the same thing long enough to get good at it before a new VP would come along and change everything again!
I wouldn’t describe my life as particularly ordered; Einstein summed it up well, “If a messy desk reflects a messy mind, of what does and empty desk reflect?”. I am messy and proud! 🙂 But compared to the corporate world my current work-life does feel a lot more stable, my processes only change when I need them to, not because someone else is peeing on my lamppost!
Of course, one downside to being a self-employed maker is that many of us feel we have to take the work when it comes, this can lead to working 18 hour days but that is my decision to work long hours (not due to some arbitrary deadline set by a faceless manager) and if I don’t want to work that many hours, I can always refuse a commission or only accept it with an extended delivery deadline. There’s nothing to say you have to take on every piece of work that is offered to you, in fact I think there are some things you should always say no to, but that is a whole other post!
Biophilia: Not on the list I know, but I think it is very relevant for most of us. Those of you who make felt on a regular basis will understand the deep connection with nature and the past that it brings, taking natural fibres and thousands-year-old techniques to create beautiful works guided only by your imagination and what the materials want to do.
I recently discovered this connection with nature and the desire to surround ourselves with natural materials has a name; biophilia. It seems to be something of a trend in textile studies at the moment but of course felt-makers have been familiar with the concept (if not the name) for centuries 🙂
Felting Friendships
One of the respondents on the FB page also talked about how isolating it can be to be a creative working from home, she described how she has changed from an assertive, confident woman to feeling like a timid mouse. I felt so sad reading that but I can easily relate to where she is coming from. Working on your own, 7 days a week can be tough, even for introverts who are comfortable with their own company, I can only imagine it must be an impossible challenge for extroverts.
For me, while designing and making are where I find the most fulfilment in my work, I realise that attending fairs and teaching are what keeps me sane. I need that social interaction, while Pickle (my cat) is very chatty, his conversation is hardly what anyone would think of as intelligent.
If you mostly work alone, how do you find it? Do you have strategies for coping with the isolation?
I think we are social animals (even the introverts!), we need to connect with other humans and for me, I am finding I need to collaborate and share with others, Open Studio events and craft fairs are a great way to connect but are quite sporadic so I was chuffed to bits to spend a day with Janine and Nancy making winged vessels in Janine’s studio (she has a studio to die for!). I am already looking forward to our next play-date and hope this will become a regular event in our diaries. I have long admired Ruth’s creative textile gatherings and hope we can develop something similar.
These are the pieces we made:
Janine – green vase, Teri – cloche hat with rosette, Nancy – large winged pod
I only made a small one as I didn’t have a lot of time. I made the resist about 4 inches across.
I wanted to make a 3 layer pot. The first layer is red and not wanting to just do a regular pot I added two silk cocoons.
After both sides were covered in red wool I wrapped it in plastic wrap.
After that I wrapped it in black wool more plastic wrap and then white wool. I have no pictures of those as my battery died in the phone. I rubbed it a while and then popped it in my heatless dryer to tumble and went off to work. That was a few days ago and I finally got back to it a bit this morning. I cut open the first layer.
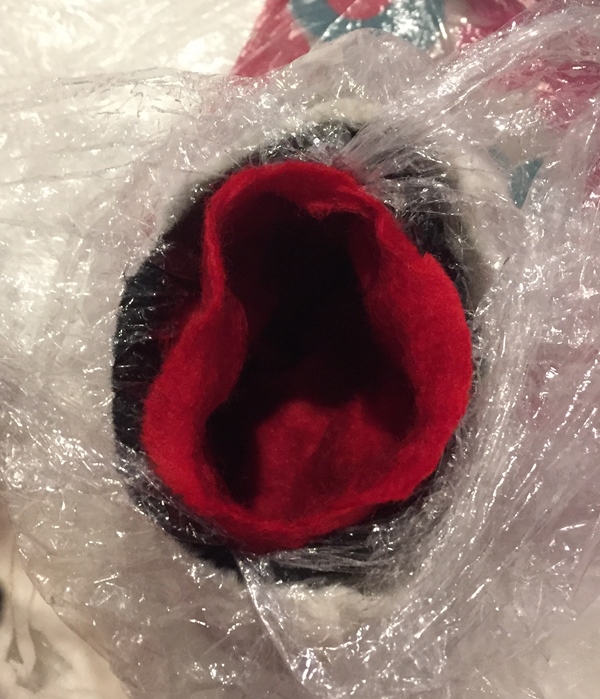
and then the black and red
I left he plastic wrap on the inner layers and blew up a balloon in side it. I wrapped it up in plastic like a Christmas pudding. and popped it back in to the dryer for more tumbling.
Now I have you all exited, I have to say it’s not done. My studio was freezing this morning so I went back to the house to stay warm. I do not like working in the cold with cold wet wool. I will have to finish it this week and show you next week. Enjoy the anticipation. LOL It’s supposed to be the best part, isn’t it? Were you inspired to give a pot in a pot a try after last weeks post? How did it go?