Browsed by
Category: 3D

Three Dimensional Encaustic

Three Dimensional Encaustic

At our November art group meeting, Paula kindly showed us how to make three-dimensional encaustic bowls. Although this isn’t technically fiber, these are made with paper pulp to make a paper clay and I thought you all might like to see the process.

This bird is one of Paula’s creations that was in our recent show in September. The bird is made the same way that we made our bowls.

Paula already had our bowls made and ready out of paper clay so that we could do the “fun part”, adding encaustic wax.

Here’s Sally making another set of paper clay with a mixture of plaster and the paper pulp stuff that forms the base of the clay. The clay is worked into a ball and then flattened with a rolling pin to the desired thickness. Then you need something to mold it over to make a bowl shape. Sally and I created a 3D creature to try later. I made the fish and Sally shaped a bird.

Here’s Paula covering a dish with aluminum foil so that a paper clay bowl can be shaped over this surface and left to dry.

But we already had our bowls ready to go thanks to Paula so the next step is to add layers of encaustic wax with a brush. In between layers of wax, a heat gun is used to fuse the wax to the paper clay surface.


Once there are at least two layers of wax, you can start adding texture. This was really amazing to me how this worked. A sharp tool was used to scratch a pattern into the surface of the wax and then using a slightly cooled brush with wax,  the cooler wax was brushed over the surface and it built up over the incised line. Drips from the edges can also be added by allowing hotter wax to run down the inside or outside of the bowl’s surface. Look at those textures, now I know you all love texture. 🙂

Of course, you don’t have to add texture if you want a smoother surface. The next step was to add color with pan pastels and powdered pigments. In between layers of color, the wax needs to be fused again with the heat gun so that it will adhere to the wax. I found this to be the most difficult part as there is a fine line between fusing and melting the wax completely.

These two are Paula’s bowls. I love the depth that she achieves with different layers of color.

This is Sally’s bowl. Aren’t the leaves in the center an interesting accent?

This is Deb’s finished bowl. You really can’t see the depth of color in this photo but it looks like an ancient artifact.

Here’s my finished bowl. Can you guess the inspiration? I don’t have a photo of Louise’s finished bowl because she didn’t finish hers. She wasn’t really happy with the colors but I know that she will end up creating a wonderful bowl. Hopefully, I will get a photo of it later.

Have you tried a different media or craft lately? Do you think it gives you more creative ideas when you try something new? We had great fun learning about 3D encaustic and thank you Paula for all your help!
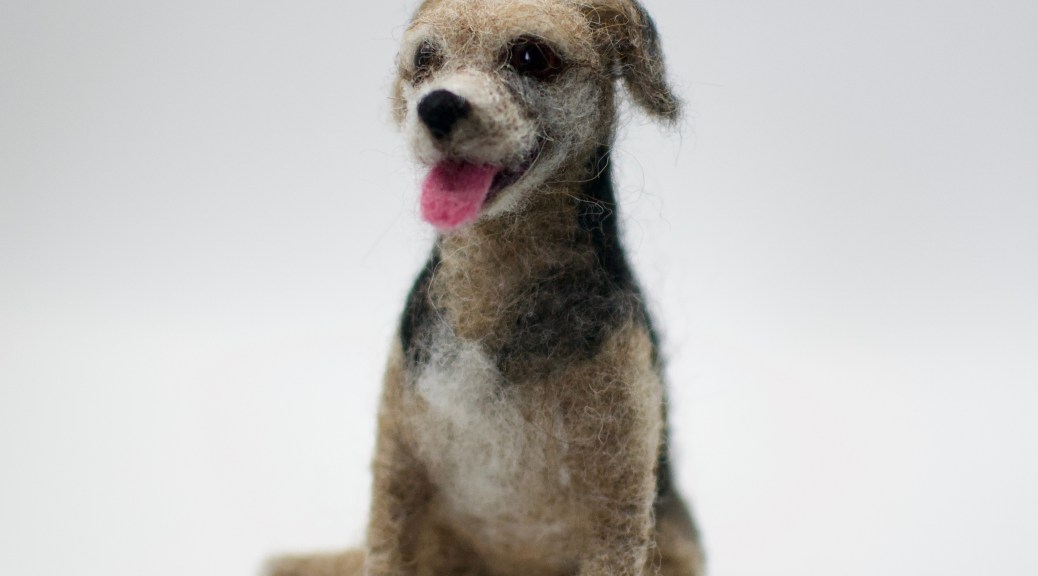
 

Chico the needle felted dog

Chico the needle felted dog

Hello, Leonor here. My guest post for today is going to be a simple “show and tell” as the weather here in London is too warm for complicated thoughts!

Some of you might be aware that I am a fibre artist by trade. Anything wool and I love it. I got into this business a little by accident, and making custom needle felted dogs was even more unexpected – basically, a friend asked me for a mini of his whippet, I took the challenge, and the rest is history!

I’ve now been playing with wool professionally for around 5 years, and I must confess there was one hurdle I was yet to conquer in my work – creating an open mouth. I’d tried once and it didn’t come out right, so I more or less gave up on it. That is, until I made Chico!

DSC_1102

At first I was going to make his tongue out of polymer clay (the idea of finishing it off with a nice layer of glossy varnish to mimic moisture was very attractive to me) but then I decided not to. I liked the idea of a 100% fibre sculpture better.

DSC_1106

I made the lower jaw separately, making sure the upper section was thin enough to accommodate both parts without looking weird. I added a layer of black around the edge to make it more realistic, and then a little white on the back for teeth. The tongue was made using two shades of purplish pink blended together. I made two mini tongues and chose the one that fit best.

DSC_1110

I received a few reference photos to make this little guy, my favourite was one where he was sitting with his leg to the side and smiling. I just had to make him this way.

DSC_1115

I love the detail of paw pads, the feet immediately look real. You can’t really tell from this picture, but Chico is er… anatomically correct. I like a realistic sculpture!

DSC_1114

Below is a picture of the original Chico. The mini version is off to a Spanish island as a surprise for the whole human family. I hope they like it!

unnamed

Have you ever created a needle felted animal? What wool did you use and how did you like your experience? Let me know in the comments section.
Questions? Happy to help, just leave a comment!

Penquin’s 2017 Christmas Card

Penquin’s 2017 Christmas Card

Penquin (Anne Hickley) made me a beautiful Panda card for the holiday exchange.  For some reason I was stuck on the idea of a Poinsettia.  You may have already seen it on the Forum.

I made one for myself last year to hang as a decoration and wanted to do another.  Of course, making a card became more complicated than I had anticipated.  But I enjoyed making it.

I started out making thin red prefelt and cut out 5 or 6 layers of different sizes, putting plastic wrap between each layer leaving a hole in the center so they’d all felt together.  I had some green for the leaves and laid those underneath.  Unfortunately, I didn’t take pictures before I felted them.  But here is the flower after felting with beads for the center.

I stitched each petal and leaf.

Then I felted a white background with some sparkly fabric for a snowy effect.

I did another without the sparkle to be the back.  On the back I used Luminescent paint to write the words.

Now it was time to put it all together.  I used stabilizer on the back of the sparkly piece and sewed the flower on by hand.

Then the fun part was putting them together using the blanket stitch.

I’m happy Penguin enjoyed it and hope everyone is ready for the holidays!

Pandagirl’s Maneki-Neko for 2017 3rd Quarter Challenge Part 1

Pandagirl’s Maneki-Neko for 2017 3rd Quarter Challenge Part 1

I’ve still been in the mood to explore the Edo Period.  I remembered when my oldest son was in high school and brought home a Japanese exchange student who gave us a little kitty statute to bring prosperity to our home.

Of course, when I looked for it I couldn’t find it, but found plenty of pictures on the Internet.  It is technically called Maneki-neko which means “beckoning cat.” Of course,  there are many stories behind the cat.  You can read a few of them here:

https://www.tofugu.com/japan/maneki-neko/

There are also different meanings and results for different colored cats.  I chose black since it helps with good health (or getting rid of evil spirits).  Different writings have different meanings.  I did see one for green for good health, but I just wasn’t ready for a green cat.

Normally the traditional white cat brings wealth and prosperity and is seen in Asian restaurants and shops.  There is also confusion as to whether it is Japanese or Chinese.  It was the Japanese in the Edo period who developed this character.

I knew it was going to be a bit more complex than just making a resist for a pod.  Since I didn’t have a particular size in mind, I just made a resist I felt I could get enough detail on and manage.

I used prefelts for the first layer and merino wisps for the sides.  I also added needle felted noses, cheeks and prefelt and cotton batting for the one arm. Then added three layers of corriedale putting the eyes under the last two and prefelt for the ears.  On the back I also made a small tail using needle felted Jacob wool.  Not much of it is visible on the wet cat.

Then I added some silk with throwsters waste to add a little bling.

Then I fulled it and stuffed it with bubblewrap to give it some shape.  I did forget to open the eyes.

I rewet it and opened the eyes. So, next I will have to add all the details needed to finish.

Stay tuned!

Cat Cave Class Part 2

Cat Cave Class Part 2

Here are the finished caves.

Lynda’s sea monster needed a little needle felting to reinforce the eyestalks so they would stand up properly. Her little dog was not impressed with the cave so It will be Lynda’s companion holding her roving next to her chair.

This is Diane’s beagle pillow. The real beagles seem to be unimpressed. The first picture is half stuffed and the next is all finished.

This is Catherin’s Cave. She let it partially dry before shaping it and stuffing it into the right shape.


And the cat fits but she had other ideas. LOL


And last but not least is Kimberly’s Cave. She wrapped the long spikes around some mini pool noodle like sticks. This was for a friends cat, who loved it.  Kimberly is a good friend. It was a lot of work.


Guest Artist Terri Simon on Dimensional Felt

Guest Artist Terri Simon on Dimensional Felt

Our Guest Artist today is Terri Simon aka Meterrilee on the forum.

Hello fellow fiber enthusiasts!    I’m originally from Detroit, Michigan but moved to Oregon in 2014. I have been felting for about six years, both needle felting and vessels, but my real love is painting with felt and exploring different textures.

Marilyn and I both recently participated in an online class from Opulent Fibers — Kristy Kun’s Texture Techniques with Needled Wool.  Marilyn asked me to  show my work and I am happy to do this.  In addition to telling you a bit about this class, which was excellent, I would like to generate a little discussion about inspiration and the artist equivalent of plagiarism.  First the class…

Kristy’s class centered on three sample projects; each project building on the techniques learned in the prior project.  The class fee included all materials for the class, instructions and videos demonstrating certain techniques.  Kristy set up chatrooms that allowed students to ask questions, post pictures of progress, comment on each other’s creations and get expert guidance, suggestions and commentary from Kristy.  You can check out the classes Kristy offers at her website, Opulent Fibers, here:  http://www.opulentfibers.com

Here is a link to her newest class:

http://www.opulentfibers.com/heavily-textured-felting-techniques-home-online-workshop/#.V9qWJa268e1

Kristy creates the most gorgeous 3D wall hangings (among other beautiful things) and I was so excited to learn how she fabricates them in this online class.  To see some of Kristy’s work, look here (just wonderful!): http://www.kristykun.com/gallery/   Now you understand why I wanted to learn this technique!

Below are the three sample projects I created in this class.  It’s a very interesting technique to attach pieces of heavy weight prefelt fabric to each other.  There is a lot of labor involved to ensure everything is tightly attached and felted to a very hard finish.   But well worth it! Our samples were a 12” square and each one took several hours to prepare before even before using water.  Many students were active in posting pictures of their creations and providing encouragement and feedback to others.  Overall, a very enjoyable and educational experience.

terri-1

Project one: learning to attach the prefelt vertically to a square of prefelt.  It’s a weird looking, but the purpose was to learn the technique.  J

terri-2

Project two: learning to attach prefelt vertically and to each other onto a square prefelt.  This was definitely much trickier.

terri-3

Project three: The flower.  This was the reason I took the class!  If you looked at Kristy’s gallery, you can see all the many possibilities for this technique.

Which leads me to the issue for which I hope to generate some discussion: artistic plagiarism.

I follow a few fiber artists’ blogs and have great admiration for many fiber artists; the moderators of this forum included.  To mention a few others that I greatly admire: Moy Mackay, Nicola Brown, Kim Winters, Lyn and Annie at RosiePink, Fiona Duthie, Sara Renzulli, and Andrea Noesk-Porada.  I love to look at the works by these artists and I’m so inspired by them.  I want to make everything they make!  There is a fine line here, however, and I’m mindful of trying not to cross it.  When I make something that is very similar (with felt, it is never EXACTLY identical), I certainly would give credit to the original artist if I were to do anything with that piece.

I’ve never sold anything yet—I give nearly everything I make away.  But, I hope to sell pieces soon.  Anything I intend to sell is going to be, hopefully, solely my creation, (not ones I’ve attempted to copy to learn a technique or just because I loved the item and wanted to duplicate it).

How do you address this?  I can needle felt a chipmunk or make a felt painting of a highland cow in the manner of Sara Renzulli and Moy Mackay, respectively.  They aren’t going to be identical to something either one of these artists produced, but I was inspired by them in the creation of my item.

Now that I know how to make lovely 3D wall hangings, taught by Kristy Kun, I intend to make larger pieces; similar of course due to material and technique, but they won’t be identical to Kristy’s work.  In fact, I will work hard to make sure they DON’T look like her work…but the idea was hers.

Do you mention the artist who inspired the work, when relevant, on items you sell?  Do you feel that since no piece is identical in size, shape, color, and texture, that items you sell are your creation and there is no need for mentioning the artist who inspired you?  This is a really important issue for me.  I would love to hear your thoughts on this subject.

Thanks!

Thank you Terri for sharing your class work and invoking this discussion.

Pods and Cords

Pods and Cords

I’ve mentioned we’ve been exploring resists at the Well Being centre recently, and one of the group said she’d really like to make a round vessel, so I thought we’d follow rosiepink’s vessel tutorial. It turned out there was only 2 of us there early enough to have a go, so we’re doing it again this week, but this is mine:

OLYMPUS DIGITAL CAMERAAnd the other side:

OLYMPUS DIGITAL CAMERAI’ve been looking for ‘smoothing tools’ for vessels for years, like Lyn’s suggestions of a baby’s rattle or laundry liquid dispenser, I keep checking the baby section, and dog toy section, even the kitchen section for a ladel, but still haven’t found one! I did buy some foam for resists though and I thought I’d try it out and make a new birdpod. I remembered those coconut ones, and tried to do a similar shape. I didn’t get it quite right, but using lots of coarse wools did give it a hairy coconut look, though:

OLYMPUS DIGITAL CAMERAI need to make a cord for it to hang it up. Usually, I make cords from offcuts or make some handspun yarn and felt that, but I had an idea for some garden ornaments and thought I’d give it a go using a bamboo mat. I can’t remember which wool I used, I think it was something from Wollknoll labelled just ‘Scottish grey’. I had a hard time getting photos of all my things, it went too dark yesterday, so this morning I took them into the garden and tried them in a few places, when I put the first cord down on the paving stones it camouflaged itself, even the pattern seems to match!

OLYMPUS DIGITAL CAMERAThat was just the test piece for the idea I wanted to try. The only trouble was, I needed a larger mat than a placemat. I looked at my living room blinds, just hanging there with a huge roll of unused bamboo sat at the bottom. I unrolled it and there must have been two feet of spare blind, so a few snips and a few tied ends later, I had a shorter window blind and a new rolling mat! This cord hasn’t completely dried yet, but I know I need to make the next one a bit thinner, and I think that will help it be firmer too, but it turned out a lot better than I expected:

OLYMPUS DIGITAL CAMERAAs usual, whenever I’m in the garden, I had a visitor, noseying from the background, poor little thing has no feet 🙁

OLYMPUS DIGITAL CAMERA