Browsed by
Author: Shepherdessann

What Happened to the Orange Batt

What Happened to the Orange Batt

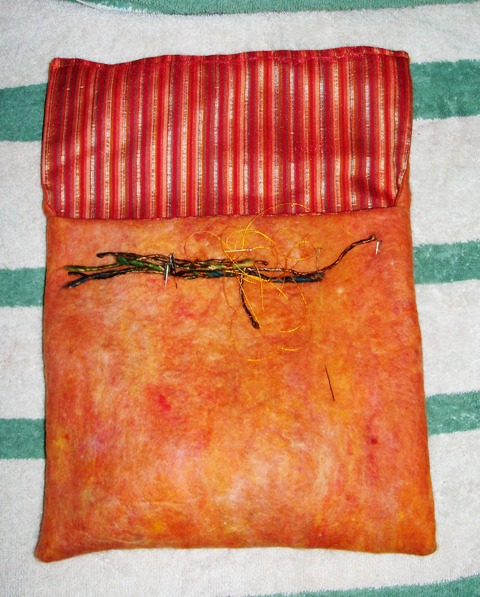
This is just a quick post to show you what I have been up to this week. I am selling at The New Art Festival in Ottawa June 2 and 3 . http://www.newartfestival.ca/ I am trying to get everything I want made, made by then. This week I have been working on I pad bags and  E-reader bags. I am sewing these as a better way to make sure I end up with the right sized every time. I am a slow sewer. I have my machine set to turtle. I decided this was a good thing to make with the art batts I carded up a while ago. http://wp.me/p1WEqk-AX


iPad bags in progress

The bags turned out nice but boring I thought. I am couching down some yarn I have to make them more interesting. The one the right everything is pinned but not sewn yet.I did two sizes one to put the iPad in short side first and the other to go in long side first. When I asked people what they prefered, it was a pretty even split.

All the bags are lined. Here you can see the yarn and thread I am going to decorate this one with.

iPad bags

Two almost finished ones. They have their decorations but I am not sure about how to close them. I was thinking a ribbon or piece or yarn and a button to wrap it around. I am not a fan of velcro. I never seen to have much luck sewing or gluing it on. Anyone else have a good idea?

Felted Cityscape

Felted Cityscape

I was asked about my cityscape in gallery so  I thought I would tell you about it. I made it about 3 years ago so there are no pictures of it going together .  The base is wet felted. There are 2 layers of merino, then a layer of cotton gauze and then 2 more layers of merino. I added the cotton gauze to make sure it wouldn’t sag when the temperature and humidity goes up.  I do live in Canada and although many people think its cold here all the time the summer temperature gos up above 85 frequently and we get high humidity to go with it.  I also wet felted several rectangles in diferant colours for the buildings and the windows. To put it together I used a little feltcraft needle felting machine.

small feltcraft needlfelting machine.

I placed all the buildings on the background and then tacked them in place by hand. Just a few quick jabs to keep them where I wanted them. I then went over all over them thoroughly with the little machine. I only broke a few needles.

I put the windows in with a single  needle first. I was afraid they would disappear if the corners were not well anchored.  Then went over them again with the machine.  The moon and the haze around it where put in the same way.  The stars are pearl beads, hand stitched to the background . Originally I wanted to sell this one so I made a smaller one to keep. I ended up keeping them both. I never did  offer it for sale. The moon in the smaller picture isn’t actually blue. the felt I used to make it was quite thin and the black showing through it makes it look blueish.

wet and machine felted aprox 20×15
wet and machine felted picture aprox 10×10
A Few Felt Samples

A Few Felt Samples

I haven’t been doing much that is interesting to look at lately. Everything is white and is waiting for the dye pot.  I thought I would show you some samples a made a little while ago. The first 2  are purple merino with some silk strips on them. I thought they came out nicely with lots of texture.

Purple wool with strips of silk before felting
Purple samples after felting

The second is orange merino with some silk and curls on it, here I wanted to felt the curls right into the background. I also wanted to see how it would stick if I put it over the silk. I really like the way the little blob of curls all became one with nice texture. The curls going across the silk stuck down very well. Enough wool migrated through the silk to grab the courser wool of the curls.

Orange wool with silk and curls before felting
Orange sample after felting

This last set I wanted the curls to be attached at the base and left loose and hanging for the rest of their length. I use a small piece of scrap floor underlay with a hole in it so the wouldn’t stick down. It worked very well. I am not sure how I ended up with one really long curl.

Small samples with curls with their resists on before felting
Small samples with curls after felting.

I am not sure what I am gong to do with these. I might make some buttons or hair clips. Do you have any ideas?

Felting Class

Felting Class

To start I apologise for the formatting but no matter how many times I fix it, it changes when I save It. I hope you can read it alright.

Last weekend I taught needle felting to a group of ladies at Just Knitting in Carleton Place Ontario. They were learning the basics by making Easter eggs.

Here they are starting with their core wool. That’s me on the left, in the orange.

Beginning to Felt


Here they’ve covered the eggs in a base colour and they are adding decorations.


Adding Colour


Here are four completed eggs


Easter Eggs


One of the ladies wanted to do a matryoshka doll. She didn’t have time to finish during class so she took some wool home.


Matryoshka doll
matryoshka finished


Another decided hers looked more like a chick and added a beak and wings.


Blue Chic


Two weeks ago I did a wet felted bird house class. I forgot to take pictures during class but did get one at the end of the class. The lady on the right has felted before and brought wool from her flock. It was Rideau Arcott wool. It is a down breed. She knew it might not work the way she wanted but wanted to give it a try.  Her bird house didn’t shrink very much and it needs a lot more work to sturdy it up. She ended up putting them through the washer twice and they still haven’t shrunk much or hardened up. It is the nature of this wool. It was an interesting experiment.


Bird House Class
2012 Second Quarter Studio Challenge

2012 Second Quarter Studio Challenge

For the second quarter challenge I thought abstract representation would be a good one. Take a picture, landscape or portrait and do it over as an abstract. There are many kinds of abstract design. Here are 3 pictures to give you some style ideas.

I like to do abstracts. Trying to make something that is life like is just an exercise in frustration for me.  Abstracts give my artistic side a chance to express itself.

If you’d like to join in, please join our Flickr group and post your photos there with a tag of “Abstract challenge”. Or if you have your own blog, post about the challenge and then come back here and leave us a comment with a link so we can go check out your abstract piece or process. We’ll put all the links into one of our Felting Around the Web posts so that everyone can see.

What I am working on.

What I am working on.

A while back I showed you some multi coloured batts I made from all my leftover bits.  I felted 2 of them with the intent of making some tablet and ereader covers. I haven’t made the covers yet but I have felted them. I only have a picture of one.

blue/green batt before felting
Blue green batt felted up.

I also made this nuno piece. I didn’t like the blue wool much and its been hanging around a while. It was wool dyed to exhaust a dye bath. so I put this nice piece of  to colour silk on top and nuno felted it. I think it will make a nice bag.

Before felting
After Felting
Close up of texture.

I will be going to a medieval fair later this summer. one thing they need is a way to hide their modern electronics but stay in costume. one traditional piece that they can ware is a belt pouch. I am working on making them. I sewed them with my machine but to make them look period correct I need to add stitching to cover that up the machine stitches and I want them to be strong and not stretch out of shape if people over fill them.

Group of belt pouches.
This is the back where you can see the slits for your belt and the stitching to hide the modern sewing machine stitches.
Demo at the Farm Show

Demo at the Farm Show

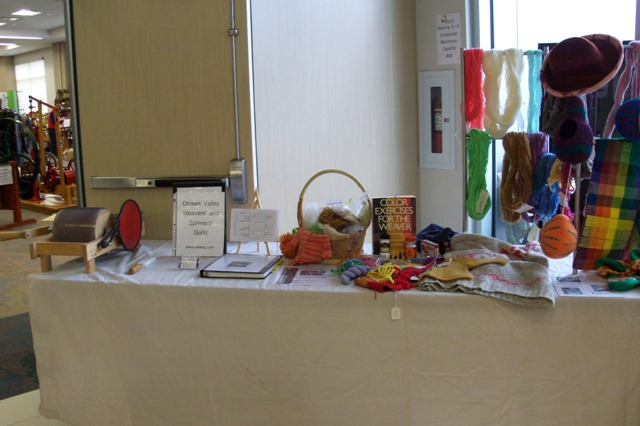
It was time for our spring farm show. It’s a trade show for Farmers. There is machinery , equipment, Information an animals and buildings and and just about anything you can think of that a farmer might be interested in. The best part to me is the antique display because I get to be one. The guild I belong to, the Ottawa Valley Weavers and Spinners Guild helps out with a display and demonstration. On the day I was there, there were two of us. Neither of us are weavers so we did Carding, Spinning, and Felting. They were short of space in the room the antiques were in so we ended  up out in the hall to attract people in.

her are to pictures of our display. you can see some machinery outside.

Farm Show Demo Display

Here is Merilyn spinning on an spinning wheel that is a one of a kind home made, she bought 3rd or 4 hand. My ashford traveler is set beside her. you don’t get  a picture of me because I had the camera.

Marilyn demonstrating spinning.

Across from us doing a different kind of spinning was the rope maker. he was so popular with the kids that he got blisters.  After spinning the rope onto the hooks he has someone turn the handle. This moves the grooved paddle slowly down the 4 ropes and it spins the rope behind.  Our rope was much softer.

Rope Maker
"spinning" the rope

Here is my piece of rope. The last piece he made that day.

Rope

The thing I wanted at the farm show was a sock knitting machine. This is a hand cranked affair. they were fairly common at one time. you can make toes, heals and the ribbing for socks with it.  The lady that was demonstrating this one said she usually does the ribbing by hand because hers doesn’t work very well. I want one of theses because despite enjoying spinning wool I can not knit.

circular sock knitting machine.
Washing Some Wool

Washing Some Wool

This weekend I decided to wash some of the masses of raw wool I have. This is a small piece from one of my sheep she is a mixed breed meat sheep. Here it is before washing.

Raw wool

I put it a large tub with hot water and dish soap.

wool soaking
wool soaking, close

Here is the water after the first soak. The problem with a dark fleece is you can never see how dirty it really is. Here is the water after the first wash.

dirty water

I washed it 3 more times  then gave it a rinse. The water was still to dirty and I washed again. So I had to wash it 5 times.  Then I rinsed it twice, the first rinse had some vinegar in the water.

washed wool

Here it is all dry. I don’t know if I will card it or use chunks of it to make something primitive looking.

More Dryer Felt and Easter Eggs

More Dryer Felt and Easter Eggs

As you know I wasn’t very happy with the dryer felt I did last week but I thought I would try some nunofelt. This went much better. I made this piece called snowy night.

Snowy Night

I used fine merino on a silk chiffon. It was inspired by the snow falling outside my window the other night. I had tried this before without being all that happy. I use plastic top and bottom as recommended but didn’t like it. I went back to using my sheer curtains. I did rub it on the back for about 5 min. There wasn’t a lot of wool on this one. I rolled it up around a damp towel an then wrapped another one around it , tied it up and tossed it in the dryer with no heat for 20 min. when I rook it out is was attached somewhat to the sheer. When I roll by hand this happens too. I carefully peeled it off . I though it was done really well and ready to full. For some reason I though I would roll it up the other way and give it more time in the dryer to be sure. I  opened the dryer to find everything had come undone and was in a pile. When I untangled everything I found the scarf was completely fulled and very close to dry. I need ironing but I havn’t done that yet.

Felt Easter Eggs

I made these Easter eggs the other night. I will be teaching an Easter egg class at Just knitting in Carleton Place, Ontario. If your close why not join in.

Experiment in Dryer Felting

Experiment in Dryer Felting

I have been hearing about felting in your dryer all over the place.  I wouldn’t mind less time rolling my felt so I thought I better give it a try. I wanted to try some of the felt batts I made last week and wanted to try some designs for belt pouches. None of these have been ironed or blocked yet

I used batts for all of these. The orange(supposed to look like leather and does in person) one is merino I dyed and carded into a batt.  The pink is from last weeks carding of left overs. It is mostly merino with a little corriedale in it. The brown striped pouch and flat piece of felt are from last weeks left over carding as well but has a lot of different fibers with different micron counts, some dyed and some natural.

This one came out the best. It felted the most in the dryer.  It didn’t shrink much. It didn’t buckle it’s resist.

This one did the next best. The ropes attached well and it was felted but not as much as I would like.

These two were felted but not much.

For this experiment I decided to treat them all the same. I laid  the wool out around the resists, covered them with netting and rubbed them all the same. I then wrapped them around a damp towel then wrapped that in another towel and tied the bundle. I let it bump around in my dryer with no heat for 20 min then unrolled it, made sure the net wasn’t stuck and rolled them up from the other end.  I let it do another 20 min in the dryer. I took it back to my work table unwrapped them, cut out the resists and then rolled all of them 50 times  in both directions in my reed mat with a pool noodle in the middle. This was  to set the cut edge and felt them a little more.

I then fulled them as I  normally would, rinsed out all the soap and blocked them a little. I would say that over all it worked.  They are not felted enough for my liking and need more work.   The felt was not far enough along when it came out of the dryer. I normally wouldn’t has started fulling them when I did for this experiment but the idea was to eliminate the manual rolling.  I am not to happy with the pink pouch or the brown pieces. I am going to wet them again and roll them in my stick blind. Next week I will let you know how that went.

I think it definitely has potential. There are things that would make it better.  I think if the dryer didn’t have the fins in it that would be better. It would roll it more and thump(drop) it less. I see that some of the modern dryers don’t have fins.  I have plans for a roller that uses a big tube. Right now I am looking for a suitable tube. If I ever find one and get my hubby to make it I will definitely let you know.