Browsed by
Author: rosiepink

Fourth Quarter Challenge 2019 Colourscapes

Fourth Quarter Challenge 2019 Colourscapes

This challenge is inspired by our trip to Mottisfont Abbey where Kaffe Fassett exhibited over 70 glorious items including furniture fabric, clothing and wall hangings.

“I create in palettes of colour because that is my main obsession.” Kaffe Fassett

We were allowed to take photographs of Kaffe’s work at the exhibition – this is one of his wall hangings …

Kaffe Fassett Exhibition at Mottisfont

…and a close up of another.

Kaffe Fassett Exhibition at Mottisfont 1

Please click on the link below, scroll down a little, and you will come to a very short video of Kaffe Fassett talking about and showing some of his work.

https://www.nationaltrust.org.uk/mottisfont/features/kaffe-fassett-exhibition-at-mottisfont

So this quarter’s challenge is to make a “colourscape” using whatever fibre media you enjoy working with.  It can be realistic or abstract and any shape or form.

Go wild with this challenge and be as free as you like!

We often use our photos to inspire us, so we’d like to share some with you.

Chihuly Glass installation at the Bellagio in Las Vegas, US

Chihuly glass installation at the Bellagio in Las Vegas 1

Chihuly glass installation at the Bellagio in Las Vegas 2

Bar top in a hotel in Las Vegas, US

Bar top in a hotel in Vegas

A Peacock in Madrid, Spain

Peacock in Madrid

Jellyfish in a Singapore aquarium

Jellyfish in Singapore aquarium

Gaudi mosaic in Barcelona, Spain

Gaudi mosaic in Barcelona

Meadow in Christchurch, UK

Meadow in Christchurch, Dorset

Leaves on the ground at Kew Gardens, London

Leaves on the ground at Kew Gardens, London

Fishing nets in Crete

Fishing nets in Crete

Glass House in West Dean gardens, Chichester, UK

Glass house at West Dean gardens, Chichester

Trees at Mottisfont Abbey, UK

Trees at Mottisfont Abbey

Lego installation in Singapore botanical gardens

Lego installation in Singapore botanical gardens

And finally some blueberry leaves in our garden in the autumn …

blueberry leaves in the autumn in our garden

… and at this time of year, in some parts of the world, the trees and shrubs will be giving a wonderful display of colour!

We hope that you enjoy this challenge and that it brightens this quarter of the year.

Cityscape

Cityscape

Some cities in the UK have evolved over several centuries so that old and new buildings are often knitted together – this gate is in the city of Salisbury.

Salisbury

Councils invest in sculptures, green spaces, floral displays and bunting to make cities more attractive and some individuals will spend time and money enhancing their own small bit of the city.

Yet all this effort is often spoiled by vandals, litter louts and spray-can yobs who deface walls.

My cityscape is mixed media – I chose not to depict a whole city – just one old city building.

I wet-felted a base from white merino wool, then needle felted the building using black yarns of different thicknesses as shown in the photo below.

needle felting with yarn

The bunting is cut from dupion silk scraps and glued in place, and the graffiti is hand stitched using a thick thread.  The finished piece is approx 33 x 23cm (13″ x 9″)

cityscape

Is anyone else working on a cityscape?

Third Quarter Challenge 2019 – Cityscapes

Third Quarter Challenge 2019 – Cityscapes

This is going to be a real challenge!  We looked for pictures by forum members but cityscapes are as rare as hen’s teeth!

However, we did find this lovely felted picture by Ann (Shepherdess)…

cityscape

…and Marilyn’s ‘Windy City’ cityscape…

20160523_142107

…and here’s a rosiepink cityscape.

Felt and Stitched Sketch of Tower Bridge

Make your cityscape using your favourite felting and fiber technique – or used mixed media – then please show it on The Felting and Fiber Forum

The word ‘cityscape’ brings to mind a view of a large part of a city, but it can be just a small part of a city such as a statue…

statue

or a fountain…

fountain

something comical…

something comical

or floral…

flowers in the city

or impressive architecture.

buildings

If you choose to depict a large part of a city, will it be day or night?

city at night

Will the view be ground level or from up high?

city from high viewpoint

You could choose a city from history or perhaps part of your city has ancient buildings that still stand.

If you live in a city you might now look at it with new eyes as you consider the possibilities.

Have a look through your holiday photos – all the examples above came from our city trips.

Have fun with this challenge!    Remember that the challenge is not limited to making a picture – a cityscape can feature on clothing, accessories and homeware etc.

‘Waiting for the Surf’ – a seascape from inspiration to completion

‘Waiting for the Surf’ – a seascape from inspiration to completion

Waiting for the Surf - small image

Last year we visited St Agnes, in Cornwall, on a day when there was a cloudless blue sky and a sea breeze.  So for my seascape inspiration I chose two photos of St Agnes beach and a photo of Annie’s ‘Flowers on Coverack Beach’.

inspiration photos - small image

I planned to make the sea the main focus with some pink flowers in the foreground.

I have a square white frame, 50x50cm (approx 20″sq) that I wanted to use, so to ensure that my seascape would fit well, I made a paper template to put under the bubble-wrap as a guide for the layout of wool fibres (photo below left).

I made two fine layers of white merino wool fibres then topped them with a third fine layer of pale blue wool fibres to make a base (photo below right).

template and first 3 layers - smalll image

The fourth layer (photo below left) was just bands of solid colour then I added a fifth (partial) layer of wisps of wool fibres (photo below right) to give the impression of waves and some thinly spread yellow wool blend to look like sand with a length of fancy yarn for the water’s edge…

fourth and fifth partial layer - small image

… and the frilly edges of scrap white felt made the surf (the photo below is after felting).

close up sea - small image

I was just getting out some pink fibres to make the flowers when my son saw the work-in-progress.  I told him it wasn’t finished yet and that I was about to add flowers.  He went a bit quiet – he’s not a flower person – then he suggested that I should just stick a surfboard, upright, in the sand.  Why didn’t I think of that?

I made some yellow pre-felt then cut a surfboard shape from it.  I wetted down the sea and sand before placing the pre-felt on it.

the surfboard pre-felt - small image

After felting, when the seascape was dry, I added the stripes to the surfboard. Each stripe is just a large stitch of single ply cotton knitting yarn.

The felt that shows behind the white mount measures 38x38cm (approx 15″sq).

I’m glad that the days are long now because it makes photography easier. The seascape frame is deep so it stood, unaided, on my garden table … and the light was perfect!

seascape in frame - small image

Second Quarter Challenge 2019 – Seascapes

Second Quarter Challenge 2019 – Seascapes

An old music hall song’s opening line is: “Oh, I do like to be beside the seaside”.  And who doesn’t?

So this quarter the challenge is to make a seascape and it doesn’t have to be just ‘sea’. You might include beaches, yachts, lighthouses, seabirds, piers etc.  The Felting Forum embraces all things fibre and mixed media, so do your favourite thing or have a go at something new!

As in the previous challenge, size doesn’t matter and it doesn’t have to be wall art – your seascape could feature on clothing, a vessel or a mug mat.

Here are some seascapes made with various techniques:

Anne (Penguin) made this wet-felted seascape, added a gull using applique, then made a hanger from driftwood.   Anne wrote about how the picture evolved in this forum post

Anne (Penguin) - seascape with gull

Tracey made this mixed media wet-felted seascape then added sea glass boats and shells.  She gave more details in this thread

Tracey's sea glass boats

Julie (Paintergirl) needle-felted ‘The Boathouse’ then added some stitching…

Julie (Paintergirl) TheBoathouse

…she also needle-felted ‘Ailsa Craig’ shown below.  Julie has a photobucket slideshow here

More of Julie’s work can be seen at  Cloud 9 Gallery

Julie (Paintergirl) AilsaCraig

Lindsay wet-felted ‘Big Wave’ – read more here

Lindsay 'Big Wave'

and ‘Winter Sea’ read more here

Lindsay 'Winter Sea'

Annie (rosiepink) made this sea/sky image with dry wool fibres.  Un-felted fibre pictures can be photographed then the images printed to make wall art.  Or the fibres can be trapped under glass then framed.

Annie (rosipink) sea and sky

Annie (rosiepink) made this nuno seascape with wisps of fibres and open-weave fabrics, then soaked it with CMC paste, scrunched it up a bit then let it dry.  It’s stiff enough to hang on a nail in the wall!

Annie (rosiepink) CMC seascape small image

Here’s a part of it in close-up.

Annie (rosiepink) CMC seascape close up small image

We hope you’ve been inspired to have a go at this challenge!  It would be lovely to see some new seascapes on the forum.


Landscape Challenge – Uffington Horse and Some Tiny Abstract Landscapes

Landscape Challenge – Uffington Horse and Some Tiny Abstract Landscapes

Lyn

I took inspiration, for the ‘Landscape Challenge’, from an old photo of my dad stood in front of ‘The Long Man’ of Wilmington in East Sussex.  The figure is carved into the chalk hill and is approx 235 feet high.

I liked the different colours and curves in the landscape, and at certain times of the year the fields in the middle ground would be brighter colours.

OLYMPUS DIGITAL CAMERA

I was also inspired by Ruth to use up stuff that I already had, so out came the scrap box!  I sorted out several pieces of felt of different colours then chopped them into small pieces.

3. chopped bits of fulled felt

I decided to make the landscape first then needle felt the chalk figure on afterwards, so I arranged the coloured pieces – a bit like making a mosaic – on top of four layers of white merino wool.

This technique requires a pair of tweezers and a swear box – moving the little pieces of felt across loose white merino wool fibres is a test of patience and persistence.

4. chopped bits of fulled felt placed onto white merino wool

I felted it all together very carefully so that the pieces didn’t move out of place.  Here is an angled shot after felting showing the texture …

5. angled photo after felting

… and a close up to show the variety of colour made by chopping up bits of felt …

6. close up after felting

… and doesn’t the reverse look pretty?  Quite a strong migration of colour through four layers of white!

7. reverse after felting

I started to tack some white yarn onto the hill to represent the ‘Long Man’ but it didn’t look right – so I needle felted a different chalk figure!

The ‘Uffington White Horse’ in Oxfordshire is the oldest British chalk figure, believed to have been carved in the late bronze or early iron age, approx 3,000 years ago.

The finished size of the coloured area is 42 x 30cm (16.5″ x 12″).

8. Uffington Landscape

Annie

Thought I’d do the same as mum after reading Ruth’s post about using things up so I gathered fabric and felt scraps and laid out a piece of felt with lots of blocks and bits that could loosely potentially become landscapes through a viewfinder later.

piece_to_cut_up - small image

One of the more interesting pieces was created by using up all of the frilly edge pieces cut from various bits of felt over the years.

scrap_edges_landscape - small image

Do you remember inchies, twinchies and thrinchies?  I don’t know if they are still popular in the craft world but I decided this would be a good way to get lots of abstract landscapes from my piece of felt.  I made a 1 inch, 2 inch and 3 inch viewfinder from white cardboard (just a piece of card with a square hole cut out).  I cut four 3 inch pieces…

scrap_thrinchies_mosaic - small image

…then nine 2 inch pieces…

scrap_twinchies.mosaic - small image

…then I was down to the scraps so I thought I’d see what I could get out of them.  With a bit of imagination, and possibly a few stitches or a dab of paint, these sixteen 1 inch pieces make cute tiny abstract landscapes too.

scrap_inchies_mosaic - small image

This was a fun little project – a bit like the equivalent of collage and cutting and sticking in a sketchbook.   I might make some more landscapes with more intention later but this was a great play exercise to generate ideas. Simple is good sometimes!

Happy Creative New Year – Let The Challenges Begin!

Happy Creative New Year – Let The Challenges Begin!

‘The Felting and Fiber Forum’ devise quarterly challenges to encourage us all to have a go at developing our fibre skills – there’s no entry fee, no judging, nor any prize money! But there’s the potential for experimentation and fun and anyone can join in by simply posting a photo of their challenge piece on the forum.

This year the theme for the challenges will be ‘scapes’ and the first quarter challenge is ‘landscapes’.

The size of your landscape doesn’t matter – it can be postcard size or ten feet high or anywhere in between.

It doesn’t have to be wall art – your landscape could feature on a cushion or your comfy slippers or a greetings card.

Your landscape can be realistic or abstract and you can use whatever fibre skills and materials you like.

Here are a few landscapes made in different ways:

Jan used needle felting to make this snowy landscape.  She describes how she made it in this blog post.

8.2 adding a bit moe detailand shadow

Ruth used mixed media – left-over pieces of handmade felt, yarn and hand-stitching – to create this landscape.  To read more about it please see this blog post.

Close Up Tree Stitching with More Yarn Added

Annie used free motion machine stitching on pieces of handmade felt to make a mini-landscape tea-light cover…

tea light cover - small image

…and this tiny, quirky landscape.  It’s just 10cm x 10cm (4″x 4″).  The background was felted using handmade pre-felts and nepps.

In the Land of the Pink Trees small image

Tracey used wool fibres to make the background to her landscape then added details with pre-felts, free motion machine stitching, needle-felting and hand embroidery.  Tracey describes the making of her landscape in this blog post.

HOUSE ON THE HILL - SOLD Tracey

Zed made this landscape using loose wool fibers to create the background then added foreground embellishments of kapok, silk, trilobal nylon, viscose and nepps.  Read about the making of this landscape in more detail in this blog post

OLYMPUS DIGITAL CAMERA

Karen added simple stitching to a piece of her handmade nuno-felt to create this landscape.  Karen writes about her experience with nuno felt in this blog post.

Green/Blue Nuno landscape

We hope these lovely felty pieces have inspired you to have a go at this challenge!  It would be great to see some new landscapes on the forum.


Christmas Tea Cosy

Christmas Tea Cosy

Christmas tea cosy

There are lots of pretty things you can buy for the kitchen to use at Christmas, but where do you store them for the rest of the year?

So I decided to decorate my felted tea cosy for Christmas in a way that would be temporary, so that as soon as Christmas is over I can remove the embellishments.

I made my felted tea-cosy in 2008 and it’s still in daily use but only one side ever gets seen whether it’s on the tea-pot or hanging on the kitchen wall…

tea cosy in kitchen

…so I decorated the reverse side and that’s the side that will show during the festive season.

After much pencil-end chewing I drew a rough design then, because I find proper drawing difficult, I searched the internet for a free-to-use outline of a deer.

It’s extremely difficult to draw a complicated shape directly onto felt, and freehand cutting a deer out is beyond me.  Luckily there is an easy way using freezer paper.

I reversed the outline then traced it onto the paper side of a piece of freezer paper, then placed it, waxy side down onto a small, thin piece of white fulled felt.  I ironed the freezer paper onto the felt (1-2 minutes with a medium dry iron) then let it cool for half an hour.

freezer paper ironed onto felt

I won’t lie to you – cutting the white felt to the outline of the deer was very fiddly and I nearly lost some of the antler.  Next time I’ll choose something simpler!  Holding my breath, I carefully removed the freezer paper.

I put a felting mat inside the tea cosy then I used a felting needle to ‘tack’ the white deer in place.  I should mention that my tea cosy is a chunky thing – it’s thick and therefore easy to work on.  I didn’t go too near the edges of the silhouette for fear of splitting the white felt – even so the antler still went a bit wonky – so although tacking the deer shape in place would be ok for art work it wouldn’t survive long on a working tea cosy!

tacking with felting needle

The snowflakes are just wisps of white merino wool fibres loosely needle felted in.

snowflakes

The snowy ‘ground’ is fancy yarn. I used white thread to hold it in place – a small stitch every inch.

fancy yarn looks like snowflakes

I liked all the blue and white but a small colour accent was needed so I cut a piece of Christmas ribbon to make a collar and attached it to the white felt with fabric glue.

When I’d finished I could see that I just had to make a new hanging hook the same colour as the tea cosy, so I knitted an i-cord from some sparkly crochet cotton.

i-cord

All the embellishments are easily removable after Christmas.  The deer can be peeled off, the snowflakes popped out, the yarn unstitched and the forgiving felt will smooth itself out with a bit of gentle rubbing.

But I’ll keep the sparkly hanging hook – it looks good with the other side of the tea cosy!

Felting with yarns

Felting with yarns

The challenge for this quarter is “surface decoration by twists, tubes, yarns” and I chose to use only yarns as surface decoration.

This is my inspiration photo, taken by my daughter Annie, on a local beach.  I used it to inspire my felted piece for the challenge.

inspiration photo for challenge

The first thing I see in the photo are the ropes, thick and thin, in white, orange and turquoise and there’s a lot of frayed ends.  Then at the top there’s a metal ring that may have had chain attached to it at some time, and in the middle is some tangled fibre.

I decided to make the yarn embellishments first, starting with the ropes.

I used 100% wool 4-ply yarn to make the ropes (there’s a good tutorial by ‘Textile Arts Now’ that shows how to make a twisted cord).  The thickness of the cord will depend on how many strands of yarn used to make it.

different thicknesses of cord

Note: Some 100% wool is labelled ‘Superwash’ and it won’t felt.

To distress the ends of the ropes, untwist the yarn strands.  It can be tricky – I lost a bit during the separation of the strand below – it looks like 3-ply now!

frayed yarn rope end

I used 100% wool yarn to make a chain by tying knots at regular intervals in a double length of yarn.

chain made by knotting wool yarn

A piece of this fancy yarn, after distressing, made the fibre mess I needed.

distressed fancy yarn

I wanted to add a little something that wasn’t in the inspiration photo but I still wanted it to be made from yarn.

After a quick trip to Googleland I found a lovely free knitting pattern, by ‘knittingninja’, free starfish pattern, so I made one from pink mohair.  A piece of knitting can be fairly ‘solid’ so I thought the fluffy mohair would help the starfish to felt in easily and I made the stitches a bit looser than I normally would.

starfish knitted with mohair yarn

So I then had all the components I needed – all made from yarn.

I made a base of loose yellow merino wool fibres to compose my challenge piece on.  When I’d finished I took a quick snap on my phone to check the composition – it’s much easier to see the whole thing on a screen.

quick phone snapshot to check layout

I started the felting agitation very carefully so as not to disturb the design, then turned it over and worked mainly from the back – checking the front at regular intervals.

When the yarns were loosely attached I rolled the felt until the piece felt firm.  When it was dry I trimmed the edges with a rotary cutter – the finished size is 32 x 26cm (13″ x 10″).

Strandline


As you can see from the close-up below, the texture is pronounced but none of the yarn embellishment moves under finger pressure!  It’s all felted in there “good ‘n’ proper”.

texture


HOW TO MAKE PRE-FELT

HOW TO MAKE PRE-FELT

Pre-felt is quick and easy to make.  It’s used to make definite shapes in a layout – a shape that’s cut from pre-felt is called an ‘inlay’.  Pre-felt is firm enough to cut but loose enough to felt into other fibres.

Pre-felt can be bought ready-made, but if you make your own you can have the exact colour, plain or blended, that you want.  You can also add other fibres on top as embellishment.

We’ve used merino wool tops but any wool fibres can be used.  Shown below: merino wool tops blended colours and plain.

merino wool

To make a small piece of pre-felt you will need: merino wool fibres, a round-stick sushi mat, small-bubble bubble-wrap, net, 2 rubber bands, soapy water in a mister/spray bottle, a bar of soap, and an old towel.

Spread an old towel onto your work surface then put a round-stick sushi mat on it.  Place a piece of bubble wrap – bubbles down so they will not be against the wool fibres – onto the sushi mat.

Place a tuft of wool fibres, with the fibres running horizontally, onto the bubble wrap, shown below left, then add a second tuft of fibres slightly overlapping the first. Continue laying tufts of wool until you have completed a row, shown below right.

first tufts and first row

Then add more rows, each row slightly overlapping the one above it, until you have completed the first layer.

first layer complete

Start a second layer by placing a tuft of wool fibres, with the fibres running vertically (i.e. at right angles to the first layer of fibres),  on the top left corner of the first layer, shown below left, then continue laying tufts  until you have completed a row.  Then lay more rows until you have completed the second layer, shown below right.

second layer

Cover the wool fibres with a piece of net, then spray warm soapy water over until the fibres are saturated (but not swimming away!)

apply warm soapy water to the fibres

We prefer to use Olive Oil soap flakes dissolved in water because it’s low-sud, but you can use any soap flakes or dish-wash liquid.

Push down gently on the wool, with flat hands, to encourage the wool to take up the water and to eliminate air pockets.

flatten the fibres

Hold the net with one hand then carefully draw a bar of soap all over the net.  We prefer to use a bar of Olive Oil soap but any soap will work.

draw bar of soap across fibres through the net

Slowly peel the net off…

carefully peel away the net

…then cover the wool fibres with a second piece of bubble wrap, bubbles up so that they are not against the wool.  Gently press down all over to flatten the bubble wrap onto the fibres.

flatten the bubble wrap against the fibres

Roll it all up snugly in the sushi mat…

rolling up the fibres in the mat

…then drain off any excess water.

draining excess water

Put 2 rubber bands around the sushi mat to prevent it unrolling.

rubber bands to hold sushi mat tight

Using light pressure, roll the mat 100 times.

rolling the sushi mat

We count 1 roll on the sushi mat as going from fingertips through to wrist then back again.

Unroll the mat, smooth and flatten the bubble wrap and fibres, turn it through 90°, as shown below, then roll it up again in the mat and replace the rubber bands.

turn the pre-felt through 90 degrees

Using light pressure, roll the mat 100 times. Unroll the mat, smooth and flatten the bubble wrap and fibres, turn it through 90°, then roll it up again in the mat and replace the rubber bands.

Repeat twice more so that the pre-felt has been rolled 400 times (100 times in 4 different directions).

Remove both pieces of bubble wrap then place the wool fibres directly onto the sushi mat.  Roll it up, then using light pressure roll it 50 times.

Unroll the mat, turn the wool fibres through 90°, roll the mat up then roll again 50 times.

Repeat twice more so that the fibres have been rolled 200 times (50 times in 4 different directions).

Don’t worry about neatening the edges during felting – they end up looking lacey/cobwebby and can make interesting inlays.

lacey edges

This amount of rolling should result in a soft pre-felt that can be cut, wet or dry, into the shapes you want.  It will give you a solid block of colour but the edges will blur into the background fibres.

To achieve a firmer pre-felt, roll it more.

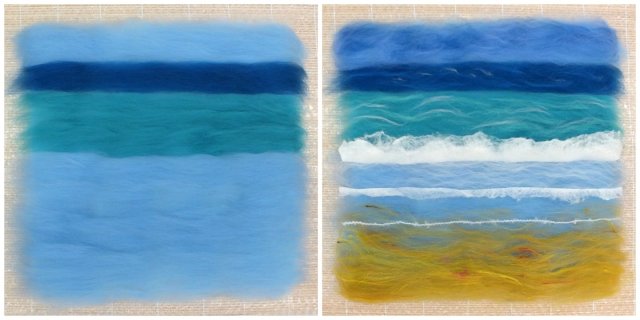
Two pieces of rectangular, turquoise merino pre-felt (inlays) were felted into yellow merino wool fibres, shown below.  The top one is a soft pre-felt and you can see how the edges have blurred during felting, whereas the other, shown below it, is a firm pre-felt and the edges are distinct.

differences in pre-felt

If you are going to use the pre-felt straight away there’s no need to rinse the soap out, but if you want to keep it for longer, it’s advisable to rinse the soap out.

The pre-felt is delicate, so take care when rinsing it.  The easiest way is to rinse it through the sushi mat until the water runs clear.

rinsing the pre-felt

Keep the pre-felt rolled in the mat, place it on an old towel then roll it a few times to remove most of the water.  Place the pre-felt on a rack to dry.

Tips:

If you want to make a lot of pre-felts, save rolling time by using a large bamboo mat with several lots of fibres.  You can keep them apart or lay them close together then you will get some interesting pre-felt from the joins.

multiple pre-felts

If you’re making a lot of pre-felts for your stash you won’t know whether you will need soft or firm pre-felt for future projects, so make all your pre-felts up to the soft stage then rinse and dry them.  When you want to use them you can then choose to leave them soft or wet them to re-work to the firmness you need.