
An Experiment-thinking about the year long challenge
One of this year’s challenges is divided into the 4 seasons. A tree in each of the four seasons. Now I like evergreens so I could have cheated and made the same identical evergreen 4 times but thought that was a bit too easy. I had seen online someone say they had been shown how to do a tree by Andrea Hunter, Creating Felt Picturesblackwells.co.uk/bookshop/product/ It’s a great little book. What I saw was just a picture of the finished layout. I thought I can figure that out. That was months ago. On Monday I finally gave it a try.
Monday was a Holiday here, so I gathered up my supplies and headed into the guild to meet Jan. We were going to do our felting machine comparison so she could blog about it and I wanted to try making the tree.
I brought a new rolling mat I had just picked up because it had a nice little lip to help me keep things dry. I was not going to need a lot of water. I used some prefelt for the background and some black merino for the tree.

I decided to do the first one quickly and without any fiddling around. I just held the trunk portion firmly and fluffed out the rest. Part of what I wondered was: would the rolling cause movement that would make some thicker branches?

I think it would have been better if I had taken out the two blobs in the branches but I was quite pleased and if I would going to lay some green over it to make a summer tree it would have been fine.


Next, I tried wetting the prefelt and the black wool to see if it would spread out any better but it was so terrible I just pulled it off and tossed it before I even started. It would make a good start for a flower.


I squeezed most of the water out of the prefelt and got some new black. I also grabbed a knitting needle to manipulate the wool. the wool picked up moisture from the wet prefelt and that made it easier to have the wool stay where I wanted it.

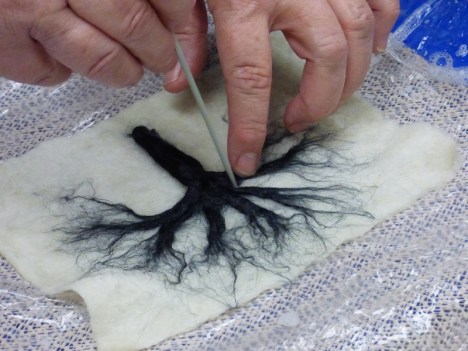
This is much better I fiddled around with making bigger branches and trying to make it look less like a small child drew it. I was quite happy with it and decided to add a little mixed brown wool for some texture and Jan suggested adding a thin haze of green to give it a spring haze look like just before the trees get their leaves.

I am quite happy with how it turned out. I like the way the thicker trunk area kept some of its 3dness( I am sure that’s not a real word) You know, they stick up a bit. The trunk needs work but I think this will work well for the challenge. Now I need to go shopping for some brown wool or I need to get on with some dying. I have almost nothing in the way of brown wool.


Oh, and since Jan is always posting pictures of me I thought I would share one of her in her octopus hat at the Chesterville Spin-In a few weeks ago.

19 thoughts on “An Experiment-thinking about the year long challenge”
Thank you for sharing – really had a good understanding with how you detailed everything and photos / I plan to try this tree too!!
I am so happy to have inspired you . Please share your experiments with us
Thank you for sharing your experimental progress Ann – just goes to show that perseverance pays off! Using the knitting needle is a good idea 🙂 Adding the brown certainly gave the trunk a ’roundness’ and you now have ‘winter tree’ – are you going to add some weight to the bottom of the trunk?
Thanks Lyn. I am really happy with the tops of both trees. I really wasn’t thinking about the trunks at the time. They will need to be fixed. I will make another for the challenge.
Great tree experimentation, Ann. You’ve really got the branches & twigs looking realistic. I suppose the trunk just needs a bit more wool at the base to make sure it is firmly into the ground. Look forward to seeing what happens next.
Thanks Lindsay . Yes, the trunks need more care. The one would not stand a chance in a storm.
I really like the tree Ann. You’ve almost got two seasons in one there – the just-laid-out version for winter, and the almost-spring fulled one (though I do appreciate that you now only have the latter – pity).
I’ve never been able to manage to get much in the way of good results combining the wet and dry method, so It’s nice to see how this different way of working can achieve good results.
I shouldn’t worry about something looking like a small child drew it – I think most “modern art” looks like that, especially the pieces that sell for lots of lolly!
Here’s to seeing your next tree.
Ann
Thanks Ann, I thin k I need to pay attention to the trunks next time. I was really only thinking of the tops at the time. I have never had much luck either. The damp prefelt seemed to help it say in place without getting really wet. Trying Ildi’s method of making a pattern is on my list of things to try.
it was fun watching you felt! the blue roll-up mat from dollerama was cool, i will keep an eye out for one. although i do tend towards Dry felting.
Before you buy more or dye more brown, you may want to wate until you unpack your studio, i suspect you may have a box of brown wool, but it will be in the last box you open!!!
i think we need one more surface to try the Chinese felting macheen on before makeing a final decition, the Ukrainian one was grate!
the Octopus hat was nice and warm! (Canadian winter can be cold) it is vary stylish to have an octopus sitting on your head….or maybe he was hungry…. Thankyou again for all your help as always you are grate company!
Thanks Jan, It was nice to have the whole afternoon and not feel rushed with our experiments. I do have some natural brown wool somewhere. It will be interesting to see how different breeds of wool work. So many more experiments to do.
Very spooky tree, Ann! In a good way 😀 I love it. For a moment, I was wondering what gigantic felting needle you had there, but I’m glad I read the explanation!
I am glad you like the tree, add some crows and it all done. lol
I love your tree experiments Ann. These would be great for background trees in the distance. I will have to remember to try this approach. Ildi’s method of wetting the wool would work if you wanted smooth branches and no twigs. But it is very fiddly and she usually does the design first and then adds the background wool.
yes the wet wool did not work well for the tree. I do want to try her method for making an outlined pattern.
Love the experiments Ann. I think the one you scrapped looks like a very active ghost (I was viewing it upside down) – great movement in it. Pity you scrapped it,
great idea to use the knitting needle to control the positioning. (I must remember that hint for future work).
I keep looking out in the garden trying to figure out what three to capture. My son recently pruned back all the fruit trees so they might be worth futher consideration.